


Qjet divorced choke setup
Thread Starter
Advanced


Joined: Sep 2013
Posts: 90
Likes: 6
From: Ottawa Illinois
Trying to reinstall divorced choke on newly rebuilt carb by Lars. Believe PO did not have it installed correctly, which added to "hard starting" experience.
New choke....is the rod connected as it is shown in pic...on right side? Or should there be tension and "wound around" so there is constant pressure?
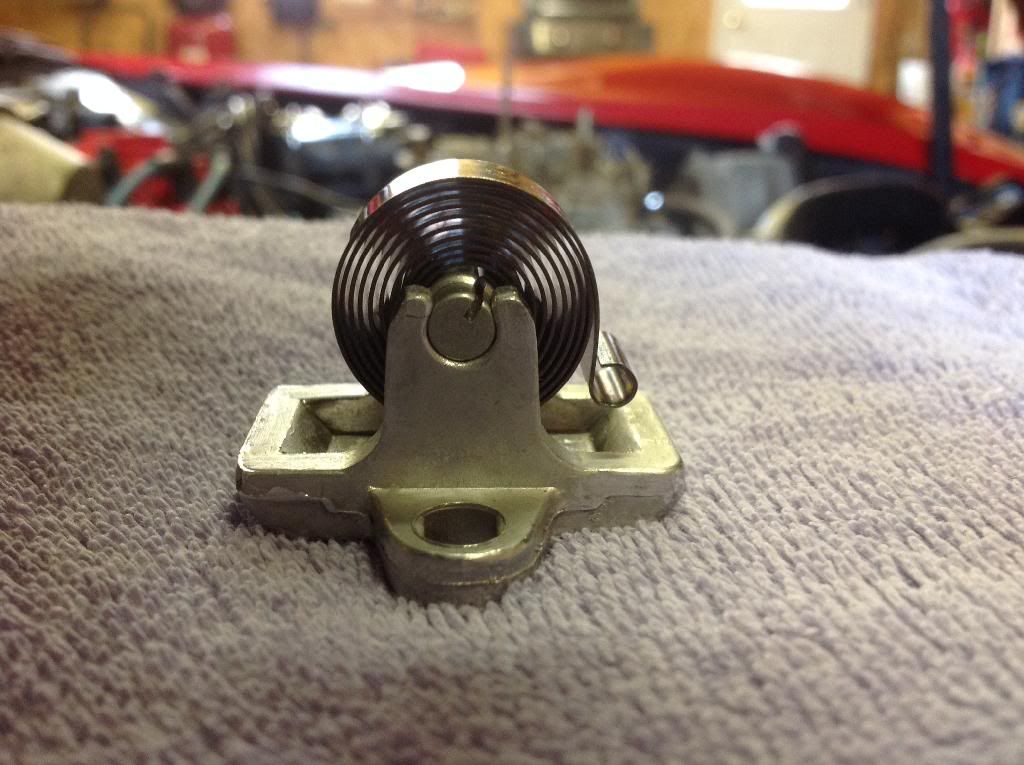
How does the "cover" install so there is no interference? Thanks for any and all help...
New choke....is the rod connected as it is shown in pic...on right side? Or should there be tension and "wound around" so there is constant pressure?


How does the "cover" install so there is no interference? Thanks for any and all help...
Team Owner


Joined: Jul 1999
Posts: 65,492
Likes: 230
From: Orange Park Florida
Without going out a photo my camper, that setup looks so damn close to what is on my vehicle, it's not even funny.....
now having said that, I had to play with the choke rod a tad to get the thing to slam closed on a ~80f day in order to start, and then pull off after running a while.....I too have an aluminum manifold.....but being FLORIDA I blocked the hear river cross over passage with Plaster of Paris, but left the passage open enough under the heat stove, so it got hot enough to pull the choke off.....without heating the carb to the point it was hating life.....


now having said that, I had to play with the choke rod a tad to get the thing to slam closed on a ~80f day in order to start, and then pull off after running a while.....I too have an aluminum manifold.....but being FLORIDA I blocked the hear river cross over passage with Plaster of Paris, but left the passage open enough under the heat stove, so it got hot enough to pull the choke off.....without heating the carb to the point it was hating life.....
Race Director


Joined: May 2005
Posts: 10,674
Likes: 122
From: Millington Illinois
St. Jude Donor '08-'09
Race Director
Joined: May 2006
Posts: 18,737
Likes: 2,582
the choke coil is properly installed. Put the cover on it and follow the directions from the link repasted below, do you have the correct cover? have a picture?
Divorced Choke Systems (1967-1974)
Disconnect the divorced choke rod from the lever on the passenger side of the carb. Leave it attached to the choke coil box on the manifold.
Open the throttle slightly and fully close the choke by pushing on the lever arm that the disconnected rod normally attaches to.
Push the choke rod all the way down into the choke coil until it hits the stop. If the engine is dead cold, it may already be bottomed out.
At this position, the top of the choke rod should be level with the bottom edge of the choke rod hole in the lever on the carb.
Bend the rod to obtain this relationship.
Once complete, hook the rod back up to the lever.
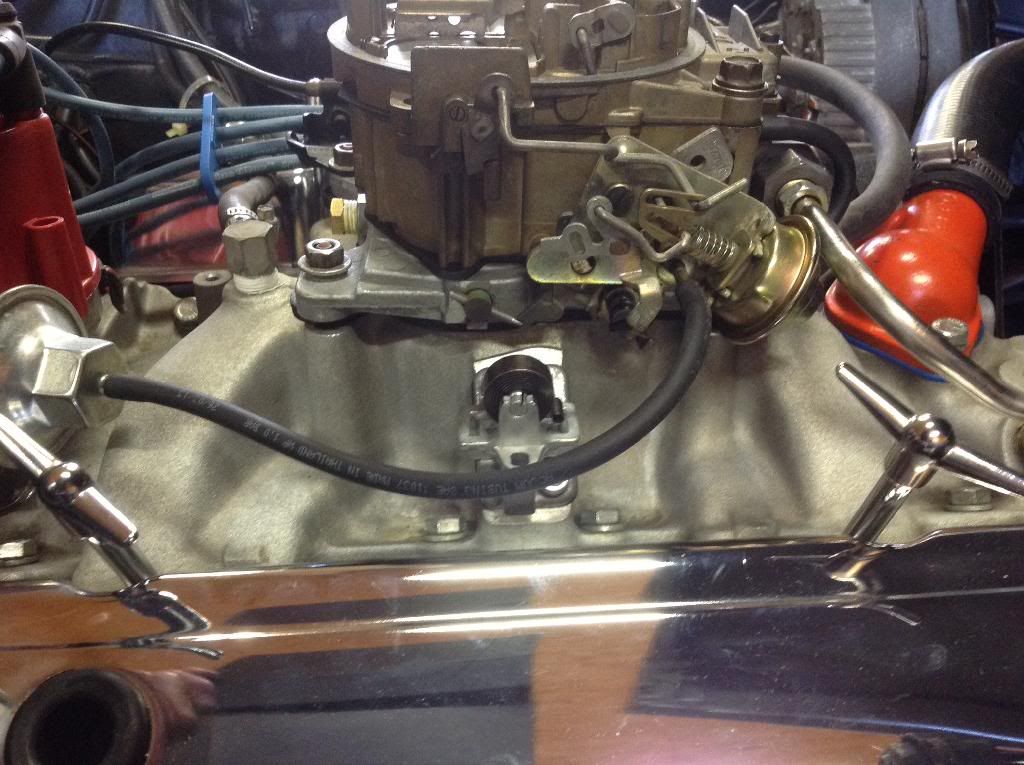
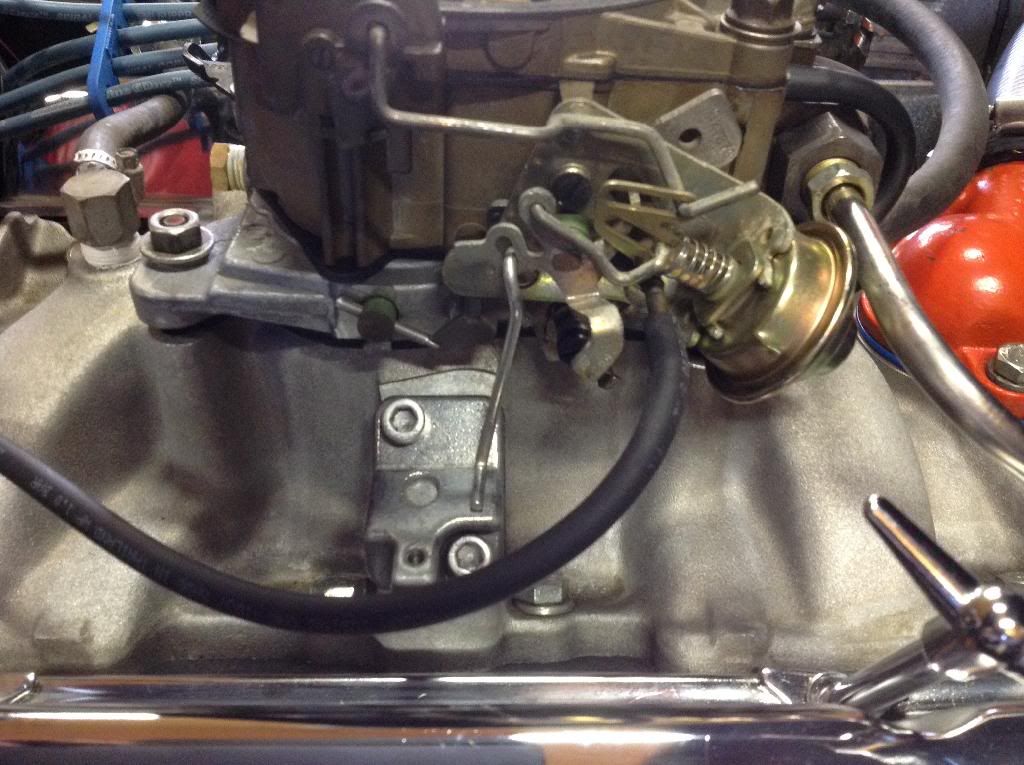
With the rod hooked up, push the choke rod back down to the seated position once again. This should fully close the choke blade. If the choke blade is not fully closed in this position, bend the choke intermediate rod that comes up through the body of the carb and attaches to the choke blade lever. Bend the rod so that the choke blade is fully closed.
Remove the short piece of vacuum hose attaching the choke pulloff to the vacuum nipple on the carb. Attach a long (about 2’) vacuum hose to the pulloff.
Crack the throttle slightly and push down on the divorced choke rod to close the choke fully. Release the throttle. Keep light finger pressure on the choke rod to maintain light closing pressure on the choke.
Suck on the vacuum hose to retract the choke pulloff. If the pulloff does not retract, it must be replaced.
With the pulloff fully retracted and light finger pressure on the choke rod, use your other hand to lightly push down on the forward lower edge of the choke blade to simulate to force of the air across the blade. This will open the choke slightly. At this point, measure the distance between the forward lower edge of the choke blade and the forward wall of the airhorn. This distance should be �”. You can use a �” drill bit as a simple gauge to check it. To adjust, bend the tang on the choke linkage where it contacts the choke pulloff rod.
Re-attach the vacuum hose to the pulloff and the carb.
This completes choke adjustment for a divorced choke carb.
Divorced Choke Systems (1967-1974)
Disconnect the divorced choke rod from the lever on the passenger side of the carb. Leave it attached to the choke coil box on the manifold.
Open the throttle slightly and fully close the choke by pushing on the lever arm that the disconnected rod normally attaches to.
Push the choke rod all the way down into the choke coil until it hits the stop. If the engine is dead cold, it may already be bottomed out.
At this position, the top of the choke rod should be level with the bottom edge of the choke rod hole in the lever on the carb.
Bend the rod to obtain this relationship.
Once complete, hook the rod back up to the lever.
With the rod hooked up, push the choke rod back down to the seated position once again. This should fully close the choke blade. If the choke blade is not fully closed in this position, bend the choke intermediate rod that comes up through the body of the carb and attaches to the choke blade lever. Bend the rod so that the choke blade is fully closed.
Remove the short piece of vacuum hose attaching the choke pulloff to the vacuum nipple on the carb. Attach a long (about 2’) vacuum hose to the pulloff.
Crack the throttle slightly and push down on the divorced choke rod to close the choke fully. Release the throttle. Keep light finger pressure on the choke rod to maintain light closing pressure on the choke.
Suck on the vacuum hose to retract the choke pulloff. If the pulloff does not retract, it must be replaced.
With the pulloff fully retracted and light finger pressure on the choke rod, use your other hand to lightly push down on the forward lower edge of the choke blade to simulate to force of the air across the blade. This will open the choke slightly. At this point, measure the distance between the forward lower edge of the choke blade and the forward wall of the airhorn. This distance should be �”. You can use a �” drill bit as a simple gauge to check it. To adjust, bend the tang on the choke linkage where it contacts the choke pulloff rod.
Re-attach the vacuum hose to the pulloff and the carb.
This completes choke adjustment for a divorced choke carb.
Last edited by MelWff; Apr 19, 2014 at 11:17 AM.
Thread Starter
Advanced
Joined: Sep 2013
Posts: 90
Likes: 6
From: Ottawa Illinois
the choke coil is properly installed. Put the cover on it and follow the directions from the link repasted below, do you have the correct cover? have a picture?
Divorced Choke Systems (1967-1974)
Disconnect the divorced choke rod from the lever on the passenger side of the carb. Leave it attached to the choke coil box on the manifold.
Open the throttle slightly and fully close the choke by pushing on the lever arm that the disconnected rod normally attaches to.
Push the choke rod all the way down into the choke coil until it hits the stop. If the engine is dead cold, it may already be bottomed out.
At this position, the top of the choke rod should be level with the bottom edge of the choke rod hole in the lever on the carb.
Bend the rod to obtain this relationship.
Once complete, hook the rod back up to the lever.
With the rod hooked up, push the choke rod back down to the seated position once again. This should fully close the choke blade. If the choke blade is not fully closed in this position, bend the choke intermediate rod that comes up through the body of the carb and attaches to the choke blade lever. Bend the rod so that the choke blade is fully closed.
Remove the short piece of vacuum hose attaching the choke pulloff to the vacuum nipple on the carb. Attach a long (about 2�) vacuum hose to the pulloff.
Crack the throttle slightly and push down on the divorced choke rod to close the choke fully. Release the throttle. Keep light finger pressure on the choke rod to maintain light closing pressure on the choke.
Suck on the vacuum hose to retract the choke pulloff. If the pulloff does not retract, it must be replaced.
With the pulloff fully retracted and light finger pressure on the choke rod, use your other hand to lightly push down on the forward lower edge of the choke blade to simulate to force of the air across the blade. This will open the choke slightly. At this point, measure the distance between the forward lower edge of the choke blade and the forward wall of the airhorn. This distance should be ��. You can use a �� drill bit as a simple gauge to check it. To adjust, bend the tang on the choke linkage where it contacts the choke pulloff rod.
Re-attach the vacuum hose to the pulloff and the carb.
This completes choke adjustment for a divorced choke carb.


Corvette Stories
The Best of Corvette for Corvette Enthusiasts

Top 10 Most Expensive Corvettes Ever Sold on Bring A Trailer
Brett Foote
10 Things Every Corvette Owner Needs (2026 Edition)
Michael S. Palmer
8 Most "Only Corvette Owners Understand" Quirks and Problems
Pouria Savadkouei
10 Reasons the C6 Z06 is Still A Performance Benchmark After 20 Years
Joe Kucinski
How Much Horsepower Every Corvette Engine "LOST" in 1972
Joe Kucinski
Top 10 DOs and DON'Ts for Protecting Your Convertible Top!
Michael S. Palmer
Top 10 Most Explosive Corvettes Ever Made: Power-to-Weight Ratio Ranked!
Joe Kucinski
150 hp to 1,250 hp: Every Corvette Generation Compared by the Specs That Matter
Joe Kucinski
8 Coolest Corvette Pace Cars (and Replicas) of All Time
Verdad Gallardo
Melting Slicks

Joined: Jul 2009
Posts: 3,264
Likes: 3
From: Vero Beach FL
I had problems with the rod rubbing against the coil cover as well. My cover is a reproduction and I have nothing to compare it to so I am not sure how good of a reproduction it is. I just tilted it some but may come back and remove some material where it was rubbing with a Dremel.
Currently I have a aftermarket manifold on my car that may be contribute to the cover not aligning as the original.
Currently I have a aftermarket manifold on my car that may be contribute to the cover not aligning as the original.
Last edited by Roco71; Apr 20, 2014 at 11:21 AM.
Thread Starter
Advanced
Joined: Sep 2013
Posts: 90
Likes: 6
From: Ottawa Illinois
I had problems with the rod rubbing against the coil cover as well. My cover is a reproduction and I have nothing to compare it to so I am not sure how good of a reproduction it is. I just tilted it some but may come back and remove some material where it was rubbing with a Dremel.
Currently I have a aftermarket manifold on my car that may be contribute to the cover not aligning as the original.
Currently I have a aftermarket manifold on my car that may be contribute to the cover not aligning as the original.
Race Director
Joined: May 2005
Posts: 10,674
Likes: 122
From: Millington Illinois
St. Jude Donor '08-'09
Stock parts might not work with Performer intake without modification or edlebrock choke kit. The EDL 1931 rod from the coil to the carb looks different than yours to clear the cover. Might be able to buy the rod 9171 separate to work with your existing coil, cover and carb with the performer intake.
http://www.summitracing.com/parts/EDL-1931/
http://www.summitracing.com/parts/edl-9171/overview/
http://static.summitracing.com/globa...chokelinka.pdf
Hope this helps, Happy Easter Tom!
http://www.summitracing.com/parts/EDL-1931/
http://www.summitracing.com/parts/edl-9171/overview/
http://static.summitracing.com/globa...chokelinka.pdf
Hope this helps, Happy Easter Tom!
Last edited by 63mako; Apr 20, 2014 at 08:38 PM.
Melting Slicks
Joined: Jul 2009
Posts: 3,264
Likes: 3
From: Vero Beach FL


Thread Starter
Advanced
Joined: Sep 2013
Posts: 90
Likes: 6
From: Ottawa Illinois
Thanks to all for the replies. Happy to report I was able to install and adjust choke rod to specifications listed above. Started and ran well. Now onto the Lars rebuilt distributor installation...soon. Gotta get me some happy driving time in...after a long winter! 