


control arm bushing installation??

Thread Starter
Pro


Joined: May 2015
Posts: 572
Likes: 21
From: Milford, CT
I am ready to install the bushings in my control arms on my 77. I bought Energy Suspension poly bushings. They are the ones that come with the sleeves. Should I bring it to a shop or should I try installing them myself using a large socket.
Last edited by jgcable; Oct 1, 2015 at 08:45 AM.
Le Mans Master


Joined: Apr 2001
Posts: 5,941
Likes: 281
From: Was New Orleans but swam to Baton Rouge LA
Cruise-In IX Veteran
If you have a press you can do it yourself. If you do not I would bring them somewhere. Biggest issue is to make sure and support the control arms so they do not bend.
Le Mans Master

Joined: Oct 2007
Posts: 7,453
Likes: 976
From: RI, Now Franklin/Nashville TN
I did poly control arm bushings from energy suspensions when I did my control arm and did the first arm removal myself but had trouble installing the new poly bushing so I took that arm to a machine shop for the install...I think that they charged my $25 for the install. I had the second arm done completely by the machine shop for about $35...well worth the money and the lack of aggrevation. Just my personal experience!
Le Mans Master
Joined: Oct 2007
Posts: 7,453
Likes: 976
From: RI, Now Franklin/Nashville TN
Burning Brakes

Joined: Apr 2010
Posts: 1,018
Likes: 9
From: Winston Ga.
no propane. thats the oxy torch setup he was using to burn the rubber out. it was further than it looks in the pic and we had a collection of extinguishers around. He was just in a mood that day.
Thread Starter
Pro
Joined: May 2015
Posts: 572
Likes: 21
From: Milford, CT
Believe me... there was plenty of cursing removing the original bushings. It took me hours. I started with a torch, graduated to an air chisel and an electric drill. My control arms are all cleaned up and ready for paint this weekend. After that.. I am going to install the bushings and pivot rods and the new ball joints. I watched several videos of guys just pounding them in with a small sledge hammer and a large socket. I happen to already have both. The videos make it look simple. I could also take them to the local machine shop and have them pressed in. I just want to do the right thing, do it once and do it right.
Corvette Stories
The Best of Corvette for Corvette Enthusiasts

Top 10 Most Expensive Corvettes Ever Sold on Bring A Trailer
Brett Foote
10 Things Every Corvette Owner Needs (2026 Edition)
Michael S. Palmer
8 Most "Only Corvette Owners Understand" Quirks and Problems
Pouria Savadkouei
10 Reasons the C6 Z06 is Still A Performance Benchmark After 20 Years
Joe Kucinski
How Much Horsepower Every Corvette Engine "LOST" in 1972
Joe Kucinski
Top 10 DOs and DON'Ts for Protecting Your Convertible Top!
Michael S. Palmer
Top 10 Most Explosive Corvettes Ever Made: Power-to-Weight Ratio Ranked!
Joe Kucinski
150 hp to 1,250 hp: Every Corvette Generation Compared by the Specs That Matter
Joe Kucinski
8 Coolest Corvette Pace Cars (and Replicas) of All Time
Verdad Gallardo


Race Director

Joined: Apr 2009
Posts: 19,294
Likes: 2,754
From: Charlotte NC
 100%....BUT...just because you take them to a shop.....THE SHOP you choose better have the VERY USEFUL spacers that are made so when they go and press in the LOWER A-arm bushings...the A-arm does not collapse. The lower A-arm is the worst....the upper is not so bad. BUT...getting the bushing to index correctly in BOTH holes in the lower a-arm is a BEOTCH!!!!!.....and if they get off kilter a little bit...it will (or can) ruin the control arm, I have done more of these than I can count....and even though I have done countless control arms....getting the bushings out is a snap....but getting those blasted lower bushings in correctly is as I wrote....or can be....a BEOTCH!!!
The lower A-arm takes three spacers to keep it from collapsing. I have also made one for the upper A-arms also.
YES..I know that these bushing can go in with other methods...because along time ago...I could service the lower A-arm bushing while the A-arm was still in the car.....but I no longer do it that way.
DUB
Drifting

Joined: Mar 2009
Posts: 1,461
Likes: 361
From: Monson MA
I used the socket method. With a bit of lube on the outside of the bushing, it worked like a charm. No issues. Most of the fun is figuring things out, doing research and succeeding in the repair and reconstruction of these cars. Just my opinion.
Melting Slicks

Joined: May 2004
Posts: 2,002
Likes: 17
From: Inlet Beach, FL
I had to laugh when I saw the pic. I was out on my front lawn with a tank of MAPP gas burning the damn things out. My neighbors probably thought I was nutz.
I'd let a shop press in the new ones. At least that is what I'll do if I ever have to put new ones in again.
Good luck!

Thread Starter
Pro
Joined: May 2015
Posts: 572
Likes: 21
From: Milford, CT
100%....BUT...just because you take them to a shop.....THE SHOP you choose better have the VERY USEFUL spacers that are made so when they go and press in the LOWER A-arm bushings...the A-arm does not collapse. The lower A-arm is the worst....the upper is not so bad. BUT...getting the bushing to index correctly in BOTH holes in the lower a-arm is a BEOTCH!!!!!.....and if they get off kilter a little bit...it will (or can) ruin the control arm, I have done more of these than I can count....and even though I have done countless control arms....getting the bushings out is a snap....but getting those blasted lower bushings in correctly is as I wrote....or can be....a BEOTCH!!!The lower A-arm takes three spacers to keep it from collapsing. I have also made one for the upper A-arms also.
YES..I know that these bushing can go in with other methods...because along time ago...I could service the lower A-arm bushing while the A-arm was still in the car.....but I no longer do it that way.
DUB
I called a few local machine shops and I don't feel confident that they will be able to install the bushings without collapsing or bending my control arms. Its as if they have never done work like this before. Most of the machine shops in my area are either booked up for months or they only do engine work. I watched the video on Youtube of the guy installing the bushings using the large socked and sledge hammer method and it looks crazy easy. Have you ever used this method? I don't have a 12 ton press and I don't want to buy one and all the spacers required.
Thread Starter
Pro
Joined: May 2015
Posts: 572
Likes: 21
From: Milford, CT
I called a few more machine shops. I have no confidence in leaving them with a machine shop. I am going to use the 1-1/4" socket and sledge method to install. The Youtube video makes perfect sense and looks super easy. I will post back when they are done.


Thread Starter
Pro
Joined: May 2015
Posts: 572
Likes: 21
From: Milford, CT
Since I am installing the Energy Suspension poly bushings I bought the entire kit. This includes the split sleeve that goes around the pivot rod, the housing and the bushing. The instructions don't explain this but... do I install the split sleeve on the pivot arms first or do I assemble the complete bushings and then install them.
Thread Starter
Pro
Joined: May 2015
Posts: 572
Likes: 21
From: Milford, CT
I tried to install them using the large socket and the large hammer method. No way.... no how!! I can't even get them started. It would be different if they slipped in a little but they don't. Every wack of the hammer just caused them to pop off. I don't want to damage my control arms so I guess I am back to looking for a machine shop.
Melting Slicks
Joined: Nov 2010
Posts: 2,216
Likes: 113
From: Michigan
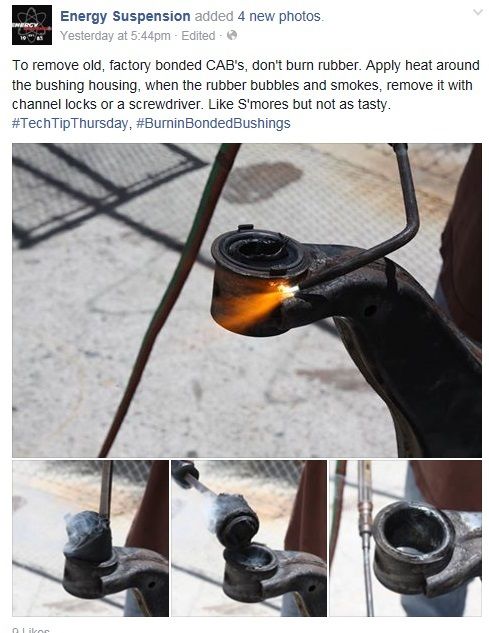
I know they are already removed but I thought I'd share what I saw on FB not long ago. I've seen here and a lot of other places where people burn them out like the earlier pic.
Also they make a installation lube I read about here awhile back. http://www.energysuspensionparts.com...shing-lube.asp
Also they make a installation lube I read about here awhile back. http://www.energysuspensionparts.com...shing-lube.asp

Last edited by BOOT77; Nov 2, 2015 at 11:06 AM.