When you click on links to various merchants on this site and make a purchase, this can result in this site earning a commission. Affiliate programs and affiliations include, but are not limited to, the eBay Partner Network.
I'm going to add OEM style '69 side pipes on my '72. I have searched the forum a few times, and I'm not finding any write-ups on the OEM (non-header) style installations. I'm a huge fan of the original '69 look, so that's what I'm going with.
I already have a set of aftermarket fiberglass covers, but all I have are the covers themselves. They did not include any mounting hardware at all, and they are not pre-drilled anywhere. I assume once I remove the factory rocker covers, I will be able to tell where to drill the new sidepipe covers to reuse the mounting locations from my original rocker covers?
What about any lower bracing or mounting for the covers? Are there supposed to be any brackets?
What about insulation or a stand off mounted inside the cover? My covers included nothing other than the bare fiberglass covers. I haven't been able to locate detailed under car photos showing how the mount or what keeps them off the pipes.
I know I will also need to purchase the mounting kit for the pipes. Is that all that holds the pipes on the car? Just bolted to the manifold and bolted through that one tab near the rear of the muffler?
Any installed pics would be much appreciated. Thanks!
Hi Z,
I'd caution you about using the 65-67 style chambered side exhaust rather than the 69 side exhaust pipes and mufflers. They sound 'different', but certainly, to my ear, not 'much better'.
The information Kubs indicated is for mounting the Chevrolet side exhaust insulators and covers, not the fiberglass covers.
I'm not sure how much of the Paragon info, if any, can be used with the fiberglass side exhaust covers. It doesn't appear that there's any hardware specifically for the fiberglass covers.
I believe it may be possible to use the rear brace (#5736) but certainly not the front brace (#2147k and 2148k).
The fiberglass covers are very 'skimpy' in size so you need to be very careful how you mount them so that the the pipes themselves aren't visible below the covers.
The Eckler's info even contains a caution about how much trimming and work may be required to get a satisfactory fit and appearance…. so be prepared.
AND, you haven't begun to deal with the 2 bezel openings in the rear valance panel yet!
Regards,
Alan
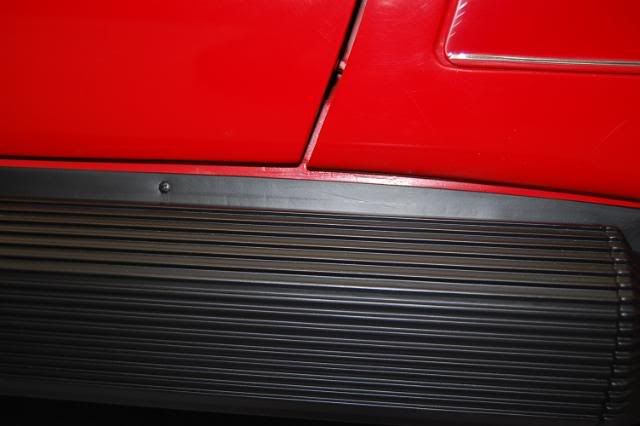
Here's the location of the front bracket and you can see it's not visible from the outside because it actually mounts to the insulator under the cover.
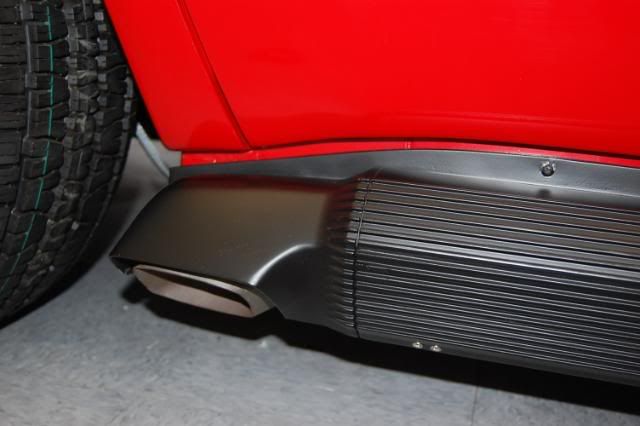
Here's the location of the rear brace. The 2 screws mount to the cover, but remember in this case it's metal not fiberglass.
Here's the location of the front bracket and you can see it's not visible from the outside because it actually mounts to the insulator under the cover.
So there is supposed to be an insulator under the cover, a forward cover mounting bracket, and a rear cover mounting bracket / brace?
Hi K,
The original 69 Side Exhaust covers were made up of fiberglass/metal "insulators" that the 3 piece chrome plated shields screwed to.
They were mounted/supported using the holes from the rocker trim panels, a large bracket near the front, and a small brace near the rear.
Very complicated, very expensive (now, relatively cheap then), but quite a terrific sound and appearance.
The chrome plating lifted off the shields faster than the dealers could replace them. This was especially a problem where 'salt' was used on snow covered roads.
There are now 1 piece moulded fiberglass covers that look more or less like the original and 'hang' over the pipe and muffler by being screwed to the rocker panel.
These look o.k. . People often paint them silver, black, or body color.
Regards,
Alan
Here's the location of the rear brace. The 2 screws mount to the cover, but remember in this case it's metal not fiberglass.
I can see where one end of the brace is riveted or screwed to the lower lip on your fiberglass cover. Is that the OEM '69 brace that would have been used with the original style metal covers? If not, does the other end of that brace attach to the pipe or the frame rail?
Hi Z,
The side exhaust in my pictures are actual 69 insulators and covers painted black.
I posted them only so you could see where the original bracket and brace mounted.
There's no prevision on the fiberglass coves to mount either the front bracket or rear brace.
I don't think there's anyway to mount the front bracket, and you'll have to figure out where and how to mount the rear brace.
I really don't know what if anything people are doing to mount the fiberglass covers besides just screwing them to the rocker channel.
You REALLY need to be careful just where you mount the covers or the pipes WILL SHOW below them.
Regards,
Alan
Alan 71 is giving accurate advice as usual. I just mounted a set of aftermarket fiberglass covers on my '73 and they're much different than mounting the stock '69s. You can and should use the factory rear brace but the front brace won't work.
I used my old rocker moldings to make a drill jig out of a 2"x6" to locate the screw holes in the covers. Before you drill the holes you'll need to 'glass in the mounting surface under the covers (only where the screws are located) so you have a flat surface to tighten down on. Also had to trim the forward part of the covers to clear the '70 and up "mud flap" fenders.
Here's a pic of some covers listed on ebay right now showing how you glop some fiberglass where the screw holes will be positioned.
I sanded these areas first to rough them up so the glass would stick and then glopped some glass fibers and resin on. I put wax paper on my workbench and then before the resin dried, laid the covers on the bench in the position I wanted to attach the covers. This gives you a nice flat surface on the covers to mount on.
Here's the 2x6 I used as a drill jig.
I clamped one of the rocker moldings on the board and then, using the holes in the molding as a guide, drilled holes through the board. Then I traced the outline of the molding on both sides of the board to use as a guide to position the the exhaust covers for drilling. It worked real well; all the screw holes lined up perfectly on both covers.
Here's a pic of the rear bracket in position.
And here's a few pictures of the finished product.