
FIA/L88 headlight kit assembly instructions needed
 06-07-2016, 12:27 PM
#1
Burning Brakes

Thread Starter
Hey Guy's
Bought FIA headlight kit from a forum member, but he doesn't have the installation instructions.
How do I assemble the kit?
What do I reuse from my car?
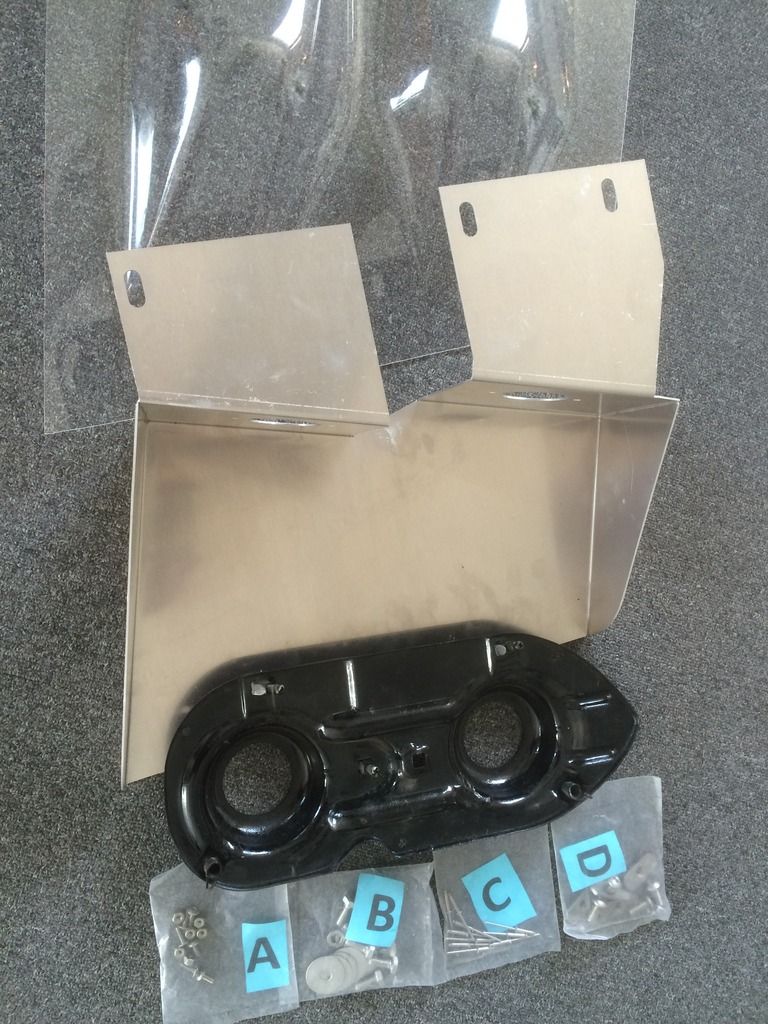
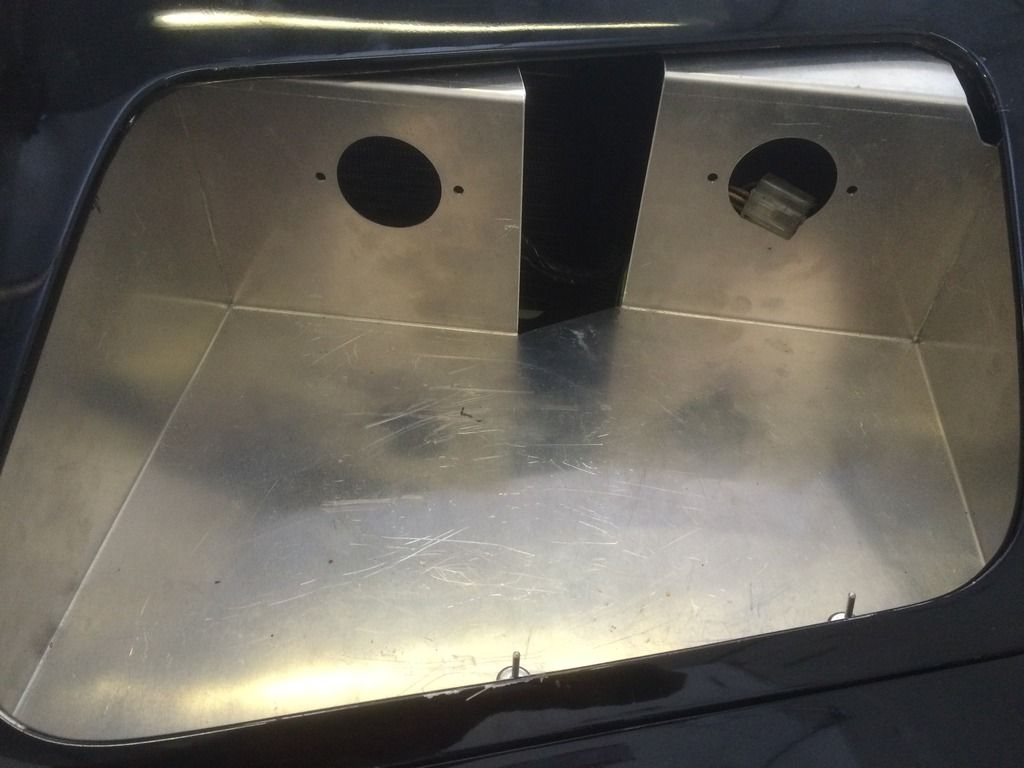
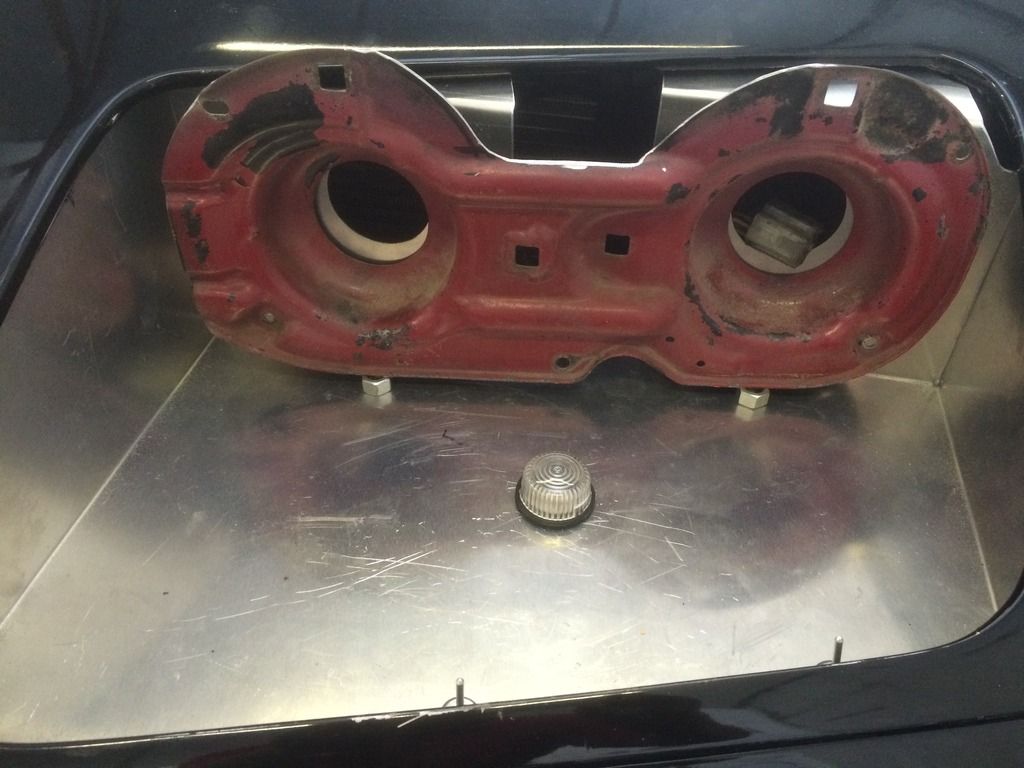
All I have received is in the pictures.
Many thanks
Paul
Bought FIA headlight kit from a forum member, but he doesn't have the installation instructions.
How do I assemble the kit?
What do I reuse from my car?
All I have received is in the pictures.
Many thanks
Paul


 06-07-2016, 12:32 PM
#2
who manufactured the kit?
06-07-2016, 01:23 PM
#3
Burning Brakes
Thread Starter
Don't know.
I believe it is an assortment of parts.
I don't mind sourcing additional times if required, just need to know what I have (this kit + my car) and what else and how to install it.
I believe it is an assortment of parts.
I don't mind sourcing additional times if required, just need to know what I have (this kit + my car) and what else and how to install it.
Last edited by C3Paul; 06-07-2016 at 01:29 PM.
06-08-2016, 06:30 AM
#4
Safety Car


Has been a while since I did mine...its pretty easy and a lot of this is considered "fab work" as each car is a little different and not necessarily install work.
Obviuosly you have to remove the original lights and the housing that mounts to the underside of the nose.
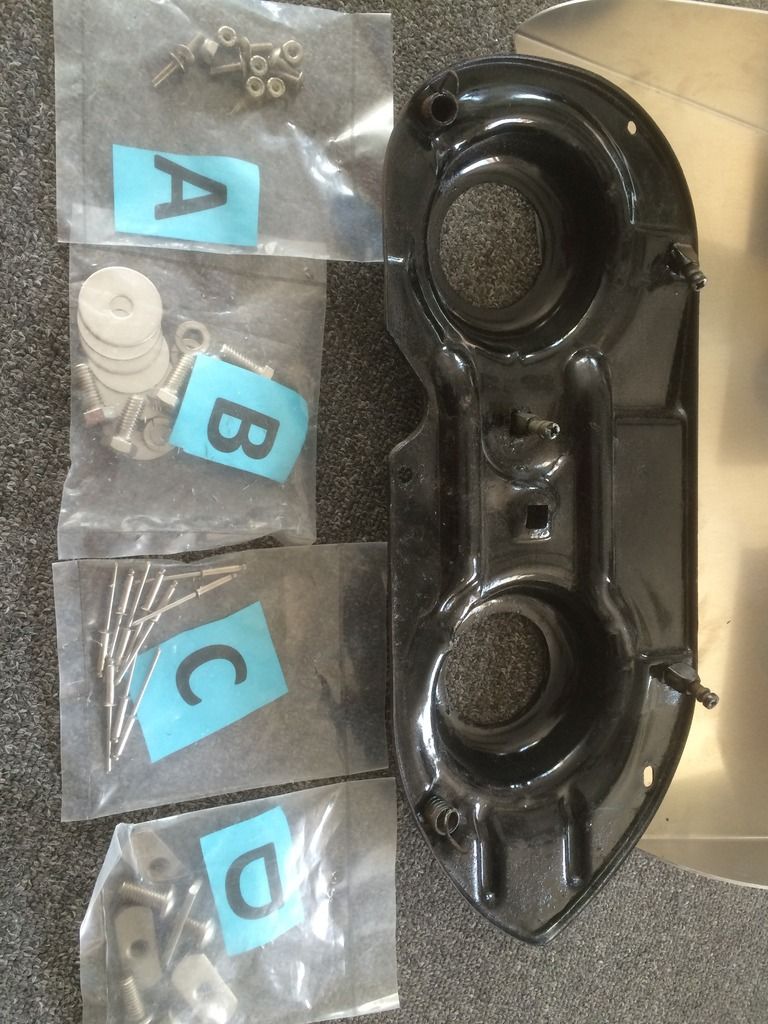
The aluminum bucket slides into the opening from the radiator side, the three slotted holes should line up with the holes to the metal support brace under the nose and use what's in bag B to install.
The front of the bucket should rest on top of the L shaped metal support that runs along the very tip of the nose. I simply drilled down (3 holes) and use what's in bag A to mount.
The lamp holder/backing plate (which should be from a Corvair as per the originals) simply rivets to the aluminum bucket. This is where some trial and error comes in, make sure the big holes in the backing plate line up with the big holes in the aluminum bucket (its where the back of the lamp will come through) now you want to position them high enough up that the light will go over the lip of the nose area, but not too high that they will hit the lexan lense. You can get small spring clamps through the big hole and hold it in place whilst you check for height. Once your happy, drill 2 small holes through the backing plate and aluminum housing where they touch (around the big hole where the lamp goes through and rivet them in place, bag C)
The other thing here is that you MAY have to trim the backing plate to make it fit properly (to match the shape of the lense) Your backing plate seems to be missing a lamp adjuster (white plastic thing that pushes into the backing plate and has a screw with a slot around it that moves the cup in and out) you need to replace those (they are easy to find in autozone etc. etc.)
The last part is the lexan lense itself. Mounting can be done many ways, piano hinge at the front with a coupel of screws at the back, in theory you could do a no drilling version where you mount a L shaped bracket behind th ebumper so the cover slips under it and then use 3M trim tape on the back. A word of warning, look up some videos on line about cutting drilling this stuff as it can crack. I bought a couple of special drill bits that have a sharper cutting tip that helps prevent cracking and make sure the cover is always supported when you drill.
Nick
Obviuosly you have to remove the original lights and the housing that mounts to the underside of the nose.
The aluminum bucket slides into the opening from the radiator side, the three slotted holes should line up with the holes to the metal support brace under the nose and use what's in bag B to install.
The front of the bucket should rest on top of the L shaped metal support that runs along the very tip of the nose. I simply drilled down (3 holes) and use what's in bag A to mount.
The lamp holder/backing plate (which should be from a Corvair as per the originals) simply rivets to the aluminum bucket. This is where some trial and error comes in, make sure the big holes in the backing plate line up with the big holes in the aluminum bucket (its where the back of the lamp will come through) now you want to position them high enough up that the light will go over the lip of the nose area, but not too high that they will hit the lexan lense. You can get small spring clamps through the big hole and hold it in place whilst you check for height. Once your happy, drill 2 small holes through the backing plate and aluminum housing where they touch (around the big hole where the lamp goes through and rivet them in place, bag C)
The other thing here is that you MAY have to trim the backing plate to make it fit properly (to match the shape of the lense) Your backing plate seems to be missing a lamp adjuster (white plastic thing that pushes into the backing plate and has a screw with a slot around it that moves the cup in and out) you need to replace those (they are easy to find in autozone etc. etc.)
The last part is the lexan lense itself. Mounting can be done many ways, piano hinge at the front with a coupel of screws at the back, in theory you could do a no drilling version where you mount a L shaped bracket behind th ebumper so the cover slips under it and then use 3M trim tape on the back. A word of warning, look up some videos on line about cutting drilling this stuff as it can crack. I bought a couple of special drill bits that have a sharper cutting tip that helps prevent cracking and make sure the cover is always supported when you drill.
Nick
06-08-2016, 08:04 AM
#5
Burning Brakes
Thread Starter
Has been a while since I did mine...its pretty easy and a lot of this is considered "fab work" as each car is a little different and not necessarily install work.
Obviuosly you have to remove the original lights and the housing that mounts to the underside of the nose.
The aluminum bucket slides into the opening from the radiator side, the three slotted holes should line up with the holes to the metal support brace under the nose and use what's in bag B to install.
The front of the bucket should rest on top of the L shaped metal support that runs along the very tip of the nose. I simply drilled down (3 holes) and use what's in bag A to mount.
The lamp holder/backing plate (which should be from a Corvair as per the originals) simply rivets to the aluminum bucket. This is where some trial and error comes in, make sure the big holes in the backing plate line up with the big holes in the aluminum bucket (its where the back of the lamp will come through) now you want to position them high enough up that the light will go over the lip of the nose area, but not too high that they will hit the lexan lense. You can get small spring clamps through the big hole and hold it in place whilst you check for height. Once your happy, drill 2 small holes through the backing plate and aluminum housing where they touch (around the big hole where the lamp goes through and rivet them in place, bag C)
The other thing here is that you MAY have to trim the backing plate to make it fit properly (to match the shape of the lense) Your backing plate seems to be missing a lamp adjuster (white plastic thing that pushes into the backing plate and has a screw with a slot around it that moves the cup in and out) you need to replace those (they are easy to find in autozone etc. etc.)
The last part is the lexan lense itself. Mounting can be done many ways, piano hinge at the front with a coupel of screws at the back, in theory you could do a no drilling version where you mount a L shaped bracket behind th ebumper so the cover slips under it and then use 3M trim tape on the back. A word of warning, look up some videos on line about cutting drilling this stuff as it can crack. I bought a couple of special drill bits that have a sharper cutting tip that helps prevent cracking and make sure the cover is always supported when you drill.
Nick
Thank you Nick,
Found the manufacturer of the kit.
http://www.classicaircraftautoinc.com/apps/webstore/
Now, it looks like the Corvair backing plate is rather special as you know.
Would you mind if I was DM you to find out more about the Corvair plate modifications to do them justice, rather than hack them to make them fit?
Kindest regards
Paul
Edit: Spoke to the manufacturer and was advised to Not use the Corvair bracket due to the mounting issues and difficulty with head light adjustment.
Apparently, this kit is far more user and clearance friendly!?
http://www.classicaircraftautoinc.co...s/show/3577077
Last edited by C3Paul; 06-08-2016 at 08:14 AM.
06-08-2016, 10:02 AM
#6
Safety Car
Thank you Nick,
Found the manufacturer of the kit.
http://www.classicaircraftautoinc.com/apps/webstore/
Now, it looks like the Corvair backing plate is rather special as you know.
Would you mind if I was DM you to find out more about the Corvair plate modifications to do them justice, rather than hack them to make them fit?
Kindest regards
Paul
Edit: Spoke to the manufacturer and was advised to Not use the Corvair bracket due to the mounting issues and difficulty with head light adjustment.
Apparently, this kit is far more user and clearance friendly!?
http://www.classicaircraftautoinc.co...s/show/3577077

PM me and I can send you some pics later.
Nick


The following 2 users liked this post by lvrpool32:
bmans vette (06-09-2016),
C3Paul (06-09-2016)
06-09-2016, 11:09 AM
#10
Safety Car
Did you get the lamp cups with the kit? they are specific to hi beam and low beam, they will all fit on the backing plate, but when you go to install the lamp the notches on the lamp/cup may not let the lamp sit upright, so make sure you mock them up before you start the install.
Last edited by lvrpool32; 06-09-2016 at 11:13 AM.
06-09-2016, 12:31 PM
#11
Race Director


Member Since: Nov 2006
Location: Athens GA
Posts: 19,446
Received 351 Likes
on
304 Posts
St. Jude Donor '12-'13, '15- '16-'17-'18-'19, '21

I have the same setup but have yet to install it. Have other body work to do first.
Your pics along with Jim from Classic Air's info make this much easier to visualize.
Dennis


 06-12-2016, 07:59 AM
#15
Safety Car
06-18-2016, 07:12 AM
#16
Burning Brakes
Thread Starter
Trial fitting:
I guess because of my late car with plastic bumpers, I will need to trim the buckets to sit on the Nose Steel reinforcing plate!?
I guess because of my late car with plastic bumpers, I will need to trim the buckets to sit on the Nose Steel reinforcing plate!?
 06-18-2016, 03:29 PM
#17
Safety Car
Yes, the buckets need to be trimmed. You can use the slotted holes on the other end as a guide as they should line up with the factory holes for the stock headlight surrounds.
06-30-2016, 04:46 PM
#18
Burning Brakes
Thread Starter
Coming along nicely.
Aluminium buckets required quit a bit of trimming to make them fit.
Lights holders trimmed as well and all mocked up.
One addition will be white parking light as required in the Europe.
Really pleased with the progress.
Aluminium buckets required quit a bit of trimming to make them fit.
Lights holders trimmed as well and all mocked up.
One addition will be white parking light as required in the Europe.
Really pleased with the progress.


 07-23-2016, 11:16 AM
#19
Burning Brakes
Thread Starter
Hey Guys,
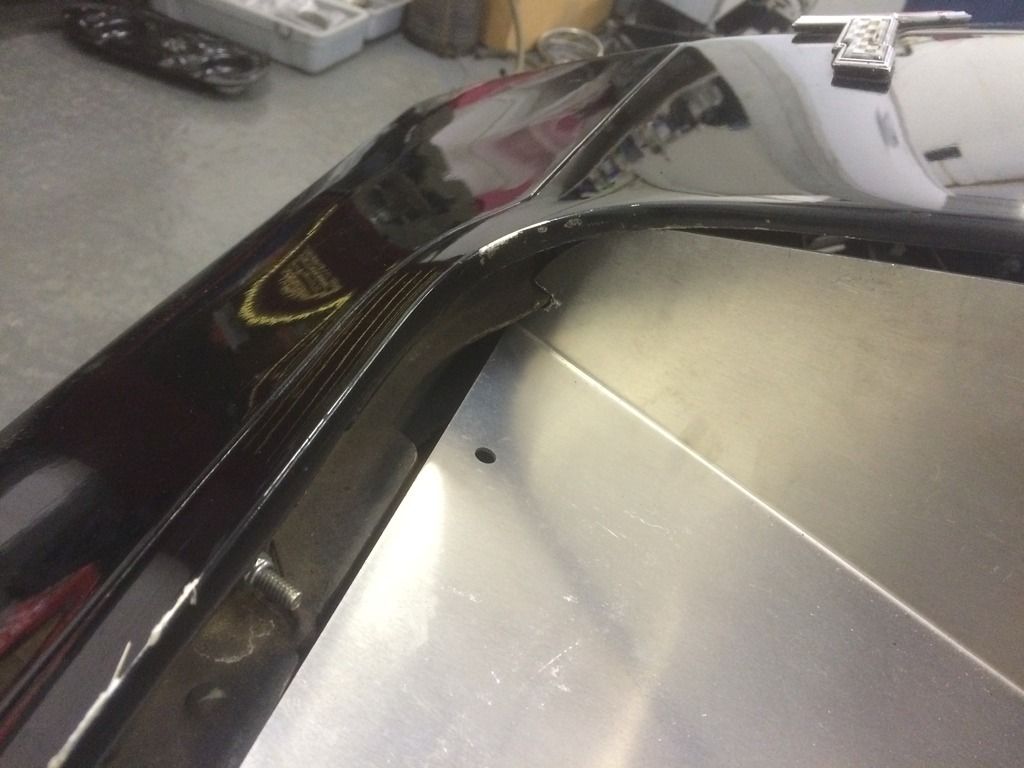
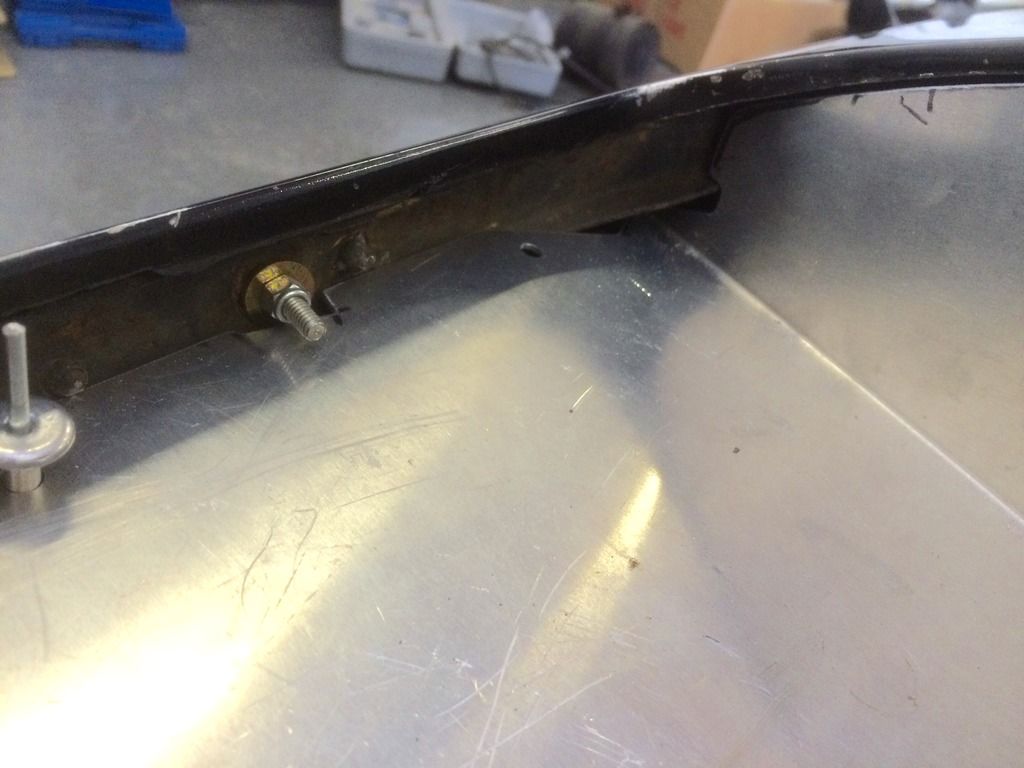
Almost finished just the lights covers.
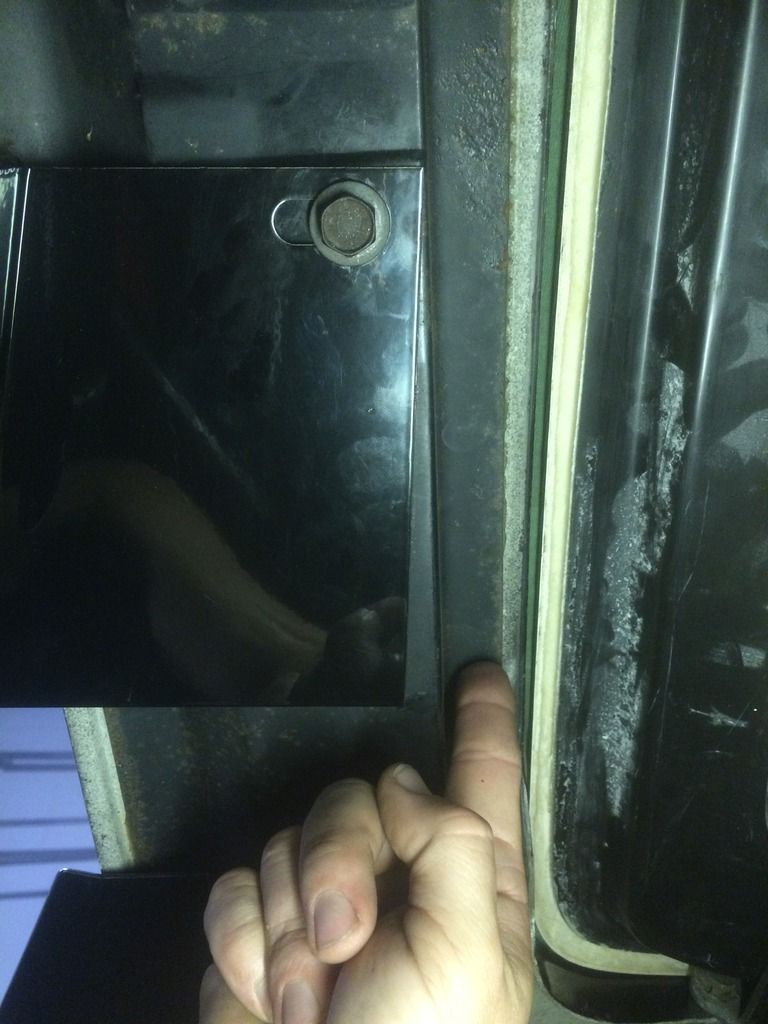
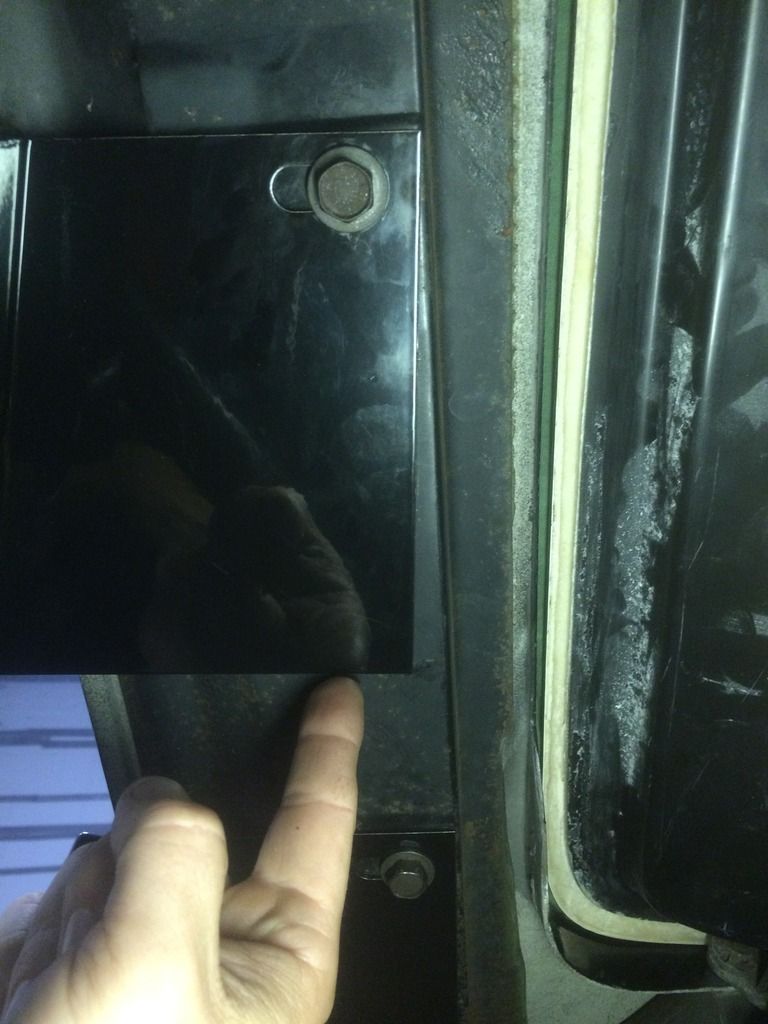
How did you fix the covers to the bodywork?
Can you post a close up pic of the fasteners, and how far is the hole from the hood edge?
Also, this may sound stupid, but I rather aske.
Where should the holes for the covers go through:
A
Or
B
Almost finished just the lights covers.
How did you fix the covers to the bodywork?
Can you post a close up pic of the fasteners, and how far is the hole from the hood edge?
Also, this may sound stupid, but I rather aske.
Where should the holes for the covers go through:
A

Or
B

Last edited by C3Paul; 07-23-2016 at 12:27 PM.
07-28-2016, 09:59 AM
#20
Safety Car
You can use a couple of ways to mount them..1) a stainless piano hinge in front, drill your own holes at whatever spacing you like or 2) just take a piece of right angle aluminum and mount that to the nose (between the bumper and the front of the headlight opening)so the plexi cover slides under it.
fastening at the back is simple..2 holes and go to a hardware store and get some 1/4" aluminum rivet nuts - http://www.mcmaster.com/#standard-rivet-nuts/=13h8q8k
you just drill through the fiberglass, install these and use a stainless nut/washer to hold them in place.
Just be careful drilling the lenses, they are thin and crack easily. always drill with wood behind and if you can find them there are special drill bits for plastics (the tip of the drill has a much greater cutting angle)
cheers
Nick