


Vacuum leak/hissing from headlight switch
Thread Starter
Pro

Joined: May 2013
Posts: 570
Likes: 22
I have a 69 coupe and when I turn the headlights on I get a hissing sound coming from under the dash. I have read the vacuum lines could be mounted backwards on the switch. What is the best way to access the back of the switch to check the connection? Can it be done without removing the dash? The headlights operate normally
Also when I turn on headlights the headlight warning light stays illuminated. The light does not illuminate when using the override switch. Do I have a bad cutoff switch? How do I test them?
Thank you
Also when I turn on headlights the headlight warning light stays illuminated. The light does not illuminate when using the override switch. Do I have a bad cutoff switch? How do I test them?
Thank you
Burning Brakes


Joined: Feb 2009
Posts: 780
Likes: 1
From: Shelby NC
I have a 69 coupe and when I turn the headlights on I get a hissing sound coming from under the dash. I have read the vacuum lines could be mounted backwards on the switch. What is the best way to access the back of the switch to check the connection? Can it be done without removing the dash? The headlights operate normally
Also when I turn on headlights the headlight warning light stays illuminated. The light does not illuminate when using the override switch. Do I have a bad cutoff switch? How do I test them?
Thank you
Also when I turn on headlights the headlight warning light stays illuminated. The light does not illuminate when using the override switch. Do I have a bad cutoff switch? How do I test them?
Thank you
It's at least one pack of cheese crackers and coke job...2 packs of crackers on a bad day!!
Thread Starter
Pro
Joined: May 2013
Posts: 570
Likes: 22
Thread Starter
Pro
Joined: May 2013
Posts: 570
Likes: 22
My headlight switch leaks vac when I turn the light on...got a new switch but haven't put it on yet. I have taken it, the dash panel, lose on the side and across the top and pulled the corner down to access it before. Its a job I don't look forward to...lol
It's at least one pack of cheese crackers and coke job...2 packs of crackers on a bad day!!
It's at least one pack of cheese crackers and coke job...2 packs of crackers on a bad day!!
Safety Car


Joined: Sep 2013
Posts: 4,355
Likes: 2,633
From: Draper Utah
I replaced the headlight switch and control hoses in my 70 about 6 month's ago. I thought it was rather easy... below is a write up I did last week for someone else.
Disconnect the battery.
Removed A/C duct from under dash. Mine just slide out but I believe there is supposed to be a screw holding it in. I don't know what's under a non A/C cars dash, but I assume it's simpler.
Remove the drivers side kick panel (couple of screws).
Drop the steering column by removing the two bolts under the dash pad. This will allow the steering column to lower about 2".
Remove all the dash pad screws, this allows the dash pad to slide out and down to gain access to the headlight switch. Be careful with the dash pad as it's brittle and will break easy. If you need more room you could remove the steering column bolts at the firewall and gain a little more room, I didn't have to do this.
At this point you should be able to reach in and unplug the electrical connection and vacuum hoses. Pay attention to which hose goes where.
Now you can remove the headlight switch. First you remove the headlight switch ****, and there is a trick to it. Pull the headlight **** to the full ON position. Reach under the switch in front of the vacuum hoses and there is a small spring loaded button. Push the button in and you can pull the **** the rest of the way out.
After the **** is removed you will see a big retainer nut that can be removed with a large flat blade screw driver. I actually didn't have a screwdriver big enough so I used some small needle nose pliers. Once the retainer nut is removed the headlight switch will slide out.
I also replaced my vacuum control lines at the same time. I broke off a golf tee and plugged the new line into the old line. I than reached under the dash and pulled the new line through using the old line.
I replaced the headlight switch and vacuum hoses in about an hour and I'd never done it before.
Thread Starter
Pro
Joined: May 2013
Posts: 570
Likes: 22
I replaced the headlight switch and control hoses in my 70 about 6 month's ago. I thought it was rather easy... below is a write up I did last week for someone else.
Disconnect the battery.
Removed A/C duct from under dash. Mine just slide out but I believe there is supposed to be a screw holding it in. I don't know what's under a non A/C cars dash, but I assume it's simpler.
Remove the drivers side kick panel (couple of screws).
Drop the steering column by removing the two bolts under the dash pad. This will allow the steering column to lower about 2".
Remove all the dash pad screws, this allows the dash pad to slide out and down to gain access to the headlight switch. Be careful with the dash pad as it's brittle and will break easy. If you need more room you could remove the steering column bolts at the firewall and gain a little more room, I didn't have to do this.
At this point you should be able to reach in and unplug the electrical connection and vacuum hoses. Pay attention to which hose goes where.
Now you can remove the headlight switch. First you remove the headlight switch ****, and there is a trick to it. Pull the headlight **** to the full ON position. Reach under the switch in front of the vacuum hoses and there is a small spring loaded button. Push the button in and you can pull the **** the rest of the way out.
After the **** is removed you will see a big retainer nut that can be removed with a large flat blade screw driver. I actually didn't have a screwdriver big enough so I used some small needle nose pliers. Once the retainer nut is removed the headlight switch will slide out.
I also replaced my vacuum control lines at the same time. I broke off a golf tee and plugged the new line into the old line. I than reached under the dash and pulled the new line through using the old line.
I replaced the headlight switch and vacuum hoses in about an hour and I'd never done it before.
Burning Brakes


Joined: Jan 2006
Posts: 1,073
Likes: 331
From: Clear Lake Shores Texas
2016 C3 of Year Finalist
As far as the headlamp warning light is concerned each headlight door has a readily available inexpensive switch. They have often fail over time. They are accessible from under the car and are probably one of the easiest fixes there is on these cars.
Corvette Stories
The Best of Corvette for Corvette Enthusiasts

Top 10 Most Expensive Corvettes Ever Sold on Bring A Trailer
Brett Foote
10 Things Every Corvette Owner Needs (2026 Edition)
Michael S. Palmer
8 Most "Only Corvette Owners Understand" Quirks and Problems
Pouria Savadkouei
10 Reasons the C6 Z06 is Still A Performance Benchmark After 20 Years
Joe Kucinski
How Much Horsepower Every Corvette Engine "LOST" in 1972
Joe Kucinski
Top 10 DOs and DON'Ts for Protecting Your Convertible Top!
Michael S. Palmer
Top 10 Most Explosive Corvettes Ever Made: Power-to-Weight Ratio Ranked!
Joe Kucinski
150 hp to 1,250 hp: Every Corvette Generation Compared by the Specs That Matter
Joe Kucinski
8 Coolest Corvette Pace Cars (and Replicas) of All Time
Verdad GallardoDrifting


Joined: Jul 2006
Posts: 1,259
Likes: 154
From: Deplorableville Nebraska
Check out this thread;
https://www.corvetteforum.com/forums...-question.html
You can test the vacuum hose routing easily. If indeed the hoses are reversed, crawl up under the dash and reverse the hoses at the OTHER end. Remember, the vacuum supply hose goes to the switch port closest to the pull ****. Also, some brief hissing could be attributed to the fact the h/l switch allows atmosphere into the downstream circuit to allow the h/l's to open. If they are opened with the over ride, atmosphere is allowed into the system at a different point (over ride).
Safety Car
Joined: Sep 2013
Posts: 4,355
Likes: 2,633
From: Draper Utah
Thank you, a few questions: you are accessing the switch from the top, correct? Why the need to remove the AC duct which is below the switch. Mine is a non AC car but I have the Astro ventilation duct. Regarding the dash pad, are the screws just on the outer left and right edge? I read somewhere there is a screw underneath that attached it to the firewall.
I did just go out and look at my car and remembered I had to remove the door sill plate (4) screws to remove the kick panel. I also had to remove the small molding under the steering column (3) screws to allow the dash pad to slide down.
The dash pad has (3) screws across the top. (2) screws on the right, accessed from the radio side, and (2) screws on the left, accessed from the door jam. The screws in the door jam required a stubby screw driver. All dash pad screws can be removed while sitting in the drivers seat.
The AC duct came off so I could replace the vacuum hoses, I can't think of a reason it would need to come off for just the switch. I also could have removed the duct at first when I tried to access the switch from below and behind. That was a no-go.
Thread Starter
Pro
Joined: May 2013
Posts: 570
Likes: 22
I wrote that all up from memory last week, I replaced the switch 6 month's ago so I could be forgetting something, but I know I hit all the highlights.
I did just go out and look at my car and remembered I had to remove the door sill plate (4) screws to remove the kick panel. I also had to remove the small molding under the steering column (3) screws to allow the dash pad to slide down.
The dash pad has (3) screws across the top. (2) screws on the right, accessed from the radio side, and (2) screws on the left, accessed from the door jam. The screws in the door jam required a stubby screw driver. All dash pad screws can be removed while sitting in the drivers seat.
The AC duct came off so I could replace the vacuum hoses, I can't think of a reason it would need to come off for just the switch. I also could have removed the duct at first when I tried to access the switch from below and behind. That was a no-go.
Safety Car
Joined: Sep 2013
Posts: 4,355
Likes: 2,633
From: Draper Utah
After you drop the steering column and slide the dash pad out and down you have about two or three inches of room to reach behind the dash pad.
Last edited by Iceaxe; Jun 23, 2016 at 11:24 PM.
Team Owner


Joined: Jun 2000
Posts: 38,923
Likes: 1,482
From: Southbound
Cruise-In II Veteran
There is no free lunch. You'll have to loosen the dash pad and lower the steering column to the point where you can get to the light switch.
Where do you hear the leak? "Under the dash" is likely to be the over ride and not the switch. "Behind the dash" is probably the switch.

Where do you hear the leak? "Under the dash" is likely to be the over ride and not the switch. "Behind the dash" is probably the switch.
Team Owner


Joined: Sep 2006
Posts: 31,283
Likes: 4,374
From: Westminster Maryland
Hi BH,
Yes.
You can access the switch's hoses from the top.
Reversed hoses can cause the hiss you're hearing.
Regards,
Alan
Blue striped hose forward nipple.

Blue striped hose at the vacuum over-ride pull switch.
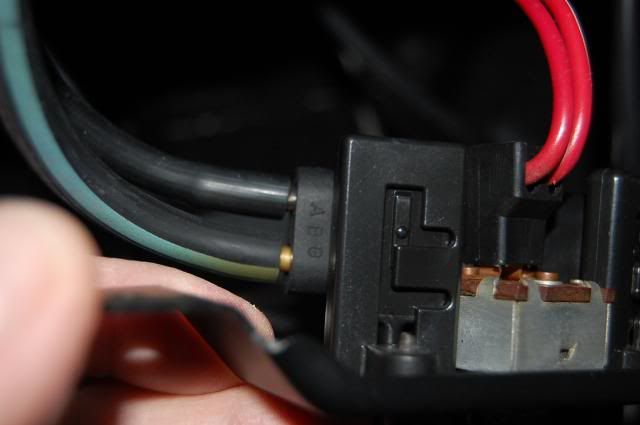
Yes.
You can access the switch's hoses from the top.
Reversed hoses can cause the hiss you're hearing.
Regards,
Alan
Blue striped hose forward nipple.
Blue striped hose at the vacuum over-ride pull switch.
Last edited by Alan 71; Jun 24, 2016 at 08:45 AM.
Burning Brakes
Joined: Oct 2013
Posts: 1,114
Likes: 520
From: McClellandtown, Pa.
It is possible to remove the headlight switch without lowering the steering column. I've had mine in and out a couple of times on my 73 for various reasons. First, disconnect the battery! Then, remove the headlight switch ****, the process was mentioned above. Next, I just removed the top three dash pad screws, the guage cluster screws for that side, the two in the door jamb, unscrewed the black air vent pull, removed the kick panel, removed the screws holding the vacuum bypass to the lower dash, and finally I removed the three screws holding the vinyl access plate on the steering column. Then proceed with caution as you gently pull on the left corner of the dash pad. You should be able to access the switch and the hoses at this time. Note, it is a tight squeeze in there but it can be done.
Good luck,
Jim
Good luck,
Jim
Last edited by Tooch1; Jun 24, 2016 at 09:28 AM.
Safety Car
Joined: Sep 2013
Posts: 4,355
Likes: 2,633
From: Draper Utah
Lowering the steering column is a two minute job as it's only two bolts and will give you an extra inch or more of room. You just remove the two bolts next to the vacuum override switch. The extra room can be really helpful to some so they don't put pressure on the dash pad and break it. Those old dash pads can be really brittle.
Team Owner
Joined: Sep 2006
Posts: 31,283
Likes: 4,374
From: Westminster Maryland
Hi,
Don't forget the 2 screws from the side of the center gauge cluster.
Also, at least on my 71, the bracket that mounts the parking brake bracket to the hinge pillar needs to be loosened too in order for the dash pad to drop down far enough to get your fingers to the hoses.
Regards,
Alan
A lot going on under that corner.
Last edited by Alan 71; Jun 24, 2016 at 10:26 AM.
Thread Starter
Pro
Joined: May 2013
Posts: 570
Likes: 22
Hi,
Don't forget the 2 screws from the side of the center gauge cluster.
Also, at least on my 71, the bracket that mounts the parking brake bracket to the hinge pillar needs to be loosened too in order for the dash pad to drop down far enough to get your fingers to the hoses.
Regards,
Alan
A lot going on under that corner.
Safety Car
Joined: Sep 2013
Posts: 4,355
Likes: 2,633
From: Draper Utah
I didn't have to do this on my 70. It would be interesting to know why they are different. Perhaps the difference between AC and non AC?