When you click on links to various merchants on this site and make a purchase, this can result in this site earning a commission. Affiliate programs and affiliations include, but are not limited to, the eBay Partner Network.
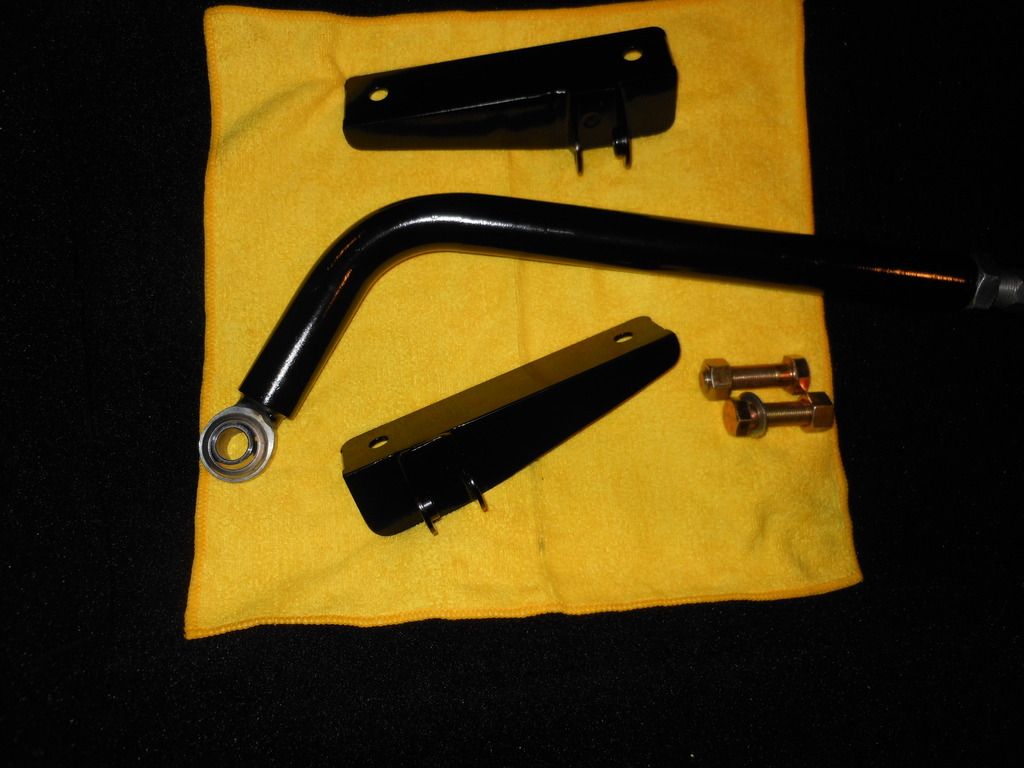
I made my own. The bracket design is a copy from someone here on the forum.
I made the brackets from 1/4" plywood first to get the exact measurements, then cut out the steel plate.
The bar parts were from Speedway Motors.
It's nice to see the custom designs made here. I did the same for my 454 with the belt-driven fan removed. Less than $30 invested in parts readily available. You just need a welder or know someone who has a welder to make the brackets.
It's nice to see the custom designs made here. I did the same for my 454 with the belt-driven fan removed. Less than $30 invested in parts readily available. You just need a welder or know someone who has a welder to make the brackets.
Or start the a c-channel piece of metal and cut away what you don't need. These where made without any welding.
Some very creative solutions on here. Very well done gentlemen
For those of us without fabrication skills, VB&P used to offer a spreader bar kit with unwelded mounting plates. You simply mocked it up and took them to a shop to be welded. I imagine these could still be found on eBay.
I made my own. The bracket design is a copy from someone here on the forum.
I made the brackets from 1/4" plywood first to get the exact measurements, then cut out the steel plate.
The bar parts were from Speedway Motors.
I am looking to order the parts to make up my own Spreader bar the same as you have done (great job)
How did you work the length of the bar to order ?
I am guessing it is best to have the longest possible with less thread as close to the Control Arm as possible.
Andy
I am looking to order the parts to make up my own Spreader bar the same as you have done (great job)
How did you work the length of the bar to order ?
I am guessing it is best to have the longest possible with less thread as close to the Control Arm as possible.
Andy
Andy,
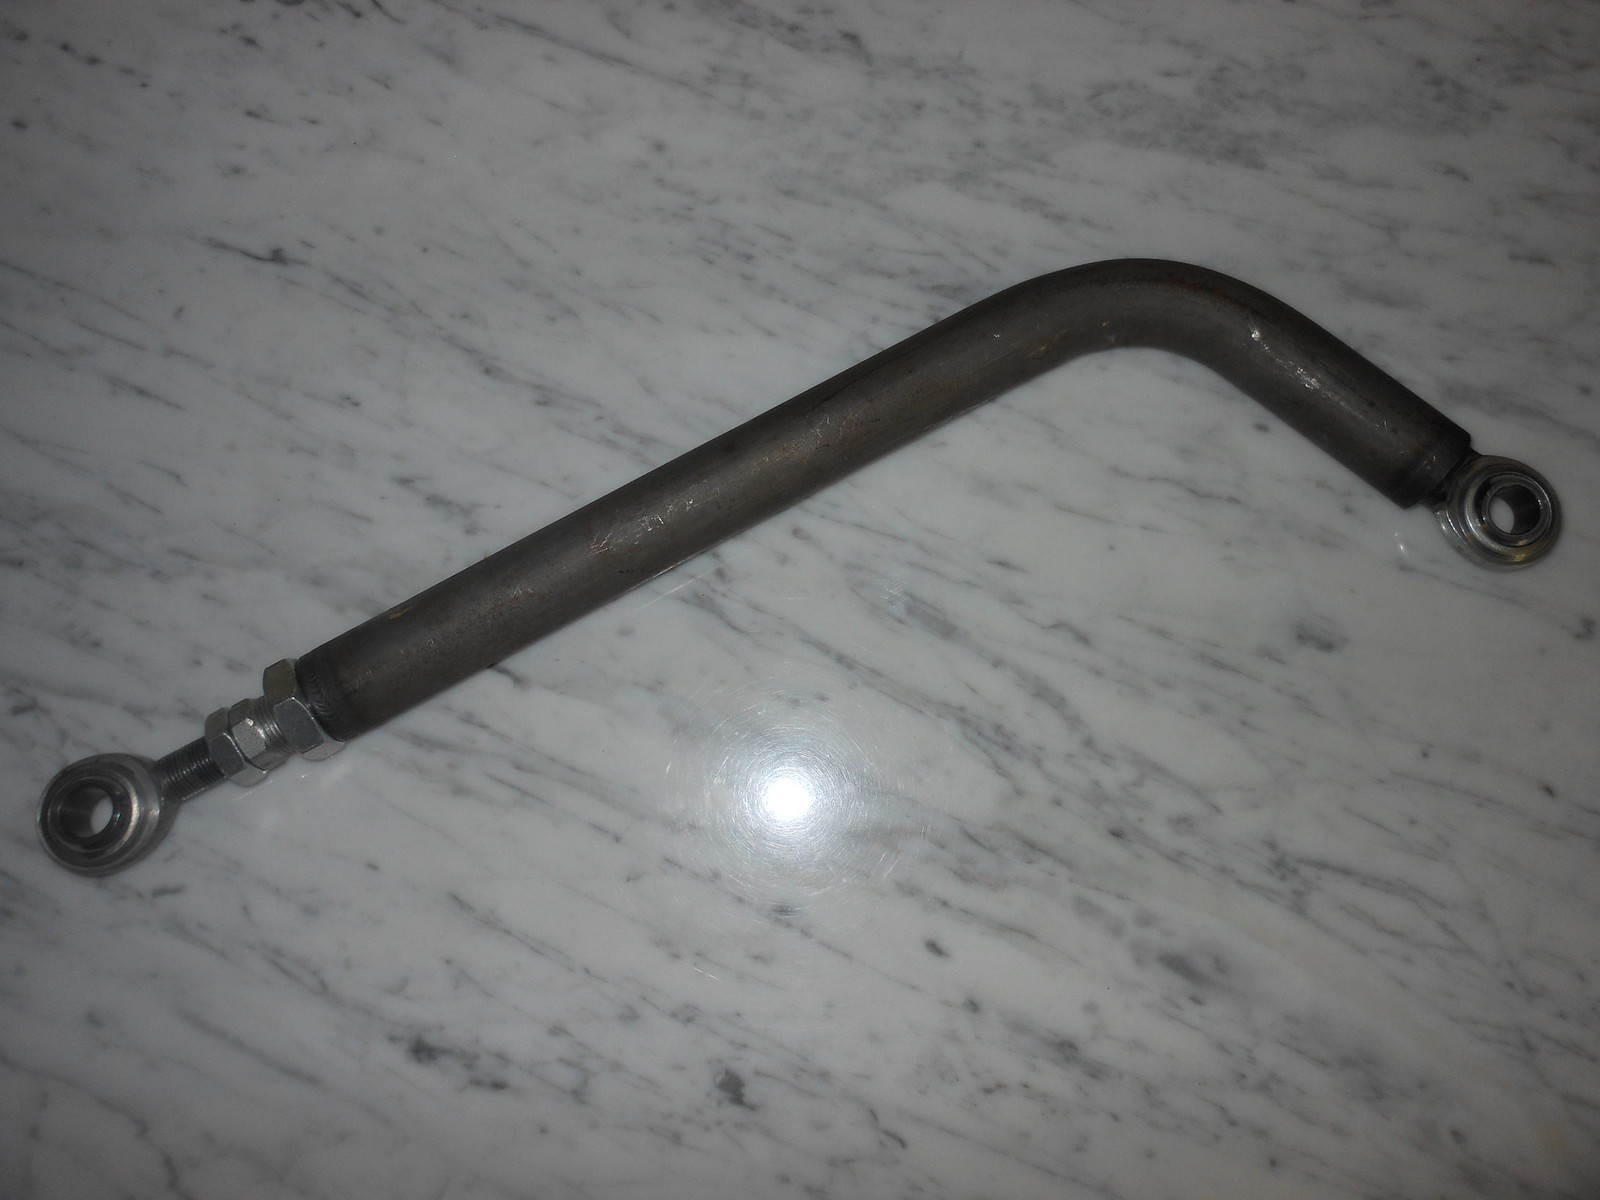
I chose an 18" bar, which seemed to be sufficient, as I wasn't sure what my brackets would be like. The Speedway Motors part number is for the 18" bar. the number 910-34158 is the generic bar, then you choose the length. (In my case -18)
I agree that the longer the bar and less thread on the ends would/should be the most rigid.
After I constructed the brackets and installed the bar, I see that perhaps I might have been able to use the 19" bar. However I'm very satisfied with the 18".
A point I would like to make, a friend has a '74 Vette, and he also has a spreader bar (purchased pre made) and he said it made little difference in the feel of the car. This is before I made mine.
When I installed mine I immediately noticed the difference.
When I installed mine I had both front wheels off the ground, jack stands located where the lower "A" arm connects to the front cross member. I installed the bar and hand tightened the bar/joints pressing outward, then secured the nuts.
When I asked my friend how he installed his, he said, just hand tight with wheels on the ground. I explained my procedure, so he tried that. He said that produced a huge difference, much stiffer.
My view is that a "preload" is required to get the maximum result. When jacked up, the shock towers must lean out more than you might think.
Barry
I know this post is a couple of years out but as I've just completed fabricating bracket for and installing a spreader bar in my 73 and used Barry's order information from Speedway Motors. I figured I'd just post here as it concerns the size of the bar.
My biggest challenge is that I have a March front runner system installed and it extends forward quite a bit. So, getting the spreader bar located took some thinking/measuring/etc. It's located quite a bit forward from center due to the limitations with the front runner's pulleys.
My initial plan was to just use angle iron like what I saw in the posting. In fact, I bought some and cut two brackets and drilled them and test attached them in the car. They would probably have worked fine but I changed my mind the bought some 2" x 3/16" flat bar from HD and cut/drilled them out using some brackets from RideTech (RideTech 90000076 Rod End Bracket, [Narrow] Part #: 76890000076) that I ordered along with a 19" bar from Speedway Motors.
Yesterday I took my flat bar and brackets over to my friend's house as he has an industrial welder and all the good stuff to do the job right and had him weld the RideTech brackets to the flat bar. I took them home and painted them up and this morning I installed them in the car.
I initially started with the 19" bar but once it was installed there were no threads showing at all on the hiem joints, so I switched to the 18" bar. Maybe that was a non-issue, but I was thinking that there needed to be some adjustability with this setup? I'm guessing the reason I had less distance was because I changed to the flat bar/brackets vs. angle iron. The distance between the CA's cross shafts was 24.5" with wheels on the ground and the difference between the flat bar and angle iron should only be about 3/8" difference? Regardless, I now have about 3/4" of threads showing on each hiem joint. I believe the threaded area is 1.5" so about half is in the bar. The holes in the brackets and hiem joints are a humongous 5/8" so I had to procure that hardware from HD.
I did install the spreader bar with wheels off the ground. The weather here is in the 20's and snow on the ground so a test drive to check it out may not be until next spring.
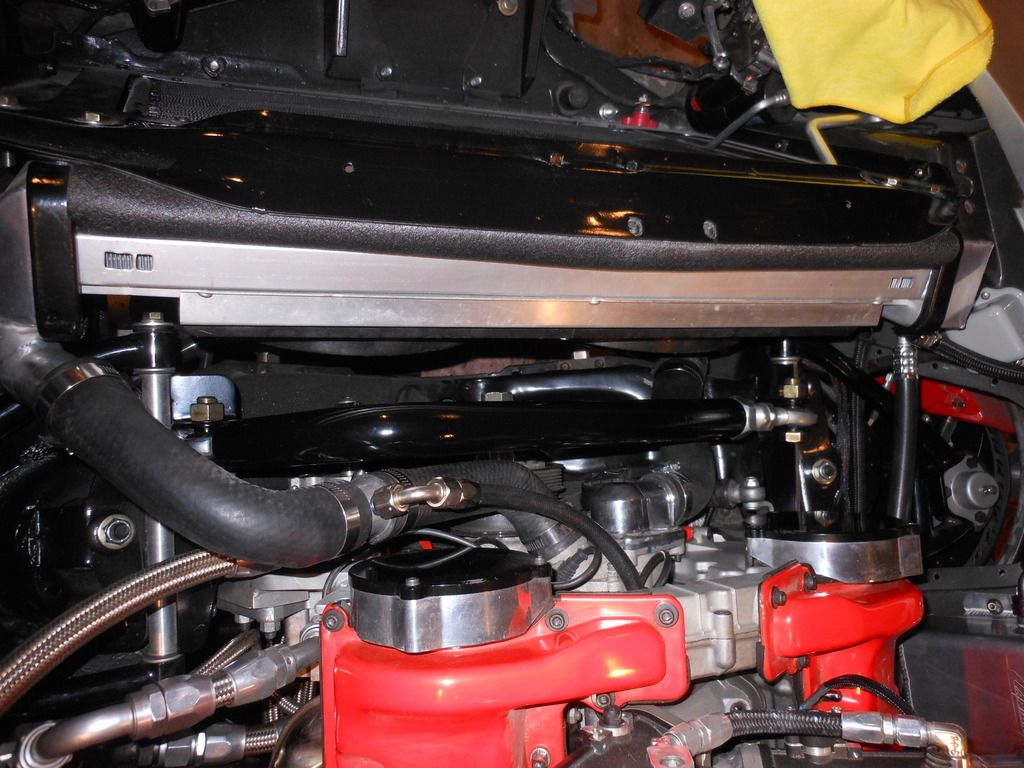
Pics attached. Spreader bar installed. Drivers side pic Passenger side pic Passenger side with flash Spreader bar passenger side view
Nice solution.
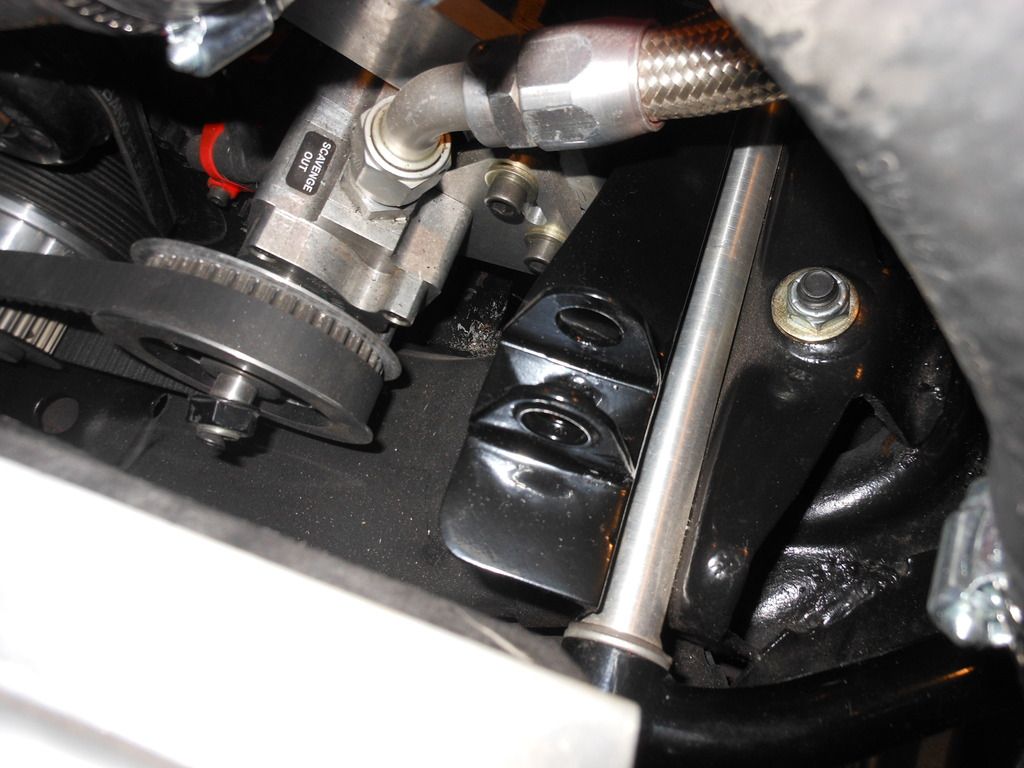
Anything non-stock on the front of the motor is going to affect the spreader fit and then we just need to make it work the best we can and that's not always the best it could be. Having it anywhere is still a lot better than not having it at all.
Mine with the BB ended, if I put is as close as possible to the front bolt it just barely cleared the pulleys so UI had to move it up in front of the forward mounting bolt. Not ideal but not a lot of choice unless I change something else
(fwiw, the distance from the frame bracket to bracket where the UCA rods mount should be 26 3/8.
M
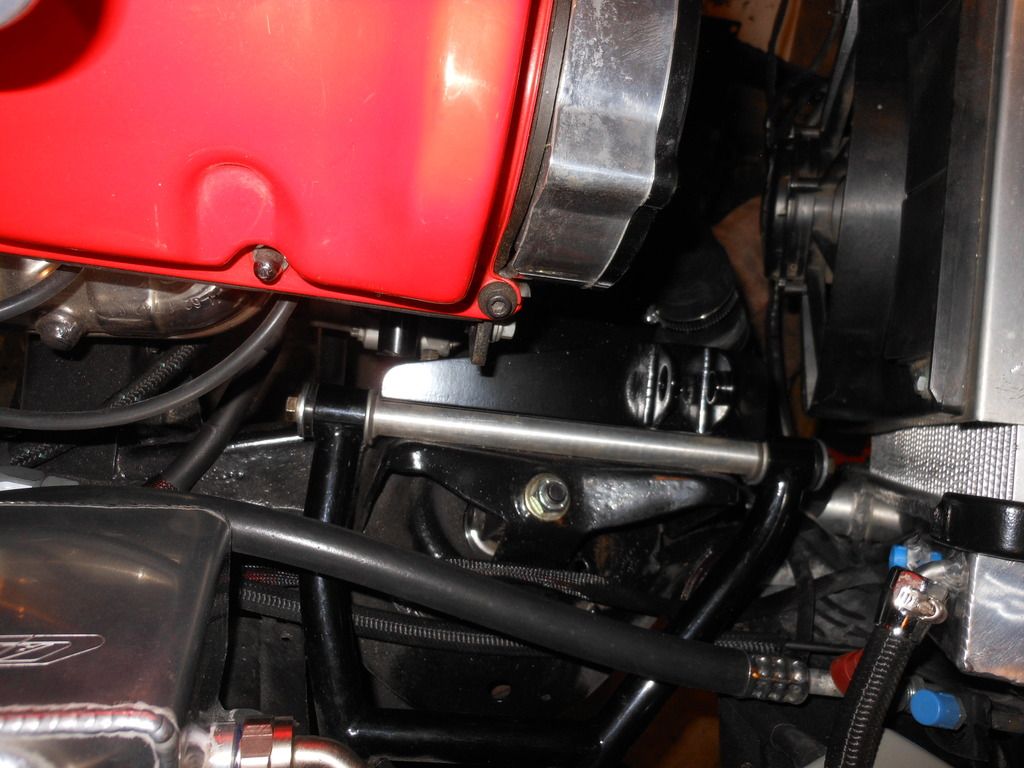
Mooser, thanks for the reply. Wow, I thought my space was limited. Yours is really stuffed in there! Nice job to you!
Yeah, I'm measuring from the inside of the cross-shaft bolt which are pretty big on the eBay CAs so there's probably another 2 inches there. I'll have to double check and measure it again. I think this car has had some issues in its past with some body work that I'm aware of; drivers side fender and rear panel have been replaced/repaired. So, I wouldn't be surprised if it off some.
I know this post is a couple of years out but as I've just completed fabricating bracket for and installing a spreader bar in my 73 and used Barry's order information from Speedway Motors. I figured I'd just post here as it concerns the size of the bar.
My biggest challenge is that I have a March front runner system installed and it extends forward quite a bit. So, getting the spreader bar located took some thinking/measuring/etc. It's located quite a bit forward from center due to the limitations with the front runner's pulleys.
My initial plan was to just use angle iron like what I saw in the posting. In fact, I bought some and cut two brackets and drilled them and test attached them in the car. They would probably have worked fine but I changed my mind the bought some 2" x 3/16" flat bar from HD and cut/drilled them out using some brackets from RideTech (RideTech 90000076 Rod End Bracket, [Narrow] Part #: 76890000076) that I ordered along with a 19" bar from Speedway Motors.
Yesterday I took my flat bar and brackets over to my friend's house as he has an industrial welder and all the good stuff to do the job right and had him weld the RideTech brackets to the flat bar. I took them home and painted them up and this morning I installed them in the car.
I initially started with the 19" bar but once it was installed there were no threads showing at all on the hiem joints, so I switched to the 18" bar. Maybe that was a non-issue, but I was thinking that there needed to be some adjustability with this setup? I'm guessing the reason I had less distance was because I changed to the flat bar/brackets vs. angle iron. The distance between the CA's cross shafts was 24.5" with wheels on the ground and the difference between the flat bar and angle iron should only be about 3/8" difference? Regardless, I now have about 3/4" of threads showing on each hiem joint. I believe the threaded area is 1.5" so about half is in the bar. The holes in the brackets and hiem joints are a humongous 5/8" so I had to procure that hardware from HD.
I did install the spreader bar with wheels off the ground. The weather here is in the 20's and snow on the ground so a test drive to check it out may not be until next spring.
Pics attached. Spreader bar installed. Drivers side pic Passenger side pic Passenger side with flash Spreader bar passenger side view
good job.
what alumn radiator is that?
did it install like a stock one?
That is a Cold Case Direct Fit rad. Well, almost direct fit lol. I had to replace the petcock that came with it to one that was more narrow (without wings) so it would open. Interference issue with the frame. Otherwise it's been OK.
That is a Cold Case Direct Fit rad. Well, almost direct fit lol. I had to replace the petcock that came with it to one that was more narrow (without wings) so it would open. Interference issue with the frame. Otherwise it's been OK.
I hadn't looked into the spreader bar much, although it has been on my wish list. I never knew that it can be installed on a stock clutch fan set up. Thanks for the thread and photos.
(probably have to click to watch it over on youtube, it's an old video so it'll sit and load for awhile here)
This was just an easy drive up the street in town
M