


Connection for reverse light switch

Thread Starter
Instructor


Joined: Sep 2015
Posts: 216
Likes: 16
From: Haverfordwest Pembrokeshire
During my gearbox rebuild I decided to replace the missing switch for my back up lights, fortunately the mounting bracket was still there but I can't find the electrical connection.
Where should it be located 1970 SBC convertible, looks like another Bubba mod I'm reversing, like the door ajar wires and interior light wires which were all cut!
Thanks
Graham
Where should it be located 1970 SBC convertible, looks like another Bubba mod I'm reversing, like the door ajar wires and interior light wires which were all cut!
Thanks
Graham
Melting Slicks


Joined: Mar 2005
Posts: 2,095
Likes: 299
From: Midlothian VA
During my gearbox rebuild I decided to replace the missing switch for my back up lights, fortunately the mounting bracket was still there but I can't find the electrical connection.
Where should it be located 1970 SBC convertible, looks like another Bubba mod I'm reversing, like the door ajar wires and interior light wires which were all cut!
Thanks
Graham
Where should it be located 1970 SBC convertible, looks like another Bubba mod I'm reversing, like the door ajar wires and interior light wires which were all cut!
Thanks
Graham
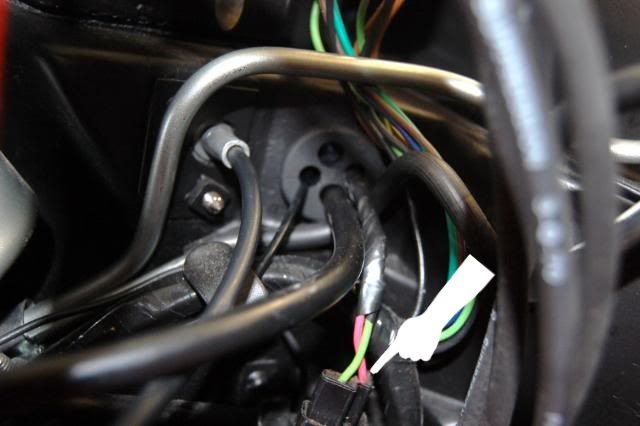
Comes through the firewall normally via the 4 hole rubber plug just to the passenger side of the master cylinder. The transmission switch has the same color wires with a plug and the two plugs meet @ where the firewall transitions to the transmission tunnel.
Team Owner


Joined: Sep 2006
Posts: 31,335
Likes: 4,451
From: Westminster Maryland
Hi G70,
As HF described the connection for the back-up light switch comes from the dash harness through the 4 hole grommet. It only extends into the engine compartment a couple of inches.
Notice that the lead is typically wrapped so you only see a little bit of the colored wires.
Good Luck!
Regards,
Alan
As HF described the connection for the back-up light switch comes from the dash harness through the 4 hole grommet. It only extends into the engine compartment a couple of inches.
Notice that the lead is typically wrapped so you only see a little bit of the colored wires.
Good Luck!
Regards,
Alan
Thread Starter
Instructor
Joined: Sep 2015
Posts: 216
Likes: 16
From: Haverfordwest Pembrokeshire
Hi G70,
As HF described the connection for the back-up light switch comes from the dash harness through the 4 hole grommet. It only extends into the engine compartment a couple of inches.
Notice that the lead is typically wrapped so you only see a little bit of the colored wires.
Good Luck!
Regards,
Alan
As HF described the connection for the back-up light switch comes from the dash harness through the 4 hole grommet. It only extends into the engine compartment a couple of inches.
Notice that the lead is typically wrapped so you only see a little bit of the colored wires.
Good Luck!
Regards,
Alan
Graham
Team Owner
Joined: Sep 2006
Posts: 31,335
Likes: 4,451
From: Westminster Maryland
Hi G70,
Engine compartments, (and chassis too,) actually take more TIME than anything else.
They really don't eat money the way the exterior and interior of a car can!
Regards,
Alan
Engine compartments, (and chassis too,) actually take more TIME than anything else.
They really don't eat money the way the exterior and interior of a car can!
Regards,
Alan
Thread Starter
Instructor
Joined: Sep 2015
Posts: 216
Likes: 16
From: Haverfordwest Pembrokeshire

Graham
Corvette Stories
The Best of Corvette for Corvette Enthusiasts

5 Best & 5 Worst Corvette Daily Drivers
Joe Kucinski
The Headlights of Every Corvette Generation Explained
Joe Kucinski
5 Best & 5 Most Overrated Corvette Track Packages of All Time!
Joe Kucinski
Every 2027 Corvette Engine Explained
Joe Kucinski
Designer Imagines A Corvette That Looks More Like a Corvette Than the Corvette
Verdad Gallardo
10 Ugly Corvettes That We Still Kinda Love
Joe Kucinski
Top 10 Most Expensive Corvettes Ever Sold on Bring A Trailer
Brett Foote
10 Things Every Corvette Owner Needs (2026 Edition)
Michael S. Palmer
8 Most "Only Corvette Owners Understand" Quirks and Problems
Pouria Savadkouei
Thread Starter
Instructor
Joined: Sep 2015
Posts: 216
Likes: 16
From: Haverfordwest Pembrokeshire
Graham
Team Owner


Joined: Jun 2001
Posts: 23,381
Likes: 1,067
From: Virginia USA
Hi G70,
As HF described the connection for the back-up light switch comes from the dash harness through the 4 hole grommet. It only extends into the engine compartment a couple of inches.
Notice that the lead is typically wrapped so you only see a little bit of the colored wires.
Good Luck!
Regards,
Alan
As HF described the connection for the back-up light switch comes from the dash harness through the 4 hole grommet. It only extends into the engine compartment a couple of inches.
Notice that the lead is typically wrapped so you only see a little bit of the colored wires.
Good Luck!
Regards,
Alan
Keep in mind the switch has very little throw to turn it on and off.
Thread Starter
Instructor
Joined: Sep 2015
Posts: 216
Likes: 16
From: Haverfordwest Pembrokeshire
Thanks everyone, I have the additional problem that I'm missing the linkage between the switch and the reverse arm but I'm sure I can make something to do that job, already had my MM on the switch to determine the switch point.
I managed to get some nice button head stainless allen screws to mount the switch with so well on the way now, weather was horrible last night so didn't venture out once I got indoors.
Graham
I managed to get some nice button head stainless allen screws to mount the switch with so well on the way now, weather was horrible last night so didn't venture out once I got indoors.
Graham
Team Owner
Joined: Sep 2006
Posts: 31,335
Likes: 4,451
From: Westminster Maryland
Hi G70,
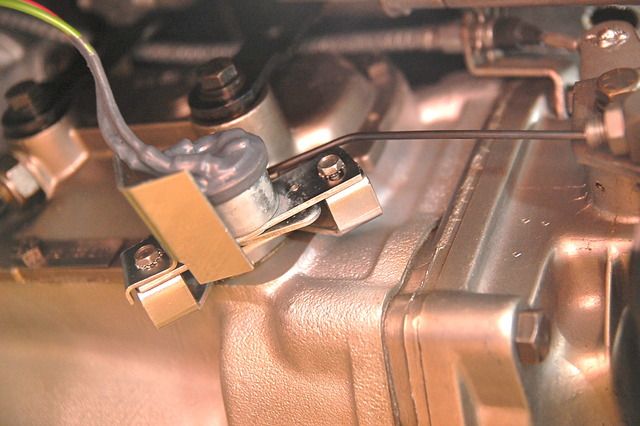
Here's a photo of the switch, bracket and link/rod.
Perhaps it'll be a help to you in making the link/rod.
Besides getting the length and configuration right remember you'll need some clips of some sort to hold it in place.
The original uses 2 very small hair-pin clips that slide into grooves in the link/rod.
Regards,
Alan
Last edited by Alan 71; Nov 22, 2016 at 08:13 AM.
Team Owner
Joined: Jun 2001
Posts: 23,381
Likes: 1,067
From: Virginia USA
Also notice the small hole in the side of the switch bracket. In the AIM it's called an index hole or something like that. You can take a small drill bit or wire and you are suppose to line up the hole in the bracket and the hole on the switch side (short side of the boomerang looking piece) that pivots. Look at the switch and you'll see what I'm talking about.....hopefully.
Anyway. If you make a rod be sure that this indexing of the switch is done. After your rod is installed then you can adjust it like I suggested. It's quick and easy.
Another thread on the subject:
best-way-to-adjust-the-backup-light-switch
Anyway. If you make a rod be sure that this indexing of the switch is done. After your rod is installed then you can adjust it like I suggested. It's quick and easy.
Another thread on the subject:
best-way-to-adjust-the-backup-light-switch
Thread Starter
Instructor
Joined: Sep 2015
Posts: 216
Likes: 16
From: Haverfordwest Pembrokeshire
Thanks for that additional info, I assume with a pin in the holes the switch is on.
Found the electrical connection and in a fit of activity got my gearbox back in place, one tip to note, don't attach anything to the gearbox until it's back in place, had to remove the switch and the rubber mount with it half in and half out all the time lying on my back wondering if it was all going to come down on top of me!
Anyway all good now, next battle is getting the shifter back in place, not much space up there!
Graham
Team Owner
Joined: Jun 2001
Posts: 23,381
Likes: 1,067
From: Virginia USA
Thanks for that additional info, I assume with a pin in the holes the switch is on.
Found the electrical connection and in a fit of activity got my gearbox back in place, one tip to note, don't attach anything to the gearbox until it's back in place, had to remove the switch and the rubber mount with it half in and half out all the time lying on my back wondering if it was all going to come down on top of me!
Anyway all good now, next battle is getting the shifter back in place, not much space up there!
Graham
Found the electrical connection and in a fit of activity got my gearbox back in place, one tip to note, don't attach anything to the gearbox until it's back in place, had to remove the switch and the rubber mount with it half in and half out all the time lying on my back wondering if it was all going to come down on top of me!
Anyway all good now, next battle is getting the shifter back in place, not much space up there!
Graham
Been there, done that.

Good luck
Thread Starter
Instructor
Joined: Sep 2015
Posts: 216
Likes: 16
From: Haverfordwest Pembrokeshire
Got some 1/8" rod to make a linkage, just waiting for some spring clips to arrive for the ends and I'll get it made up and that'll be another job off the list!
Graham
Graham
Team Owner
Joined: Jun 2001
Posts: 23,381
Likes: 1,067
From: Virginia USA

I didn't do this on my backup light linkage but on my choke linkage (which seems to be the same diameter of the backup linkage) I took some .025 SS safety wire (aircraft mechanics toolbox staple) and used that as a "clip" since I didn't have one for the choke. It fits perfectly in the little groove on the end of the rod. My guess is that would work on the backup rod as well.
Last edited by theandies; Nov 29, 2016 at 04:15 PM.
Thread Starter
Instructor
Joined: Sep 2015
Posts: 216
Likes: 16
From: Haverfordwest Pembrokeshire
I didn't do this on my backup light linkage but on my choke linkage (which seems to be the same diameter of the backup linkage) I took some .025 SS safety wire (aircraft mechanics toolbox staple) and used that as a "clip" since I didn't have one for the choke. It fits perfectly in the little groove on the end of the rod. My guess is that would work on the backup rod as well.
Graham
Thread Starter
Instructor
Joined: Sep 2015
Posts: 216
Likes: 16
From: Haverfordwest Pembrokeshire
Graham
Team Owner
Joined: Sep 2006
Posts: 31,335
Likes: 4,451
From: Westminster Maryland
Hi Graham,
You might think about using a file to form a little groove maybe 3/16"-1/4" from the end of the rod you made.
This might help the star washer you're going to use have a little something to 'settle' into.
Regards,
Alan
This sort of clip works well too. It does require a groove for the prong to grab into.
For this clip the groove is only about 1/8" from the end go the rod.
Last edited by Alan 71; Dec 5, 2016 at 11:15 AM.