When you click on links to various merchants on this site and make a purchase, this can result in this site earning a commission. Affiliate programs and affiliations include, but are not limited to, the eBay Partner Network.
Hi pmr,
Will you be using the original heat shielding for the spark-plugs/spark wires, and the original radio interference shielding?
If so, it might be a good idea to take careful note of where it is located, how it's mounted, and how the wires travel through it.
Regards,
Alan
Yes I had the heat shields at least over the distributor and going down on the side of the block. Intend to carefully reuse, I see there is a 4 wire holder at the top of the guide going to the distributor.
If there are lower shields and holders not exactly sure if they are all there....looks like it although I see a tie wrap or two on the lower wires.
I realize this is a bit of a pain of a job due to access so any tips will help!
If you are routing any wires through the motor mount area one trick is to remove the end boot, snake the wire through, and then reinstall the boot. Spraying the wire with silicon will help removing and installing the boot.
Hi pmr
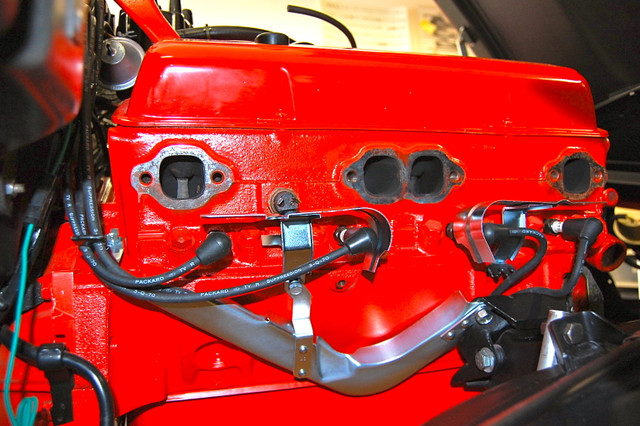
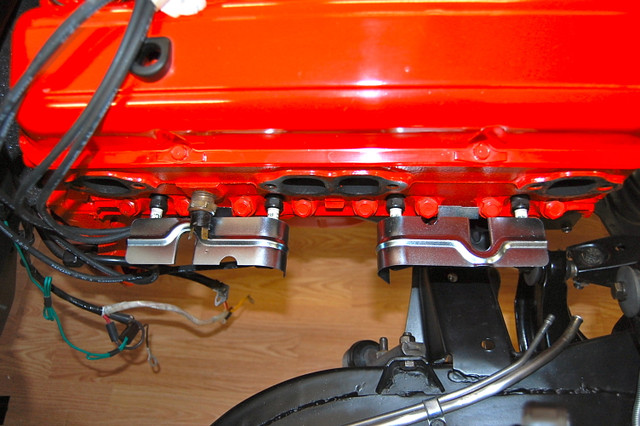
The chromed pieces are part of the radio shielding.
The heat shielding originally consisted of 2 spark plug shields (one for each pair of plugs, and a 'boomerang' shield on each side of the block that the 2 forward wires ran through.
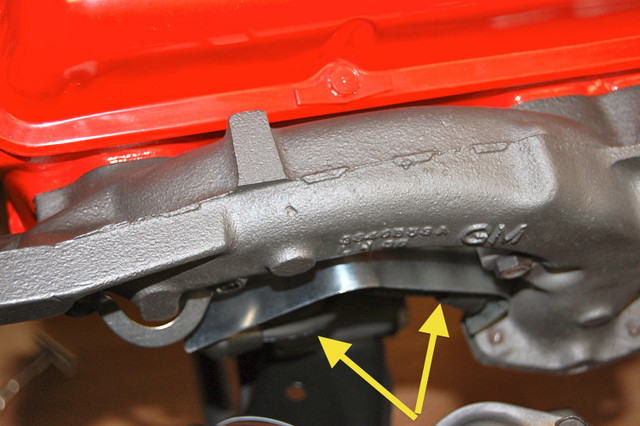
There were also 2 small clips that were under an oil pan bolt and helped route the forward wires.
You really won't know what you have until you get under there.
Regards,
Alan
Right side heat shields, and sparkgplug routing. (Left side is similar)
Hi pmr
The chromed pieces are part of the radio shielding.
The heat shielding originally consisted of 2 spark plug shields (one for each pair of plugs, and a 'boomerang' shield on each side of the block that the 2 forward wires ran through.
There were also 2 small clips that were under an oil pan bolt and helped route the forward wires.
You really won't know what you have until you get under there.
Regards,
Alan
Right side heat shields, and sparkgplug routing. (Left side is similar)
Your photos never cease to amaze me Alan. Is there any part of that car you didn't photograph?
Hi Mike,
Those photos are actually quite recent.
I'm going back and redoing some things and increasing the quality of the plating on parts and fasteners.
This has allowed me to take different photos of things that I remember folks asking about in the past.
Regards,
Alan
Hi pmr,
Routing the wires is quite a chore.
You really need to have access from both above and below.
The forward pair of wires on each side of the engine pass between the side of the block and the engine mount as jim mentions.
Regards,
Alan
I just changed the plugs on my 80 L-48 last weekend. I was able to get 1-7 from the top side using a spark plug socket, a (roughly) 3" extension, and a 1/4" drive ratchet. I had to get #8 from under the car. I used a combo of spark plug socket, swivel, about 2" worth of extension, and a 1/4" drive ratchet. The #8 really sucks. Lifting the car will help quite a bit. Please just remember to add anti-seize to the new plugs before installing them, as did the former owner/mechanic before me. It made removal of the old plugs much, much easier. Also a good idea to add dielectric silicone grease inside the wire boots to seal out water and improve connectivity a bit.
One last thought: spark plug sockets come in different lengths, even for the same-size plug. I had a long socket in my toolbox, but bought a shorter one at O'Reilly Auto when I picked up the AC Delco plugs. I ended up using the shorter socket the entire time since it fit around and between the plugs and exhaust manifold pipes with the least amount of fuss.
The plug change is a bit of a challenge, but you can do it! Let us know how it turns out.
Hi Alan,
I just had to compliment you on the wonderful photos that you post.
If I told my wife that I removed the shields to improve their appearance see would send me to a therapist.
LOL!
Regards, Pete.
I just changed the plugs on my 80 L-48 last weekend. I was able to get 1-7 from the top side using a spark plug socket, a (roughly) 3" extension, and a 1/4" drive ratchet. I had to get #8 from under the car. I used a combo of spark plug socket, swivel, about 2" worth of extension, and a 1/4" drive ratchet. The #8 really sucks. Lifting the car will help quite a bit. Please just remember to add anti-seize to the new plugs before installing them, as did the former owner/mechanic before me. It made removal of the old plugs much, much easier. Also a good idea to add dielectric silicone grease inside the wire boots to seal out water and improve connectivity a bit.
One last thought: spark plug sockets come in different lengths, even for the same-size plug. I had a long socket in my toolbox, but bought a shorter one at O'Reilly Auto when I picked up the AC Delco plugs. I ended up using the shorter socket the entire time since it fit around and between the plugs and exhaust manifold pipes with the least amount of fuss.
The plug change is a bit of a challenge, but you can do it! Let us know how it turns out.
Blaine, can I ask what you gapped plugs at? Any improvement seen? How about removing front wheels to help access?
I removed my wheel and then tried to remove my inner fender cover. Not sure why it couldn't come out, but I was unable to remove the inner fender cover. I took out all of the bolts for it, but it just weren't gonna come out or even budge a bit. Could be age, something done by a former owner, or some other something. I was able to get #8 by going a bit rearward of the tire from the floor of the garage. Inconvenient, but totally doable.
For my L-48, I gapped them to .045. They were pre-gapped AC Delcos, but I checked them with my gauge anyway.
I noticed a bit more smoothness in the engine. If my records I received with the car are correct, they were about four years old and due for a change.
Make sure to save and inspect your old plugs, noting from which cylinder you removed each. I write the cylinder number on them with a Sharpie immediately upon removing the old plugs. The condition of the plugs will tell you much about your engine's health and operating condition. And please don't forget the anti-seize on the plug threads! Someone, and that someone may be you, will thank you for it one day!
Here's a picture of the setup I used to get that pesky #8 out. Note that in addition to the way I described it earlier, I used a 1/4" to 1/2" adapter and a 1/2" ratchet. I forgot about that. I used the larger ratchet to give myself a bit larger handle to twist with. It definitely helped.
Keep us posted so we will know how it turned out for you!
Yikes that is some long reach needed for no 8 plug....thanks for the pic and advice. For some reason my plugs and wires are on back order from Ecklers so will not attempt for a couple of weeks.

 03-07-2017, 09:43 AM