
Removing body shims to lower passenger side
 04-02-2017, 12:02 AM
#1
Drifting

Thread Starter
I got around to measuring my trim height, I guess it's called. My passenger side is around 1/4 inch higher at the top of the wheel openings and I do have body shims I can remove.
If it's a viable solution, what do I have to loosen to be able to get the weight off each mount just enough to slide the passenger side shims out?
Will removing shims affect the front wheel opening height at all? No point of lowering just the rear and the right front is the biggest offender. With the tires I have I should be at 27 1/2.
Driver front is 27 3/4 but right now front passenger is 28 1/16
Right rear is 28 1/16 to 3/16 depending on the day and that's as low as it will go, but there's a 1/4 inch of shims back there. Guess my guy needed a place to put 'em. Looks like there's 2 shims up front. Not sure how many in between.
I've been driving the car for about 3 years now, if that matters.
 04-02-2017, 01:45 AM
#2
Melting Slicks


Member Since: Jul 2010
Location: perth western australia
Posts: 3,100
Received 599 Likes
on
533 Posts

Shims are there to keep the body straight and uniform by compensating for the variation in the c3 frames . The reason 4 were in one spot is your frame is lower there than optimum or maybe say average . Its not a bad thing , there are cars with more shims in one spot .
If your door gaps ,hood gaps and alignment , bumper alignment are all good why would you mess with them by changing shim height ?
I haven't even mentioned rust and body mounts or suspension work.
If your door gaps ,hood gaps and alignment , bumper alignment are all good why would you mess with them by changing shim height ?
I haven't even mentioned rust and body mounts or suspension work.
 04-02-2017, 06:32 AM
#3
Melting Slicks
Look at where the very front of the body mounts to the frame, around the lower core support area. If it's a solid mounting to frame there changing the shims at the #1 and #2 body mounts won't change the 28 1/16 measurements. Our chrome bumpers bolt to brackets that are bolted tight to the frame. T
04-02-2017, 07:58 AM
#4
Team Owner

Member Since: Sep 2006
Location: Westminster Maryland
Posts: 30,173
Likes: 0
Received 2,878 Likes
on
2,515 Posts

Hi Barry,
Originally the frame was 'measured' in a 'jig' at St.louis to compare it to the engineering specifications and dimensions. This was done while the frame was being assembled and was before the body was put on the frame the first time. The shims have to do with the frame� not the body.
The number of shims at each location wasn't changed once the body was placed on the frame�.there was no way to do it.
Ride-height has nothing to do with the body shims; ride-height is determined by the suspension. So that's where you should be looking to making an adjustment��. if needed.
There are VERY few ways to affect the FRONT ride height beyond choosing parts with specifications similar to the originals and ensuring that they are assembled correctly.
The REAR ride-height is a function mainly of the rear spring's specifications and installation. The condition of the rubber bushings on the spring to trailing arm bolts can also have an effect.
Unless the body to frame shims and pucks/bushings are in EXTREMELY deteriorated condition they're not causing what you're seeing.
Regards,
Alan
The frame being 'measured'� note the frame hasn't been turned over yet (they were assembled up-side down), and, the tool used to determine how many shims were required at each body mount location.
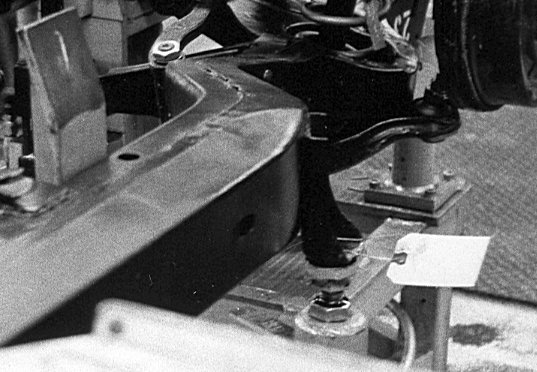
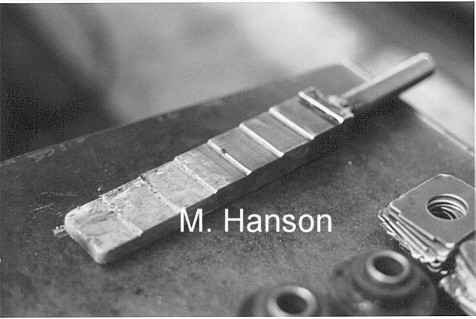
Last edited by Alan 71; 04-02-2017 at 08:00 AM.
04-02-2017, 12:16 PM
#5
Safety Car

you do Not adjust ride height, by removing body shims.
Last edited by 69Vett; 04-02-2017 at 08:58 PM.
04-02-2017, 12:34 PM
#6
Drifting
Thread Starter
Thanks guys. I'm just LOOKING for something to work on. Just got new door windows in and I'm afraid I'm running out of things to do that only requires screwdrivers and wrenches.
04-04-2017, 05:16 PM
#7

You can adjust rear side to side height with the rear spring bolts. Adjusting rear spring bolt will have an effect on the front also. Are both rear heights the same, you only mentioned one rear height.
Last edited by dariopop; 04-04-2017 at 05:23 PM.
04-04-2017, 09:44 PM
#8
Drifting
Thread Starter
I had already lowered the passenger side rear by about 7/16 inch by taking the nut all the way to bottom of the bolt.
With my tires the rear should be 27.75. My right rear is 28 1/16 now. Driver rear was around 27 15/16 and I think I could have lowered it if needed but I tried to raise it using the spring bolt. That actually had little affect raising it. Maybe 1/16. So it's right at 28.
Front heights are the issue now. Fronts should be 27.5 with the tires I have up there but front left is 27 3/4 and front right is 28 1/16.
Last edited by BarryB72; 04-04-2017 at 10:04 PM.
04-05-2017, 09:45 AM
#10
Team Owner
Member Since: Sep 2006
Location: Westminster Maryland
Posts: 30,173
Likes: 0
Received 2,878 Likes
on
2,515 Posts
Hi,
I believe that typically:
tightening the nut on the spring to t-arm bolt (shortening it's effective length) RAISES the ride height.
loosening the nut on the spring to t-arm bolt (increasing it's effective length) LOWERS the ride height.
Regards,
Alan
I believe that typically:
tightening the nut on the spring to t-arm bolt (shortening it's effective length) RAISES the ride height.
loosening the nut on the spring to t-arm bolt (increasing it's effective length) LOWERS the ride height.
Regards,
Alan
04-05-2017, 10:55 AM
#11
Safety Car
"Lowering the rear spring bolt nut actually raises the height. Screwing the nut up lowers it."
wrong... you buy longer bolts to lower the ride height.
or in this case run the nut to the end of the bolt/cotter pin for max. lower ride.
wrong... you buy longer bolts to lower the ride height.
or in this case run the nut to the end of the bolt/cotter pin for max. lower ride.
Last edited by 69Vett; 04-05-2017 at 12:24 PM.
04-06-2017, 11:03 AM
#12
Melting Slicks

Member Since: May 2002
Location: Sulphur LA
Posts: 2,686
Received 105 Likes
on
95 Posts
St. Jude Donor '05-'06,'11,'13-'14,'16,'18,'19

Loosen the core support bolts and use the two large bolts on the bottom of the vacuum can to adjust the height of the front of the car. The holes in these brackets are large to allow adjustment. You may also have to loosen the front crash bar brackets if you need to move it a good distance.
Support the front of the car prior to loosening these bolts,
The 72 should be close to the 77 in design,
Mine was like yours and this is how I adjusted it,
Neal
Support the front of the car prior to loosening these bolts,
The 72 should be close to the 77 in design,
Mine was like yours and this is how I adjusted it,
Neal
07-15-2017, 08:23 PM
#13
Instructor


Loosen the core support bolts and use the two large bolts on the bottom of the vacuum can to adjust the height of the front of the car. The holes in these brackets are large to allow adjustment. You may also have to loosen the front crash bar brackets if you need to move it a good distance.
Support the front of the car prior to loosening these bolts,
The 72 should be close to the 77 in design,
Mine was like yours and this is how I adjusted it,
Neal
Support the front of the car prior to loosening these bolts,
The 72 should be close to the 77 in design,
Mine was like yours and this is how I adjusted it,
Neal
My passenger side is pretty high. Looking under the car at the sway bar you can really tell as the body has a much larger gap between it and the sway bar on the passenger side.