

69 Parking Brake Adjustment

Thread Starter
Racer

Joined: Jan 2017
Posts: 272
Likes: 23
From: McKinney TX
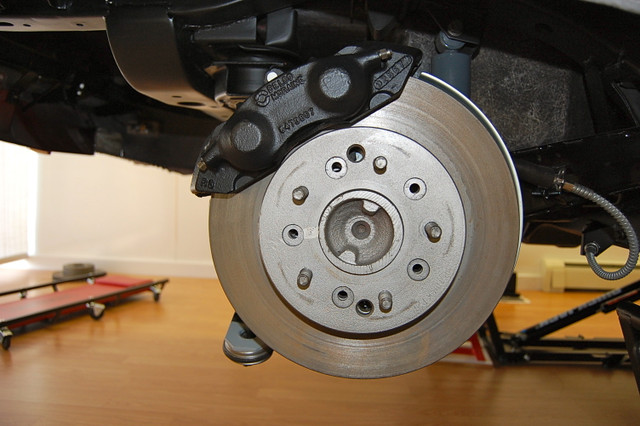
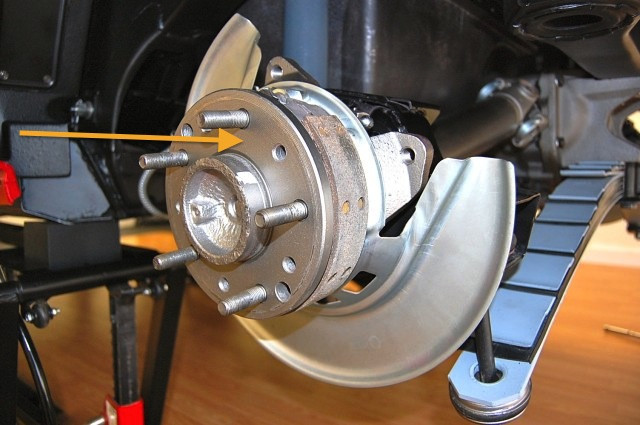
Just got my first C3 (pics to come  )and the parking break pulls the cable but doesn't get tight enough to hold the car. In my service manuals it says to rotate the rear discs until the hole lines up with the adjustment screw. The problem I'm having is that when I rotate the rotor, whatever it is behind the hole moves with the rotor.
I'm a car novice, but fairly handy and a quick learner. Hoping this will be a simple job to get started.
Thanks everyone.
)and the parking break pulls the cable but doesn't get tight enough to hold the car. In my service manuals it says to rotate the rear discs until the hole lines up with the adjustment screw. The problem I'm having is that when I rotate the rotor, whatever it is behind the hole moves with the rotor. I'm a car novice, but fairly handy and a quick learner. Hoping this will be a simple job to get started.
Thanks everyone.
Thread Starter
Racer
Joined: Jan 2017
Posts: 272
Likes: 23
From: McKinney TX
Found this thread: https://www.corvetteforum.com/forums...ustment-3.html
I'm wondering if my brakes are stuck in the "on" position. Guess I need to remove the rotors, but not sure how difficult that will be if the PB is malfunctioning.
I'm wondering if my brakes are stuck in the "on" position. Guess I need to remove the rotors, but not sure how difficult that will be if the PB is malfunctioning.
Team Owner


Joined: Sep 2006
Posts: 31,283
Likes: 4,373
From: Westminster Maryland
Hi H,
You need to position the adjustment hole so it's at the 6 o'clock position on the hub.
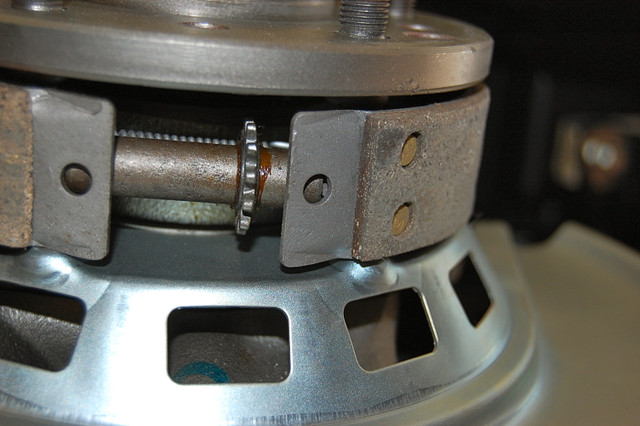
Insert your screwdriver and feel for the notches in the 'star' adjuster.
When the screwdriver is engaged move your hand and end of the screwdriver up, (away from the floor,) this rotates the 'star' and adjusts the shoes.
Tighten until the rotor will not move and then 'back-off' 6-8 notches.
Hope that the shoes aren't 'frozen' in place.
Regards,
Alan
Rotate until hole is at the bottom.
Rotor removed so you can see the shoes and adjuster.
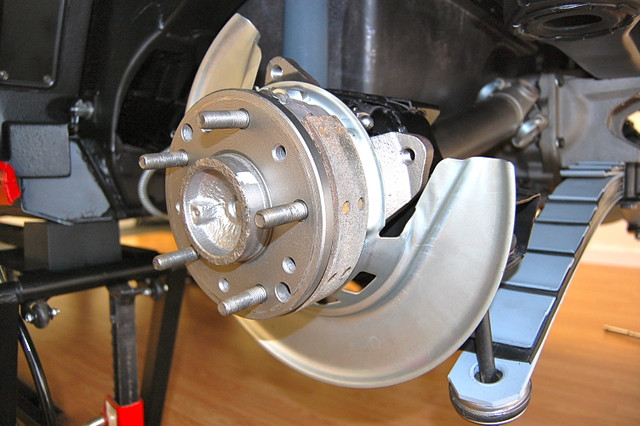
Shoes at top.
Adjustment at bottom… rotate 'star' so it turns counter-clockwise.
You need to position the adjustment hole so it's at the 6 o'clock position on the hub.
Insert your screwdriver and feel for the notches in the 'star' adjuster.
When the screwdriver is engaged move your hand and end of the screwdriver up, (away from the floor,) this rotates the 'star' and adjusts the shoes.
Tighten until the rotor will not move and then 'back-off' 6-8 notches.
Hope that the shoes aren't 'frozen' in place.
Regards,
Alan
Rotate until hole is at the bottom.
Rotor removed so you can see the shoes and adjuster.
Shoes at top.
Adjustment at bottom… rotate 'star' so it turns counter-clockwise.
Last edited by Alan 71; Jun 22, 2017 at 04:47 PM.
Thread Starter
Racer
Joined: Jan 2017
Posts: 272
Likes: 23
From: McKinney TX
Hi H,
You need to position the adjustment hole so it's at the 6 o'clock position on the hub.
Insert your screwdriver and feel for the notches in the 'star' adjuster.
When the screwdriver is engaged move your hand and end of the screwdriver up, (away from the floor,) this rotates the 'star' and adjusts the shoes.
Tighten until the rotor will not move and then 'back-off' 6-8 notches.
Hope that the shoes aren't 'frozen' in place.
Regards,
Alan

Last edited by Hayes69; Jun 22, 2017 at 04:54 PM.
Thread Starter
Racer
Joined: Jan 2017
Posts: 272
Likes: 23
From: McKinney TX
After giving this some more thought, I'm wondering if this rotor was not put back on correctly to line up with the hole behind it. In which case I'll have to remove the calipers and rotor, reinstall the rotor in the correct alignment, then adjust the screw. Does that sound right?
I read in the other thread that I should put the rotor on back the same way I took it off. In this case would it cause any problems to put it back on in such a way that the holes align?
Thanks
I read in the other thread that I should put the rotor on back the same way I took it off. In this case would it cause any problems to put it back on in such a way that the holes align?
Thanks
Team Owner


Joined: May 2001
Posts: 87,375
Likes: 1,593
From: Western NY
After giving this some more thought, I'm wondering if this rotor was not put back on correctly to line up with the hole behind it. In which case I'll have to remove the calipers and rotor, reinstall the rotor in the correct alignment, then adjust the screw. Does that sound right?
I read in the other thread that I should put the rotor on back the same way I took it off. In this case would it cause any problems to put it back on in such a way that the holes align?
Thanks
I read in the other thread that I should put the rotor on back the same way I took it off. In this case would it cause any problems to put it back on in such a way that the holes align?
Thanks
In your case, I'd rotate the rotors in respect to the hubs, so you can access the adjustment hole, then use a dial indicator to check the run-out. Hopefully, you'll be within spec, which I believe is about 0.002-0.005"....or less.
Team Owner
Joined: Sep 2006
Posts: 31,283
Likes: 4,373
From: Westminster Maryland
Hi,
I agree with lf4 that the rotor needs to be pulled off and clocked properly on the hub so the holes line up.
Regards,
Alan
This is the surface being seen in your photo. (concentric machining rings).
The paint stripe on the rotor and hub indicate where the rotor needs to be placed on the hub to minimize run-out.


