
How to: Powdercoat at home
 01-03-2018, 08:48 PM
#1
Burning Brakes

Thread Starter
There have been some inquiries about my powdercoating process and equipment. What follows is something that I wrote years ago when I had first started delving into coating at home.
I will follow with what my current setup is and how it works.
It is important to note that you can begin coating very inexpensively and get pretty decent results but like most things, if you want professional results you need to use professional tools.
Also this is by no means a comprehensive instruction. It assumes a basic level of aptitude with tools and safety equipment.
This is a very simple overview designed just to get someone started to powder coating.
**************************************** **************
FYI I got my entire setup for <$100 including the powder and the curing oven. The only thing not included in that price is an air compressor but even the crappy small pancake compressor for $40 from Harbor Freight would be enough.
You will need:
Powder Coat Gun
latex/nitrile gloves
powder in whatever colors you want
Air compressor
dust mask
safety glasses
oven (toaster oven for small parts, get a used cheapo electric from craigslist for bigger)
Acetone or some other cleaner
lint-free cloths
masking tape at the least, powder coat masking tape is much better.
To start your part to be powder coated needs to conduct electricity (metals) and needs to be able to withstand temperatures of ~400 degrees.
Put your gloves on. DO NOT touch any part of your body after this as the oils from your skin will find their way onto the part and ruin the finish.
I start by thoroughly cleaning the parts with acetone and the lint free cloths. Here are the two rear hub pieces I made yesterday. They are freshly bead-blasted but to be sure always clean your parts thoroughly.

Next take out your powder coat gun. I picked this up on sale with a 20% off coupon from our friends at Harbor Freight for $50. Eastwood makes a great kit for around $100 that supposedly is better. If you want to go better there are numerous kits around in the $500-$1000 range that will get you extremely good results at home.
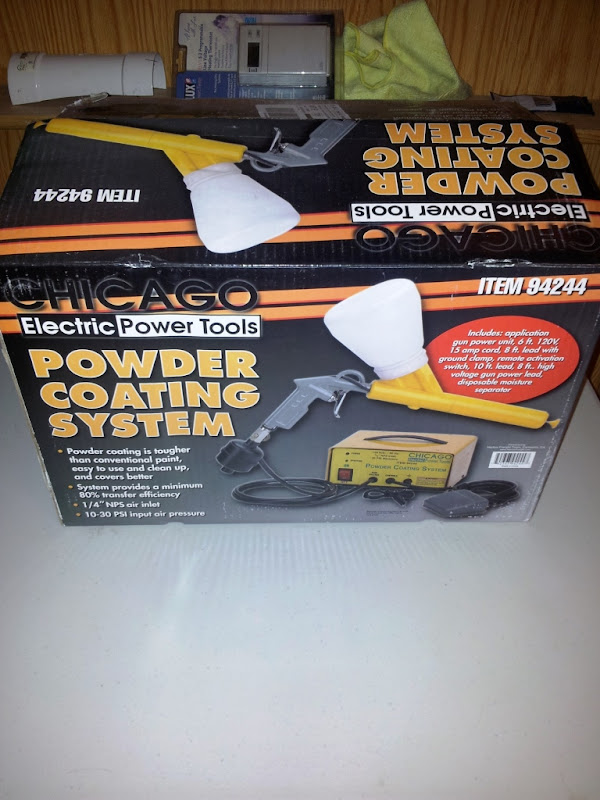

Hook up your air supply to the powder coat gun. You only need between 10-20psi of pressure...very low. It is important that your incoming air is dry so be sure to put a filter inline.
Powder goes in the hopper. In my case I picked up red, yellow, and black from Harbor Freight for $5 each. I wanted to do the outer hub in RSP orange so a little creative mixing of red/yellow got me the results I wanted. This is very cheap powder and really only good for experimenting. There are various places online where you can purchase quality powder. Two places that I use are www.powderbuythepound.com and www.prismaticpowders.com
Put the pedal on the floor, connect the alligator clip to the part and then switch the unit on. Test the spray pattern before you work on your part. If the hopper is too full you can get large glops of powder that will ruin your part. If this happens, dont worry. The powder is easily removed with compressed air, a brush, or with water.
You do not want to get the tip of the gun near the part or you can arc it out (you are dealing with a lot of voltage here). Step on the pedal and hold it down. This puts a negative charge on the part that you are coating. The barrel of the gun has doo-dads in it that gives the powder a positive charge. Much like my wife and I, opposites attract and when you squeeze the trigger, the puff of powder will be sucked onto the part with very little waste.
Repeat this until you have a nice even coat. You do not want to go too heavy, just enough to get the part covered.
It will look dull and, err, like it is covered in powder

Once the part is coated, set the part aside on the rack of your toaster oven. Preheat the over to ~400 degrees (depends on the powder). Once heated, put the part in and wait =).

After a few minutes the dull powder will start to take on a sheen. This is when it is beginning to "flow out" as they say. See how it is beginning to get glossy?

Once this happens, set your timer for 20 minutes. Ding, fries are done...so is your powder coating.
Open the oven and let the part cool. Do not pull the part out as it can dull the finish if it cools too quickly. It only takes about 20-30 minutes for aluminum to cool off this way.
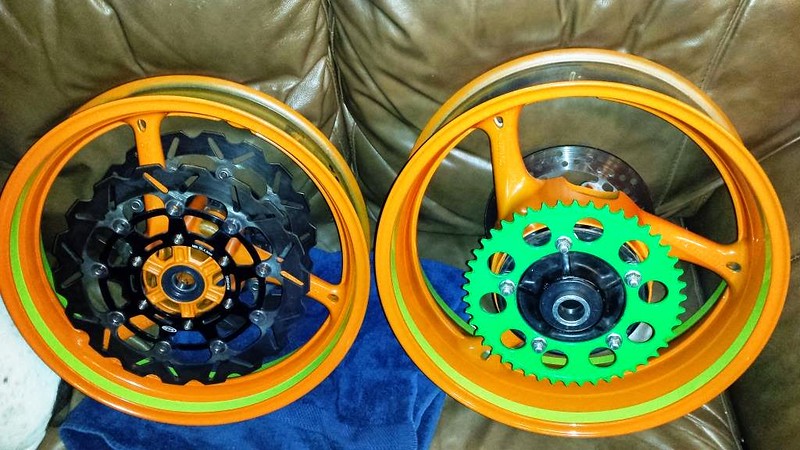
And here we have an ultra shiny, well protected finished part in just around 35 minutes. Another benefit of powder coating is that you can immediately put the part into service. No curing time like conventional paints.
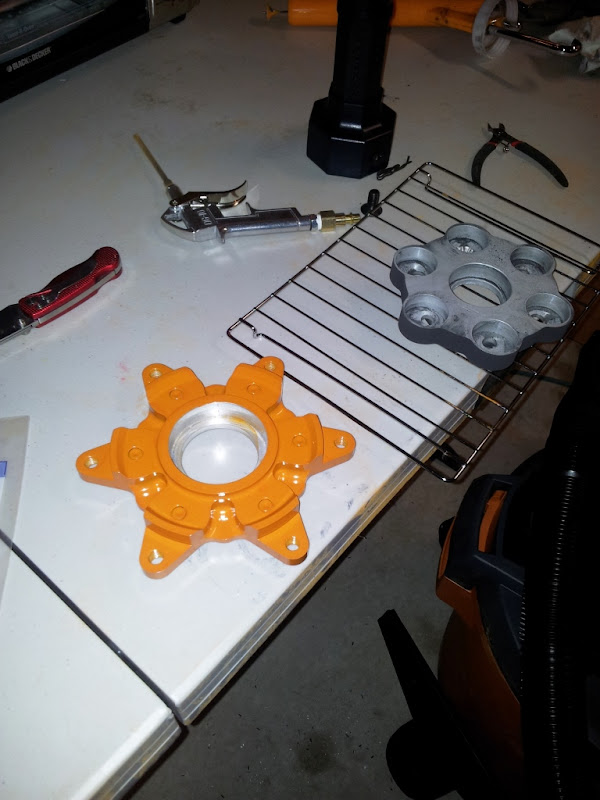

While the sprocket carrier was cooling I did the intermediate carrier in matte black.

Cleanup is super easy. You can either use a shop-vac to pick up any stray powder, blow your clothes off with compressed air, or just wash it off.
In the end you get an excellent, very durable finish for cheap, and it is super easy to boot!
**EDIT**
I missed a few things. Wear your safety glasses. Powder in eyes would suck
Once you use an oven for curing powder, DO NOT use it for food.
Use masking tape to keep the powder off of any surface you dont want coated. As you may have guessed I masked off the inner bearing surface of the sprocket carrier. Pull the tape off BEFORE you put it in the oven. they make special heat-resistant masking tape which you can leave on but I didnt have any handy...
Also I should add that I used approximately $.30 of powder in this experiment. It goes a long way and is VERY cheap so although the startup costs are a little higher than picking up a can of spray paint, you get a much better finish from a system that is completely reusable.
I guess I should add some pics of the finished product.

I will follow with what my current setup is and how it works.
It is important to note that you can begin coating very inexpensively and get pretty decent results but like most things, if you want professional results you need to use professional tools.
Also this is by no means a comprehensive instruction. It assumes a basic level of aptitude with tools and safety equipment.
This is a very simple overview designed just to get someone started to powder coating.
**************************************** **************
FYI I got my entire setup for <$100 including the powder and the curing oven. The only thing not included in that price is an air compressor but even the crappy small pancake compressor for $40 from Harbor Freight would be enough.
You will need:
Powder Coat Gun
latex/nitrile gloves
powder in whatever colors you want
Air compressor
dust mask
safety glasses
oven (toaster oven for small parts, get a used cheapo electric from craigslist for bigger)
Acetone or some other cleaner
lint-free cloths
masking tape at the least, powder coat masking tape is much better.
To start your part to be powder coated needs to conduct electricity (metals) and needs to be able to withstand temperatures of ~400 degrees.
Put your gloves on. DO NOT touch any part of your body after this as the oils from your skin will find their way onto the part and ruin the finish.
I start by thoroughly cleaning the parts with acetone and the lint free cloths. Here are the two rear hub pieces I made yesterday. They are freshly bead-blasted but to be sure always clean your parts thoroughly.
Next take out your powder coat gun. I picked this up on sale with a 20% off coupon from our friends at Harbor Freight for $50. Eastwood makes a great kit for around $100 that supposedly is better. If you want to go better there are numerous kits around in the $500-$1000 range that will get you extremely good results at home.
Hook up your air supply to the powder coat gun. You only need between 10-20psi of pressure...very low. It is important that your incoming air is dry so be sure to put a filter inline.
Powder goes in the hopper. In my case I picked up red, yellow, and black from Harbor Freight for $5 each. I wanted to do the outer hub in RSP orange so a little creative mixing of red/yellow got me the results I wanted. This is very cheap powder and really only good for experimenting. There are various places online where you can purchase quality powder. Two places that I use are www.powderbuythepound.com and www.prismaticpowders.com
Put the pedal on the floor, connect the alligator clip to the part and then switch the unit on. Test the spray pattern before you work on your part. If the hopper is too full you can get large glops of powder that will ruin your part. If this happens, dont worry. The powder is easily removed with compressed air, a brush, or with water.
You do not want to get the tip of the gun near the part or you can arc it out (you are dealing with a lot of voltage here). Step on the pedal and hold it down. This puts a negative charge on the part that you are coating. The barrel of the gun has doo-dads in it that gives the powder a positive charge. Much like my wife and I, opposites attract and when you squeeze the trigger, the puff of powder will be sucked onto the part with very little waste.
Repeat this until you have a nice even coat. You do not want to go too heavy, just enough to get the part covered.
It will look dull and, err, like it is covered in powder
Once the part is coated, set the part aside on the rack of your toaster oven. Preheat the over to ~400 degrees (depends on the powder). Once heated, put the part in and wait =).
After a few minutes the dull powder will start to take on a sheen. This is when it is beginning to "flow out" as they say. See how it is beginning to get glossy?
Once this happens, set your timer for 20 minutes. Ding, fries are done...so is your powder coating.
Open the oven and let the part cool. Do not pull the part out as it can dull the finish if it cools too quickly. It only takes about 20-30 minutes for aluminum to cool off this way.
And here we have an ultra shiny, well protected finished part in just around 35 minutes. Another benefit of powder coating is that you can immediately put the part into service. No curing time like conventional paints.
While the sprocket carrier was cooling I did the intermediate carrier in matte black.
Cleanup is super easy. You can either use a shop-vac to pick up any stray powder, blow your clothes off with compressed air, or just wash it off.
In the end you get an excellent, very durable finish for cheap, and it is super easy to boot!
**EDIT**
I missed a few things. Wear your safety glasses. Powder in eyes would suck
Once you use an oven for curing powder, DO NOT use it for food.
Use masking tape to keep the powder off of any surface you dont want coated. As you may have guessed I masked off the inner bearing surface of the sprocket carrier. Pull the tape off BEFORE you put it in the oven. they make special heat-resistant masking tape which you can leave on but I didnt have any handy...
Also I should add that I used approximately $.30 of powder in this experiment. It goes a long way and is VERY cheap so although the startup costs are a little higher than picking up a can of spray paint, you get a much better finish from a system that is completely reusable.
I guess I should add some pics of the finished product.

The following 10 users liked this post by PainfullySlow:
blue427 (01-04-2018),
Brooklinite (02-26-2018),
jim-81 (01-04-2018),
lionelhutz (01-04-2018),
OldCarBum (05-10-2019),
and 5 others liked this post.

Popular Reply
01-03-2018, 09:01 PM
Burning Brakes
Thread Starter
Now, my current setup has changed significantly since I wrote that original how-to however the principles remain the same.
My current powdercoating rig consists of a Spectracoat ES02-C gun which is approximately $1000, a DIY powdercoating booth that I made myself out of 2x4s, some melamine, grounding wire, and an exhaust fan and house filters.
I have two ovens that I use for coating: a conventional electric house oven (NOT my food oven, this one sits in my garage) and a small toaster oven used for smaller parts.
I have a 60 gallon air compressor however a small compressor is more than enough for this. The inexpensive ~20 gallon ones that run off of 115v are more than sufficient.
I also have a blast cabinet which while not necessary, really makes things a lot easier/faster.
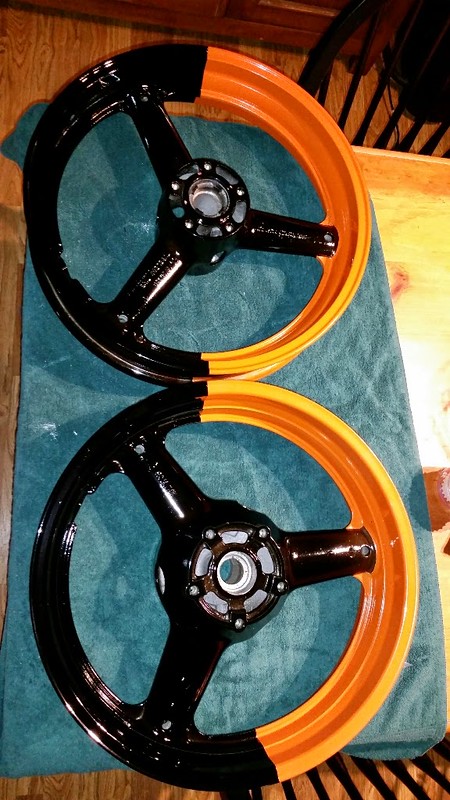
To begin, here are some pictures of items which I coated with that same setup that I posted in the above tutorial. You CAN get very good results with this gun, it just requires good prep (cleaning) and paying attention to how much powder you are laying down.
Too much to show here but I took this bike:
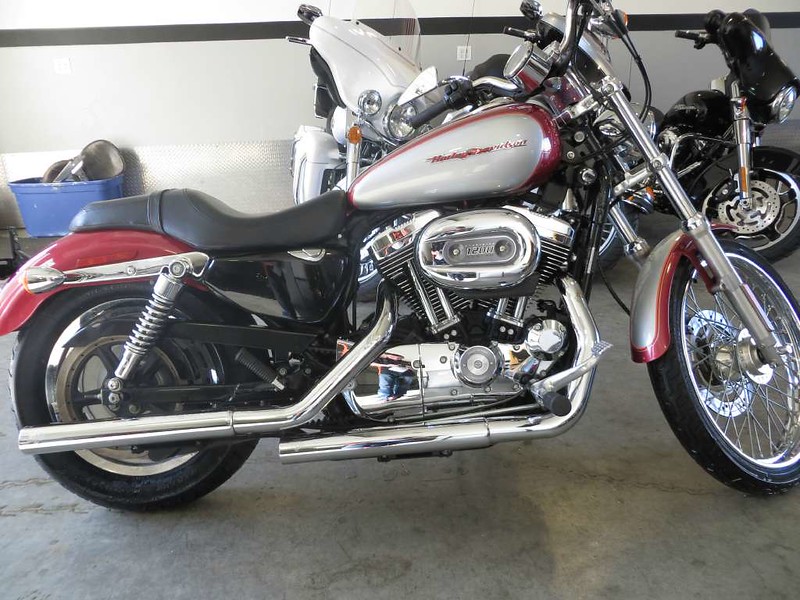
and turned it into this bike. ALL of the chrome was powder coated either black or copper.
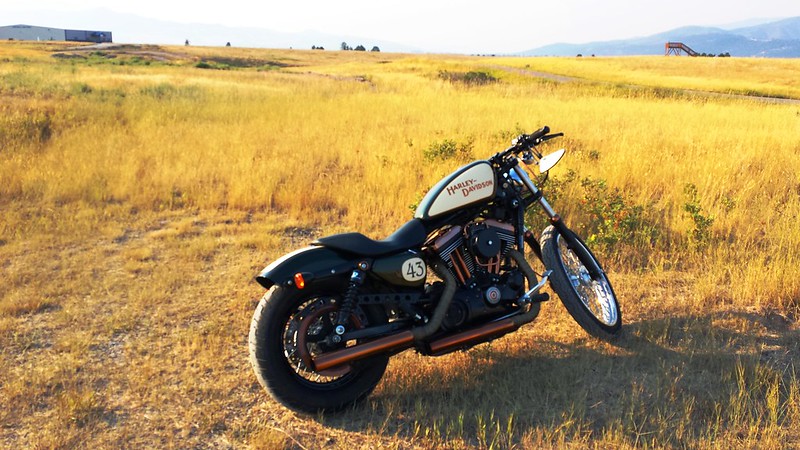
Again, all of the above powder coating was done with the rig shown in the tutorial.
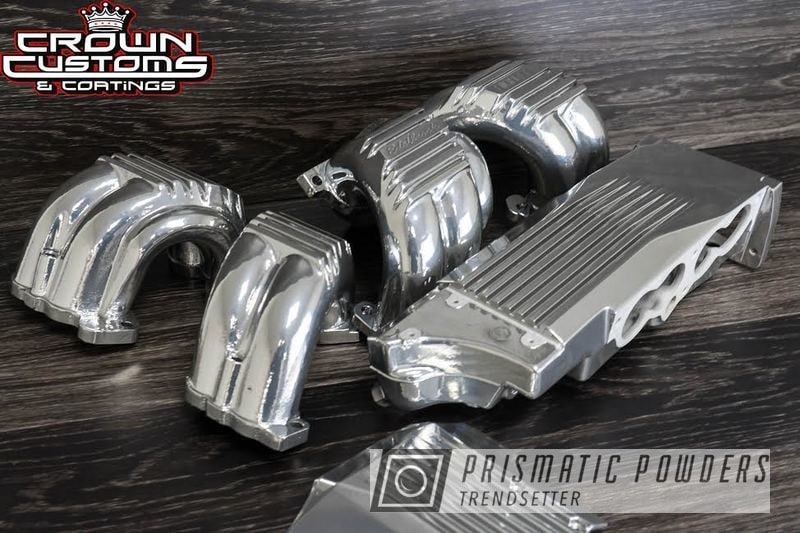
Now, I can achieve more consistent results, quicker, and with less hassle using my current setup. An example of what I can do with my current rig

When I get some time I will try to write down my entire process in detail which will allow the DIYer to get the same results at home.
My current powdercoating rig consists of a Spectracoat ES02-C gun which is approximately $1000, a DIY powdercoating booth that I made myself out of 2x4s, some melamine, grounding wire, and an exhaust fan and house filters.
I have two ovens that I use for coating: a conventional electric house oven (NOT my food oven, this one sits in my garage) and a small toaster oven used for smaller parts.
I have a 60 gallon air compressor however a small compressor is more than enough for this. The inexpensive ~20 gallon ones that run off of 115v are more than sufficient.
I also have a blast cabinet which while not necessary, really makes things a lot easier/faster.
To begin, here are some pictures of items which I coated with that same setup that I posted in the above tutorial. You CAN get very good results with this gun, it just requires good prep (cleaning) and paying attention to how much powder you are laying down.
Too much to show here but I took this bike:
and turned it into this bike. ALL of the chrome was powder coated either black or copper.
Again, all of the above powder coating was done with the rig shown in the tutorial.
Now, I can achieve more consistent results, quicker, and with less hassle using my current setup. An example of what I can do with my current rig
When I get some time I will try to write down my entire process in detail which will allow the DIYer to get the same results at home.
01-03-2018, 09:01 PM
#2
Burning Brakes
Thread Starter
Now, my current setup has changed significantly since I wrote that original how-to however the principles remain the same.
My current powdercoating rig consists of a Spectracoat ES02-C gun which is approximately $1000, a DIY powdercoating booth that I made myself out of 2x4s, some melamine, grounding wire, and an exhaust fan and house filters.
I have two ovens that I use for coating: a conventional electric house oven (NOT my food oven, this one sits in my garage) and a small toaster oven used for smaller parts.
I have a 60 gallon air compressor however a small compressor is more than enough for this. The inexpensive ~20 gallon ones that run off of 115v are more than sufficient.
I also have a blast cabinet which while not necessary, really makes things a lot easier/faster.
To begin, here are some pictures of items which I coated with that same setup that I posted in the above tutorial. You CAN get very good results with this gun, it just requires good prep (cleaning) and paying attention to how much powder you are laying down.
Too much to show here but I took this bike:
and turned it into this bike. ALL of the chrome was powder coated either black or copper.
Again, all of the above powder coating was done with the rig shown in the tutorial.
Now, I can achieve more consistent results, quicker, and with less hassle using my current setup. An example of what I can do with my current rig
When I get some time I will try to write down my entire process in detail which will allow the DIYer to get the same results at home.
The following 7 users liked this post by PainfullySlow:
caskiguy (02-27-2018),
DanStp (03-24-2019),
jim-81 (01-04-2018),
keithl1967 (01-03-2018),
OldCarBum (05-10-2019),
and 2 others liked this post.

 01-04-2018, 07:41 AM
#4
Burning Brakes
Thread Starter
01-04-2018, 08:30 AM
#5
Team Owner

Member Since: Sep 2006
Location: Westminster Maryland
Posts: 30,173
Likes: 0
Received 2,878 Likes
on
2,515 Posts

Hi PS,
Very interesting information and photos of the equipment you use and your RESULTS!!!
Regards,
Alan
As with plating, it seems like the preparation and handling of the part really important.
Very interesting information and photos of the equipment you use and your RESULTS!!!
Regards,
Alan
As with plating, it seems like the preparation and handling of the part really important.
01-04-2018, 09:33 AM
#6
Melting Slicks

 Thanks for sharing all this good info. You are quite an asset to this forum. One question regarding the chrome. I would assume you need to sand it down a little, maybe even just some scotch guard to help the adhesion? would that be the case? Or is the electric charge all that is needed. THanks.
01-04-2018, 09:49 AM
Thanks for sharing all this good info. You are quite an asset to this forum. One question regarding the chrome. I would assume you need to sand it down a little, maybe even just some scotch guard to help the adhesion? would that be the case? Or is the electric charge all that is needed. THanks.
01-04-2018, 09:49 AM
#7
Le Mans Master

Cool stuff. My neighbor has gotten into the powdercoat thing too. He has a sandblast cabinet. (Really handy for me!) He washes the parts to get all the surface stuff, then blasts them, washes again with alcohol/acetone/lacquer thinner or whatever is handy, then bakes them to pull the oils out. He bought an old kitchen oven for $100, we did a bit of modification, removed the stovetop burners and did a bit of wire removal to clean things up. Then added a piece of sheet metal to make a nice worktable.
He's gotten some really excellent results with the whole system.
He's gotten some really excellent results with the whole system.
01-04-2018, 11:14 AM
#8
Hello Painfullyslow,
After reading the first post I was wondering about the taping process. You did a good job of addressing that in the follow up, thank you. After paying a profession to coat jeep parts, my son and I had to deal with the poor taping job that was done, not a lot of fun. We changed powder coaters because of that.
Unfortunately for us, the parts we needed coated would never fit in an oven unless you cut them up. To me, if you have the space, powder coating is well worth the investment.
01-04-2018, 12:56 PM
#9
Burning Brakes
Thread Starter
I really enjoy tinkering and learning new things which is exactly how I got into powder coating in the first place.
Thanks for sharing all this good info. You are quite an asset to this forum. One question regarding the chrome. I would assume you need to sand it down a little, maybe even just some scotch guard to help the adhesion? would that be the case? Or is the electric charge all that is needed. THanks.You do not scuff up the chrome as that would show through in the finish coat so just clean, clean, clean. The translucent powders are not quite as durable as the opaque ones largely because you cannot scuff up the base layer but it is still more than durable enough to use.
Here is a closer view of the rocker cover which was a translucent copper powder applied directly over chrome. The results are really outstanding.

Cool stuff. My neighbor has gotten into the powdercoat thing too. He has a sandblast cabinet. (Really handy for me!) He washes the parts to get all the surface stuff, then blasts them, washes again with alcohol/acetone/lacquer thinner or whatever is handy, then bakes them to pull the oils out. He bought an old kitchen oven for $100, we did a bit of modification, removed the stovetop burners and did a bit of wire removal to clean things up. Then added a piece of sheet metal to make a nice worktable.
He's gotten some really excellent results with the whole system.
He's gotten some really excellent results with the whole system.
Hello Painfullyslow,
After reading the first post I was wondering about the taping process. You did a good job of addressing that in the follow up, thank you. After paying a profession to coat jeep parts, my son and I had to deal with the poor taping job that was done, not a lot of fun. We changed powder coaters because of that.
Unfortunately for us, the parts we needed coated would never fit in an oven unless you cut them up. To me, if you have the space, powder coating is well worth the investment.
After reading the first post I was wondering about the taping process. You did a good job of addressing that in the follow up, thank you. After paying a profession to coat jeep parts, my son and I had to deal with the poor taping job that was done, not a lot of fun. We changed powder coaters because of that.
Unfortunately for us, the parts we needed coated would never fit in an oven unless you cut them up. To me, if you have the space, powder coating is well worth the investment.
While it would not be cost effective for me to do anything as large as a car frame at home, I can at least do the majority of the things that I need. Another perk of having spent some time coating, I know what to look for and ask for in a professional.
For example, I am planning on having my C3 frame powder coated. I will not be able to do it myself but I can do almost all of the prep and base work before hand. I will also be able to hand the shop a bunch of powder to use so that it exactly matches the rest of the components I am building.
As for taping, it really is just like masking off any other part with the caveat that you use special high-temperature masking tape. For things like plugging holes and threaded areas, there are assortments of various sized silicone plugs which you simply wedge in there before coating and they stay in until the part comes out of the oven. They are reusable and worth their weight in gold.
I have also learned a few masking tricks over the years which has really helped speed things up. One such trick is when masking larger areas you can use tinfoil to mask and just seal the edges with tape.
Another material is used in composite making for vacuum bagging. Basically a thin, flexible plastic (think a little thicker than a garbage bag) that is able to resist the 400 degree temps so it can be used to mask as well.
I hope this helps out. I am still writing up a detailed exact process that I follow and hope to have it later today.
 02-25-2018, 04:08 PM
#11
Burning Brakes
Thread Starter
I have gotten a bunch of requests for details on my powder coating booth which I suppose is a good thing because apparently I forgot to finish writing down my process as well.
So, first things first. The booth.
It is a simple box frame on casters, lined with 1/8" melamine, and cut to fit two household filters. The back of the filters is also enclosed, forming a plenum. More on that in a bit.
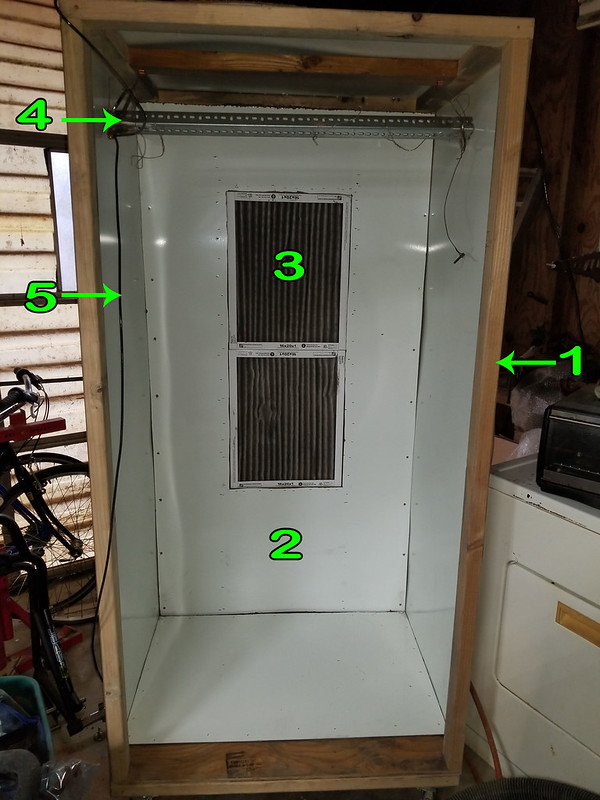
1) 2x4 construction. Mine is 3'x3'x6' but really you could make it any size that you wanted. I have casters down the bottom to make it easy to move it around the shop. There are extra 2x4 supports in the top and bottom for rigidity as well as two extra studs in the back wall where the filters go. More on that in a bit.
2) The entire frame is lined with melamine. The reason is simple: it wipes down very easily and powder sticks to it so it catches any stray powder not drawn into the filters and then you vacuum and/or wipe it clean afterwards.
3) These are simple household filters and they do a pretty good job grabbing all the stray powder. These are 16x20, and I stacked two. They are held in with duct tape and the back is held my simple angle brackets screwed into the studs.
4) The grounding bar. This is critical in a cabinet *IF* you are using a system which requires an external ground. Most of the higher end ones do however simpler systems such as the harbor freight and eastwood home systems that part grounds directly to the powder coating unit via an alligator clip.
In any case, you will need something to hang your parts off of while coating which in this case is simple angle iron suspended from the top 2x4 with wire. Be sure to use mild steel and NOT stainless. Mild is magnetic and conducts electricity a lot better.
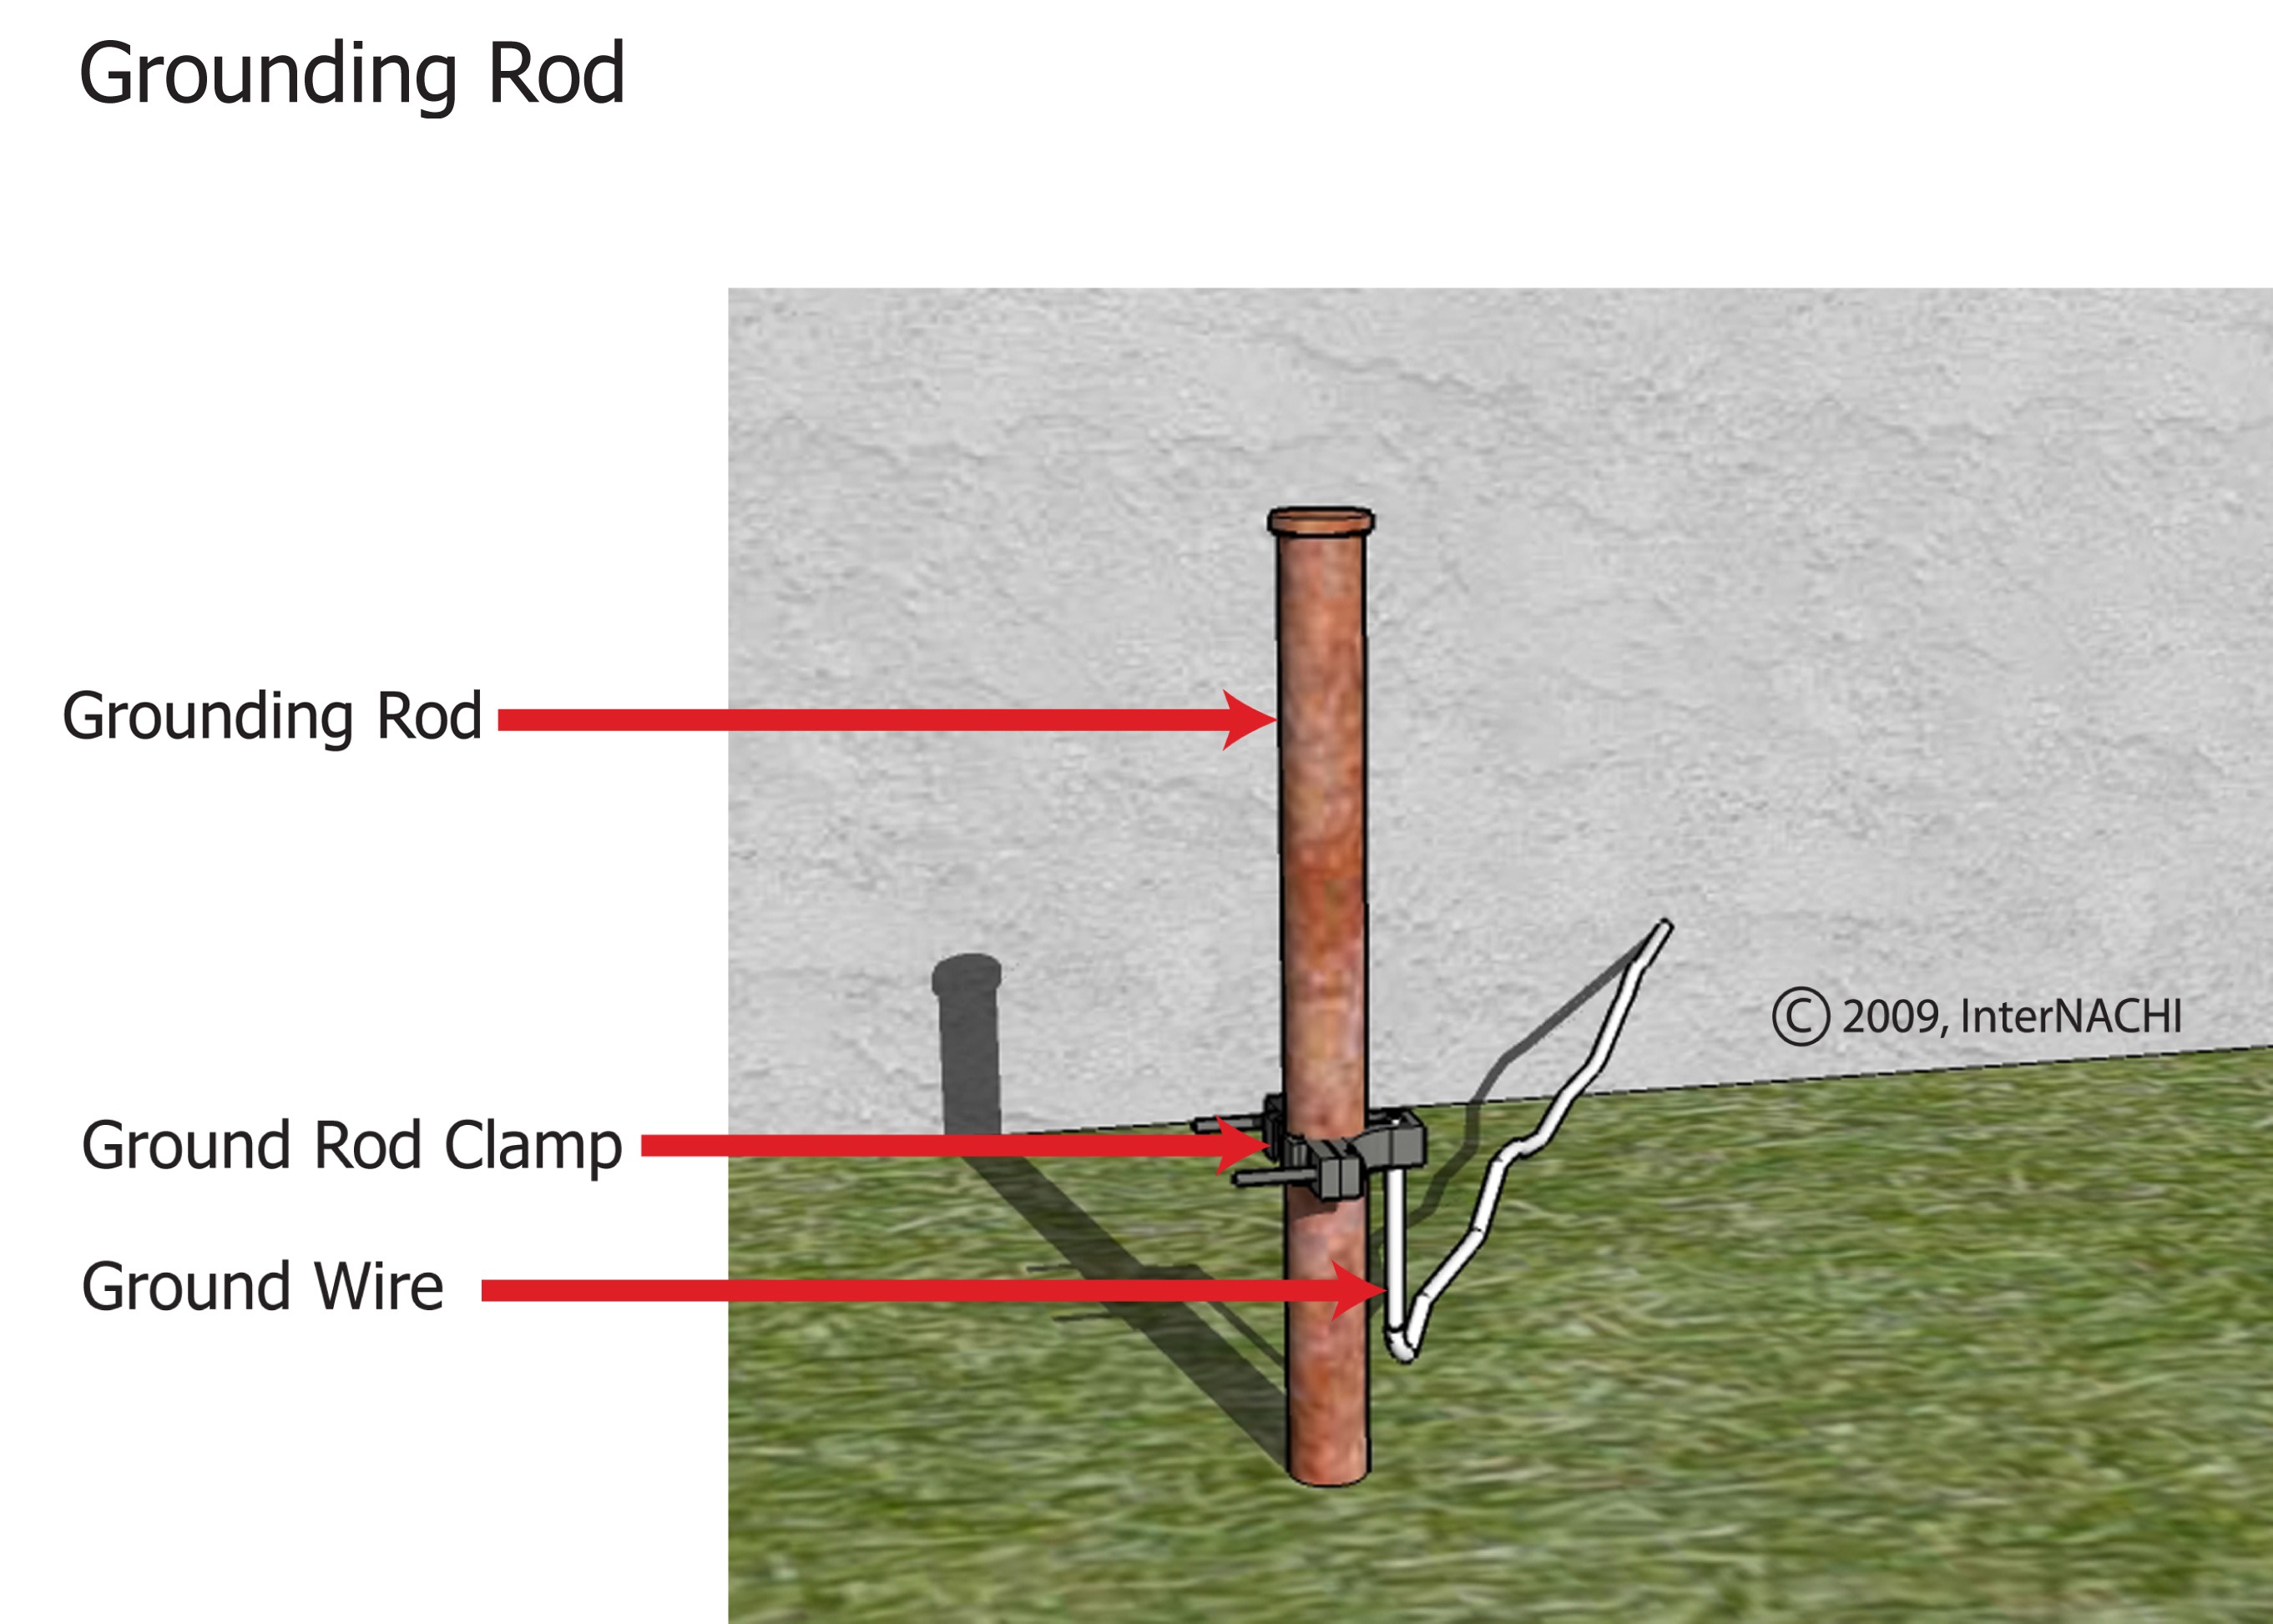
5) The grounding wire. In powdercoating the ground is critical; the better the ground, the better the powder will stick to the part. This is an 8ga wire that I run directly to a copper grounding rod driven into the earth right outside of my garage. You can pick up those grounding rods (and the clamp to attach the wire to it) at any home improvement store for about $25. It is basically an 8' copper coated rod that you drive into the earth with a sledge hammer.
The parts are hung off of the grounding bar either with wire or metal hangers which subsequently grounds the part.
The back side of the unit shows the plenum.
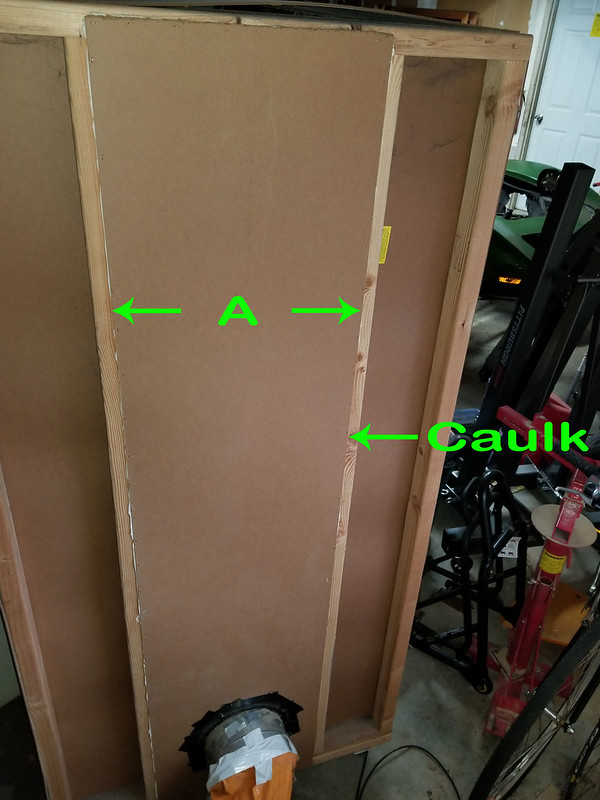
You will notice that there are two extra studs in the back which are used to form the plenum. Dimension "A" is the width of your filters. I used 16" wide filters so those studs are 16" apart. The plenum is finished with more melamine (the white side facing inwards) which is caulked and then stapled/nailed to the studs. You want the plenum to be airtight.
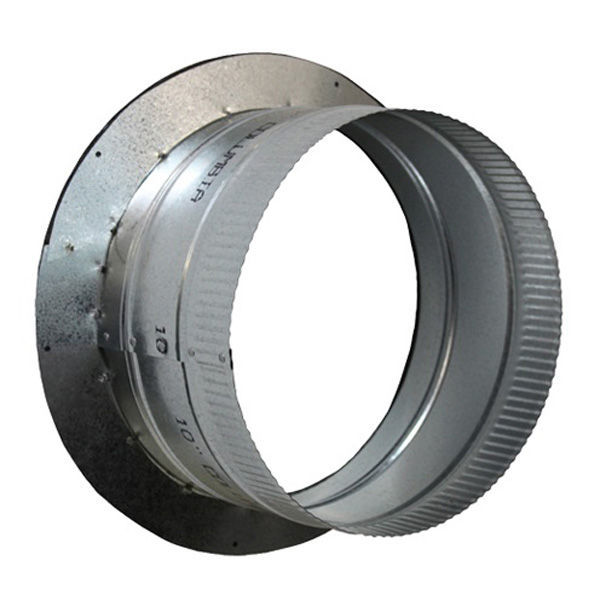
Down the bottom you will see where the exhaust fan connects. This is a simple duct flange in the size that matches whatever exhaust fan you are using. Mine is a 10" hose so I used a 10" duct flange. It looks like this
Simply cut a hole in the bottom of your plenum and attach the flange. Be sure to seal it with caulk as well.
This is my exhaust fan
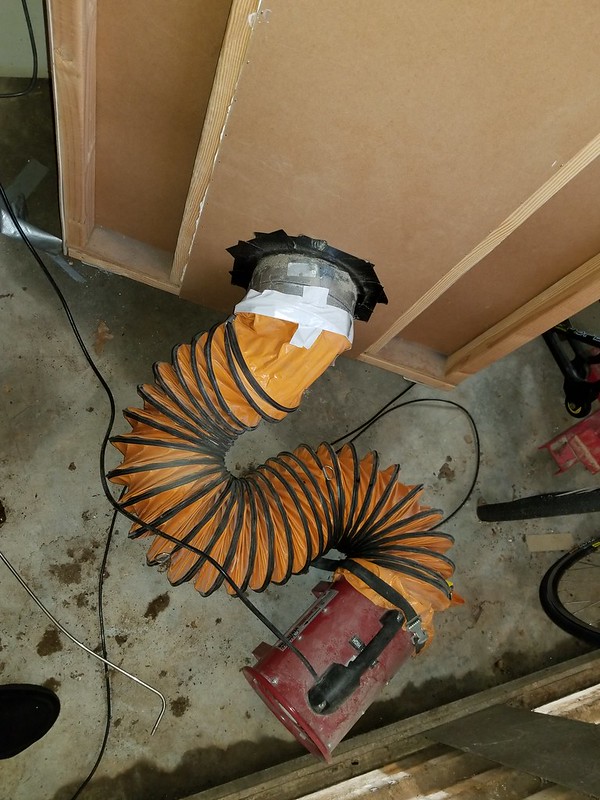
It is a 10" that pulls around 2500 CFM which is more than enough to pull light powder out of the air. There are various models like this to be found on Amazon, Ebay, and at your home improvement stores.
So, first things first. The booth.
It is a simple box frame on casters, lined with 1/8" melamine, and cut to fit two household filters. The back of the filters is also enclosed, forming a plenum. More on that in a bit.
1) 2x4 construction. Mine is 3'x3'x6' but really you could make it any size that you wanted. I have casters down the bottom to make it easy to move it around the shop. There are extra 2x4 supports in the top and bottom for rigidity as well as two extra studs in the back wall where the filters go. More on that in a bit.
2) The entire frame is lined with melamine. The reason is simple: it wipes down very easily and powder sticks to it so it catches any stray powder not drawn into the filters and then you vacuum and/or wipe it clean afterwards.
3) These are simple household filters and they do a pretty good job grabbing all the stray powder. These are 16x20, and I stacked two. They are held in with duct tape and the back is held my simple angle brackets screwed into the studs.
4) The grounding bar. This is critical in a cabinet *IF* you are using a system which requires an external ground. Most of the higher end ones do however simpler systems such as the harbor freight and eastwood home systems that part grounds directly to the powder coating unit via an alligator clip.
In any case, you will need something to hang your parts off of while coating which in this case is simple angle iron suspended from the top 2x4 with wire. Be sure to use mild steel and NOT stainless. Mild is magnetic and conducts electricity a lot better.
5) The grounding wire. In powdercoating the ground is critical; the better the ground, the better the powder will stick to the part. This is an 8ga wire that I run directly to a copper grounding rod driven into the earth right outside of my garage. You can pick up those grounding rods (and the clamp to attach the wire to it) at any home improvement store for about $25. It is basically an 8' copper coated rod that you drive into the earth with a sledge hammer.
The parts are hung off of the grounding bar either with wire or metal hangers which subsequently grounds the part.
The back side of the unit shows the plenum.
You will notice that there are two extra studs in the back which are used to form the plenum. Dimension "A" is the width of your filters. I used 16" wide filters so those studs are 16" apart. The plenum is finished with more melamine (the white side facing inwards) which is caulked and then stapled/nailed to the studs. You want the plenum to be airtight.
Down the bottom you will see where the exhaust fan connects. This is a simple duct flange in the size that matches whatever exhaust fan you are using. Mine is a 10" hose so I used a 10" duct flange. It looks like this
Simply cut a hole in the bottom of your plenum and attach the flange. Be sure to seal it with caulk as well.
This is my exhaust fan
It is a 10" that pulls around 2500 CFM which is more than enough to pull light powder out of the air. There are various models like this to be found on Amazon, Ebay, and at your home improvement stores.
The following users liked this post:
Rodnok1 (03-28-2019)
02-25-2018, 05:12 PM
#12
Burning Brakes
Thread Starter
The Process
Before we begin it is important to always wear your PPE/safety equipment. A dust mask at the least, a full on filtered breathing mask is better. Also nitrile/latex gloves are essential as any grease or oil, including the oils in your skin, can make the finish less than perfect.
1) Degreasing - The method depends on the part and how dirty/contaminated it is. Something which is fairly clean I will usually give it a quick wipe down with Acetone while parts which are dirtier (engine parts, etc) get a bath in a solution of simple green/water and then blown dry with compressed air.
2) Surface Preparation - Again this depends on the material of the part and the condition. Many parts at this point will go off to my blast cabinet for media blasting. Since I always get asked: I use 80 grit black aluminum oxide for most things. Glass beads for 'delicate' aluminum parts.
I blast to not only remove any remaining paint, dirt, or rust but also to profile the part; giving the powder a textured surface to 'bite' into. This ensures the best results. Keep in mind that you will still receive a smooth powder coated surface. The texture is very minor to the naked eye.
3) Degassing - This is an optional step which I only do on parts that are very smooth and need an absolutely flawless 'showcar' finish. I put the parts in the curing oven at 300 degrees for about 20 minutes. This forces any remaining embedded grease or impurities out of the part. It is almost never necessary but on things like polished wheels that are getting coated I find that it helps the final finish.
4) Final Cleaning - Again this depends on the part. Ferrous parts (steel, iron, anything that rusts) I use a product from Eastwood called 'Afterblast' which is a cleaner used to remove those final imperfections but has the added bonus of phosphoric acid in it. This causes a chemical reaction with ferrous metals, turning the surface into a thin layer of 'iron phosphate' which is very resistant to rust. Think of it as 'primer' to prevent rust if that helps.
On aluminum or other non-ferrous parts I simply wipe the part down with acetone.
In either method, be sure to use lint-free cloths to do the wiping and also turn the rag often so as to remove any remaining imperfections instead of smearing it around the part.
Parts coming out of the blast cabinet
Parts after being coated with Afterblast. Note the uniform grey appearance. That is the thin layer of iron phosphate which will ensure that the part remains free of rust.
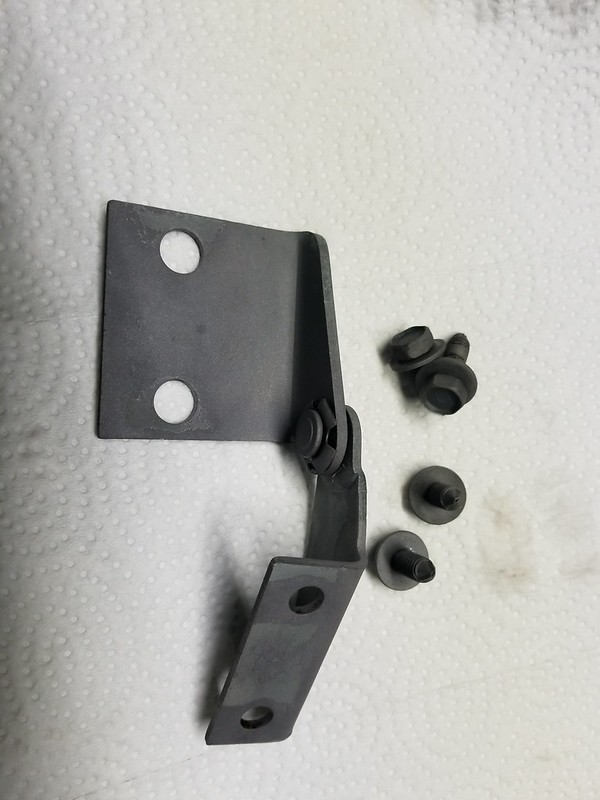
5) Masking - Any area of the part which you do not want coated needs to be masked off. There are special high-temperature masking tapes which are used or you can also use aluminum tape. You can also use aluminum foil to mask off an area as well. There are special silicone plugs which can be purchased to block off passages, bolt holes, etc that you do not want coated. Often my masking methods involve a combination of all of these techniques.
Masking off this master cylinder for powder coating. This has aluminum tape over the top, aluminum foil covering the rear and secured with tape, and the brake lines are plugged with pipe fittings.
6) Hanging the part - Most of the time I hang the part with metal hangers made specifically for powder coating but any conductive material will work. I have used steel and copper wire with equally good results. Keep in mind that anywhere that this hanger is will not be coated with powder so it is best to loop the hook through a bolt hole or someplace which will be covered up.
You need to make sure that however you are hanging this part will also fit into your coating oven. It can't hang down so low that it contacts the bottom.
Various kinds of hooks for powder coating

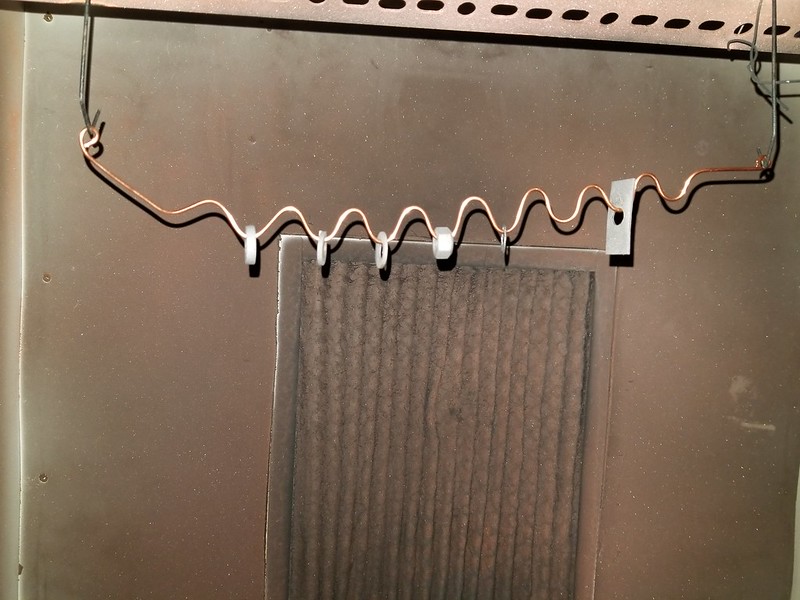
Sometimes you have to get creative. To do small parts like nuts and washers I came up with this method: it is a piece of grounding wire out of regular household romex that I had laying around. I bent some waves into it to keep the parts separated and coated them this way.
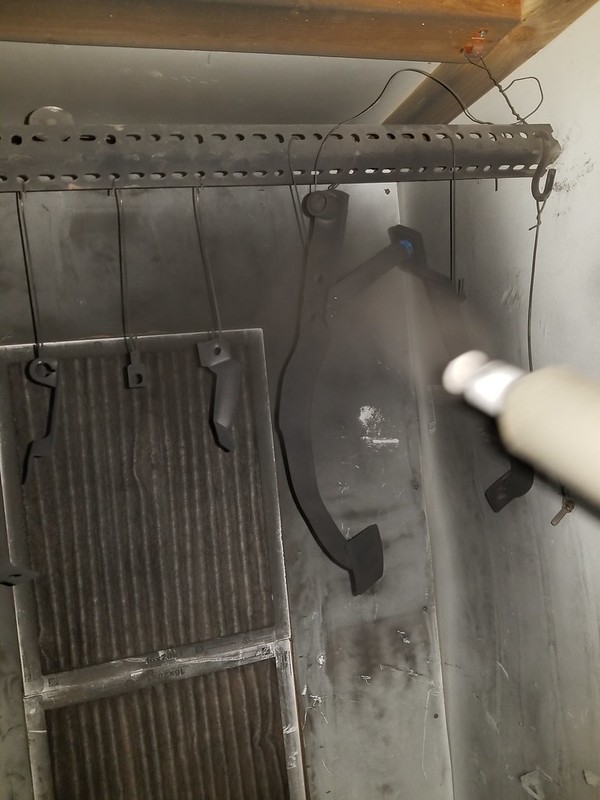
7) Powder Coating - This is the time to apply your powder. The part must be grounded; either through the grounding bar or via a wire directly connected to your powder coating rig. Air pressure and settings will vary from different pieces of equipment but if your coating rig has a setting for kilovolts, you will generally want to get it up into about the 70% of its range for flat parts. The more angles and 'nooks and crannies' on the part you may have to turn the KV down a bit.
Basically KV is how 'sticky' the part becomes to the powder. The higher it is, the faster the powder is drawn to the part. This is great when working on flat pieces but if you have to put powder into the inside of a 90 degree angle, a high KV will draw all the powder to the flat areas and leave the inside bare. This is known as the 'farraday effect'. Turning down the KV will allow the powder to travel a bit further before being sucked onto the part.
Be sure to turn the part and coat every area on it equally. A trick is to use an LED flashlight (it has to be LED, don't ask me why) on the part. Any area which does not have enough powder shows up very easily under this light.
You can see the powder cloud coming out of my coating gun in this picture.
8) Baking/curing - Different powders cure at different temperatures and for different cure times. Basically wherever you purchase your powder from will have a cure schedule for it. Most of the stuff I use is ~15 minutes at 400 degrees part temperature.
The surface of the part needs to reach 400 degrees before the timer starts so the thickness and material will affect your cure time however for most parts this is not extremely sensitive. Light parts (aluminum, thin steel/iron, etc) I usually put in for 20 minutes, heavier/thicker parts for 25.
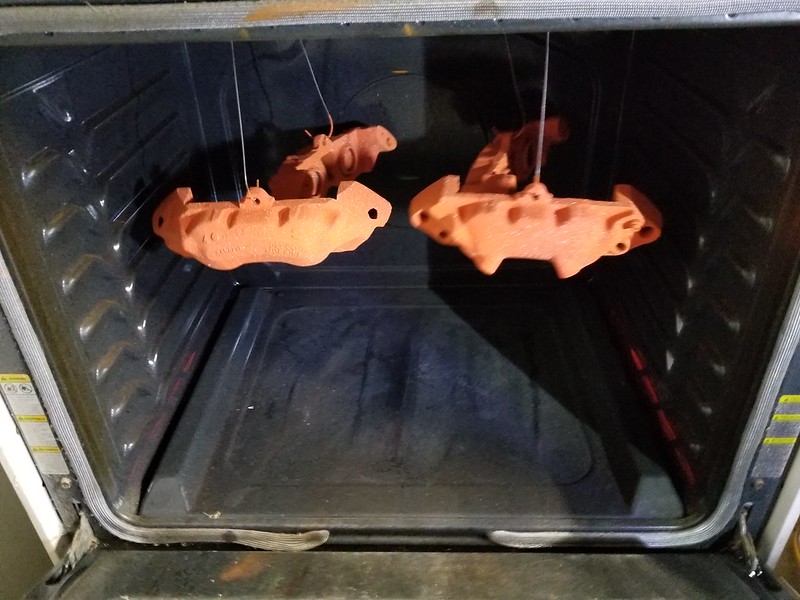
These calipers are coated and going into the oven.
9) Cooling - Once the cure cycle is complete, shut your oven off, crack the door open a bit and walk away. You want the part to cool down naturally. If you force the part to cool quickly it can dull the final finish. In really cold temps (like we have been having here) I leave the oven door closed and let the entire oven cool down that way. It takes longer but guarantees a superior finish.
That is it. Hopefully people have gotten something out of it and feel free to ask any questions that you may have.
Before we begin it is important to always wear your PPE/safety equipment. A dust mask at the least, a full on filtered breathing mask is better. Also nitrile/latex gloves are essential as any grease or oil, including the oils in your skin, can make the finish less than perfect.
1) Degreasing - The method depends on the part and how dirty/contaminated it is. Something which is fairly clean I will usually give it a quick wipe down with Acetone while parts which are dirtier (engine parts, etc) get a bath in a solution of simple green/water and then blown dry with compressed air.
2) Surface Preparation - Again this depends on the material of the part and the condition. Many parts at this point will go off to my blast cabinet for media blasting. Since I always get asked: I use 80 grit black aluminum oxide for most things. Glass beads for 'delicate' aluminum parts.
I blast to not only remove any remaining paint, dirt, or rust but also to profile the part; giving the powder a textured surface to 'bite' into. This ensures the best results. Keep in mind that you will still receive a smooth powder coated surface. The texture is very minor to the naked eye.
3) Degassing - This is an optional step which I only do on parts that are very smooth and need an absolutely flawless 'showcar' finish. I put the parts in the curing oven at 300 degrees for about 20 minutes. This forces any remaining embedded grease or impurities out of the part. It is almost never necessary but on things like polished wheels that are getting coated I find that it helps the final finish.
4) Final Cleaning - Again this depends on the part. Ferrous parts (steel, iron, anything that rusts) I use a product from Eastwood called 'Afterblast' which is a cleaner used to remove those final imperfections but has the added bonus of phosphoric acid in it. This causes a chemical reaction with ferrous metals, turning the surface into a thin layer of 'iron phosphate' which is very resistant to rust. Think of it as 'primer' to prevent rust if that helps.
On aluminum or other non-ferrous parts I simply wipe the part down with acetone.
In either method, be sure to use lint-free cloths to do the wiping and also turn the rag often so as to remove any remaining imperfections instead of smearing it around the part.
Parts coming out of the blast cabinet
Parts after being coated with Afterblast. Note the uniform grey appearance. That is the thin layer of iron phosphate which will ensure that the part remains free of rust.
5) Masking - Any area of the part which you do not want coated needs to be masked off. There are special high-temperature masking tapes which are used or you can also use aluminum tape. You can also use aluminum foil to mask off an area as well. There are special silicone plugs which can be purchased to block off passages, bolt holes, etc that you do not want coated. Often my masking methods involve a combination of all of these techniques.
Masking off this master cylinder for powder coating. This has aluminum tape over the top, aluminum foil covering the rear and secured with tape, and the brake lines are plugged with pipe fittings.
6) Hanging the part - Most of the time I hang the part with metal hangers made specifically for powder coating but any conductive material will work. I have used steel and copper wire with equally good results. Keep in mind that anywhere that this hanger is will not be coated with powder so it is best to loop the hook through a bolt hole or someplace which will be covered up.
You need to make sure that however you are hanging this part will also fit into your coating oven. It can't hang down so low that it contacts the bottom.
Various kinds of hooks for powder coating
Sometimes you have to get creative. To do small parts like nuts and washers I came up with this method: it is a piece of grounding wire out of regular household romex that I had laying around. I bent some waves into it to keep the parts separated and coated them this way.
7) Powder Coating - This is the time to apply your powder. The part must be grounded; either through the grounding bar or via a wire directly connected to your powder coating rig. Air pressure and settings will vary from different pieces of equipment but if your coating rig has a setting for kilovolts, you will generally want to get it up into about the 70% of its range for flat parts. The more angles and 'nooks and crannies' on the part you may have to turn the KV down a bit.
Basically KV is how 'sticky' the part becomes to the powder. The higher it is, the faster the powder is drawn to the part. This is great when working on flat pieces but if you have to put powder into the inside of a 90 degree angle, a high KV will draw all the powder to the flat areas and leave the inside bare. This is known as the 'farraday effect'. Turning down the KV will allow the powder to travel a bit further before being sucked onto the part.
Be sure to turn the part and coat every area on it equally. A trick is to use an LED flashlight (it has to be LED, don't ask me why) on the part. Any area which does not have enough powder shows up very easily under this light.
You can see the powder cloud coming out of my coating gun in this picture.
8) Baking/curing - Different powders cure at different temperatures and for different cure times. Basically wherever you purchase your powder from will have a cure schedule for it. Most of the stuff I use is ~15 minutes at 400 degrees part temperature.
The surface of the part needs to reach 400 degrees before the timer starts so the thickness and material will affect your cure time however for most parts this is not extremely sensitive. Light parts (aluminum, thin steel/iron, etc) I usually put in for 20 minutes, heavier/thicker parts for 25.
These calipers are coated and going into the oven.
9) Cooling - Once the cure cycle is complete, shut your oven off, crack the door open a bit and walk away. You want the part to cool down naturally. If you force the part to cool quickly it can dull the final finish. In really cold temps (like we have been having here) I leave the oven door closed and let the entire oven cool down that way. It takes longer but guarantees a superior finish.
That is it. Hopefully people have gotten something out of it and feel free to ask any questions that you may have.
Last edited by PainfullySlow; 02-25-2018 at 05:31 PM.
02-25-2018, 09:27 PM
#14
Burning Brakes
Thread Starter
When I first started I checked every piece for temperature but you can quickly get a feel for the process. I spot check myself every once in a while or if I am doing a piece that is a different size or material than I have used before but most times I have a pretty good idea of when it is coming up to temperature.
You can actually see the powder get shiny and flow out which is a good indicator that you are getting close to the proper part temperature.
 03-23-2019, 09:12 PM
#16
I was planning to paint the center console metal plate on my 68 but this looks more interesting. Does that sound "doable" for powder coating?
03-24-2019, 08:34 AM
#17
Le Mans Master
Member Since: May 2003
Location: Fernandina Beach FL
Posts: 8,481
Received 3,220 Likes
on
1,732 Posts
2023 Restomod of the Year finalist
2020 C3 of the Year Winner - Modified

The other thing I have found- using Harbor Freight's media versus Summit Racing's- The Summit's although $15 more covers soooo much better - it's worth it!!!
Here's my hood hardware- "kromezone" powdercoat from Summit

The following 2 users liked this post by Richard454:
carriljc (03-24-2019),
PainfullySlow (04-28-2019)
03-24-2019, 08:59 AM
#18
Thanks Richard454 - Never considered that it was pot metal. I'd hate to ruin that. I don't mind the 15 bucks - I just like the ability to go get stuff without waiting 
That "kromezone" stuff looks cool. Wonder if I could use it on the rear vents for astro ventilation? But I think they're pot metal also?
That "kromezone" stuff looks cool. Wonder if I could use it on the rear vents for astro ventilation? But I think they're pot metal also?
Last edited by carriljc; 03-24-2019 at 09:07 AM.
04-28-2019, 10:44 PM
#19
Burning Brakes
Thread Starter
Thanks Richard454 - Never considered that it was pot metal. I'd hate to ruin that. I don't mind the 15 bucks - I just like the ability to go get stuff without waiting
That "kromezone" stuff looks cool. Wonder if I could use it on the rear vents for astro ventilation? But I think they're pot metal also?
That "kromezone" stuff looks cool. Wonder if I could use it on the rear vents for astro ventilation? But I think they're pot metal also?
As for chrome powder, nothing is exactly like chrome however some are fairly close. I personally use SuperChrome from Prismatic Powders...
 04-29-2019, 01:42 PM
#20
Racer

Is there any risk to aluminum wheels (Torque Thrust II's) if I powder coat them? Does the heating process make them weaker or brittle?
I'd like to coat mine black. Thank you for the great write up!!
I'd like to coat mine black. Thank you for the great write up!!