


Emergency brake

Thread Starter
Advanced

Joined: Oct 2015
Posts: 99
Likes: 1
From: Morristown/ Knoxville area Tennessee
My emergency brake is loose when I engage it and I believe it needs adjustment. How difficult and time consuming is it t do this E.B. adjustment? Have new trailing arms rear rotors and brakes just a year old. I believe the brakes were pre set in the rear, but need to adjust the brake handle
Last edited by flyguy767; Apr 18, 2018 at 08:23 AM.
Race Director


Joined: Mar 2017
Posts: 11,978
Likes: 4,528
From: Virginia
If you follow the instructions in the shop manual, it is very doable.
Some mistakes I made so you don't have to:
Really follow the instructions in the shop manual.
Follow the instructions, even though you will need to buy a 100 lb fish scale from Amazon or Bass Pro Shops.
You don't have to connect your half-shafts to get an okay brake adjustment, but you should if you want to do it correctly (I didn't, and had to redo it a few times).
Make sure everything is lined up first, so that you are engaging both brakes. (The levers popped out of one of my sets of shoes).
If you need to go deeper than an adjustment, don't mix stainless hardware with stainless shoes. Stick to the OEM-style shoes. (This mistake cost me about full workday, spread out over several weeks waiting for parts to arrive).
Look up the dental floss trick, and have a good set of needlenose pliers, if you need to replace the hardware and spring retainers. Hopefully this is not the case for you.
Good luck!
Team Owner


Joined: Sep 2006
Posts: 31,335
Likes: 4,449
From: Westminster Maryland
Hi f,
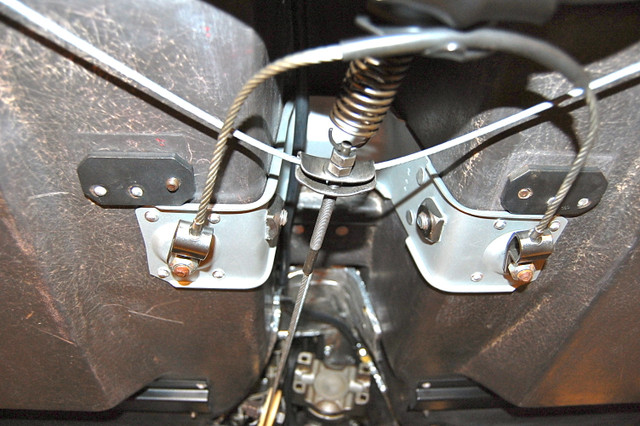
The cable that runs from the parking brake mechanism to the brakes themselves is adjusted (tightened or loosened) from under the car.
There are two nuts that need to be tightened to take any slack out of the cable.
If doing that doesn't give you the results you're looking for then the parking brake shoes themselves need to be adjusted.
See if tightening the cable first will help.
Regards,
Alan
Often there is one nut on each side of that little clip rather than both on the same side.
Le Mans Master

Joined: Aug 2006
Posts: 7,431
Likes: 1,562
From: mount holly NC
2025 c3 ('74-'82) of the Year Finalist - Unmodified
2019 C3 of Year Finalist (appearance mods)
The best practice is to remove the half shafts but the parking brake can be adjusted with the half shafts installed if you compensate for the additional drag.
With the lug nuts installed on the rotor start by adjusting the star wheel.
Insert a screwdriver into the star adjuster and pull up from the floor until the wheel will not turn. Then back off 7 to 9 teeth.
Then adjust the cables (shown in Alan's picture) until the parking brake handle stops (and the PB holds) at the 14th click.
Race Director
Joined: Mar 2017
Posts: 11,978
Likes: 4,528
From: Virginia
The best practice is to remove the half shafts but the parking brake can be adjusted with the half shafts installed if you compensate for the additional drag.
With the lug nuts installed on the rotor start by adjusting the star wheel.
Insert a screwdriver into the star adjuster and pull up from the floor until the wheel will not turn. Then back off 7 to 9 teeth.
Then adjust the cables (shown in Alan's picture) until the parking brake handle stops (and the PB holds) at the 14th click.
With the lug nuts installed on the rotor start by adjusting the star wheel.
Insert a screwdriver into the star adjuster and pull up from the floor until the wheel will not turn. Then back off 7 to 9 teeth.
Then adjust the cables (shown in Alan's picture) until the parking brake handle stops (and the PB holds) at the 14th click.
Thread Starter
Advanced
Joined: Oct 2015
Posts: 99
Likes: 1
From: Morristown/ Knoxville area Tennessee
with or without the half shafts connected?
Race Director
Joined: Mar 2017
Posts: 11,978
Likes: 4,528
From: Virginia
The 80 lbs of force is after the shoes are adjusted with the adjusting star. One method is to remove the half-shafts. Peterbuilt's method (above) is what I did, but I had to do it a few times to get it just right. Turns out that is what is in the shop manual.
I used some 550 tactical cord and a fish scale to get the 80 lbs measurement. If you can read it (I can't rotate it), here is the procedure from the 1980 Corvette Shop Manual. If you don't have one, I can't recommend it highly enough. It's $24- from Rock Auto.
https://www.rockauto.com/en/moreinfo...041152&jsn=424
Last edited by Bikespace; Apr 20, 2018 at 07:47 PM. Reason: Better Photo
Corvette Stories
The Best of Corvette for Corvette Enthusiasts

5 Best & 5 Worst Corvette Daily Drivers
Joe Kucinski
The Headlights of Every Corvette Generation Explained
Joe Kucinski
5 Best & 5 Most Overrated Corvette Track Packages of All Time!
Joe Kucinski
Every 2027 Corvette Engine Explained
Joe Kucinski
Designer Imagines A Corvette That Looks More Like a Corvette Than the Corvette
Verdad Gallardo
10 Ugly Corvettes That We Still Kinda Love
Joe Kucinski
Top 10 Most Expensive Corvettes Ever Sold on Bring A Trailer
Brett Foote
10 Things Every Corvette Owner Needs (2026 Edition)
Michael S. Palmer
8 Most "Only Corvette Owners Understand" Quirks and Problems
Pouria SavadkoueiFormer Vendor
Joined: Aug 2006
Posts: 76,656
Likes: 1,853
From: Jeffersonville Indiana 812-288-7103
St. Jude Donor '08-'09-'10-'11-'12-'13-'14-'15
Go to this link and click on supporting document.
http://repairs.willcoxcorvette.com/1...ke-adjustment/
http://repairs.willcoxcorvette.com/1...ke-adjustment/
Le Mans Master

Joined: Jan 2001
Posts: 6,751
Likes: 1,391
Willcox,
What's the scoop on the recommendation to NOT uses SS hardware with SS shoes?
What's the scoop on the recommendation to NOT uses SS hardware with SS shoes?
Go to this link and click on supporting document.
http://repairs.willcoxcorvette.com/1...ke-adjustment/
http://repairs.willcoxcorvette.com/1...ke-adjustment/