C3 Tech/Performance V8 Technical Info, Internal Engine, External Engine, Basic Tech and Maintenance for the C3 Corvette
Sponsored by:
Sponsored by:

Installing Removable Frame X-member Brackets - Weld Nuts

Thread Tools
 
Search this Thread
 
Old Nov 9, 2018 | 10:52 AM
  #1  
ScottEwine's Avatar
ScottEwine
Thread Starter
Burning Brakes
Liked
Loved
Community Favorite
 
Joined: Apr 2017
Posts: 877
Likes: 80
From: Frederick MD
Default Installing Removable Frame X-member Brackets - Weld Nuts

Good morning all,

I am planning on replacing the welded crossmember on my 1973 4-speed frame with an aftermarket crossmember. My question is, if I weld in the removable cross member brackets, how do I get the weld nuts on the bottom of the frame installed? I know that the frames have a lot of weld nuts installed that are not necessarily used, such as for the rear sway bar, but I don't think these are installed, am I correct?

Thanks,
Scott


Reply
Old Nov 9, 2018 | 04:56 PM
  #2  
ScottEwine's Avatar
ScottEwine
Thread Starter
Burning Brakes
Liked
Loved
Community Favorite
 
Joined: Apr 2017
Posts: 877
Likes: 80
From: Frederick MD
Default

Here is the plan I have come up with:
  1. Grind out the welds on the current crossmember and remove it.
  2. Clamp the Paragon crossmember brackets and Gforce crossmember in place and tack weld the brackets.
  3. Mark the position where the holes need to be in the bottom of the frame.
  4. Install (2) 3/8-16 Rivnuts ( http://www.rivetnutusa.com/rivnut-ca...omponents.html ) on each frame rail.
  5. Complete the welds on the crossmember brackets and put some chassis paint on it.
  6. Install the new crossmember.
  7. Have a beer or two.
Any other suggestions or guidance would be appreciated!

Scott
Reply
Old Nov 9, 2018 | 05:35 PM
  #3  
bazza77's Avatar
bazza77
Melting Slicks
15 Year Member
Liked
Loved
Community Favorite
 
Joined: Jul 2010
Posts: 3,176
Likes: 633
From: perth western australia
Default

Yes you are correct , the manual frame didn't get those captured nuts .

Have you priced the tool that is used for the installation ? They are quite expensive . Especially for just 4 rivets of the size you would want .3/8 or 1/2 inch ?

I have a set of those (different brand ) ,they are handy ,they came with different size pieces but not up to the size you want .I use them for dash board mounting pieces and small stuff ,so there's no real load on them .

Have you rang the company and asked just what the load rating is ? they say class 5 hardware , so I assume its not for heavy duty applications.


If your handy with a welder and ok with flipping the frame over you can make something a lot cheaper and with proper grade nuts and install it your self.(that would be my first choice )

Last edited by bazza77; Nov 9, 2018 at 05:36 PM.
Reply
Old Nov 9, 2018 | 05:52 PM
  #4  
derekderek's Avatar
derekderek
Race Director
 
Joined: Jul 2015
Posts: 13,082
Likes: 3,399
From: SW Florida.
Default

PM David Howard. He is kind of a frame guru. Has a few designs that may be easier to do with the body on.y
Reply
Old Nov 9, 2018 | 05:55 PM
  #5  
ScottEwine's Avatar
ScottEwine
Thread Starter
Burning Brakes
Liked
Loved
Community Favorite
 
Joined: Apr 2017
Posts: 877
Likes: 80
From: Frederick MD
Default

Originally Posted by derekderek
PM David Howard. He is kind of a frame guru. Has a few designs that may be easier to do with the body on.y
Thanks, I will PM him. Just to clarify, the body is off, I have the suspension and tires on but no engine yet.
Reply
Old Nov 9, 2018 | 06:00 PM
  #6  
ScottEwine's Avatar
ScottEwine
Thread Starter
Burning Brakes
Liked
Loved
Community Favorite
 
Joined: Apr 2017
Posts: 877
Likes: 80
From: Frederick MD
Default

Originally Posted by bazza77
Yes you are correct , the manual frame didn't get those captured nuts .
Have you priced the tool that is used for the installation ? They are quite expensive . Especially for just 4 rivets of the size you would want .3/8 or 1/2 inch ?
I have a set of those (different brand ) ,they are handy ,they came with different size pieces but not up to the size you want .I use them for dash board mounting pieces and small stuff ,so there's no real load on them .
Have you rang the company and asked just what the load rating is ? they say class 5 hardware , so I assume its not for heavy duty applications.
If your handy with a welder and ok with flipping the frame over you can make something a lot cheaper and with proper grade nuts and install it your self.(that would be my first choice )
Thanks,

A welder friend of mine suggested the rivnuts, he has the installation tool and the rivnuts so the cost for me is $0. But he is also a great welder and I would like to do the best fabrication within reason and I can pick up the frame with my forklift to where it will be easy to work on.

What would you do if the frame was flipped over and you had a welder?

Scott
Reply
Old Nov 9, 2018 | 06:09 PM
  #7  
DUB's Avatar
DUB
Race Director
10 Year Member
Liked
Loved
Community Favorite
 
Joined: Apr 2009
Posts: 19,294
Likes: 2,754
From: Charlotte NC
Default

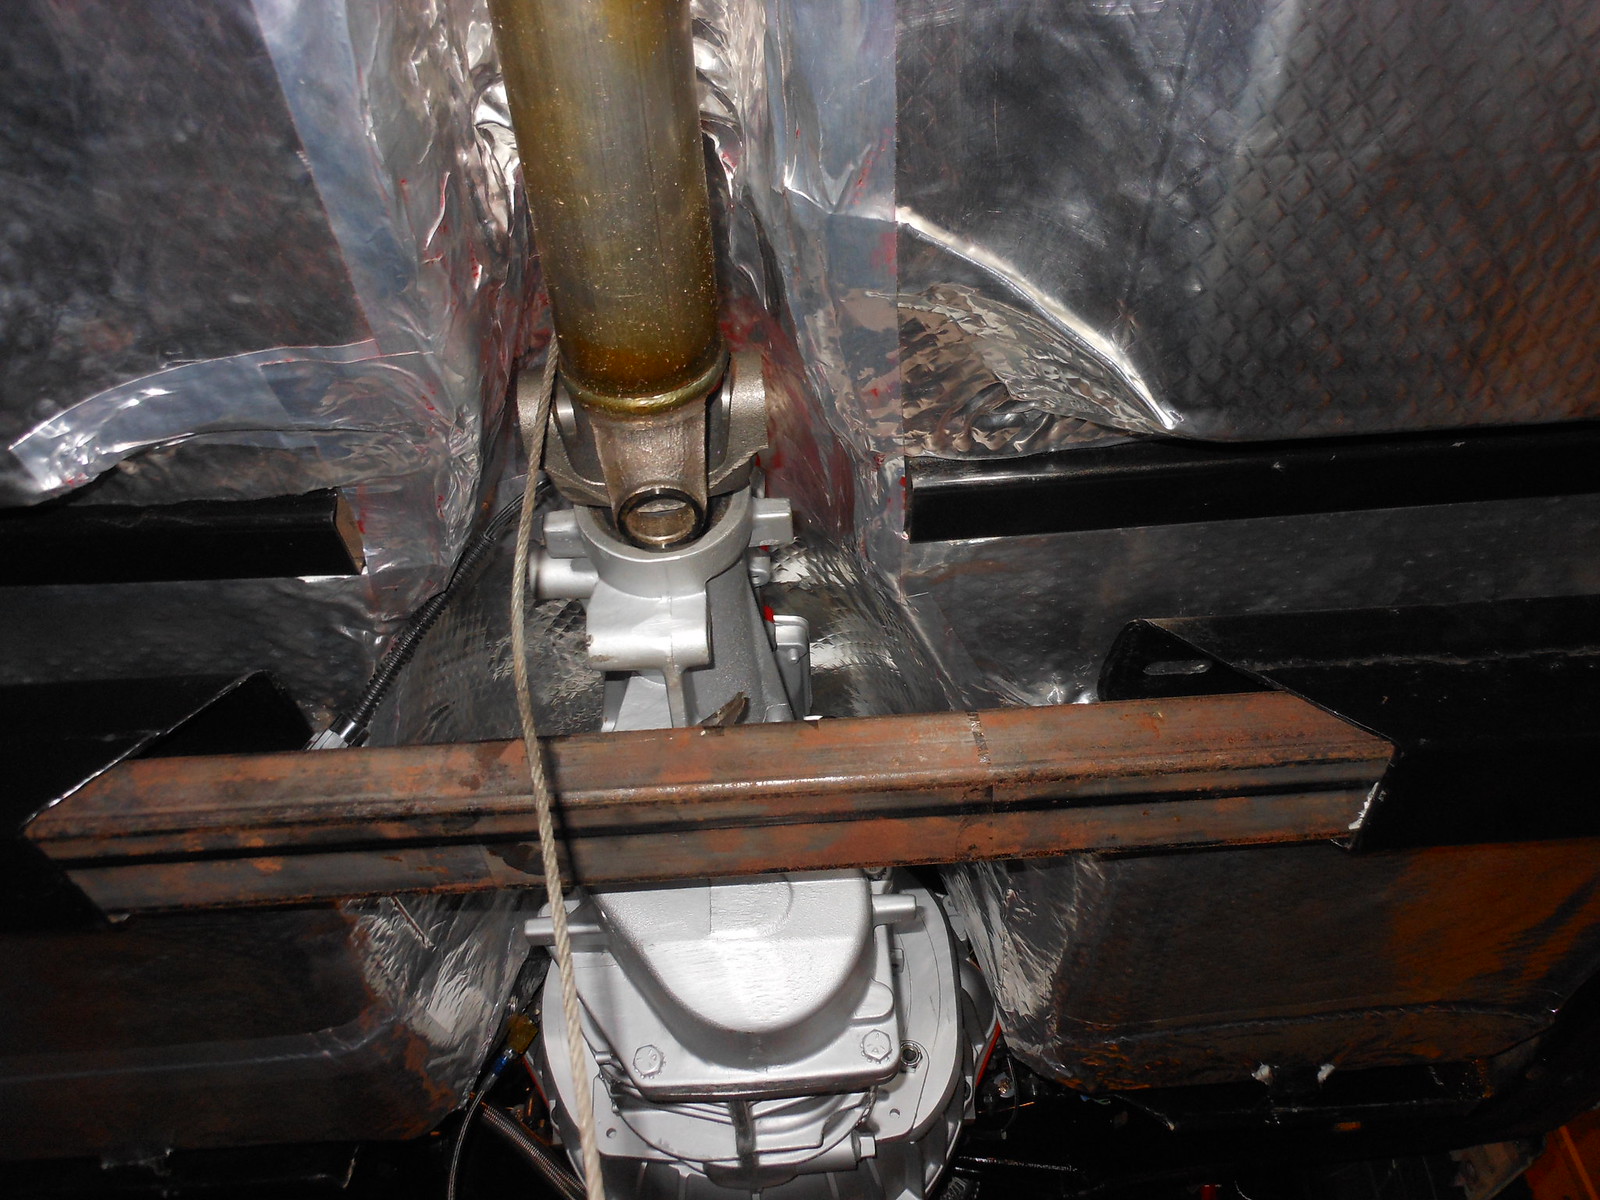
Knowing that this cross member has a bolt that runs though the cross member and the new bracket you plan on welding in. NOT all of the support for this cross member is on the area where you plan on using the riv-nuts. So it is not like the four bolts on the bottom of the frame are holding the cross member UP.. The long bolt...if positioned correctly...will not allow the cross member to drop down and it is taking almost all of the load.

Becasue if you stop and look at the cross member...those tabs where the lower four bolts go where you plan on using the riv nuts is NOT reinforced or gusseted due it is not made to do that. You can bend that tab by tapping on it with a hammer....so it alone by itself is not designed to be seriously structural. And that is where the long bolt comes into play and changed how strong this area is when all six bolts are installed.

DUB
Reply
Old Nov 9, 2018 | 06:16 PM
  #8  
Richard454's Avatar
Richard454
Le Mans Master
20 Year Member
Active Streak: 30 Days
Top Answer: 1
Top Answer: 3
 
Joined: May 2003
Posts: 8,877
Likes: 3,556
From: Fernandina Beach FL
2023 Restomod of the Year finalist
2020 C3 of the Year Winner - Modified
Default

Don't know if you are going to be running sidepipes- but you body is off-

My body was NOT off- so I didn't want to weld- and I'm running sidepipes-

No plates- or welding needed-drilled some holes and ran bolts through it.


Cut out the crossmemeber w/ a sawzall-


Wood mock-up-


Bought some 3" x 1-1/2" x 3/16" 36" in length steel rectangular for about $20.


Slides in the drivers side-


Test fit


Drilled a few holes-modded the OEM bracket- painted it up- bolted it in- TKO 500


Reply
Corvette Stories

The Best of Corvette for Corvette Enthusiasts

story-0

10 Ugly Corvettes That We Still Kinda Love

 Joe Kucinski
story-1

Top 10 Most Expensive Corvettes Ever Sold on Bring A Trailer

 Brett Foote
story-2

10 Things Every Corvette Owner Needs (2026 Edition)

 Michael S. Palmer
story-3

8 Most "Only Corvette Owners Understand" Quirks and Problems

 Pouria Savadkouei
story-4

10 Reasons the C6 Z06 is Still A Performance Benchmark After 20 Years

 Joe Kucinski
story-5

How Much Horsepower Every Corvette Engine "LOST" in 1972

 Joe Kucinski
story-6

Top 10 DOs and DON'Ts for Protecting Your Convertible Top!

 Michael S. Palmer
story-7

Top 10 Most Explosive Corvettes Ever Made: Power-to-Weight Ratio Ranked!

 Joe Kucinski
story-8

150 hp to 1,250 hp: Every Corvette Generation Compared by the Specs That Matter

 Joe Kucinski
story-9

8 Coolest Corvette Pace Cars (and Replicas) of All Time

 Verdad Gallardo
Old Nov 9, 2018 | 06:52 PM
  #9  
bazza77's Avatar
bazza77
Melting Slicks
15 Year Member
Liked
Loved
Community Favorite
 
Joined: Jul 2010
Posts: 3,176
Likes: 633
From: perth western australia
Default

Originally Posted by ScottEwine
Thanks,

A welder friend of mine suggested the rivnuts, he has the installation tool and the rivnuts so the cost for me is $0. But he is also a great welder and I would like to do the best fabrication within reason and I can pick up the frame with my forklift to where it will be easy to work on.

What would you do if the frame was flipped over and you had a welder?

Scott
If you can get them for 0 and there strong enough , just get them and put them in ,but for me …..

First I would clamp on the crossmember in the correct position ,then flip it over.
mark where the holes/nuts were needed and extend those alignment marks further out so they don't get lost when I start cutting.
Getsome plate steel (same or slightly thicker ) and weld the 2 nuts on(each plate) leave some excess plate around the nut holes/threads.
whatever size plate you end up with , copy that size onto some cardboard with the nut holes marked , get the nut holes in alignment on the frame and mark where the edge of the new plate sits

cut a hole in the frame and place the new piece in , hold it in situ by either bolting in a piece of scrap steel across each new hole (so it cant fall in ) or just tack some scrap across the top (easier)
you will more than likely cut across the frame join so there will be a double thickness there, if you fully weld your new plate(with bevelled edges)it will be plenty strong
that's what I would do if I was keen to not have those flanges in the cross piece.

Last edited by bazza77; Nov 9, 2018 at 06:56 PM.
Reply
Old Nov 10, 2018 | 11:21 AM
  #10  
DUB's Avatar
DUB
Race Director
10 Year Member
Liked
Loved
Community Favorite
 
Joined: Apr 2009
Posts: 19,294
Likes: 2,754
From: Charlotte NC
Default

Nice idea Richard.

DUB
Reply
Old Nov 10, 2018 | 11:39 AM
  #11  
ScottEwine's Avatar
ScottEwine
Thread Starter
Burning Brakes
Liked
Loved
Community Favorite
 
Joined: Apr 2017
Posts: 877
Likes: 80
From: Frederick MD
Default

Originally Posted by Richard454
Don't know if you are going to be running sidepipes- but you body is off-

My body was NOT off- so I didn't want to weld- and I'm running sidepipes-

No plates- or welding needed-drilled some holes and ran bolts through it.
I contemplated something like this, but will be using rear exhaust so I need either the holes or the open area in the aftermarket crossmember.
Reply
Old Nov 10, 2018 | 09:35 PM
  #12  
OMF's Avatar
OMF
Melting Slicks
15 Year Member
Liked
Loved
Community Favorite
 
Joined: Jul 2006
Posts: 2,291
Likes: 493
From: Salmon Arm, BC
Default

If you are planning on running headers.........
I'd make sure the cutouts for the exhaust on that cross member are inline with the header collectors.......if the exhaust can run straight back without bends in it, efficiency will improve.
Reply
Old Nov 11, 2018 | 12:27 PM
  #13  
ScottEwine's Avatar
ScottEwine
Thread Starter
Burning Brakes
Liked
Loved
Community Favorite
 
Joined: Apr 2017
Posts: 877
Likes: 80
From: Frederick MD
Default

I have received the information from David Howard on the brackets that are welded onto the cut ends of the existing crossmember, they are a cheaper option which I think will be just as strong as the original. So I guess my question is, how big is the advantage to having the larger open area that you get with the custom crossmember? Does that make it easier to mate up the exhaust in an LS conversion?
Reply
Old Nov 11, 2018 | 05:30 PM
  #14  
DUB's Avatar
DUB
Race Director
10 Year Member
Liked
Loved
Community Favorite
 
Joined: Apr 2009
Posts: 19,294
Likes: 2,754
From: Charlotte NC
Default

If you are asking is there an advantage to not having holes in the cross member like the factory one has. Yes there is an advantage due to you are not restricted to one specific area you have to run the exhaust THROUGH.

So with the cross member you showed a photo of. More area means more options in how you run the exhaust if needed. And for the new cross member not having holes init...if needed... you can literally drop down the entire exhaust system as a whole if service work needs to be done fit the system is welded up and not clamped or flanged together.

YES..as you know an exhaust shop can bend a pipe to fit whatever a car needs. And how teh pipes are joined can be done several ways successfully. Some are more 'user friendly' than others so it all depends on how you want the system built for any future work you may need to do on it.

I always look into the future and consider what it will take for me or the next guy who may need to take something apart and take the time to build it so it is not a pain in the backside to do something.

DUB
Reply
Old Nov 13, 2018 | 08:57 PM
  #15  
crf311's Avatar
crf311
Melting Slicks
20 Year Member
Conversation Starter
All Eyes On Me
Liked
 
Joined: Jan 2003
Posts: 3,029
Likes: 94
From: meraux LA
Default

I used self tapping bolts. No problems in 15 years
Reply
Old Nov 16, 2018 | 10:04 PM
  #16  
pauldana's Avatar
pauldana
Race Director
Supporting Member
20 Year Member
Liked
Loved
Community Favorite
 
Joined: May 2003
Posts: 10,956
Likes: 409
From: California
Default

like to see some pictures when you are done.. thx pd
Reply
Old Nov 18, 2018 | 05:01 PM
  #17  
ScottEwine's Avatar
ScottEwine
Thread Starter
Burning Brakes
Liked
Loved
Community Favorite
 
Joined: Apr 2017
Posts: 877
Likes: 80
From: Frederick MD
Default

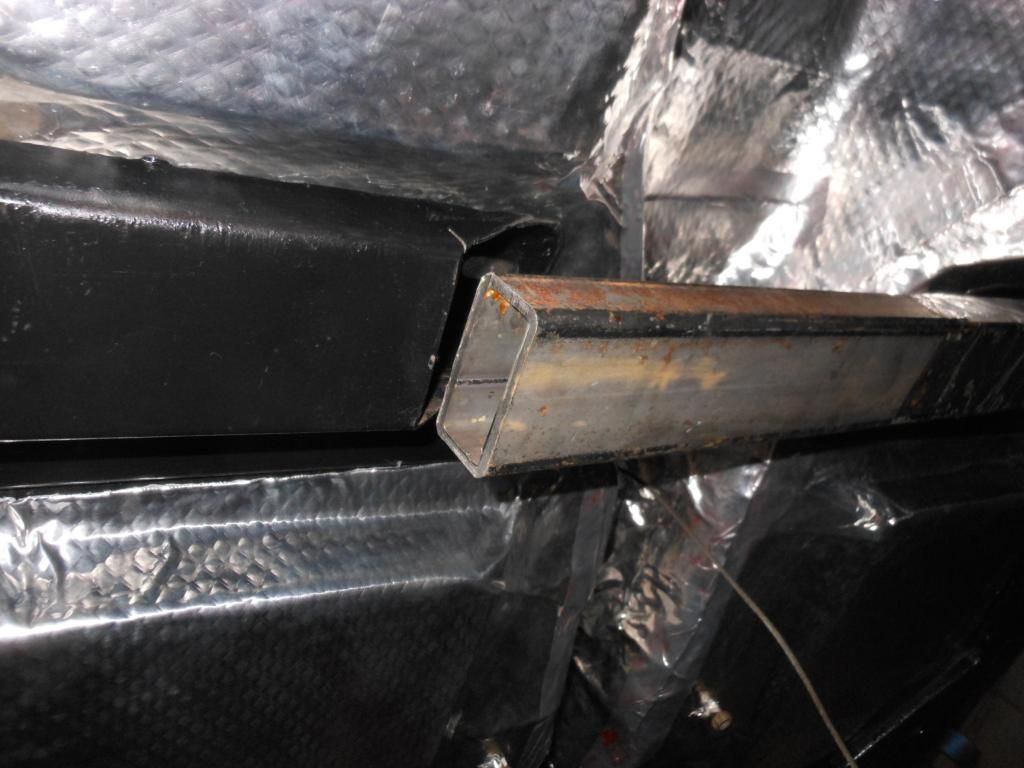
In the end I decided to make it removable by cutting it out and installing the plates that David Howard recommended and sold to me. Cutting the crossmember out nice and square was really not too bad with a circular saw and steel cutting blade. I was able to lift the front of the frame with my forklift to make the cut on the underside and that made it a bit easier.


Last edited by ScottEwine; Nov 18, 2018 at 09:50 PM.
Reply
Old Nov 18, 2018 | 11:58 PM
  #18  
TimAT's Avatar
TimAT
Le Mans Master
15 Year Member
Liked
Loved
 
Joined: Oct 2006
Posts: 7,123
Likes: 433
From: Gladstone MO
C3 of Year Finalist (appearance mods) 2019
Default

Originally Posted by Richard454
Don't know if you are going to be running sidepipes- but you body is off-

My body was NOT off- so I didn't want to weld- and I'm running sidepipes-

Bought some 3" x 1-1/2" x 3/16" 36" in length steel rectangular for about $20.

Slides in the drivers side-


Test fit


Drilled a few holes-modded the OEM bracket- painted it up- bolted it in- TKO 500

That is exactly how I did mine. I used a 2x3 piece of tube, Cut the original with a sawzall. Slid the tube in. clamped it down and drilled 6 holes, then welded nuts on the inside. I used some 3/8 socket head capscrews. I even located and welded the original parking brake guide wheel in place.

Last edited by TimAT; Nov 19, 2018 at 12:00 AM.
Reply
Old Nov 19, 2018 | 01:06 PM
  #19  
carriljc's Avatar
carriljc
Le Mans Master
25 Year Member
Liked
Loved
Community Favorite
 
Joined: Jan 2001
Posts: 6,743
Likes: 1,385
Default I just have to ask this question.....

Couldn't we use the "stubs" from the manual crossmember to bolt on this aftermarket crossmember? Seems like it would be easy enough to drill a horizontal hole for the upper bolt, and then deal with the vertical as already suggested.


Originally Posted by ScottEwine
Good morning all,

I am planning on replacing the welded crossmember on my 1973 4-speed frame with an aftermarket crossmember. My question is, if I weld in the removable cross member brackets, how do I get the weld nuts on the bottom of the frame installed? I know that the frames have a lot of weld nuts installed that are not necessarily used, such as for the rear sway bar, but I don't think these are installed, am I correct?

Thanks,
Scott


Reply

Get notified of new replies

To Installing Removable Frame X-member Brackets - Weld Nuts


All times are GMT -4. The time now is 04:48 AM.

story-0
10 Ugly Corvettes That We Still Kinda Love

Slideshow: 10 ugly Corvettes that we still kinda love.

By Joe Kucinski | 2026-06-03 10:34:17


VIEW MORE
story-1
Top 10 Most Expensive Corvettes Ever Sold on Bring A Trailer

A lot of money has changed hands at the online auction house over the years.

By Brett Foote | 2026-06-03 10:21:50


VIEW MORE
story-2
10 Things Every Corvette Owner Needs (2026 Edition)

Slideshow: 10 great gifts Corvette enthusiasts actually want for Father's Day!

By Michael S. Palmer | 2026-06-03 15:43:40


VIEW MORE
story-3
8 Most "Only Corvette Owners Understand" Quirks and Problems

Slideshow: These are the quirks, annoyances, and oddly lovable problems that every Corvette owner eventually learns to live with.

By Pouria Savadkouei | 2026-05-28 09:31:39


VIEW MORE
story-4
10 Reasons the C6 Z06 is Still A Performance Benchmark After 20 Years

Slideshow: 10 reasons why the C6 Z06 is still a performance benchmark after 20 years.

By Joe Kucinski | 2026-05-27 17:20:09


VIEW MORE
story-5
How Much Horsepower Every Corvette Engine "LOST" in 1972

Slideshow: How much horsepower every Corvette engine lost in 1972.

By Joe Kucinski | 2026-05-27 16:54:53


VIEW MORE
story-6
Top 10 DOs and DON'Ts for Protecting Your Convertible Top!

Slideshow: How to Protect A Convertible Top: 10 DOs & DON'Ts

By Michael S. Palmer | 2026-04-03 00:00:00


VIEW MORE
story-7
Top 10 Most Explosive Corvettes Ever Made: Power-to-Weight Ratio Ranked!

Slideshow: The 10 most explosive Corvettes ever built based on power-to-weight ratio.

By Joe Kucinski | 2026-05-20 07:23:03


VIEW MORE
story-8
150 hp to 1,250 hp: Every Corvette Generation Compared by the Specs That Matter

Slideshow: From C1 to C8 we compare every Corvette generation by the numbers.

By Joe Kucinski | 2026-05-12 16:54:12


VIEW MORE
story-9
8 Coolest Corvette Pace Cars (and Replicas) of All Time

Slideshow: Some Corvette pace cars became collectible legends, while others perfectly captured the look and attitude of their era.

By Verdad Gallardo | 2026-05-11 09:50:51


VIEW MORE