


Torker Intake
Thread Starter
Le Mans Master


Joined: Sep 2002
Posts: 9,386
Likes: 0
From: 30 mins north of Charlotte NC
ok, i decided to use this intake and carb on my new motor, today i started to port and polish it. i decided to go stealth on the nitrous and also save a 1/2 inch on the height,,,,so instead ot a NOS plate or nozzles, see what i came up with. Im going to get this bead blasted tomorrow.

i started with an old moroso Q-jet NOS plate and worked with it a little.


just a little more polishing


[Modified by Titanium Rat, 5:10 PM 12/28/2002]
i started with an old moroso Q-jet NOS plate and worked with it a little.
just a little more polishing
[Modified by Titanium Rat, 5:10 PM 12/28/2002]

Team Owner

Joined: Jul 2001
Posts: 182,997
Likes: 88
From: Lakeland, FL
Cruise-In IV-V-VI-VII-VIII Veteran
St. Jude Donor '03, '06, '17
:cool: :cool: :cool:
Great intake choice.. I'm running a Tarantula (TM-1) with is a Torker with bigger runners... and ... check my sig for my performance :D :D
:cheers:
Olivier
Great intake choice.. I'm running a Tarantula (TM-1) with is a Torker with bigger runners... and ... check my sig for my performance :D :D
:cheers:
Olivier

Le Mans Master


Joined: Jan 2000
Posts: 8,721
Likes: 108
From: Canada
Great intake choice.. I'm running a Tarantula (TM-1) with is a Torker with bigger runners... and ... check my sig for my performance
On mine it is the happy face that MM carved into the bottom of it that added the additional 40 hp. :thumbs:
[Modified by gdh, 12:29 PM 12/23/2002]
Team Owner
Joined: Jul 2001
Posts: 182,997
Likes: 88
From: Lakeland, FL
Cruise-In IV-V-VI-VII-VIII Veteran
St. Jude Donor '03, '06, '17
Great intake choice.. I'm running a Tarantula (TM-1) with is a Torker with bigger runners... and ... check my sig for my performance
:iagree: I am running an original Torquer that has had some work done on it, I am very happy with it, just remember that your hp will really come on at a higher rpm level than with the dual plane. I think that porting a matching will be key to your success with this intake on your engine.
On mine it is the happy face that MM carved into the bottom of it that added the additional 40 hp. :thumbs:
:cheers:
Olivier
Thread Starter
Le Mans Master
Joined: Sep 2002
Posts: 9,386
Likes: 0
From: 30 mins north of Charlotte NC
How do you plan on hiding the nitrous hose??
Corvette Stories
The Best of Corvette for Corvette Enthusiasts

Top 10 Most Expensive Corvettes Ever Sold on Bring A Trailer
Brett Foote
10 Things Every Corvette Owner Needs (2026 Edition)
Michael S. Palmer
8 Most "Only Corvette Owners Understand" Quirks and Problems
Pouria Savadkouei
10 Reasons the C6 Z06 is Still A Performance Benchmark After 20 Years
Joe Kucinski
How Much Horsepower Every Corvette Engine "LOST" in 1972
Joe Kucinski
Top 10 DOs and DON'Ts for Protecting Your Convertible Top!
Michael S. Palmer
Top 10 Most Explosive Corvettes Ever Made: Power-to-Weight Ratio Ranked!
Joe Kucinski
150 hp to 1,250 hp: Every Corvette Generation Compared by the Specs That Matter
Joe Kucinski
8 Coolest Corvette Pace Cars (and Replicas) of All Time
Verdad Gallardo
Thread Starter
Le Mans Master
Joined: Sep 2002
Posts: 9,386
Likes: 0
From: 30 mins north of Charlotte NC
ok, got it back from the beadblaster, yesterday and just need to polish it up a bit more, then do a nice port job on the heads, and she will be ready to go


[Modified by Titanium Rat, 5:15 PM 12/28/2002]
[Modified by Titanium Rat, 5:15 PM 12/28/2002]
Drifting


Joined: Oct 2000
Posts: 1,825
Likes: 56
From: Shawano WI
Brent:
Very nice job on the spray bars but before you use that intake you need to reshape the common wall on intake runners.
When they are knife-edged like they are now the fuel is thrown to the adjancent wall and you end up with a puddleing problem that really hurts performance. You want to shape the ends of the runners to look like the forward edge of an airplane wing so the air/fuel will flow along the wall rather then get pushed away from it.
Thread Starter
Le Mans Master
Joined: Sep 2002
Posts: 9,386
Likes: 0
From: 30 mins north of Charlotte NC
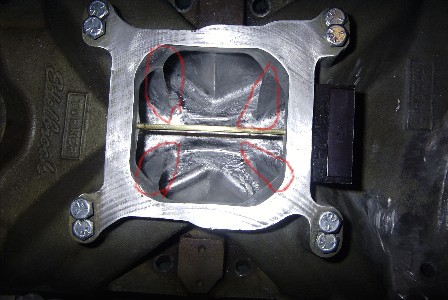
:cry that took a while to get it like that..........is the runner in the pic below too much,,,,,,or should i have just left it stock and polished it,,,,,now if i just round them out a little and keep it tapered,will that work, ok? or did i just spend a lot of time on junking my intake
[Modified by Titanium Rat, 8:29 PM 12/28/2002]
[Modified by Titanium Rat, 8:29 PM 12/28/2002]
Drifting
Joined: Oct 2000
Posts: 1,825
Likes: 56
From: Shawano WI
Looking at the picture, the runner on the left looks good, consistant thickness from top to bottom. The runner on the right looks like it gets thicker on the top and would need some work to even it out. The front edge of the left runner is about what you want them to look like. You should be able to round them over with a sanding roll to get rid of the taper and knife-edge. Don't take out any more material then you need to. You want to runner wall to be as long as possible at the floor of the plenum.
[Modified by Pete79L82, 6:24 PM 12/28/2002]
[Modified by Pete79L82, 6:24 PM 12/28/2002]


Thread Starter
Le Mans Master
Joined: Sep 2002
Posts: 9,386
Likes: 0
From: 30 mins north of Charlotte NC
The runner on the right looks like it gets thicker on the top and would need some work to even it out.
Drifting
Joined: Oct 2000
Posts: 1,825
Likes: 56
From: Shawano WI
well, there is no way to get the taper out now, if i round out the knife shape edges (from top to bottom), how well do you think this will perform?
Round the front edge of the runner over the best you can. It shouldn't hurt you too much. The "wedge effect" (like a bow of a boat) only becomes pronounced at higher RPM (over 5k).
Racer


Joined: Jul 2002
Posts: 275
Likes: 13
From: South Bend, Indiana
I did the same thing to a Victor JR out of necessity to retain hood clearance. Worked out good.
Here is a previous Torkor I ran with a hidden system. The fuel and nitrous lines exited behind the carb incased in heater hose.

Here is a previous Torkor I ran with a hidden system. The fuel and nitrous lines exited behind the carb incased in heater hose.