HID Xenon Driving Lights -How to..
 08-09-2009, 03:49 PM
#1
Drifting

Thread Starter
I have recently been investigating the possibility of converting my headlights with one of those HID kits sold on EBay. Thought it might be nice to have some modern lighting on the Z and it would help my aging night vision at the same time. My buddy Don (karterdon) ordered up some Xenons and proceeded to attempt the conversion on his car. We found that you need a new H4 bulb and lens housing, a Bi-Xenon kit (so you have high beams and low beams) and you need to wire it so that the driving lights still function properly. In all about a $200 project. Not too bad.
However, since I often drive at dusk with just my driving lights and marker lights on I thought it might be cool to try a Xenon conversion of the driving lights only. Maybe there's enough light that you don't even have to use the headlights.
In researching I found that you can indeed buy an 800 series configuration Xenon setup that fits the driving lights. It's cheap too...
So I ponied up the $49 and ordered a set off of Ebay from a US distributor (still made in China of course)
I decided to take some pictures and do a little "how to" at the same time. Hope you find this useful.
What I am showing here is for a 90'. Access to the driving light bulbs is different in the 91'+ cars but the wiring should still be the same. Access to the 91+ bulbs is via 2 trap doors under the front of the bumper.
Here's the Xenon setup, you get 2 of these in the kit. Everything is tidy with weatherproof connectors and as I found out it turns out to be plug and play.
The access to the bulbs is located under the hood on either side of the radiator just below the hood hinge.
You have to feel your way under there but this is the bulb plug. You rotate it about a quarter turn and pull it out.

The wires are somewhat short so getting it out without breaking the old bulbs (like I did) is tough.
When you get it out the bulb holder looks like this. I removed bulb already. Disassemble the holder and remove it. It comes apart easily.
Without the holder the plug looks like this. For reference later the purple wire has the power. The other is ground.
Back at the workbench you set up the HID bulb on the holder. Make sure the bottom of the bulb is snug in the top of the holder. Run the wires through and put the seal ring back in place.
The ballast/ignitor is a nice sealed unit. Hook up the plug, the upper one on the unit. It's the wiring to the new bulb. The spade connectors shown will hook to the car wiring plug noted earlier.

Now install the bulb holder with the new Xenon bulb. I goes in much easier that it came out. Be careful not to touch the bulb it will burn out early from the oils on your hands. When you slide it in make sure it's all the way in. Then turn it gently clockwise to lock it in place. A light tug will confirm it's locked. Hook up the wires from the ballast, they only go one way. Inserted and hooked up it looks like this.
Insert the spade connectors, noted earlier, into the plug. Red to purple and black to black. Insulate the connection, I used electical tape. I may go back and buy the correct weatherpak connector later.

Everthing is now connected. Zip tie the wiring to the Ballast for neatness.
You can tuck everything in next to the radiator housing. I used the velcro fasteners provided and mounted the ballast there. Make sure it sits low enough so the hood hinge doesn't hit it when you close the hood. It comes with actual brackets that I may use if this location works out.
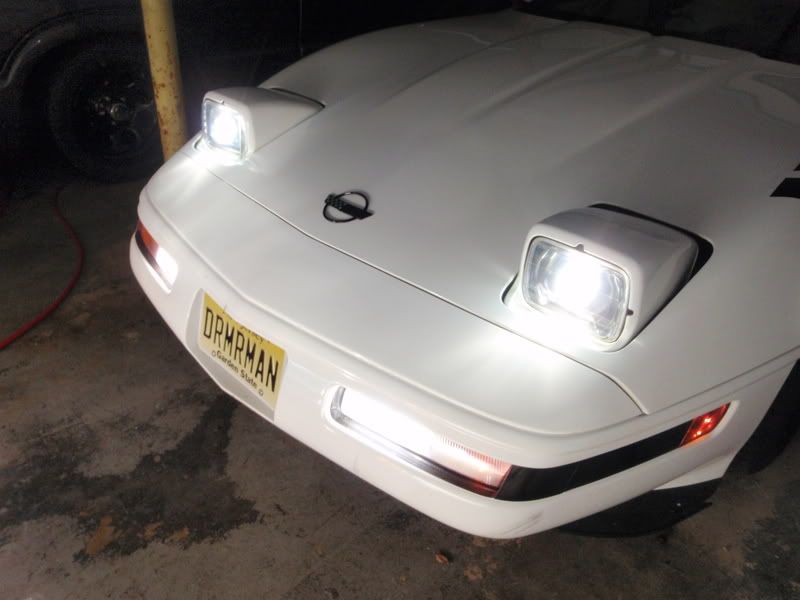
So there you have it. Took it out last night and the light output is fantastic and it only uses 35watts, the same as the original bulb. I can actually drive the car at night with only the driving lights and without the headlights on.
Here are some shots with and without the Halogen headlights. I'm jazzed...:thumbsup:

H

However, since I often drive at dusk with just my driving lights and marker lights on I thought it might be cool to try a Xenon conversion of the driving lights only. Maybe there's enough light that you don't even have to use the headlights.
In researching I found that you can indeed buy an 800 series configuration Xenon setup that fits the driving lights. It's cheap too...
So I ponied up the $49 and ordered a set off of Ebay from a US distributor (still made in China of course)
I decided to take some pictures and do a little "how to" at the same time. Hope you find this useful.
What I am showing here is for a 90'. Access to the driving light bulbs is different in the 91'+ cars but the wiring should still be the same. Access to the 91+ bulbs is via 2 trap doors under the front of the bumper.
Here's the Xenon setup, you get 2 of these in the kit. Everything is tidy with weatherproof connectors and as I found out it turns out to be plug and play.
The access to the bulbs is located under the hood on either side of the radiator just below the hood hinge.
You have to feel your way under there but this is the bulb plug. You rotate it about a quarter turn and pull it out.
The wires are somewhat short so getting it out without breaking the old bulbs (like I did) is tough.
When you get it out the bulb holder looks like this. I removed bulb already. Disassemble the holder and remove it. It comes apart easily.
Without the holder the plug looks like this. For reference later the purple wire has the power. The other is ground.
Back at the workbench you set up the HID bulb on the holder. Make sure the bottom of the bulb is snug in the top of the holder. Run the wires through and put the seal ring back in place.
The ballast/ignitor is a nice sealed unit. Hook up the plug, the upper one on the unit. It's the wiring to the new bulb. The spade connectors shown will hook to the car wiring plug noted earlier.
Now install the bulb holder with the new Xenon bulb. I goes in much easier that it came out. Be careful not to touch the bulb it will burn out early from the oils on your hands. When you slide it in make sure it's all the way in. Then turn it gently clockwise to lock it in place. A light tug will confirm it's locked. Hook up the wires from the ballast, they only go one way. Inserted and hooked up it looks like this.
Insert the spade connectors, noted earlier, into the plug. Red to purple and black to black. Insulate the connection, I used electical tape. I may go back and buy the correct weatherpak connector later.
Everthing is now connected. Zip tie the wiring to the Ballast for neatness.
You can tuck everything in next to the radiator housing. I used the velcro fasteners provided and mounted the ballast there. Make sure it sits low enough so the hood hinge doesn't hit it when you close the hood. It comes with actual brackets that I may use if this location works out.
So there you have it. Took it out last night and the light output is fantastic and it only uses 35watts, the same as the original bulb. I can actually drive the car at night with only the driving lights and without the headlights on.
Here are some shots with and without the Halogen headlights. I'm jazzed...:thumbsup:
H
 08-09-2009, 04:33 PM
#2
Advanced


Member Since: Aug 2009
Location: Superior WI
Posts: 62
Likes: 0
Received 0 Likes
on
0 Posts

Wow, talk about your timing!!! I was wondering the other day if there was something better for those driving lamps. Signing in here has already paid off. Thanks a bunch!!
08-09-2009, 08:47 PM
#4
Instructor
That's half price of the Corvette HID there is out now... they want like $120 for the "fog" running light kit and well over $500 for the headlight conversion. They are VERy nice, but for someone like me, and proly many others, $120 in foglights and $650+ in headlights is EXTREME forcing us to find cheaper ways to go. Looks good man!! Great work!!
08-09-2009, 09:08 PM
#5
Team Owner


Member Since: Aug 2005
Location: Riverside County Southern California
Posts: 34,988
Received 501 Likes
on
342 Posts
Co-winner 2020 C4 of the Year - Modified
2018 Corvette of Year Finalist
2017 C4 of Year
2016 C7 of Year Finalist
St. Jude Donor '09-'10-'11-'12-'13-'14-'15-'16-'17-'18-'19-'20


$500 for a headlight kit

08-09-2009, 10:38 PM
#6
Race Director


You'll have to do a shot of the HID's from the drivers view. I LOVE the conversion I did on both my C5 and the Grand Prix. I've seriously considered it for the C4 too. I was wondering how it would do with just the fogs.


08-09-2009, 10:56 PM
#7
Advanced
Member Since: Feb 2008
Location: Lindenhurst NY
Posts: 65
Likes: 0
Received 0 Likes
on
0 Posts
Cool they only cost 49 dollars now. I paid 56 dollars for mine on ebay 8 months ago, mine are the 10k. I thought it was well worth the upgrade on the fog lights.

08-10-2009, 07:40 AM
#9
Drifting
Thread Starter
 Glad you enjoyed the post. I used this outfit...
http://stores.shop.ebay.com/Xtreme-H...__W0QQ_armrsZ1
You want the 800 series kit.
By the way, if I didn't mention it I am not affiliated with the seller in anyway.
Good luck!
Hans
04-06-2010, 08:21 AM
#10
Melting Slicks

Its worth every penny dood....
I own both the corvettehid.com projector head lamps and fogs.... Worth every penny when you are driving at night. The quality is second to none... They vacum form and bake every head light by hand ensuring the best quality and most reliable product! I love mine! Im so glad I got em!
I own both the corvettehid.com projector head lamps and fogs.... Worth every penny when you are driving at night. The quality is second to none... They vacum form and bake every head light by hand ensuring the best quality and most reliable product! I love mine! Im so glad I got em!
Last edited by drmrman; 04-06-2010 at 08:25 AM.
04-06-2010, 03:52 PM
#11
Melting Slicks

man, i dont know which looks better: those HID foglights or that front lip fascia you have. ant more pics showing that lip in day light from other angles maybe? where did you get it?
04-06-2010, 11:00 PM
#12
Drifting
Its worth every penny dood....
I own both the corvettehid.com projector head lamps and fogs.... Worth every penny when you are driving at night. The quality is second to none... They vacum form and bake every head light by hand ensuring the best quality and most reliable product! I love mine! Im so glad I got em!
I own both the corvettehid.com projector head lamps and fogs.... Worth every penny when you are driving at night. The quality is second to none... They vacum form and bake every head light by hand ensuring the best quality and most reliable product! I love mine! Im so glad I got em!