Decided to finally paint the targa top
 08-19-2013, 12:43 PM
#1
Melting Slicks

Thread Starter

I'd been going back and forth with the idea of repainting the "solid" top on my 85 ever since I got the car almost 9 years ago. It seemed when the car was painted, they neglected to paint the top and it was all faded. I color sanded and buffed it and while that brought the shine back, the color didn't really match well. Being I hardly used it, I normally, I have the roof off or I use the tinted glass roof, I never really thought about it. Basically, the roof sat in the garage collecting dusk. When the car went to the shop to repair the paint damage to the hood and nose, I installed the solid top as I didn't want anything to happen to the glass one. Well that's when I discovered the car rides and handles so much better with that solid top. At the beginning of the year, I installed a vinyl wrap on it in gloss black. It looked ok, I wasn't really happy with it, but I wasn't prepared to repaint the top or spend money for someone to do it.
Fast forward to this summer, the vinyl wrap started to bubble for some reason. I thought it was air, but when I poked a hole with a pin, it didn't do anything. It turned out that the 3M adhesion promoter somehow got under the clearcoat and it bubbled. I figured I'd just pull the wrap off and install another. WRONG. As I pulled the wrap, it took most of the clearcoat with it. That made my decision for me. I propped up the top on the table, removed the black trim along with the old side weatherstriping and rails and went to work. I sanded it smooth, past the clearcoat, the basecoat and down to the original primer, so I thought. The top had been repainted once before, what I sanded was the repaint. So, on I went until most of the original paint was gone.
I shot epoxy primer over it, waited 24 hours and blocked it, just a few high spots, so I'm glad I blocked it. After it was blocked, I used Duplicolor's self etching primer. It hid all sanding evidence and once wetsanded was smooth as glass. After it was all primed up and smooth, I had a decision to make. Do I paint it black or paint it the original color, bright red. I knew I was using a rattle can for either so I went shopping. I figured I would restore it back to red, black seemed a little too easy. I wanted a project.
Believe it or not, Duplicolor still makes GM8774 in the rattle can. I was shocked and better yet, every part store I walked into had it. I picked one can along with a can of white primer. I figured the white would make the red pop. Also, I know they used white primer under the repaint. After shooting the white primer and wet sanding that smooth, I shot the Duplicolor. First, I shot around the edges of the top, making sure there were no high spots, then I shot the whole thing. I was able to get 2 full coats out of that 8oz can. I picked up 2 more cans and placed an order for two 12oz cans of each of the basecoat and clearcoat from an online supplier I used in the past. Their cans have a larger spray radius compared to the Duplicolor ones so I figured I'd use the large can for the final basecoat.
Anyway, it took 6 coats with the rattle cans to get the basecoat matched to the car, 4 with the Duplicolor cans, wetsanding between each coat, and 2 wet on wet coats with the larger can. Here's what it looks like sans clearcoat:
[IMG]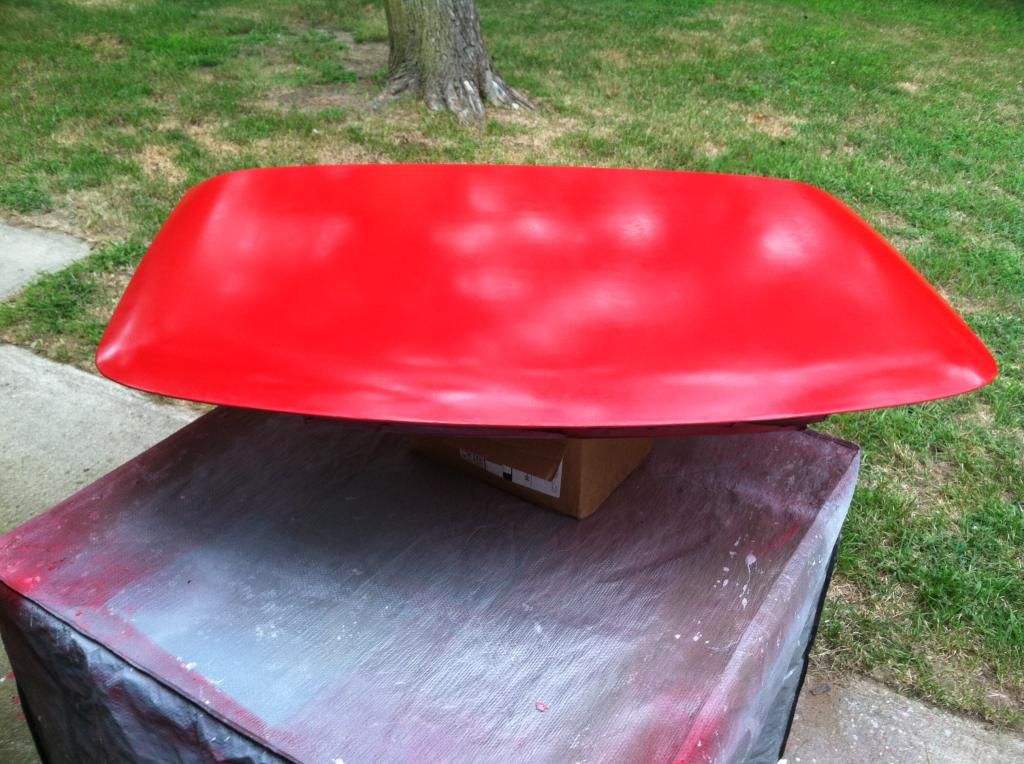 [/IMG]
[IMG]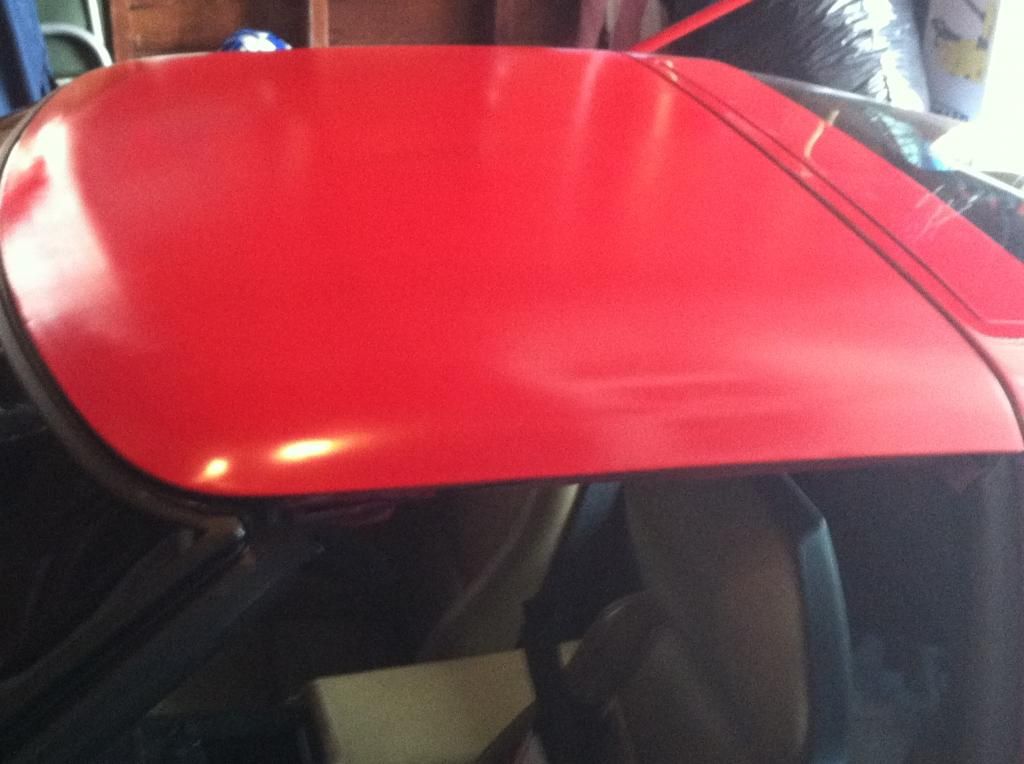 [/IMG]
I ran out of daylight yesterday before I could shoot the clear, but I will get to it this week sometime. I will be sure to post the results.
Fast forward to this summer, the vinyl wrap started to bubble for some reason. I thought it was air, but when I poked a hole with a pin, it didn't do anything. It turned out that the 3M adhesion promoter somehow got under the clearcoat and it bubbled. I figured I'd just pull the wrap off and install another. WRONG. As I pulled the wrap, it took most of the clearcoat with it. That made my decision for me. I propped up the top on the table, removed the black trim along with the old side weatherstriping and rails and went to work. I sanded it smooth, past the clearcoat, the basecoat and down to the original primer, so I thought. The top had been repainted once before, what I sanded was the repaint. So, on I went until most of the original paint was gone.
I shot epoxy primer over it, waited 24 hours and blocked it, just a few high spots, so I'm glad I blocked it. After it was blocked, I used Duplicolor's self etching primer. It hid all sanding evidence and once wetsanded was smooth as glass. After it was all primed up and smooth, I had a decision to make. Do I paint it black or paint it the original color, bright red. I knew I was using a rattle can for either so I went shopping. I figured I would restore it back to red, black seemed a little too easy. I wanted a project.
Believe it or not, Duplicolor still makes GM8774 in the rattle can. I was shocked and better yet, every part store I walked into had it. I picked one can along with a can of white primer. I figured the white would make the red pop. Also, I know they used white primer under the repaint. After shooting the white primer and wet sanding that smooth, I shot the Duplicolor. First, I shot around the edges of the top, making sure there were no high spots, then I shot the whole thing. I was able to get 2 full coats out of that 8oz can. I picked up 2 more cans and placed an order for two 12oz cans of each of the basecoat and clearcoat from an online supplier I used in the past. Their cans have a larger spray radius compared to the Duplicolor ones so I figured I'd use the large can for the final basecoat.
Anyway, it took 6 coats with the rattle cans to get the basecoat matched to the car, 4 with the Duplicolor cans, wetsanding between each coat, and 2 wet on wet coats with the larger can. Here's what it looks like sans clearcoat:
[IMG]
 [/IMG]
[IMG]
 [/IMG]
I ran out of daylight yesterday before I could shoot the clear, but I will get to it this week sometime. I will be sure to post the results.

The following users liked this post:
yakmastermax (03-15-2023)
08-19-2013, 02:29 PM
#2
Race Director


Looks good. I'm not worried about the quality of your final product (work) so much as the quality of your paint. There�s a reason that Maaco�s paint doesn�t last as long as better paints from quality shops. For a roof panel � directly exposed to heat/sunlight, it�ll be interesting to see how long the paint/finish actually lasts. If you drive it a lot in good weather, I wouldn�t be surprised if you can see evidence of chalking/fading within a couple of years.
Everyone I talked to -- about a rattle-can self-repair on my DD said the same thing...including paint shops (where I have friends). I hope they're wrong!

Everyone I talked to -- about a rattle-can self-repair on my DD said the same thing...including paint shops (where I have friends). I hope they're wrong!
The following users liked this post:
yakmastermax (03-15-2023)
08-19-2013, 02:33 PM
#3
8th Gear

Member Since: Aug 2013
Location: Lexington Park MD
Posts: 8
Likes: 0
Received 0 Likes
on
0 Posts
Nice job! I am working on my 87 Targa top too. My corvette is the metallic silver. I am not a body and fender person, so this is basically my first major paint project.
My top sat outside in the Maryland weather from 2009 until recent.. so it was sun burned real bad. I attempted to sand it down and used a clear primer. Then I use the rattle can metallic silver... but the finish is terrible. bumps and no shine what so ever. I haven't tried the wet sand yet, so that is my question. What grade paper are you using to wet sand it?
I just ordered a variety pack (1000 to 2000) and hope that works. You use just plain water (spray bottle) and place the sand paper on a block and just slightly rub back and forth, correct? I also purchased the clay kit in hopes that if the wet sand works I can bring a better shine with the clay. I can post pics, but didn't want to mess with your thread.
08-19-2013, 03:31 PM
#4
Melting Slicks
Thread Starter
Nice job! I am working on my 87 Targa top too. My corvette is the metallic silver. I am not a body and fender person, so this is basically my first major paint project.
My top sat outside in the Maryland weather from 2009 until recent.. so it was sun burned real bad. I attempted to sand it down and used a clear primer. Then I use the rattle can metallic silver... but the finish is terrible. bumps and no shine what so ever. I haven't tried the wet sand yet, so that is my question. What grade paper are you using to wet sand it?
I just ordered a variety pack (1000 to 2000) and hope that works. You use just plain water (spray bottle) and place the sand paper on a block and just slightly rub back and forth, correct? I also purchased the clay kit in hopes that if the wet sand works I can bring a better shine with the clay. I can post pics, but didn't want to mess with your thread.
My top sat outside in the Maryland weather from 2009 until recent.. so it was sun burned real bad. I attempted to sand it down and used a clear primer. Then I use the rattle can metallic silver... but the finish is terrible. bumps and no shine what so ever. I haven't tried the wet sand yet, so that is my question. What grade paper are you using to wet sand it?
I just ordered a variety pack (1000 to 2000) and hope that works. You use just plain water (spray bottle) and place the sand paper on a block and just slightly rub back and forth, correct? I also purchased the clay kit in hopes that if the wet sand works I can bring a better shine with the clay. I can post pics, but didn't want to mess with your thread.
Once I was satisfied with the primer coat, the first coat of base went on and I sanded that once it was uniform in color and dried with 600 wet. The next coat of color was also sanded with 600 wet. I applied very little pressure when sanding the basecoat, just enough to knock down the overspray from the small Duplicolor can. The last coat of basecoat went on with a bigger spray pattern so there was little to no overspray. It's fairly smooth when you run your hand over it after it dried. Generally, I keep building coats, sanding with 600-800 wet inbetween until I get a virtually smooth and uniform coat. With the old one step laquer paint jobs, you sanded in between each coat and then the last coat was sanded and buffed. Basecoat/Clearcoat works a little different, you don't sand the last coat of color, you clear over it and sand and buff the clear. This is what has worked for me in the past. I wet sand the clear with 1000 wet inbetween coats being careful not to cut thru the clear to the base. The final coat of clear is wet sanded with 2000 and then buffed, polished, etc.
Looks good. I'm not worried about the quality of your final product (work) so much as the quality of your paint. There’s a reason that Maaco’s paint doesn’t last as long as better paints from quality shops. For a roof panel – directly exposed to heat/sunlight, it’ll be interesting to see how long the paint/finish actually lasts. If you drive it a lot in good weather, I wouldn’t be surprised if you can see evidence of chalking/fading within a couple of years.
Everyone I talked to -- about a rattle-can self-repair on my DD said the same thing...including paint shops (where I have friends). I hope they're wrong!
Everyone I talked to -- about a rattle-can self-repair on my DD said the same thing...including paint shops (where I have friends). I hope they're wrong!
Last edited by ejscarfo; 08-19-2013 at 04:54 PM.
08-19-2013, 04:09 PM
#5
Race Director
BTW...I tried rattle-canning a satin-black hood insert on my DD (Isuzu Vehicross). I could never get an even coat with the rattle-can. They just don't shoot enough volume for a satin finish. With base, clear, I hope you get the right coat thickness for your clear-coats. I'd almost be tempted to have a shop shoot the clear! LOL
But I'm a worry-wart!
I wonder if they make satin urethane? Maybe I should reshoot the insert with flat-black...then satin-coat it?
Edit: Now that I think about it...I'm surprised you found a base w/o clear mixed in. Was that through a paint supply store? I'd also be tempted to avoid handling for the first few weeks or months. Let that sun cure the paint.
Last edited by GREGGPENN; 08-19-2013 at 04:12 PM.
08-19-2013, 04:49 PM
#6
Melting Slicks
Thread Starter
For major repairs, I don't use the over-the-counter stuff, I save that for small jobs. The spray radius out of those cans is just too small. I had the paint made up by microfinish.com. They have the OEM paint for almost all cars, trucks, tractors, etc. and they will sell it to you in bottle, spray can, pen or by the quart. They sell basecoat/clearcoat paints. They also have the 3 stage paints for the metallics like on the late model Cadillacs (basecoat, midcoat and clearcoat). The last rattle can job I did was a 3 stage on my Caddy SLS, I did the front grille and bumper cover. That came out amazing and only cost me $300 in materials and parts (car was involved in a car wash incident and the car wash paid me what the body shop quoted, $2500). I forgot the name of the company I used (they went out of business after Katrina), but they used PPG paint. The cans came to me with PPG labels and the paint quality was awesome.
To get the right coverage, I spray from the smallest width. For example, on my top, instead of spraying from the front of the top (as it would sit on the car) to the rear, I spray from the left-side up to the right-side. That way, the paint can overlap wet on wet and dry evenly because the distance on the return stroke is shorter. It will take multiple coats so be patient. Also, shake the hell out of the can before you start. You don't want a big dot of pigment landing in your work. I keep the can at least 5 to 6 inches from the surface, upright, instead of the 8 to 10 they write on the can. At 8-10 on a large surface in 70 degree weather, all you get is overspray or a really rough finish. The small cans have a small radius so those are good for small jobs or things like trim pieces and touch ups. To do a panel, use the larger can, the spray radius is double and you get better coverage. I attach a trigger to the nozzle to keep even pressure on it as well. Smooth and steady wins the race with paint IMO.
Once I get the first coat of clear on it and it dries, I will put the top on the car and compare the depth to the halo part of the roof. I will continue to clear it until I get the same depth and it matches. Once I'm satisfied, I'll probably take the top and put it away to cure. The paint manufacturer says I can wet sand and compound the clear once its dry, I figure about week, but no wax for 30 days.
Last edited by ejscarfo; 08-19-2013 at 04:51 PM.
08-20-2013, 10:25 AM
#7
8th Gear
Member Since: Aug 2013
Location: Lexington Park MD
Posts: 8
Likes: 0
Received 0 Likes
on
0 Posts
Yes, plain water and lots of it, have a spray bottle and bucket of water handy. I use a block on totally flat surfaces. The roof is curved so I just use the paper loose with my palm as the block so to speak. When I was sanding the primer coats, I was using 400 wet using back and forth motions only and rinsing the paper every few strokes. With the top wet, I would run my fingers over it to feel any rough or high spots. It takes practice, but I've been doing stuff like this for 25 years. After the primer was sanded, cleaned and dried, I could easily spot any places that may need filler, spot putty, etc.
Once I was satisfied with the primer coat, the first coat of base went on and I sanded that once it was uniform in color and dried with 600 wet. The next coat of color was also sanded with 600 wet. I applied very little pressure when sanding the basecoat, just enough to knock down the overspray from the small Duplicolor can. The last coat of basecoat went on with a bigger spray pattern so there was little to no overspray. It's fairly smooth when you run your hand over it after it dried. Generally, I keep building coats, sanding with 600-800 wet inbetween until I get a virtually smooth and uniform coat. With the old one step laquer paint jobs, you sanded in between each coat and then the last coat was sanded and buffed. Basecoat/Clearcoat works a little different, you don't sand the last coat of color, you clear over it and sand and buff the clear. This is what has worked for me in the past. I wet sand the clear with 1000 wet inbetween coats being careful not to cut thru the clear to the base. The final coat of clear is wet sanded with 2000 and then buffed, polished, etc.
Once I was satisfied with the primer coat, the first coat of base went on and I sanded that once it was uniform in color and dried with 600 wet. The next coat of color was also sanded with 600 wet. I applied very little pressure when sanding the basecoat, just enough to knock down the overspray from the small Duplicolor can. The last coat of basecoat went on with a bigger spray pattern so there was little to no overspray. It's fairly smooth when you run your hand over it after it dried. Generally, I keep building coats, sanding with 600-800 wet inbetween until I get a virtually smooth and uniform coat. With the old one step laquer paint jobs, you sanded in between each coat and then the last coat was sanded and buffed. Basecoat/Clearcoat works a little different, you don't sand the last coat of color, you clear over it and sand and buff the clear. This is what has worked for me in the past. I wet sand the clear with 1000 wet inbetween coats being careful not to cut thru the clear to the base. The final coat of clear is wet sanded with 2000 and then buffed, polished, etc.
I also have sun burn areas in the back of my car and I plan to try to the clay method on it. It's only on top, around the fuel tank. The sides and fenders are fine... along with the hood. None of those areas got sun burned like the targa top and the top of the rear.
08-20-2013, 10:34 AM
#8
Melting Slicks
Thread Starter
Thanks for the detailed info. I plan to try and wet sand my current targa top and see if I can get it restored better. If that don't work I'll have to sand it back down and start all over. I was planning to start with about a 1000 to 1200 grade, but after reading your technique I think I might try something more course like a 600 or a 800. Oh well, I am learning.
I also have sun burn areas in the back of my car and I plan to try to the clay method on it. It's only on top, around the fuel tank. The sides and fenders are fine... along with the hood. None of those areas got sun burned like the targa top and the top of the rear.
I also have sun burn areas in the back of my car and I plan to try to the clay method on it. It's only on top, around the fuel tank. The sides and fenders are fine... along with the hood. None of those areas got sun burned like the targa top and the top of the rear.
On your top that you painted silver, are you using basecoat/clearcoat? Even the Duplicolor cans are 2 stage if that's the way it came from the factory. There is no gloss to the basecoat, you need to apply a clearcoat to achieve the correct finish.
08-20-2013, 03:30 PM
#9
Advanced

Member Since: Aug 2011
Location: Oklahoma City Ok
Posts: 67
Likes: 0
Received 0 Likes
on
0 Posts
Question, can you find the metal replacement trim readily available for this project? I assume it cannot be reused as it would get bent up during removal? And I have only seen the plastic/flex type trim for the edges.
08-20-2013, 03:38 PM
#10
Melting Slicks
Thread Starter
I'm pretty sure that edge trim is no longer available, I haven't seen it. However, the side rails that hold the weatherstripping are still available. I've seem them for sale on eBay and at Willcox.
09-16-2013, 11:21 AM
#11
Melting Slicks
Thread Starter
Well I had to put the project on hold for a few weeks, but last week saw the final coats of clear applied and the top was wet sanded and buffed yesterday. With new weatherstripping from Willcox, here is the finished product on the car. I painted the black edge trim and haven't installed it yet. That will probably go on sometime this week when I actually glue the weatherstripping (I just installed it for a test fit).
[IMG]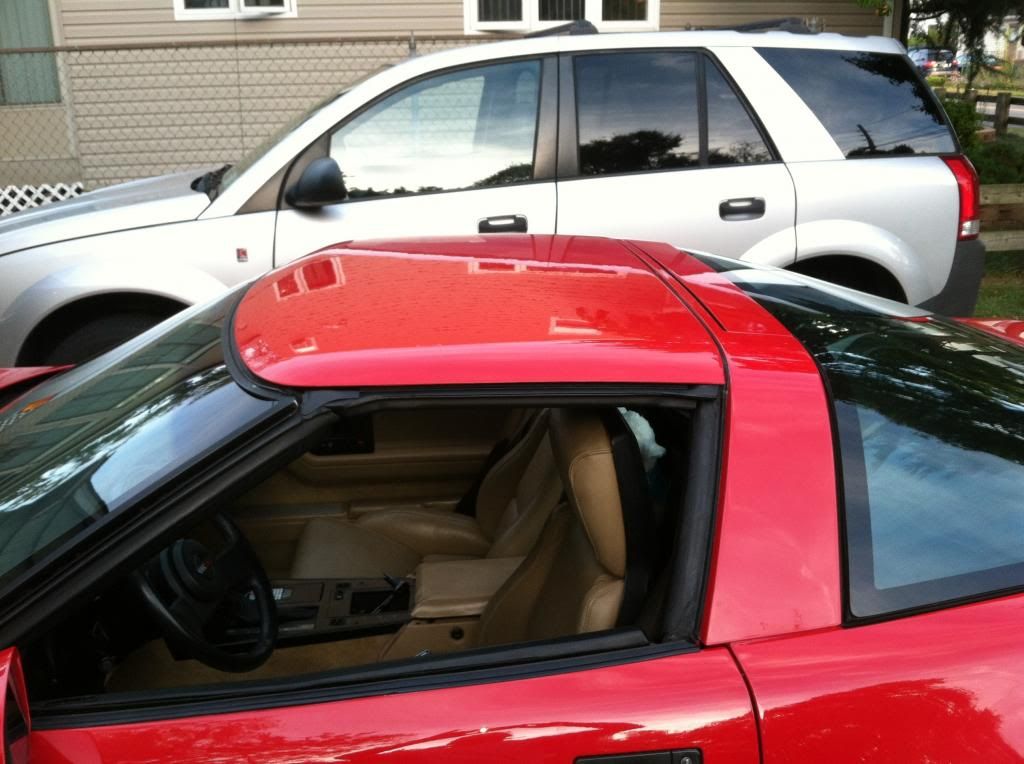 [/IMG]
[IMG]
 [/IMG]
 Very nice.
09-16-2013, 11:59 AM
Very nice.
09-16-2013, 11:59 AM
#13
Melting Slicks
Thread Starter
Thanks! I got the shine without even using glaze. I just used the rubbing compound the paint supplier sent me which I applied with a foam pad on my buffer. Now I have to wait 30 days to wax it.
09-17-2013, 01:22 PM
#14
Racer
Member Since: Oct 2010
Location: Providence RI
Posts: 499
Likes: 0
Received 0 Likes
on
0 Posts
ejs..you did an excellent job..color match looks great, gloss coat looks great. Good Luck with the final button up, weatherstrip, edge trim. Thanks for your step by step also. Best, Derek.
09-17-2013, 02:00 PM
#15
Melting Slicks
Thread Starter
Thanks! My best advice to anyone attempting the rattle can repaint is slow and steady wins the race. In my case, it took a month and I'm very happy with the results.
09-20-2013, 11:34 AM
#16
Melting Slicks
Thread Starter
Last night the remainder of the work was done to the top. It was glazed using Meguires #7 glaze (not bad, but I like the 3M one better) and I installed the black trim edge moulding. The weatherstripping needs to settle in a bit as I had to apply pressure to push the top down so I could bolt the back of it in. I haven't rolled the windows up yet, but I don't see a problem with them not sealing with the new rubber. I'll know tonight when the car comes out for a cruise with the club.
Anyway, it was dark so I took this pic in my garage. The reflection off the roof gave some distortion in the pic so I'll take a better one tomorrow to post.
Thanks to all those that gave awesome advice while I doing this project!
[IMG]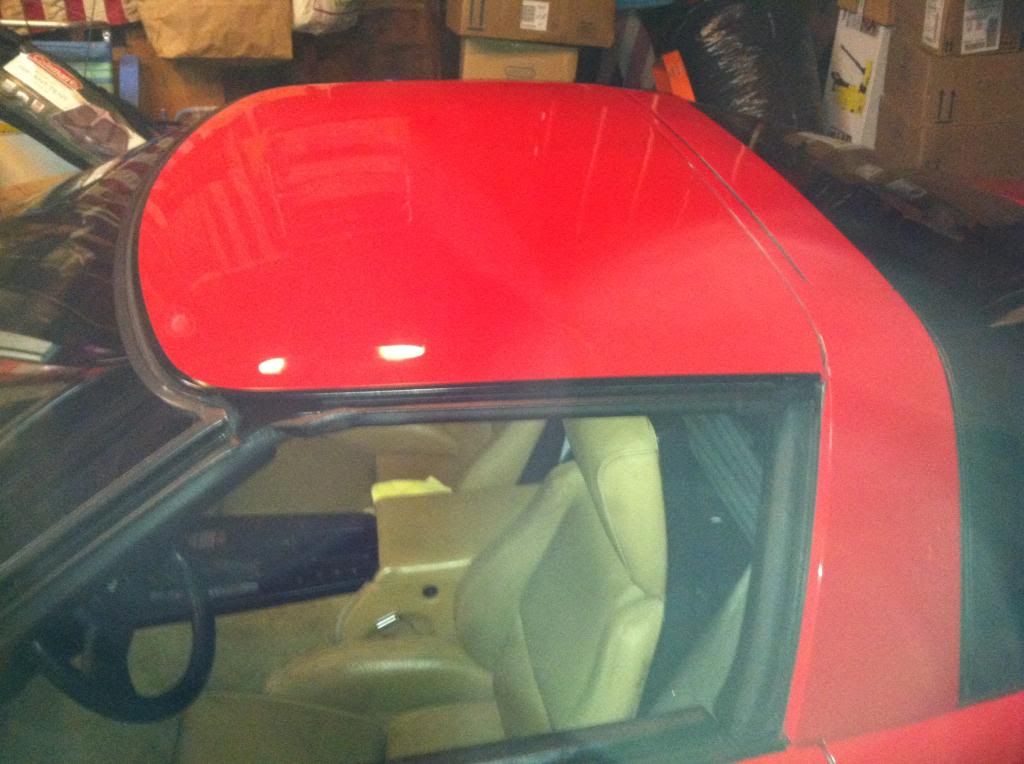 [/IMG]
Anyway, it was dark so I took this pic in my garage. The reflection off the roof gave some distortion in the pic so I'll take a better one tomorrow to post.
Thanks to all those that gave awesome advice while I doing this project!
[IMG]
 [/IMG]
09-20-2013, 12:46 PM
[/IMG]
09-20-2013, 12:46 PM
#17
Burning Brakes


One thing you can also do for a bit more money is have a local shop or supplier (Arnolds motor supply in the Midwest) use the DuPont Chroma Vision system on the car. This system will actually take a scan of the existing paint on say the hood, and determine the exact mix required to EXACTLY match your existing faded paint. If you use the appropriate shade sealer you can paint right up to another panel and achieve an exact match. Just be aware that the fade rate will differ and some day there will be a difference if you don't blend into the surrounding panels.. Just my .02 from a guy that helped put himself through college by working some at a body shop :-).
09-20-2013, 01:05 PM
#18
Melting Slicks
Thread Starter
One thing you can also do for a bit more money is have a local shop or supplier (Arnolds motor supply in the Midwest) use the DuPont Chroma Vision system on the car. This system will actually take a scan of the existing paint on say the hood, and determine the exact mix required to EXACTLY match your existing faded paint. If you use the appropriate shade sealer you can paint right up to another panel and achieve an exact match. Just be aware that the fade rate will differ and some day there will be a difference if you don't blend into the surrounding panels.. Just my .02 from a guy that helped put himself through college by working some at a body shop :-).
I know the fade rate will be different. However, it is a separate panel that will be removed and installed at various times. If it were a fixed panel, I would of blended. I am considering painting the top of the halo because I am seeing some cracking. If I do that, it will be a spot job and that will be blended into the sides.
In my warped way of thinking, even if the whole car was painted, the rate at which the roof fades most likely will be different anyway from the rest of the car (i.e. off the car being stored in a bag for the summer). Perfect example is to look at the headlight bezels on a C4 that's never been painted. I can almost guarantee when you flip the lights up, the bezels are a different shade when compared to the rest of the hood.
The car is garaged and only sees the sun when I take it out to wash, show or drive. I never really leave it out otherwise. If it was used more, I would of invested in a professional paint job on the roof. If I get 5 years out of the rattle can job, I will be more than happy. I also went the rattle can route to prove to myself that I could do it and achieve the desired results.
Last edited by ejscarfo; 09-20-2013 at 01:16 PM.
09-20-2013, 09:55 PM
#19
Safety Car

Great looking job!! I will be doing this to my '85 soon and repairing rear bumper damage as well. Your results encourage me to go ahead and get mine done.
What did you use to get the trim off? I was going to try and ease it off with a small straight screw driver and hope no one used any adhesive.
What did you use to get the trim off? I was going to try and ease it off with a small straight screw driver and hope no one used any adhesive.
09-20-2013, 11:19 PM
#20
Melting Slicks
Thread Starter
Honestly, the trim just came off. I started from the rear with a flat screwdriver and it separated cleanly. I just worked it all the way around being careful not to bend it. There was a little adhesive, most of it was dried out tho. I guess 28 years is a long time for adhesive.
Anyway, I was glad it came off and was reusable. It's not available anymore except used. Installing was a little harder. I started from the front middle being careful to line up the sides so it wouldn't scratch the new paint. Then with a towel and small hammer, I tapped it into place. I didn't have to use any adhesive, friction is holding it in place now.
Anyway, I was glad it came off and was reusable. It's not available anymore except used. Installing was a little harder. I started from the front middle being careful to line up the sides so it wouldn't scratch the new paint. Then with a towel and small hammer, I tapped it into place. I didn't have to use any adhesive, friction is holding it in place now.