


lowering front end on 88

Thread Starter
Burning Brakes

Joined: May 2003
Posts: 855
Likes: 0
From: RIDIN DIRTY usa
I got a kit from mid america . I was able to do the rear end, but i have no idea how to work on the front ? What do i do with those plastic pieces ? or can someone tell me the best way to lower the front ? Thanks.
Racer


Joined: Aug 2003
Posts: 285
Likes: 0
From: Loganville Ga
Racer
Joined: Aug 2003
Posts: 285
Likes: 0
From: Loganville Ga
Nope, for the front thats it. In all reality, an inch is a lot for these cars. I also trimmed half of the pad off the end of the spring for a total of about 1 1/2" drop up front. It is quite a job but not overly difficult. Just take your time with it enjoy really getting to know your car.
Thread Starter
Burning Brakes
Joined: May 2003
Posts: 855
Likes: 0
From: RIDIN DIRTY usa
Got started on this tonight.  I didnt get a ball joint puller . I also didnt no the spring was one long piece
  Thought I could do one side at a time
  Im having trouble geting the bolt under the car in the middle like you said
  I was wondering if you have to take both sides apart all the way to slide the spring out ?P.S If you fly to NJ Ill let you help me.LOL
I didnt get a ball joint puller . I also didnt no the spring was one long piece Thought I could do one side at a time I was wondering if you have to take both sides apart all the way to slide the spring out ?P.S If you fly to NJ Ill let you help me.LOL
Corvette Stories
The Best of Corvette for Corvette Enthusiasts

Every 2027 Corvette Engine Explained
Joe Kucinski
Designer Imagines A Corvette That Looks More Like a Corvette Than the Corvette
Verdad Gallardo
10 Ugly Corvettes That We Still Kinda Love
Joe Kucinski
Top 10 Most Expensive Corvettes Ever Sold on Bring A Trailer
Brett Foote
10 Things Every Corvette Owner Needs (2026 Edition)
Michael S. Palmer
8 Most "Only Corvette Owners Understand" Quirks and Problems
Pouria Savadkouei
10 Reasons the C6 Z06 is Still A Performance Benchmark After 20 Years
Joe Kucinski
How Much Horsepower Every Corvette Engine "LOST" in 1972
Joe Kucinski
Top 10 DOs and DON'Ts for Protecting Your Convertible Top!
Michael S. PalmerRacer
Joined: Aug 2003
Posts: 285
Likes: 0
From: Loganville Ga
You will have to relieve the tension on both sides to get the spring out so yes,you will have to separate both the lower ball joints on both sides. I replaced my bushings while I was at it so I took the control arms completly off.
You can also use a separater (looks like a large fork) to get the tie rods ends off or you may try running the bolt out flush with the end of the threads and whacking it with a hammer. As long as they are not too frozen up, that should loosen them. Don't get all He-man on it, if it is too hard you may be able to borrow a separater from Auto Zone or one of the other chain stores.
I am not sure what bold you are referring to in the middle?
Thread Starter
Burning Brakes
Joined: May 2003
Posts: 855
Likes: 0
From: RIDIN DIRTY usa
purplemajesty thanks for all ur answers so far. I was talking about the four bolts in the middle that release the spring it self . A kid who i work with who claims to know all is gonna help me on sunday,so we well see if I can get it. any more tips would be great. thanks again. 
Le Mans Master


Joined: Sep 2004
Posts: 6,019
Likes: 568
From: Conroe Texas
the bolts are through the cradle. if the bolts are turning on you, put a socket on top of the bolts. you're going to have to look for the bolt heads on top, but they're there. do one side first, alternating front to back to front. if you loosen one bolt all the way, it'll be hard to get your socket on the other. then do the other side
Thread Starter
Burning Brakes
Joined: May 2003
Posts: 855
Likes: 0
From: RIDIN DIRTY usa
Alright the spring is out! Now i understand about the new shims. What are you talking about at the end of the spring,to make it lower? Also i had two spacers at the top of my spring. I need to put both of them back right???
Now i understand about the new shims. What are you talking about at the end of the spring,to make it lower? Also i had two spacers at the top of my spring. I need to put both of them back right???
Racer
Joined: Aug 2003
Posts: 285
Likes: 0
From: Loganville Ga
Where the end of the spring contacts the lower control arm, there should be a pad separating the two. Mine was about 1" thick. I cut it in half but have heard of people simply replacing it altogether with some type of shim. It just doesn't need to rest on the control arm, it will damage the spring over time.
As far as the spacers, I didn't use anything but the new shims in the lowering kit. Just make sure you trim the brackets as illustrated in the link I posted earlier so it will hold the spring in place.
As far as the spacers, I didn't use anything but the new shims in the lowering kit. Just make sure you trim the brackets as illustrated in the link I posted earlier so it will hold the spring in place.
Racer
Joined: Aug 2003
Posts: 285
Likes: 0
From: Loganville Ga
The brackets you will need to cut are the ones that actually held the spring in place, kind of U shaped with two bolts in each one and are about 18" from the the center of the car. Your profile says yours in an '89 so you shouldn't have a problem cutting them with a hacksaw since they are aluminum. You want to basically trim them the same amount as the difference in height from the new wedges to the old rubber spacers that you need to cut off. Since the spring is going to actually sit closer to the frame, you need to take up the difference so the brackets will still hold the spring in tight.


Le Mans Master

Joined: Jan 2002
Posts: 5,556
Likes: 0
From: Jenison MI
Cruise-In VI Veteran
Cruise-In VII Veteran
St. Jude Donor '06
Originally Posted by oneonone
just got done!!!!!!!! I think the car is higher then it was >>
 Take it fro a good drive and find some bumps, it will settle a lot.
Burning Brakes
Joined: Jun 2002
Posts: 908
Likes: 0
From: Waipahu Hawaii
This might be a little to late for you but here goes anyway...
these are instructions for a slammed look if thats what you want, if not then just use those pads instead of bolting everything back together with out any pads on the leaf springs........
since we're having lots of members wanting to lower they're car's lately, it can also go in the genaral section or where ever you feel it should go.
Heres a "copy and Paste" instructions that I had written out for a fellow member on another forum about a year ago, and also did this same for several other members on different forum's so here you go, and I hope this will help you out, some of you with older C-4's will have to buy 1 1/2 inch wheel spacers at least for the back if your gonna put on C-5 rims on the older C-4 cars.
These instructions are for C-5 owners as well ........
It's so easy to do! Infact, the hardest thing to do is to cut the rubber off the spring.. that stuff on there is tuff!!
Unbolt the outer tie rod & sway bar, on both sides, lossen the spring retainers which is holding the leaf spring to the frame of the car. (blue arrow in picture below)
On either side that you what to start on first, get a block of wood ( 2 by 4 ) and a small floor jack will be fine, put the wood along with the jack under the spring closest to the a-arm, with out it being ON the a-arm it's self and slowly jack the spring up untill it's not resting on the lower a-arm ( about a 1/4 to an 1/2 inch off )
Disconect the ABS sensor thats located on the brake assembly, thats very important for you to do so!! ( if yours has one) remove the 2 bolts that are holding the shocks to the lower a-arm (they're located near the spring in the lower a-arm), unbolt the lower ball joint stud nut, you can use a two jaw puller or what I did was unscrew the nut untill it covered the end of the stud and with a hammer, tap on the top of the nut and not that hard or you'll ruin either the nut it's self or the stud or both. (try using a hard rubber mallet first)
Before doing this, find something to put under the wheel hub.. another block of wood would be fine just to stabilize it and it should come free with no problem!!
repeat this on the other side and let the presure off from the 2 by 4 and jack free and you should be able to slide the spring out from either side after you pull back at the wheel hub away little, the spring will slide out from the lower a-arm.
It will not come out all the way if the car is not jacked up high enough and it does not have to!! you just need to be able to slide the spring far enough to be able to reach the rubber mounts.
With a steak knife or I prefered a hack saw blade, saw off the rubber mounts (#1 arrows in picture's) and try not to cut into the spring it's self... take your time, don't rush!!.
Do this on both sides.
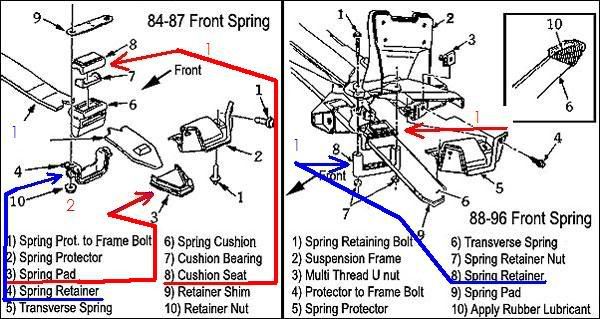
(Helpfull hint: while cutting the rubber off, lift up on the side that you started cutting at, at the same time you cutting away, the reason is that if you dont do this, the rubber will grab onto the knife/sawblade and you'll make very slow progress if any at all. The first side that I did without doing this took me about an hr and a half to cut, untill I lifted the rubber up off the blade thats sliding back and forth, the other side took 10 min to complete the job, big difference.)
This will give you the drop that your, I think looking for!!!
The wheels will be, depending on what size rims you've got, if your running stock 17's will be about an 1 inch to an 1 1/4 from the fender wells, and if you want an altamite drop on your car, take out the lowering screw's (if you own a C-5) shave off those rubber bushing's that your leaf spring sit's on in the a-arm!! (#2 red arrow in left hand pic) for a maximuim drop NO!! THE TIRE'S WILL NOT RUB!!
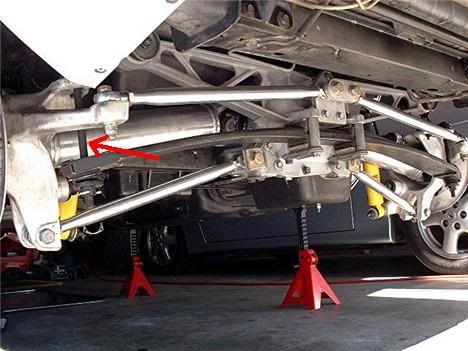
For the Rear end, take out the stock bolt's (Red arrow) and replace them with 12 inch bolts, buy some extra washers as well because you'll need them to be able to adjust the height by using them as shims.
Jack up the car, place a jack stand underneath some where stable, once the car is up in the air place your jack underneath the leaf spring with a block of wood between them (Jack and spring) to protect the spring, this will release the tention on the spring and bolt, unscrew the nut, and replace with the longer one, if you need washers on either one of the bolts the washers will go on before threading the bolt back through the the assembly, thats it plan and simple.
You will have to of course hopefully with out saying, take the wheels off to do this job, and the ride is fine, just a little more stiff, and I do mean a little.
A wheel alignment will have to be done but you dont have to go right away but evntualy it willhave to be done.
I hope this helps out all whos been wanting to lower they're car's .
Aloha
these are instructions for a slammed look if thats what you want, if not then just use those pads instead of bolting everything back together with out any pads on the leaf springs........
since we're having lots of members wanting to lower they're car's lately, it can also go in the genaral section or where ever you feel it should go.
Heres a "copy and Paste" instructions that I had written out for a fellow member on another forum about a year ago, and also did this same for several other members on different forum's so here you go, and I hope this will help you out, some of you with older C-4's will have to buy 1 1/2 inch wheel spacers at least for the back if your gonna put on C-5 rims on the older C-4 cars.
These instructions are for C-5 owners as well
........ It's so easy to do! Infact, the hardest thing to do is to cut the rubber off the spring.. that stuff on there is tuff!!
Unbolt the outer tie rod & sway bar, on both sides, lossen the spring retainers which is holding the leaf spring to the frame of the car. (blue arrow in picture below)
On either side that you what to start on first, get a block of wood ( 2 by 4 ) and a small floor jack will be fine, put the wood along with the jack under the spring closest to the a-arm, with out it being ON the a-arm it's self and slowly jack the spring up untill it's not resting on the lower a-arm ( about a 1/4 to an 1/2 inch off )
Disconect the ABS sensor thats located on the brake assembly, thats very important for you to do so!! ( if yours has one) remove the 2 bolts that are holding the shocks to the lower a-arm (they're located near the spring in the lower a-arm), unbolt the lower ball joint stud nut, you can use a two jaw puller or what I did was unscrew the nut untill it covered the end of the stud and with a hammer, tap on the top of the nut and not that hard or you'll ruin either the nut it's self or the stud or both. (try using a hard rubber mallet first)
Before doing this, find something to put under the wheel hub.. another block of wood would be fine just to stabilize it and it should come free with no problem!!
repeat this on the other side and let the presure off from the 2 by 4 and jack free and you should be able to slide the spring out from either side after you pull back at the wheel hub away little, the spring will slide out from the lower a-arm.
It will not come out all the way if the car is not jacked up high enough and it does not have to!! you just need to be able to slide the spring far enough to be able to reach the rubber mounts.
With a steak knife or I prefered a hack saw blade, saw off the rubber mounts (#1 arrows in picture's) and try not to cut into the spring it's self... take your time, don't rush!!.
Do this on both sides.
(Helpfull hint: while cutting the rubber off, lift up on the side that you started cutting at, at the same time you cutting away, the reason is that if you dont do this, the rubber will grab onto the knife/sawblade and you'll make very slow progress if any at all. The first side that I did without doing this took me about an hr and a half to cut, untill I lifted the rubber up off the blade thats sliding back and forth, the other side took 10 min to complete the job, big difference.)
This will give you the drop that your, I think looking for!!!
The wheels will be, depending on what size rims you've got, if your running stock 17's will be about an 1 inch to an 1 1/4 from the fender wells, and if you want an altamite drop on your car, take out the lowering screw's (if you own a C-5) shave off those rubber bushing's that your leaf spring sit's on in the a-arm!! (#2 red arrow in left hand pic) for a maximuim drop NO!! THE TIRE'S WILL NOT RUB!!
For the Rear end, take out the stock bolt's (Red arrow) and replace them with 12 inch bolts, buy some extra washers as well because you'll need them to be able to adjust the height by using them as shims.
Jack up the car, place a jack stand underneath some where stable, once the car is up in the air place your jack underneath the leaf spring with a block of wood between them (Jack and spring) to protect the spring, this will release the tention on the spring and bolt, unscrew the nut, and replace with the longer one, if you need washers on either one of the bolts the washers will go on before threading the bolt back through the the assembly, thats it plan and simple.
You will have to of course hopefully with out saying, take the wheels off to do this job, and the ride is fine, just a little more stiff, and I do mean a little.
A wheel alignment will have to be done but you dont have to go right away but evntualy it willhave to be done.
I hope this helps out all whos been wanting to lower they're car's .
Aloha
Last edited by Hawaiian Punch; Mar 28, 2005 at 03:09 AM.