


Frustrated beyond belief

Thread Starter
Le Mans Master


Joined: Jun 2005
Posts: 5,037
Likes: 520
From: Texas
 Frustrated beyond belief


I was trying to get the air out of my master cylinder (per factory manual) after replacing my bias spring. I tried loosening the front pipe connector but the edges were rounded and I ended up making it worse. Now nothing will "catch", not even lock pliers (material is too soft).
So, it has come down to cutting the damn pipe and using a stripped bolt remover.
First, I have a pipe cutter; however, it is going to cut more than I want. Anyone know of a way to cut the pipe at or near the fitting without causing much burring?
Second, where do I get the fitting that goes into the master cylinder for the front brakes? I can only find yellow brass fittings at hardware stores. If you know the size, that will help tremendously.
Last edited by Performance nut; May 28, 2006 at 09:04 PM.
Instructor


Joined: May 2006
Posts: 202
Likes: 16
Originally Posted by Performance nut
I was trying to get the air out of my master cylinder (per factory manual) after replacing my bias spring. I tried loosening the front pipe connector but the edges were rounded and I ended up making it worse. Now nothing will "catch", not even lock pliers (material is too soft).
So, it has come down to cutting the damn pipe and using a stripped bolt remover.
First, I have a pipe cutter; however, it is going to cut more than I want. Anyone know of a way to cut the pipe at or near the fitting without causing much burring?
Second, where do I get the fitting that goes into the master cylinder for the front brakes? I can only find yellow brass fittings at hardware stores. If you know the size, that will help tremendously.
Once it is extracted, you can go to an auto parts store & ask for a brake line adapter. Bring in the old one to match up. Install the adapter, bleed the master & install the new line from master to T or whatever.
Method 2:
If the line is real nice, cut it clean. Install the proper size tube nut (also avail at parts store). Put a nice double flare on the old tube. Bleed the master & assemble.
Method 3:
Snug it up agap, limp it or tow it to your local friendly auto repair center & "let" them fix this messy job.
Thread Starter
Le Mans Master
Joined: Jun 2005
Posts: 5,037
Likes: 520
From: Texas
Originally Posted by JBB
Method 1:
Once it is extracted, you can go to an auto parts store & ask for a brake line adapter. Bring in the old one to match up. Install the adapter, bleed the master & install the new line from master to T or whatever.
Method 2:
If the line is real nice, cut it clean. Install the proper size tube nut (also avail at parts store). Put a nice double flare on the old tube. Bleed the master & assemble.
Method 3:
Snug it up agap, limp it or tow it to your local friendly auto repair center & "let" them fix this messy job.
Once it is extracted, you can go to an auto parts store & ask for a brake line adapter. Bring in the old one to match up. Install the adapter, bleed the master & install the new line from master to T or whatever.
Method 2:
If the line is real nice, cut it clean. Install the proper size tube nut (also avail at parts store). Put a nice double flare on the old tube. Bleed the master & assemble.
Method 3:
Snug it up agap, limp it or tow it to your local friendly auto repair center & "let" them fix this messy job.

 Thanks. Method 2 is what I had in mind; however, I had specific questions.
 I want to cut the pipe with as little burring as possible as close to the fitting as I can get. I could use my Dremel but I think that will leave a jagged cut. Pipe cutter will require me to remove about 3/8" (too much for my taste).
I also would like to know the size of the fitting so I can get it ahead of time instead of searching all over the place for one once I get it off.

Burning Brakes


Joined: Jul 2004
Posts: 806
Likes: 0
From: Langley B.C.
FWIW,I have a set of pliers from Snap On (yes they cost too much)But they look like chanel locks but no adjustment,they bite on rounded studs incredibly well.But if you are going to saw it cut through the nut so you loose as little of the tube as possible.
Thread Starter
Le Mans Master
Joined: Jun 2005
Posts: 5,037
Likes: 520
From: Texas
Originally Posted by Great White North
FWIW,I have a set of pliers from Snap On (yes they cost too much)But they look like chanel locks but no adjustment,they bite on rounded studs incredibly well.But if you are going to saw it cut through the nut so you loose as little of the tube as possible.
 I will give the Snap On pliers a shot. Thanks.

Le Mans Master
Joined: Jan 2002
Posts: 9,036
Likes: 13
From: Edmonton AB
To work on tubing nuts, it is ESSENTIAL to use the correct
tool. It is called a Metric Flare Nut Wrench and it looks
like this

You need two,
- 10mm x 12mm (KD Tools 60612)
- 13mm x 14mm (KD Tools 60614)
See your KD vendor. Sears can probably help you out, too.
Your '91 master cylinder is like my '89 in that it has a smaller
nut on the front port and a larger fitting on the rear port.
You could try getting replacements from a jobber but I am not
optimistic that you'll succeed.
So I recommend going to a GM dealer and ordering the following
hydraulic fittings. They are for 3/16 ('5mm') tubing.
Front p/n #14076114 M10 x 1 (takes 12mm metric flare wrench) GM LIST: $4.17
Rear: p/n #11516404 M12 x 1 (takes 14mm metric flare wrench) GM LIST: $4.25
As for removing the existing flare nut, are you sure you
can not use a small pipe wrench or similar secure gripping
tool to gently/firmly back it out?
If you try, be sure to remove the Pressure Warning Switch that
mounts in the port between and above the fr/rr brake line ports
so there is no danger of harming it.
Supposing this is successful, you can then cut off the tubing
flare on the inside end of the flare nut, assuming that the tubing
itself does not get damaged.
If a grip wrench of some kind will not work, then you could
saw the hex portion of the nut off to save the maximum amount
of tubing. Then remove the M/C from the booster, mount it in
a vise and use an Easy Out to extract the remaining portion
of the flare nut. Be careful mounting in the vise and while
extracting or you will be in the market for a rebuilt M/C.
Do you have the proper tool for making a new flare on the
tubing? I forget whether these cars have the inverted or
ISO flare?
.
tool. It is called a Metric Flare Nut Wrench and it looks
like this
You need two,
- 10mm x 12mm (KD Tools 60612)
- 13mm x 14mm (KD Tools 60614)
See your KD vendor. Sears can probably help you out, too.
Your '91 master cylinder is like my '89 in that it has a smaller
nut on the front port and a larger fitting on the rear port.
You could try getting replacements from a jobber but I am not
optimistic that you'll succeed.
So I recommend going to a GM dealer and ordering the following
hydraulic fittings. They are for 3/16 ('5mm') tubing.
Front p/n #14076114 M10 x 1 (takes 12mm metric flare wrench) GM LIST: $4.17
Rear: p/n #11516404 M12 x 1 (takes 14mm metric flare wrench) GM LIST: $4.25
As for removing the existing flare nut, are you sure you
can not use a small pipe wrench or similar secure gripping
tool to gently/firmly back it out?
If you try, be sure to remove the Pressure Warning Switch that
mounts in the port between and above the fr/rr brake line ports
so there is no danger of harming it.
Supposing this is successful, you can then cut off the tubing
flare on the inside end of the flare nut, assuming that the tubing
itself does not get damaged.
If a grip wrench of some kind will not work, then you could
saw the hex portion of the nut off to save the maximum amount
of tubing. Then remove the M/C from the booster, mount it in
a vise and use an Easy Out to extract the remaining portion
of the flare nut. Be careful mounting in the vise and while
extracting or you will be in the market for a rebuilt M/C.
Do you have the proper tool for making a new flare on the
tubing? I forget whether these cars have the inverted or
ISO flare?
.
Le Mans Master
Joined: Jan 2002
Posts: 9,036
Likes: 13
From: Edmonton AB
Those are valid GM numbers but I have not ordered them myself.
Have the GM person double-check the numbers before ordering.
Also, don't use anything other than brake fluid around the ports,
take steps to keep cuttings out of the lines and M/C and thoroughly
clean the M/C if you need to resort to using the saw.
You do not want to contaminate the lines with non-brake fluids.
.
Have the GM person double-check the numbers before ordering.
Also, don't use anything other than brake fluid around the ports,
take steps to keep cuttings out of the lines and M/C and thoroughly
clean the M/C if you need to resort to using the saw.
You do not want to contaminate the lines with non-brake fluids.
.
Corvette Stories
The Best of Corvette for Corvette Enthusiasts

How Much Horsepower Every Corvette Engine "LOST" in 1972
Joe Kucinski
Top 10 DOs and DON'Ts for Protecting Your Convertible Top!
Michael S. Palmer
Top 10 Most Explosive Corvettes Ever Made: Power-to-Weight Ratio Ranked!
Joe Kucinski
150 hp to 1,250 hp: Every Corvette Generation Compared by the Specs That Matter
Joe Kucinski
8 Coolest Corvette Pace Cars (and Replicas) of All Time
Verdad Gallardo
Top 10 Corvette Engines RANKED by Peak Torque (70+ Years of Muscle!)
Joe Kucinski
Corvette ZR1X Will Be Pacing the Indy 500, And Could Probably Race, Too!
Verdad Gallardo
Top 10 Corvettes Coming to Mecum Indy 2026!
Brett Foote
Top 10 C9 Corvette MUST-HAVES to Fix These C8 Generation Flaws!
Michael S. Palmer
Thread Starter
Le Mans Master
Joined: Jun 2005
Posts: 5,037
Likes: 520
From: Texas
Originally Posted by Slalom4me
To work on tubing nuts, it is ESSENTIAL to use the correct
tool. It is called a Metric Flare Nut Wrench and it looks
like this
You need two,
- 10mm x 12mm (KD Tools 60612)
- 13mm x 14mm (KD Tools 60614)
See your KD vendor. Sears can probably help you out, too.
Your '91 master cylinder is like my '89 in that it has a smaller
nut on the front port and a larger fitting on the rear port.
You could try getting replacements from a jobber but I am not
optimistic that you'll succeed.
So I recommend going to a GM dealer and ordering the following
hydraulic fittings. They are for 3/16 ('5mm') tubing.
Front p/n #14076114 M10 x 1 (takes 12mm metric flare wrench) GM LIST: $4.17
Rear: p/n #11516404 M12 x 1 (takes 14mm metric flare wrench) GM LIST: $4.25
As for removing the existing flare nut, are you sure you
can not use a small pipe wrench or similar secure gripping
tool to gently/firmly back it out?
If you try, be sure to remove the Pressure Warning Switch that
mounts in the port between and above the fr/rr brake line ports
so there is no danger of harming it.
Supposing this is successful, you can then cut off the tubing
flare on the inside end of the flare nut, assuming that the tubing
itself does not get damaged.
If a grip wrench of some kind will not work, then you could
saw the hex portion of the nut off to save the maximum amount
of tubing. Then remove the M/C from the booster, mount it in
a vise and use an Easy Out to extract the remaining portion
of the flare nut. Be careful mounting in the vise and while
extracting or you will be in the market for a rebuilt M/C.
Do you have the proper tool for making a new flare on the
tubing? I forget whether these cars have the inverted or
ISO flare?
.
tool. It is called a Metric Flare Nut Wrench and it looks
like this
You need two,
- 10mm x 12mm (KD Tools 60612)
- 13mm x 14mm (KD Tools 60614)
See your KD vendor. Sears can probably help you out, too.
Your '91 master cylinder is like my '89 in that it has a smaller
nut on the front port and a larger fitting on the rear port.
You could try getting replacements from a jobber but I am not
optimistic that you'll succeed.
So I recommend going to a GM dealer and ordering the following
hydraulic fittings. They are for 3/16 ('5mm') tubing.
Front p/n #14076114 M10 x 1 (takes 12mm metric flare wrench) GM LIST: $4.17
Rear: p/n #11516404 M12 x 1 (takes 14mm metric flare wrench) GM LIST: $4.25
As for removing the existing flare nut, are you sure you
can not use a small pipe wrench or similar secure gripping
tool to gently/firmly back it out?
If you try, be sure to remove the Pressure Warning Switch that
mounts in the port between and above the fr/rr brake line ports
so there is no danger of harming it.
Supposing this is successful, you can then cut off the tubing
flare on the inside end of the flare nut, assuming that the tubing
itself does not get damaged.
If a grip wrench of some kind will not work, then you could
saw the hex portion of the nut off to save the maximum amount
of tubing. Then remove the M/C from the booster, mount it in
a vise and use an Easy Out to extract the remaining portion
of the flare nut. Be careful mounting in the vise and while
extracting or you will be in the market for a rebuilt M/C.
Do you have the proper tool for making a new flare on the
tubing? I forget whether these cars have the inverted or
ISO flare?
.
Grip wrenches do not work, the metal is too soft (I think its brass). All they do is make gouge the surface and round the bolt more. I think my only option is the do like you say and cut the bolt.
Thanks for the part numbers. I will try and call around on Tuesday to locate them.
Thread Starter
Le Mans Master
Joined: Jun 2005
Posts: 5,037
Likes: 520
From: Texas
Originally Posted by Slalom4me
Those are valid GM numbers but I have not ordered them myself.
Have the GM person double-check the numbers before ordering.
Also, don't use anything other than brake fluid around the ports,
take steps to keep cuttings out of the lines and M/C and thoroughly
clean the M/C if you need to resort to using the saw.
You do not want to contaminate the lines with non-brake fluids.
.
Have the GM person double-check the numbers before ordering.
Also, don't use anything other than brake fluid around the ports,
take steps to keep cuttings out of the lines and M/C and thoroughly
clean the M/C if you need to resort to using the saw.
You do not want to contaminate the lines with non-brake fluids.
.
Thread Starter
Le Mans Master
Joined: Jun 2005
Posts: 5,037
Likes: 520
From: Texas
Who says perseverance doesnt pay off. Got the damn fitting loose. Dear god, I thought I had snapped the bolt when it finally loosed. That thing was in there tight. 1/3 of the way there.
Le Mans Master
Joined: Jan 2002
Posts: 9,036
Likes: 13
From: Edmonton AB
Originally Posted by Performance nut
Who says perseverance doesnt pay off. Got the fitting loose.
I thought I had snapped the bolt when it finally loosened.
That thing was in there tight.
I thought I had snapped the bolt when it finally loosened.
That thing was in there tight.
higher than perseverence when something like this develops.
Congratulations on passing the test.
There probably isn't a problem, but it wouldn't hurt to get a strong
light and carefully visually inspect the M/C around the port for signs
of any anomolies. If you were reefing hard on the installed M/C,
remember that it does not have had much support. So also look for
any signs of cracks around the flange where the M/C mounts to the
booster.
Incidently, when it comes time for reassembly
FSM Torque Spec:
Brake Pipe to Master Cyl Tube Nuts - 18Nm (13 lbs ft)
Perhaps Conan, the Previous Owner didn't bother to check beforeBrake Pipe to Master Cyl Tube Nuts - 18Nm (13 lbs ft)
tightening last time. 'There! It won't leak NOW!'
.
Le Mans Master
Joined: Jan 2002
Posts: 9,036
Likes: 13
From: Edmonton AB
I made a remark above about having the right flaring tool. There are
at least two types of flares used for automotive hydraulic brake lines:
the '89 C4 uses Inverted or ISO. (Mr Mojo mentioned installing a
Line-Lock in the thread.) Can't find the thread just at the moment
and I don't recall the answer if one appeared.
However, here are the tools. Notice that there are Inverted/Double
Flare versions in Imperial and in Metric. I THINK that the metric
version is required, although I SUSPECT that repairs get made
with the Imperial version.
The descriptions for the flare nuts mentioned included references to
tube. 5mm for the M10 x 1 nut. 4.75 for the M12 x 1. If this means
that the tube & flare differ between front and rear lines, then the
metric tool is required because it includes mandrels for 5mm.
Otherwise, if 4.75mm works for both front and rear fittings, then
the 3/16" in the imperial kit would SEEM to be equally suitable to
using the 4.75 from the metric kit. 3/16" tube converts to 4.7625mm.
1/4" to 6.35mm.
Of course, if the flares are ISO, then you no longer have the option
of considering whether you can use your existing imperial kit.
Imperial Single & Double Flare tool
Metric Single & Double Flare tool
ISO Flare Tool (Bubble Flare)
Deluxe kit for three kinds of Flares
.
at least two types of flares used for automotive hydraulic brake lines:
- Inverted Flare, aka Double Flare which has been used on North
American vehicles since or shortly after the introduction of hydraulic
brakes here.
Think of a 'Y'-shape, with the ends of the ears of the 'Y' doubled back
over back into the central cup formed by the top of the letter.
. - ISO Flare, aka Bubble Flare which appeared first on imported vehicles.
Think of a wine glass, with the stem being the tubing. This flares out
to form the bowl and then curves back into form the rim.
the '89 C4 uses Inverted or ISO. (Mr Mojo mentioned installing a
Line-Lock in the thread.) Can't find the thread just at the moment
and I don't recall the answer if one appeared.
However, here are the tools. Notice that there are Inverted/Double
Flare versions in Imperial and in Metric. I THINK that the metric
version is required, although I SUSPECT that repairs get made
with the Imperial version.
The descriptions for the flare nuts mentioned included references to
tube. 5mm for the M10 x 1 nut. 4.75 for the M12 x 1. If this means
that the tube & flare differ between front and rear lines, then the
metric tool is required because it includes mandrels for 5mm.
Otherwise, if 4.75mm works for both front and rear fittings, then
the 3/16" in the imperial kit would SEEM to be equally suitable to
using the 4.75 from the metric kit. 3/16" tube converts to 4.7625mm.
1/4" to 6.35mm.
Of course, if the flares are ISO, then you no longer have the option
of considering whether you can use your existing imperial kit.
Imperial Single & Double Flare tool
Metric Single & Double Flare tool
ISO Flare Tool (Bubble Flare)
Deluxe kit for three kinds of Flares
.


Burning Brakes
Joined: Jul 2004
Posts: 806
Likes: 0
From: Langley B.C.
Originally Posted by Performance nut
Who says perseverance doesnt pay off. Got the damn fitting loose. Dear god, I thought I had snapped the bolt when it finally loosed. That thing was in there tight. 1/3 of the way there.


Congrats!!!
Thread Starter
Le Mans Master
Joined: Jun 2005
Posts: 5,037
Likes: 520
From: Texas
Originally Posted by Slalom4me
I made a remark above about having the right flaring tool. There are
at least two types of flares used for automotive hydraulic brake lines:
the '89 C4 uses Inverted or ISO. (Mr Mojo mentioned installing a
Line-Lock in the thread.) Can't find the thread just at the moment
and I don't recall the answer if one appeared.
However, here are the tools. Notice that there are Inverted/Double
Flare versions in Imperial and in Metric. I THINK that the metric
version is required, although I SUSPECT that repairs get made
with the Imperial version.
The descriptions for the flare nuts mentioned included references to
tube. 5mm for the M10 x 1 nut. 4.75 for the M12 x 1. If this means
that the tube & flare differ between front and rear lines, then the
metric tool is required because it includes mandrels for 5mm.
Otherwise, if 4.75mm works for both front and rear fittings, then
the 3/16" in the imperial kit would SEEM to be equally suitable to
using the 4.75 from the metric kit. 3/16" tube converts to 4.7625mm.
1/4" to 6.35mm.
Of course, if the flares are ISO, then you no longer have the option
of considering whether you can use your existing imperial kit.
Imperial Single & Double Flare tool
Metric Single & Double Flare tool
ISO Flare Tool (Bubble Flare)
Deluxe kit for three kinds of Flares
.
at least two types of flares used for automotive hydraulic brake lines:
- Inverted Flare, aka Double Flare which has been used on North
American vehicles since or shortly after the introduction of hydraulic
brakes here.
Think of a 'Y'-shape, with the ends of the ears of the 'Y' doubled back
over back into the central cup formed by the top of the letter.
. - ISO Flare, aka Bubble Flare which appeared first on imported vehicles.
Think of a wine glass, with the stem being the tubing. This flares out
to form the bowl and then curves back into form the rim.
the '89 C4 uses Inverted or ISO. (Mr Mojo mentioned installing a
Line-Lock in the thread.) Can't find the thread just at the moment
and I don't recall the answer if one appeared.
However, here are the tools. Notice that there are Inverted/Double
Flare versions in Imperial and in Metric. I THINK that the metric
version is required, although I SUSPECT that repairs get made
with the Imperial version.
The descriptions for the flare nuts mentioned included references to
tube. 5mm for the M10 x 1 nut. 4.75 for the M12 x 1. If this means
that the tube & flare differ between front and rear lines, then the
metric tool is required because it includes mandrels for 5mm.
Otherwise, if 4.75mm works for both front and rear fittings, then
the 3/16" in the imperial kit would SEEM to be equally suitable to
using the 4.75 from the metric kit. 3/16" tube converts to 4.7625mm.
1/4" to 6.35mm.
Of course, if the flares are ISO, then you no longer have the option
of considering whether you can use your existing imperial kit.
Imperial Single & Double Flare tool
Metric Single & Double Flare tool
ISO Flare Tool (Bubble Flare)
Deluxe kit for three kinds of Flares
.
 Helpful and a mindreader. Those tool links you provided were from the same website I was going to buy the ISO flare tool from (service manual calls for an ISO flare). They have a warehouse in Sacramento, which is about an hour and a half from where I live. Hopefully it will get here before I go back to work on Saturday.
As for the inspections, I did a cursory inspection afterwards and found nothing. I had my hand on the master cylinder providing "counter torque" when I was cranking on that nut. If I hadnt, the damn master cylinder would of ripped off the booster considering how hard I was pulling. BTW, I saw that torque spec in the manual... 13 lbs/ft my ***.
Thread Starter
Le Mans Master
Joined: Jun 2005
Posts: 5,037
Likes: 520
From: Texas
Sorry it took so long to post, my internet has been down since Tuesday morning.

I called the local dealership. There are only 3 left in the United States. I ordered one (at $4 for shipping too!). The other guy wanted $12 for shipping.
I called the local dealership. There are only 3 left in the United States. I ordered one (at $4 for shipping too!). The other guy wanted $12 for shipping.
Le Mans Master
Joined: Jan 2002
Posts: 9,036
Likes: 13
From: Edmonton AB
Originally Posted by Performance nut
There are only 3 left in the United States.
longer appear on CDN systems, even though US systems still show
the remaining items? The screen came up as 'Disc' which precludes
doing a search. They tried EPIC without success, too.
Anyway, if the GM item truly had disappeared, I believe all you
would have need to do is to is locate a short section of pre-made
'European'-style brake line. NAPA also describes it as metric thread
bubble flare - p/n 813-1260 for a 3/16" x 8" section of tube with
two M10 x 1 tube nuts. Even if you could locate a tube nut
singly, it would be more money than the pre-made line.
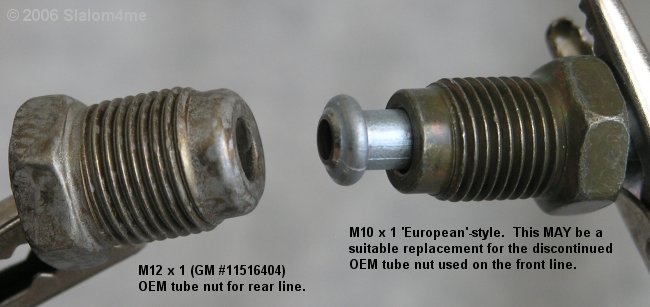
Here is a picture of the OEM tube nut for the REAR m/c port
(M12 x 1) held up for comparison with the aftermarket tube nut
for the FRONT (M10 x 1).
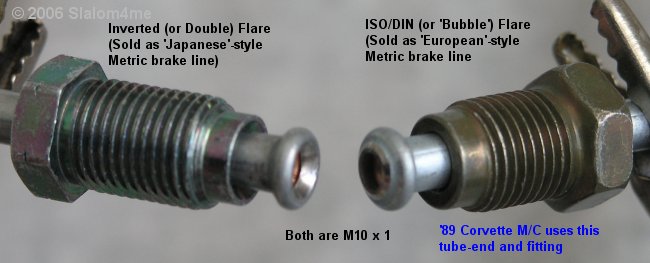
Here are the metric Inverted flare on the left, beside the
ISO/DIN Bubble flare on the right. The unit on the right
looks just like yours.
.
Thread Starter
Le Mans Master
Joined: Jun 2005
Posts: 5,037
Likes: 520
From: Texas
Well hopefully when the fitting gets here, it is the right one. If it isnt a match, I looked up some contingencies:
First choice since they are in North America.
Last resort since shipping will probably cost at least twice what the fitting will cost.
As far as the nut costing as much as the line, maybe. Depends if I have to have it shipped or if its local... hmm... local. Doh. Bet some of the junk yards with C4's would have their master cylinders (or at the very least the lines) still on them. Should of tried there first. Oh well.
First choice since they are in North America.
Last resort since shipping will probably cost at least twice what the fitting will cost.
As far as the nut costing as much as the line, maybe. Depends if I have to have it shipped or if its local... hmm... local. Doh. Bet some of the junk yards with C4's would have their master cylinders (or at the very least the lines) still on them. Should of tried there first. Oh well.