


Tech Tip: Easier radiator access.
Thread Starter
Le Mans Master


Joined: May 2005
Posts: 7,354
Likes: 2,278
From: Central Maryland
Last week I swapped out the radiator in my '94. All in all, it wasn't such a bad chore, but there was one part of the job that truly annoyed me. There are six small screws with 7mm hex heads that secure the lower portion of the upper radiator support to the lower radiator support.
These screws are located three on each side, forward of the A/C condenser, and down between the radiator support and the frame rails. Access to four of these six screws is, to put it politely, lousy. It was a genuine pain in the **** getting them out, and consumed precious time that I could have spent drinking cold beer.
As I was beginning to reassemble everything, I found myself muttering to myself under my breath about the prospect of dealing with reinstalling these screws. "Was this really the best that the engineers could have done with this? Hmm... Maybe we can improve on this..."
Try this as you put yours back together:
Remove the six J-Nuts from the upper radiator support. They are visible in the photo below, three on each side:
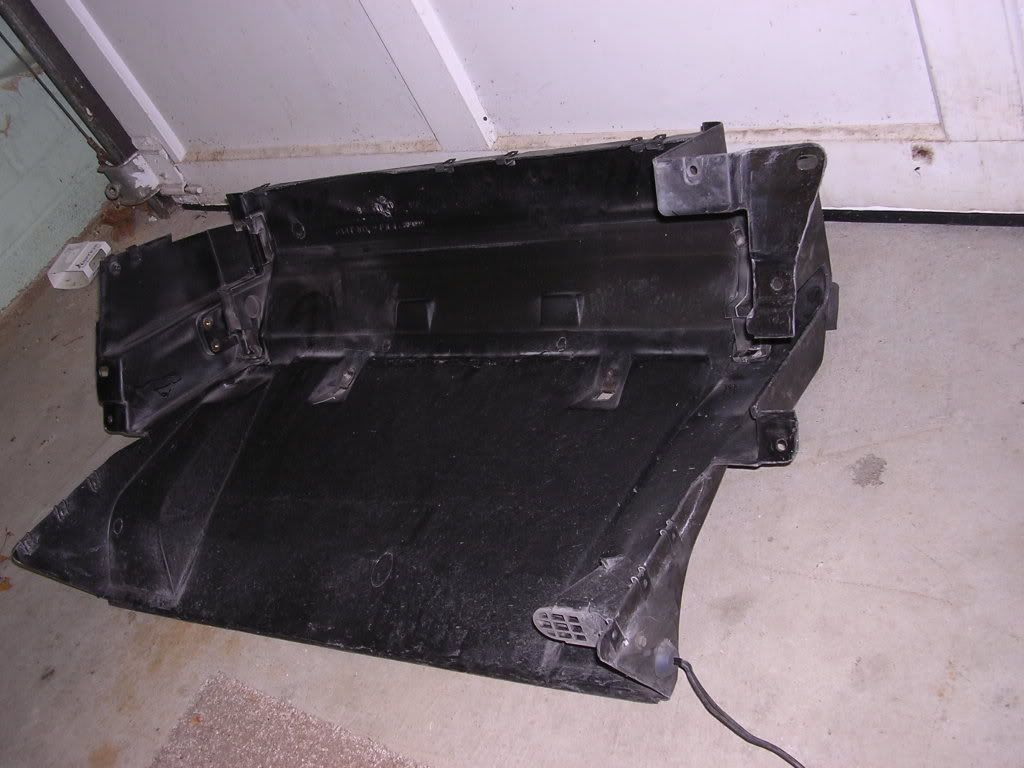
.
Here's a close-up shot of a portion of the upper radiator support with three of the J-Nuts removed:
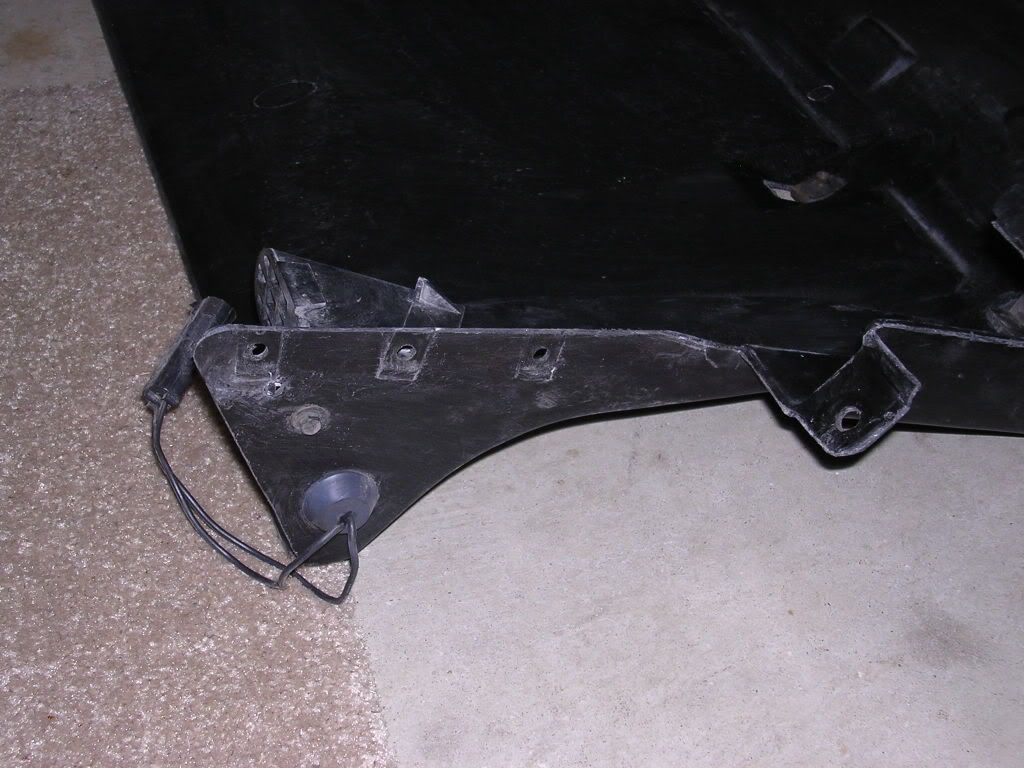
.
Install these J-Nuts on the lower radiator support as shown in the next two photos.
Driver's side:
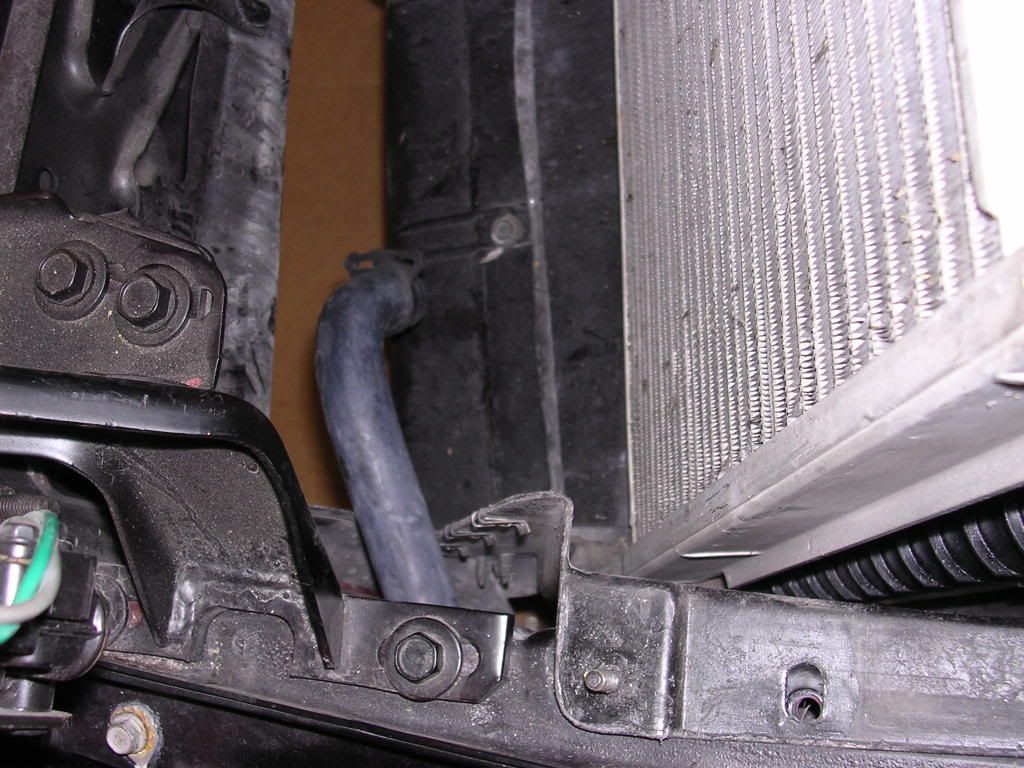
.
Passenger's side (note that photo was taken from driver's side):
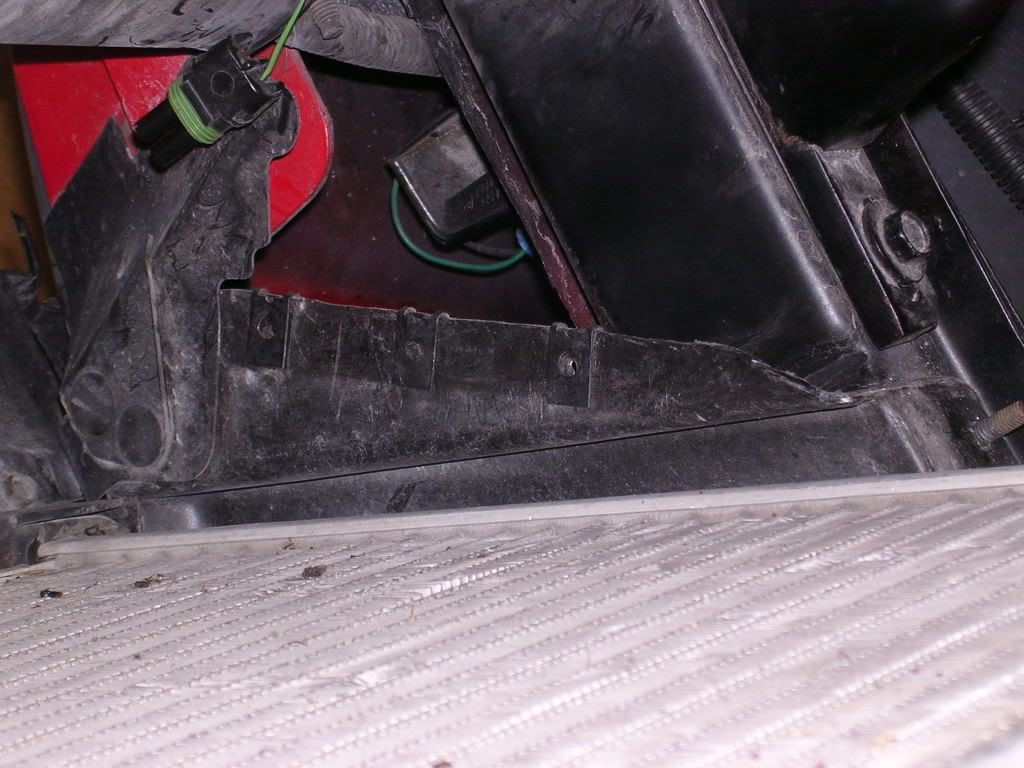
Now you can install the screws from the opposite direction. This allows you to run them in through the air intake opening below the front bumper. It's MUCH easier to install the screws this way, and it'll be every bit as easy to remove them again at some future date.
One warning:
Make sure that everything is positioned such that the screw tips are not able to contact such items as wiring and the AIR pump's air intake hose (easy enough to do, just be sure to pay attention to this so that nothing gets damaged).
Be well,
SJW
These screws are located three on each side, forward of the A/C condenser, and down between the radiator support and the frame rails. Access to four of these six screws is, to put it politely, lousy. It was a genuine pain in the **** getting them out, and consumed precious time that I could have spent drinking cold beer.
As I was beginning to reassemble everything, I found myself muttering to myself under my breath about the prospect of dealing with reinstalling these screws. "Was this really the best that the engineers could have done with this? Hmm... Maybe we can improve on this..."
Try this as you put yours back together:
Remove the six J-Nuts from the upper radiator support. They are visible in the photo below, three on each side:
.
Here's a close-up shot of a portion of the upper radiator support with three of the J-Nuts removed:
.
Install these J-Nuts on the lower radiator support as shown in the next two photos.
Driver's side:
.
Passenger's side (note that photo was taken from driver's side):
Now you can install the screws from the opposite direction. This allows you to run them in through the air intake opening below the front bumper. It's MUCH easier to install the screws this way, and it'll be every bit as easy to remove them again at some future date.
One warning:
Make sure that everything is positioned such that the screw tips are not able to contact such items as wiring and the AIR pump's air intake hose (easy enough to do, just be sure to pay attention to this so that nothing gets damaged).
Be well,
SJW
Last edited by SJW; Jul 28, 2006 at 11:49 PM.
Melting Slicks


Joined: Dec 2004
Posts: 2,137
Likes: 5
From: Howard PA
I posted this a while back, maybe two weeks ago.
http://forums.corvetteforum.com/show....php?t=1435908
I can't remember who suggested it but I tackled this little mod that should make life much easier. I had nothing better to do while I'm waiting for my heads to come back from the machine shop.
7 tools, 1 can of semi-gloss paint (makes it look factory) and about twenty minutes of time.
Of course if you have to take the whole box out it will take much longer.
The top tinnerman goes on with no modding, the second one needs a bit of filing and the bottom one needs a bunch so the tinnerman hole aligns with the hole already there.
Last edited by ALLT4; Jul 29, 2006 at 12:03 AM.
Thread Starter
Le Mans Master
Joined: May 2005
Posts: 7,354
Likes: 2,278
From: Central Maryland
Sorry about the dupe, folks. I missed that thread.
FWIW, I didn't have to do any filing/mods to get the J-Nuts to align well enough with the existing holes. I also didn't remove the lower radiator support to do this mod...
Be well,
SJW
FWIW, I didn't have to do any filing/mods to get the J-Nuts to align well enough with the existing holes. I also didn't remove the lower radiator support to do this mod...
Be well,
SJW
Originally Posted by ALLT4
I posted this a while back, maybe two weeks ago.
http://forums.corvetteforum.com/show....php?t=1435908
I can't remember who suggested it but I tackled this little mod that should make life much easier. I had nothing better to do while I'm waiting for my heads to come back from the machine shop.
7 tools, 1 can of semi-gloss paint (makes it look factory) and about twenty minutes of time.
Of course if you have to take the whole box out it will take much longer.
The top tinnerman goes on with no modding, the second one needs a bit of filing and the bottom one needs a bunch so the tinnerman hole aligns with the hole already there.
Race Director


Joined: Aug 2000
Posts: 14,130
Likes: 7
Cruise-In II Veteran
Theres a shroud mod I did on my former 86,even though there are differences in design from later models.Not hijacking but posting in case anyone is reading and wondering about their earlier cars too.
I found that on the 86,the plastic shroud has 2 parts,upper and lower.
Its not too bad to remove the top upper shroud screws if you have a power tool...however the shroud is shaped so youre forced to remove the tranny cooler line and upper rad hose.
I trim cut the top shroud bottom edges some at both ends which would have normally been in the way of the cooler lines,hose,etc when pulling it out,so now theres less time to remove and no need to remove the tranny cooler lines or etc.It even allows you to slip the top shroud off without having to remove the top rad hose.
Did this to make periodic cleaning of the leaves and junk that gets built up in there between the rad and condensor.Putting it back together,still felt as sturdy.Dont know why GM felt it was necessary to mold the shroud the way the did,forcing one to remove stuff that doesnt need to come off if youre not planning to pull the rad out.
Theres also an old tech tip,Not sure if still on the forum,but I did it on my 86 as well.The 2 plastic *****/2 shroud studs that hold the air intake box to the upper rad shroud has a tendency to spin out of its bottom insert hole and making it impossible to get off.
Using the tip,I took the air intake box off,made sure the 2 intake studs was aligned up,drilled a hole in each of them on the side of the stud through the thin metal plate it has under the shroud and used a pop rivet on both sides to keep the screw tab firmly in place.Taking the **** off never spun the bottom of the screw again.It was very simple to do.(note,use caution when drilling this ON the car,dont hit the radiator or anything with the drill bit..theres room but can be close)
Yours was a also great idea for the later design of the shroud.
Melting Slicks
Joined: Dec 2004
Posts: 2,137
Likes: 5
From: Howard PA
It'll work without filing, but I wanted the holes to align perfectly "at rest"
Without filing the those slots you'll have to pull a little on the shroud to make the holes line up and get the screw through.
This was on my '96, other years, your mileage may vary.
No, you don't have to pull the whole thing out. Mine was already out for other work I was doing at the time and made it real easy to do this mod at my leisure.
I'm glad you posted this because when I did no one paid attention at all so I figure everyone knew about this. I'm interested to see how this one goes.
Elite Torch Red Member


Joined: Sep 1999
Posts: 57,805
Likes: 23
From: Exit 89 GSP,Lakewood,NJ The Land Of Mojo
Cental/South NJ Events Coordinator
CI 1-2-3-4-5-6-7-8-9-10-11-12 Vet
CI-II Burnout & Drag Champ
St. Jude Donor '03-'04-'05-'06-'07
That tip was posted several years ago. But it's always nice to see it again as a reminder.
Large Impressive Member


Joined: Jul 2003
Posts: 65,811
Likes: 71
From: Good health is merely the slowest possible rate at which one can die
St. Jude Donor '04-'05-'06-'07
Originally Posted by Mr Mojo
That tip was posted several years ago. But it's always nice to see it again as a reminder.
 And I'd never seen it before. Those little boogers are indeed a PITA as are. Thanks for the tip!
Thread Starter
Le Mans Master
Joined: May 2005
Posts: 7,354
Likes: 2,278
From: Central Maryland
Originally Posted by Bill's86Coupe
Theres a shroud mod I did on my former 86,even though there are differences in design from later models.Not hijacking but posting in case anyone is reading and wondering about their earlier cars too.
I found that on the 86,the plastic shroud has 2 parts,upper and lower.
Its not too bad to remove the top upper shroud screws if you have a power tool...however the shroud is shaped so youre forced to remove the tranny cooler line and upper rad hose.
I trim cut the top shroud bottom edges some at both ends which would have normally been in the way of the cooler lines,hose,etc when pulling it out,so now theres less time to remove and no need to remove the tranny cooler lines or etc.It even allows you to slip the top shroud off without having to remove the top rad hose.
Did this to make periodic cleaning of the leaves and junk that gets built up in there between the rad and condensor.Putting it back together,still felt as sturdy.Dont know why GM felt it was necessary to mold the shroud the way the did,forcing one to remove stuff that doesnt need to come off if youre not planning to pull the rad out.
Theres also an old tech tip,Not sure if still on the forum,but I did it on my 86 as well.The 2 plastic *****/2 shroud studs that hold the air intake box to the upper rad shroud has a tendency to spin out of its bottom insert hole and making it impossible to get off.
Using the tip,I took the air intake box off,made sure the 2 intake studs was aligned up,drilled a hole in each of them on the side of the stud through the thin metal plate it has under the shroud and used a pop rivet on both sides to keep the screw tab firmly in place.Taking the **** off never spun the bottom of the screw again.It was very simple to do.(note,use caution when drilling this ON the car,dont hit the radiator or anything with the drill bit..theres room but can be close)
Yours was a also great idea for the later design of the shroud.
It was a bit of a hassle getting the upper support free of the car on my '94, because the flange on the passenger's side was trapped under the A/C lines. By lifting the driver's side up high, I was able to rotate the thing enough to get the flange to clear the lines, but it didn't impress me that this was necessary. Mine's a ZF-6, so trans cooler lines weren't an issue. I considered trimming this flange a bit before re-installing it, but decided against it so as to not alter the factory appearance too much (but I think I'll wish I'd done it next time I need to remove that thing).
The only other problem I had was getting the condenser to properly engage the rubber cushion on the driver's side of the upper support as I was reassembling everything. It seemed necessary to be able to nudge things around a bit as it was going together -- except that as it was going together it was no longer possible to get a hand or tool in there to do any nudging. I think the problem was made worse on my car because whoever assembled it last time (might have been at the factory) didn't get it aligned correctly, so the cushion was deformed. I never did find a clever solution for that problem, but finally got the thing to drop into place reasonably well.
Be well,
SJW
Corvette Stories
The Best of Corvette for Corvette Enthusiasts

Top 10 Most Expensive Corvettes Ever Sold on Bring A Trailer
Brett Foote
10 Things Every Corvette Owner Needs (2026 Edition)
Michael S. Palmer
8 Most "Only Corvette Owners Understand" Quirks and Problems
Pouria Savadkouei
10 Reasons the C6 Z06 is Still A Performance Benchmark After 20 Years
Joe Kucinski
How Much Horsepower Every Corvette Engine "LOST" in 1972
Joe Kucinski
Top 10 DOs and DON'Ts for Protecting Your Convertible Top!
Michael S. Palmer
Top 10 Most Explosive Corvettes Ever Made: Power-to-Weight Ratio Ranked!
Joe Kucinski
150 hp to 1,250 hp: Every Corvette Generation Compared by the Specs That Matter
Joe Kucinski
8 Coolest Corvette Pace Cars (and Replicas) of All Time
Verdad Gallardo
Thread Starter
Le Mans Master
Joined: May 2005
Posts: 7,354
Likes: 2,278
From: Central Maryland
Originally Posted by ALLT4
It'll work without filing, but I wanted the holes to align perfectly "at rest"
Without filing the those slots you'll have to pull a little on the shroud to make the holes line up and get the screw through.
This was on my '96, other years, your mileage may vary.
No, you don't have to pull the whole thing out. Mine was already out for other work I was doing at the time and made it real easy to do this mod at my leisure.
I'm glad you posted this because when I did no one paid attention at all so I figure everyone knew about this. I'm interested to see how this one goes.
Without filing the those slots you'll have to pull a little on the shroud to make the holes line up and get the screw through.
This was on my '96, other years, your mileage may vary.
No, you don't have to pull the whole thing out. Mine was already out for other work I was doing at the time and made it real easy to do this mod at my leisure.
I'm glad you posted this because when I did no one paid attention at all so I figure everyone knew about this. I'm interested to see how this one goes.
I wish I'd seen your original post about this. I had actually begun putting it back together as it originally was before the idea came to me, and by then I'd already had two of the difficult screws reinstalled. I don't have time to read every post, and I skip a lot of them if the title doesn't grab my attention. I'm sure I miss quite a bit of good stuff...
Be well,
SJW
Thread Starter
Le Mans Master
Joined: May 2005
Posts: 7,354
Likes: 2,278
From: Central Maryland
Originally Posted by Mr Mojo
That tip was posted several years ago. But it's always nice to see it again as a reminder.
Be well,
SJW
Melting Slicks
Joined: Dec 2004
Posts: 2,137
Likes: 5
From: Howard PA
I remember the first time I tried to get those screws out, there was much cussing. If the engineer was in front of me while I was trying to get those out he'd be eatin' wrenches.
I gave up and pulled the whole dam thing the first time. The second time I planned to take the whole box out while I re-did the top end and a cam change. That was the golden opportunity to fix that little pain in the ***.
I gave up and pulled the whole dam thing the first time. The second time I planned to take the whole box out while I re-did the top end and a cam change. That was the golden opportunity to fix that little pain in the ***.
Pro

Joined: Jan 2004
Posts: 707
Likes: 0
From: Syracuse Utah
Are those six little screws even necessary? I reversed the clips on mine but then never bothered to put the screws back in. I'll probably do it some day. My 94 is missing the senser thing on the side; doesn't even have an unconnected fitting in the wiring loom to plug into. I wonder why?

Burning Brakes

Joined: Nov 2005
Posts: 848
Likes: 1
From: 1992 LT1 6 speed Cayman Islands
Originally Posted by Hotred94
Are those six little screws even necessary? I reversed the clips on mine but then never bothered to put the screws back in. I'll probably do it some day. My 94 is missing the senser thing on the side; doesn't even have an unconnected fitting in the wiring loom to plug into. I wonder why?
That sensor is the outside air temp sensor and is only on cars that hane the electronic A/C control that shows the outside temp.
Thanks for the tip guys I will file it for future fefrence
Pro
Joined: Jan 2004
Posts: 707
Likes: 0
From: Syracuse Utah
Oh thanks! I thought the previous owner had maybe done something and forgot to reinstall it (ala-the local shade tree mechanic). I don't have the electronic A/C, that explains it.
Back on the subject of the 6 screws. Why would GM put so many screws in such a short seam? The only answer I can think of is they are trying to hold in any air that might escape. Three screws on each side seems to indicate there may be enough pressure in there to blow the seam open a bit, but it seems pretty stout to me even without the screws in it. Then I have this hole right there where the air temp sensor would go if I had electronic A/C. I'll bet that is loosing more air that the seam ever would.
Back on the subject of the 6 screws. Why would GM put so many screws in such a short seam? The only answer I can think of is they are trying to hold in any air that might escape. Three screws on each side seems to indicate there may be enough pressure in there to blow the seam open a bit, but it seems pretty stout to me even without the screws in it. Then I have this hole right there where the air temp sensor would go if I had electronic A/C. I'll bet that is loosing more air that the seam ever would.
Thread Starter
Le Mans Master
Joined: May 2005
Posts: 7,354
Likes: 2,278
From: Central Maryland
Originally Posted by Hotred94
Oh thanks! I thought the previous owner had maybe done something and forgot to reinstall it (ala-the local shade tree mechanic). I don't have the electronic A/C, that explains it.
Back on the subject of the 6 screws. Why would GM put so many screws in such a short seam? The only answer I can think of is they are trying to hold in any air that might escape. Three screws on each side seems to indicate there may be enough pressure in there to blow the seam open a bit, but it seems pretty stout to me even without the screws in it. Then I have this hole right there where the air temp sensor would go if I had electronic A/C. I'll bet that is loosing more air that the seam ever would.
Back on the subject of the 6 screws. Why would GM put so many screws in such a short seam? The only answer I can think of is they are trying to hold in any air that might escape. Three screws on each side seems to indicate there may be enough pressure in there to blow the seam open a bit, but it seems pretty stout to me even without the screws in it. Then I have this hole right there where the air temp sensor would go if I had electronic A/C. I'll bet that is loosing more air that the seam ever would.
You could seal the sensor hole in yours with duct tape, if you care about it.
Be well,
SJW