


Headlight Opening Question

Thread Starter
Instructor


Joined: Dec 2001
Posts: 198
Likes: 0
From: St. Charles County MO
I tried to turn on my headlights to test everything before I take my 90 in for a state inspection.
The headlights only partially opened. The right side popped into the open position, but the left only opened half way.
I turned the switch off and the right door closed but the left door did not totally close.
I turned the switch to on, again, and both headlights only opened about halfway. The headlights turn on, but the doors do not open, fully. When shut off, the doors only partially close.
I have had no problems prior to today.
I would appreciate suggestions as to what could be wrong.
Le Mans Master


Joined: Jul 2007
Posts: 5,043
Likes: 8
From: Tampa Florida

Here's a link to buy the parts so you can fix it yourself...you'll need to order 2 of these kits...one for each headlight:
http://www.ecklers.com/product.asp?p...4&dept_id=1476

Melting Slicks

Joined: Apr 2002
Posts: 2,118
Likes: 0
From: St. Charles, MO Route 66 Corvette Club
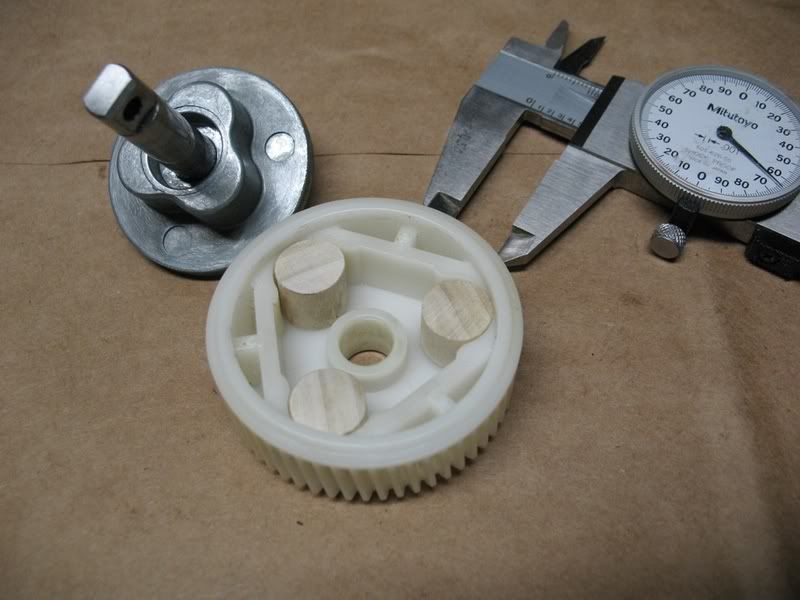
Putter: I repaired the right light motor assembly of my 89 model last week. It is amazing at the granules (the three plastic rods that transfer torque from the plastic gear to the output shaft deteriorate and crumble into little chuncks) that can be found inside the output shaft assembly. I used some 1/2 inch hardwood dowels to make the three parts. If you choose to do this, cut the rods to about 3/8 inch long. Do not cut the rods any longer than .465 or 15/32 in length as this is the max depth on the molded plastic gear.
Here is a photo of the three wood dowels sitting inside the plastic gear:
If you have questions, call me as I live in your area.
Here is a photo of the three wood dowels sitting inside the plastic gear:
If you have questions, call me as I live in your area.
Advanced

Joined: May 2007
Posts: 82
Likes: 1
From: LA California
Sam: I take it that the dowels are 1/2 inch in diameter. Is this dimension at all critical? If I may ask: why wood rather than plastic?
Melting Slicks
Joined: Apr 2002
Posts: 2,118
Likes: 0
From: St. Charles, MO Route 66 Corvette Club
1. Dowel diameter critical: The three small rods are a snug fit inside the plastic gear when you place the metal assembly into the plastic gear. If the diameter is above 1/2 inch, you will not be able to mate the two parts (plastic gear and metal shaft) and achiece the desired height of the assembly. If the length of the small rods is above .465 inches, you will not achiece the desired height of the gear assembly. If the height of the assembly is too long, it will bind when assembled into the motor housing.
2. I removed the headlight from my car and disassembled the motor unit. I wanted to see what was wrong with the unit BEFORE I started buying parts. Once I saw the problem, I ordered the repair parts from Ecklers and shipment time was one week. I wanted to drive the car to Funfest in Effingham, IL this weekend and needed working lights. I used the wood dowels out of necessity!
I wonder why GM used the split gear assembly design on the headlight motor? They could have used one part for this assembly and we would not have this problem
Corvette Stories
The Best of Corvette for Corvette Enthusiasts

150 hp to 1,250 hp: Every Corvette Generation Compared by the Specs That Matter
Joe Kucinski
8 Coolest Corvette Pace Cars (and Replicas) of All Time
Verdad Gallardo
Top 10 Corvette Engines RANKED by Peak Torque (70+ Years of Muscle!)
Joe Kucinski
Corvette ZR1X Will Be Pacing the Indy 500, And Could Probably Race, Too!
Verdad Gallardo
Top 10 Corvettes Coming to Mecum Indy 2026!
Brett Foote
Top 10 C9 Corvette MUST-HAVES to Fix These C8 Generation Flaws!
Michael S. Palmer
10 Revolutionary 'Corvette Firsts' Most People Don't Know
Joe Kucinski
5 Reasons to Upgrade to an LS6-Powered Corvette; 5 Reasons to Stay LT2
Michael S. Palmer
2027 Corvette vs The World: Every C8 vs Its Closest Competitor
Joe Kucinski
Thread Starter
Instructor
Joined: Dec 2001
Posts: 198
Likes: 0
From: St. Charles County MO
Okay,
I installed the bushings in the headlight motors, put everything back together and tried the headlights.
The doors open fully, but the doors bounce for about 5 seconds then, stop.
On the closing cycle, the doors close completely, BUT the left headlight door bounces up and down about a quarter of an inch for 4 - 5 seconds then stops. Bounced 7 times to be exact.
The right door bounces up and down about an inch for 4 - 5 seconds then stops. Bounced 7 times to be exact.
So, where did I go wrong?
Last edited by Putter; Sep 25, 2008 at 08:06 AM.

Team Owner

Joined: Oct 2000
Posts: 96,443
Likes: 9
From: Fort Knox, KY
Cruise-In IV Veteran
Cruise-In VI Veteran
Cruise-In VII Veteran
Cruise-In VIII Veteran
One thing I've seen cause this problem (from personal experience) is the motor housing halves are not bolted together properly. Tolerance here is critical. Ensure the motor segments are bolted together properly and no gasket material is misaligned or binding.

Melting Slicks
Joined: Feb 2006
Posts: 2,753
Likes: 15
From: backwoods upstate ny
since BOTH lites bounce similarly, prob may be in the "control box''...there is, strangely, only one relay inside the box, altho this single relay is driven by a separate solid state "ripple" sensing circuit for EACH lite motor...substitute another control to check, same headlite control box can be found at j-y supply on late 80's/early 90's firebirds, also pont sunbirds with 'flip' lites, but the extra external steel bracket on birds should be pryed open/removed to mount to vette
Instructor
Joined: Oct 2006
Posts: 101
Likes: 0
I had the almost the same problem. Just like you I was ready to go for inspection and was checking everthing before I went. The passenger headlight did not work. Took it apart and the bushings were like new. In Sam's picture above, you see a metal peice in the left corner. On my unit these (actually 2 parts pressed together) were turning freely. So the headlight was start turning and just stop half way. Just something to look at while your in there.
Melting Slicks
Joined: Apr 2002
Posts: 2,118
Likes: 0
From: St. Charles, MO Route 66 Corvette Club
Putter:
This is ole Sam your neighbor is St. Charles! I have repaired one headlight motor on my 89 and the other one is awaiting my attention. I found your probem interesting and did a little research on the headlight motor system in the 1889 GM Helms manual. This along with my 35 years of experience in electric motors allows me to offer the following to you:
1. You have not assembled the headlight motor internal parts correctly such that the current draw of the headlight motor has been modified.
2. The headlight control module (located on the left front wheel well just in front of the front tire on my 89) is defective.
3. You have not assembled the light assembly correctly onto the hood.
The stopping of each headlight motor is controlled by a current sensor inside the headlight control module. During the operation of the headlight motor (opening and closing the lamp assembly), the motor draws a specified current. When the head light assembly encounters an end of travel stop (either during opening or closing), the current draw of the motor goes up rapidly. The module senses the current increase and open the electrical circuit (shuts off) to that motor.
One post I read indicated that the gears inside the motor unit must be timed in a similair fashion to the ignition. This is not true as the current sensor (inside the headlight control module) stops the motor when the end of travel stop is reached.
If you go back in time, your lights were stopping in an acceptable manner prior to your rebuild process. This suggests you have a problem in item 1 or 3 from above.
Hope this is helpful to you!
Bob
PS: If you want to bring the motor assembly to my residence, shoot me an email or send me a PM.