


How does this L98 look


Safety Car

Joined: Oct 2008
Posts: 4,689
Likes: 4
From: Yucaipa CA

Dolphan
when you reassemble this motor I wouldn't use any sealer on any gaskets involved with the intake manifold. I had good luck without it, however I would put thread sealant on "ALL" bolts related to the cylinders head and prior to this cleaning the bolts threads completely. If you are smart I would also "stud" the thermostat housing to prevent any issues in the future of those bolts siezing and use good sealer on the housing gasket (I found mine seeped when under pressure with the gauge)
Good luck on your engine it's coming nicely!
when you reassemble this motor I wouldn't use any sealer on any gaskets involved with the intake manifold. I had good luck without it, however I would put thread sealant on "ALL" bolts related to the cylinders head and prior to this cleaning the bolts threads completely. If you are smart I would also "stud" the thermostat housing to prevent any issues in the future of those bolts siezing and use good sealer on the housing gasket (I found mine seeped when under pressure with the gauge)
Good luck on your engine it's coming nicely!
Safety Car
Joined: Oct 2008
Posts: 4,689
Likes: 4
From: Yucaipa CA
dolphan
this was the valve relief damage I was referring too. probably #1 cylinder correct? thats why I was asking if it had detonation issues at all. I'de really look at this piston for any cracks. just to be safe.

this was the valve relief damage I was referring too. probably #1 cylinder correct? thats why I was asking if it had detonation issues at all. I'de really look at this piston for any cracks. just to be safe.

Thread Starter
Burning Brakes


Joined: Mar 2002
Posts: 1,035
Likes: 0
From: Atlanta Ga
I'll inspect these more this weekend now that I've got some time. What would cause this and the detonation issues in a stock engine?
Safety Car
Joined: Oct 2008
Posts: 4,689
Likes: 4
From: Yucaipa CA
OK, I think I'm with you now. The slightly jagged area on the piston indents on the upper right side of #1??????? That does look like it is different from #3 beside it???
I'll inspect these more this weekend now that I've got some time. What would cause this and the detonation issues in a stock engine?
I'll inspect these more this weekend now that I've got some time. What would cause this and the detonation issues in a stock engine?
Thread Starter
Burning Brakes
Joined: Mar 2002
Posts: 1,035
Likes: 0
From: Atlanta Ga
Guys, I started cleaning the block yesterday to get ready for new head gaskets, how clean will it really come? The original GM gaskets came off pretty clean but they were orange in color and even using a razor scraper it seem like the orange has embedded into the iron? I'm not worried about how long it takes me I just want it to be done correctly.
I'll try to post a photo when I have a chance of how the clean has gone.
I did get a better look at the cylinder walls and I thought they looked really good, but I'm not a expert on this.
I'll try to post a photo when I have a chance of how the clean has gone.
I did get a better look at the cylinder walls and I thought they looked really good, but I'm not a expert on this.
Safety Car
Joined: Oct 2008
Posts: 4,689
Likes: 4
From: Yucaipa CA
dolphan
another thing I'de do is towards the front of the engine in the lifter valley you will see two large holes at the front of the block. you can feel the timing chain in there. I would feel it for any looseness while your at it.
Also when my motor was apart if you look way on the back of the block where the bellhousing is make sure the wiring back there is still covered with it's plastic covering. My wires were unprotected back there when I took my motor apart.
another thing I'de do is towards the front of the engine in the lifter valley you will see two large holes at the front of the block. you can feel the timing chain in there. I would feel it for any looseness while your at it.
Also when my motor was apart if you look way on the back of the block where the bellhousing is make sure the wiring back there is still covered with it's plastic covering. My wires were unprotected back there when I took my motor apart.
Thread Starter
Burning Brakes
Joined: Mar 2002
Posts: 1,035
Likes: 0
From: Atlanta Ga
I'll check the timing chain using the method you mentioned. While cleaning, I've got a good look at the rear of the engine and all my wire are still in the protective plastic split tubes so all looks to be in order.
I'm trying to focus on getting the block surface as clean as possible and get the intake and exhaust manifolds cleaned and painted. I figure once the heads are back those three pieces are the most critical of the build. I can clean and paint the runners/plenum/brackets later.
I'm trying to focus on getting the block surface as clean as possible and get the intake and exhaust manifolds cleaned and painted. I figure once the heads are back those three pieces are the most critical of the build. I can clean and paint the runners/plenum/brackets later.
Safety Car
Joined: Oct 2008
Posts: 4,689
Likes: 4
From: Yucaipa CA
I'll check the timing chain using the method you mentioned. While cleaning, I've got a good look at the rear of the engine and all my wire are still in the protective plastic split tubes so all looks to be in order.
I'm trying to focus on getting the block surface as clean as possible and get the intake and exhaust manifolds cleaned and painted. I figure once the heads are back those three pieces are the most critical of the build. I can clean and paint the runners/plenum/brackets later.
I'm trying to focus on getting the block surface as clean as possible and get the intake and exhaust manifolds cleaned and painted. I figure once the heads are back those three pieces are the most critical of the build. I can clean and paint the runners/plenum/brackets later.
brake cleaner and a brush works great on cleaning the TPI system, maybe some brake cleaner on the blocks deck would remove that orange stuff too.
Thread Starter
Burning Brakes
Joined: Mar 2002
Posts: 1,035
Likes: 0
From: Atlanta Ga
I've been very careful to not let anything get into the cylinders, such as simple green, or anything I use, but I guess most of the brake cleaner stuff will evaporate quickly if I spray too much.
Thread Starter
Burning Brakes
Joined: Mar 2002
Posts: 1,035
Likes: 0
From: Atlanta Ga
I guess normal depends on the use, mileage and other factors. Mine has a good film of brown material in the plenum as well, I figure with 79K miles that is was probably normal to see that but I've clean about 85% of it out.

Safety Car
Joined: Jan 2004
Posts: 3,759
Likes: 8
Where would all the gunk be coming from that is on the wire harness right behind the distributor? I'm hoping I'm not having and coolant leaking out.
Thread Starter
Burning Brakes
Joined: Mar 2002
Posts: 1,035
Likes: 0
From: Atlanta Ga
Trying to get gaskets for the rebuild, There seems to be quite a bit of debate on the ones to use.
At my local parts store the Fel-Pro model that is recommended for the car is Q7733PT2, that number is nothing like the 1003 that was discussed here or one other that I've seen mentioned????
I'm seeing that there might be a Fel-Pro and a Fel-Pro Performance line? Is that the difference? The information on the Fel-Pro Q7733PT2 is that it is the OEM replacement.
Confused?
At my local parts store the Fel-Pro model that is recommended for the car is Q7733PT2, that number is nothing like the 1003 that was discussed here or one other that I've seen mentioned????
I'm seeing that there might be a Fel-Pro and a Fel-Pro Performance line? Is that the difference? The information on the Fel-Pro Q7733PT2 is that it is the OEM replacement.
Confused?
Thread Starter
Burning Brakes
Joined: Mar 2002
Posts: 1,035
Likes: 0
From: Atlanta Ga
Well, got the heads back today
New LT4 springs
New retainers
New valve seals
Performance valve job
Guides checked out fine
Heads planed
New PRW 1.6 rockers
Looks much better now!
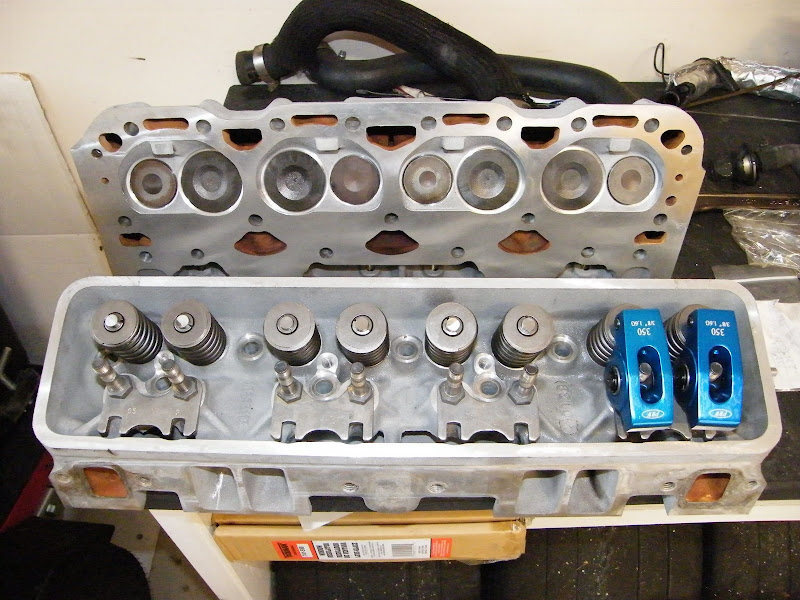
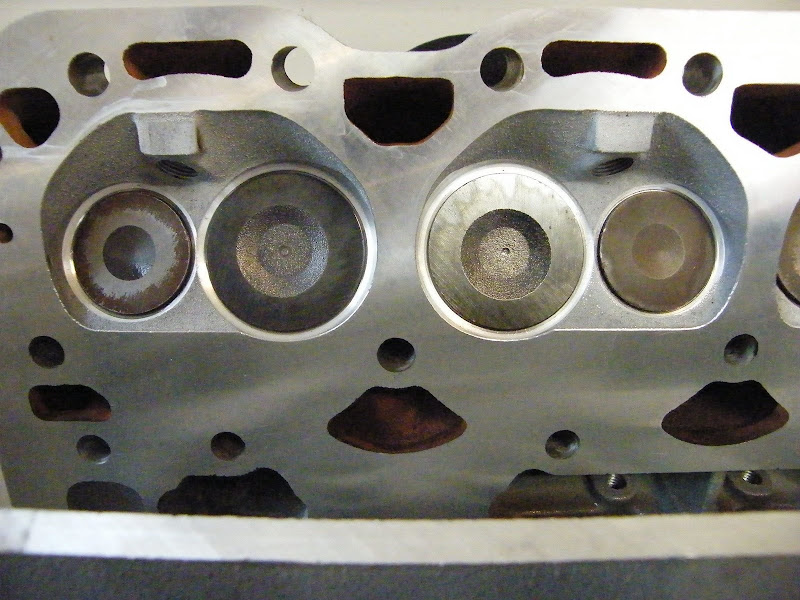
They did a little "polish" around the intake valves, you can barely see this. Just on the side of the chamber it is smoothed from the rough casting, they said they do this on many of there heads improves the flow/performance. I guess we'll see soon enough!
New LT4 springs
New retainers
New valve seals
Performance valve job
Guides checked out fine
Heads planed
New PRW 1.6 rockers
Looks much better now!
They did a little "polish" around the intake valves, you can barely see this. Just on the side of the chamber it is smoothed from the rough casting, they said they do this on many of there heads improves the flow/performance. I guess we'll see soon enough!
Safety Car
Joined: Oct 2008
Posts: 4,689
Likes: 4
From: Yucaipa CA
dam nice! your going to be glad you went the extra mile and had them done. Make sure you get the correct plugs for it as well, standard length chevy plugs wont go all the way into the chamber like the correct ones do.
Last edited by jeffp1167; May 23, 2009 at 08:08 AM.
Thread Starter
Burning Brakes
Joined: Mar 2002
Posts: 1,035
Likes: 0
From: Atlanta Ga
As far as plugs I always get a standard replacement for an 89 never thought about the length of the plug, I'll have to look at what I've been using.
I do feel better doing the heads especially they said one was a bit bowed, so now things are nice and flat.
I do feel better doing the heads especially they said one was a bit bowed, so now things are nice and flat.



Safety Car
Joined: Jan 2004
Posts: 3,759
Likes: 8
Yeah, I just got the standard AC-Delco plugs for 89 with aluminum heads. By the way, are standard AC-Delco plugs supposed to rust? A few months or something after I had my plugs installed, I was looking at the base of them where the plug wires are at, and it is all rusted.
Thread Starter
Burning Brakes
Joined: Mar 2002
Posts: 1,035
Likes: 0
From: Atlanta Ga
A little rust I've seen on occasion but if your seeing a lot of rust especially localize to a particular plug that sounds like something to look at.
