


 Thanks


 Should be a sticky at the top of the page.

Tech article- How to correctly install C4 roofs
Thread Starter
Collections Ban
Joined: Aug 2003
Posts: 331
Likes: 2
From: Name calling begins in the absence of fact and reason
Factory correct C4 roof installation procedure
Melrose T-Top Int. has been in the Corvette business for over 30 years. In that time we have taken lead position as the most reputable GM licensed aftermarket supplier of Corvette roofs and t-tops in the industry.
That being said, I feel comfortable explaining to you what seems to be a gray area in the Corvette world regarding replacement roof installation and adjustment. Most C4 Corvette owners don�t lend much thought to their tops as being an integral part of the vehicle�s structural integrity. The C4 however was initially designed as T-bar vehicle like the C3�s, and it wasn�t until a GM exec ordered the car be converted to a targa model, the engineers realized they had a problem. With the T-bar removed handling characteristics suffered greatly due to torsional flexibility. Unfortunately for us the only viable solution to this was an inconvenient bolt in bulky style targa roof.
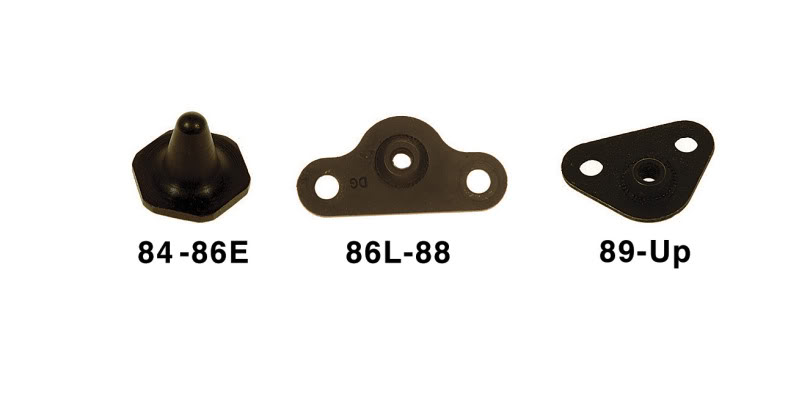
The first thing you want to do when purchasing a new roof is verify the year of the roof on your car. Even though your car may be a 1988 it could have been converted at one point. Sound unlikely? GM sold a kit for many years to convert 84-88 Corvettes to the third design 89-96 roof styles. This was due in part to the fact that only one roof design was available and it generated more income selling and installing the kits. So, how do I determine my roof year design? You can compare your front mounting hardware with chart below or measure between your front mounting bolts.
Measured from bolt to bolt O.C. across top of windshield frame.
� 1st design 84 - Early 86 28.5�
� 2nd design Late 86-88 31.5�
� 3rd design 89-96 32.5�
1984 - 1996 Roof Panel Hardware Detail
We have established the structural importance of the C4 targa style roof and it�s different designs. Now we can discuss how to properly install it, or better yet, how not to. Start by parking your vehicle on flat ground, and inflating all tires to factory specs then follow the instructions below per your specific vehicle year.
1st design 84-Early 86 front adjustments-
1. Make sure front cone / plate assembly is loose enough to move by hand.
2. Set the roof on the car and tighten rear center bolts. If bolts are being difficult to start, recheck to make sure roof is centered, and have a second person push roof towards back of car to help compress the new weatherstrip.
3. Tighten the outer two rear locator bolts.
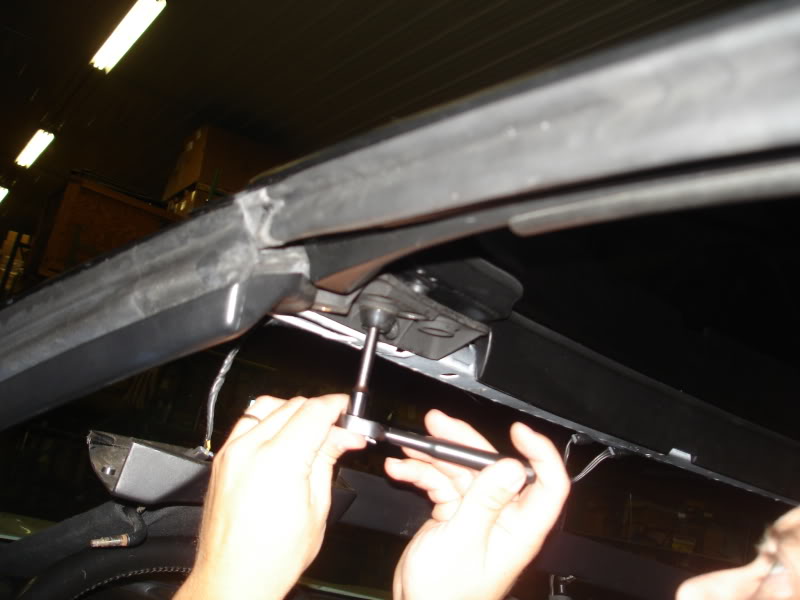
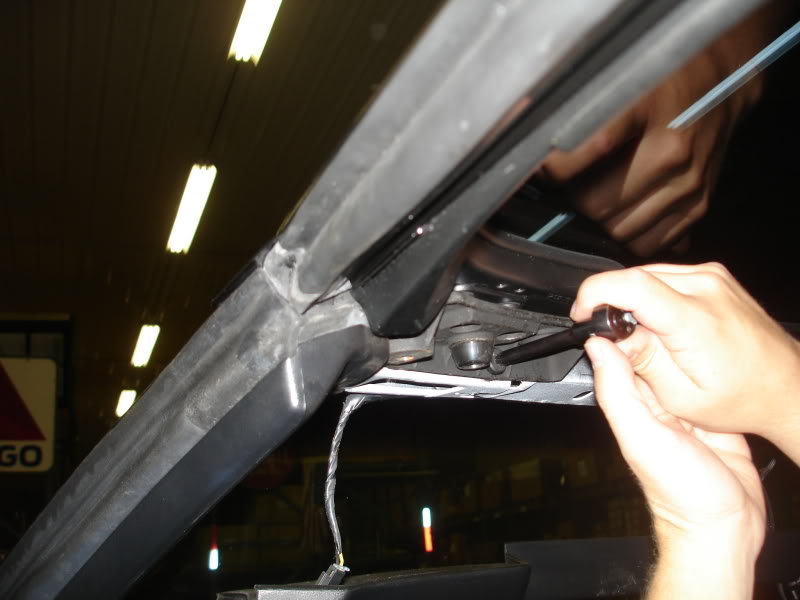
4. Tighten front mounting bolts. You may need to move the plate assembly around while trying to line up and tighten front mounting bolts with other hand.
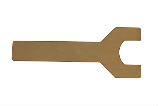
5. Tighten cones with thin 1 1/8� installation wrench as seen here:
- 84-E86 Install wrench
6. Loosen center front mounting bolts. Retighten front bolts paying close attention to when front of the roof�s lens makes an even contact with the windshield weatherstrip. The front edge should only put approximately 1/8� of pressure on the weatherstrip for proper sealing as front bolts are tightened. Too much pressure may cause warps, cracks, or other problems. Too little pressure may result in air or water leaks. If you feel there is too much pressure being put onto the front of the lens please refer to 2nd design install instruction below to adjust front roof mounting brackets.
2nd design Late 86-96 front adjustments
1. Drop front upper windshield trim panel by removing 5 Phillips screws (1 rear view mirror screw and 4 outer)
2. Remove front upper roof mounting bracket covers via 2 Phillip screws per side
3. Remove 5/16� visor nuts and pop off spring retaining washers using a flat screwdriver
4. Visors will slide out and allow entire trim panel, mirror, and visors to hang

5. Go to roof and make sure front plate assembly on roof is loose enough to move by hand.
6. Set the roof on the car and tighten rear center bolts. If bolts are being difficult to start, recheck to make sure roof os centered, and have a second person push roof towards back of car to help compress the new weathertstrip.
7. Tighten the outer two rear locator bolts.
8. Tighten center front mounting bolts. You may need to move the plate assembly around while trying to line up and tighten front mounting bolts with other hand
9. Tighten outer front roof plate bolts
10. Loosen center front mounting bolts. Retighten front bolts paying close attention to when front of the roof�s lens makes an even contact with the windshield weatherstrip. The front edge should only put approximately 1/8� of pressure on the westherstrip for proper sealing as front bolts are tightened. Too much pressure may cause warps, cracks, or other problems. Too little pressure may result in air or water leaks.
11. If you feel there is too much pressure on the front of the lens, loosen the front mounting brackets and move upward as necessary. (Tip- mark the windshield frame where bracket is sitting before you loosen it, so you have a origin to return to if needed)
12. Once roof is adjusted reassemble trim parts in reverse order. Pay attention to rear view mirror wires so they don�t get pinched.
Note-
� There are many people installing cheap aftermarket weatherstrips on their cars these days. Sometimes you don�t have a choice, but if you do, always try to find something as close to the factory latex covered foam type weatherstripping. Avoid the rubber (gummy bear) feeling stuff. It doesn�t compress very well and causes damage in many cases to Corvette transparent roofs. If you install these on your car you must readjust your front mounting brackets.
� Shims may be added or removed behind rear brackets to adjust rear roof gap, though this is most often not needed. Drop rear trim panel to access rear mounting brackets.
Melrose T-Top Int. has been in the Corvette business for over 30 years. In that time we have taken lead position as the most reputable GM licensed aftermarket supplier of Corvette roofs and t-tops in the industry.
That being said, I feel comfortable explaining to you what seems to be a gray area in the Corvette world regarding replacement roof installation and adjustment. Most C4 Corvette owners don�t lend much thought to their tops as being an integral part of the vehicle�s structural integrity. The C4 however was initially designed as T-bar vehicle like the C3�s, and it wasn�t until a GM exec ordered the car be converted to a targa model, the engineers realized they had a problem. With the T-bar removed handling characteristics suffered greatly due to torsional flexibility. Unfortunately for us the only viable solution to this was an inconvenient bolt in bulky style targa roof.
The first thing you want to do when purchasing a new roof is verify the year of the roof on your car. Even though your car may be a 1988 it could have been converted at one point. Sound unlikely? GM sold a kit for many years to convert 84-88 Corvettes to the third design 89-96 roof styles. This was due in part to the fact that only one roof design was available and it generated more income selling and installing the kits. So, how do I determine my roof year design? You can compare your front mounting hardware with chart below or measure between your front mounting bolts.
Measured from bolt to bolt O.C. across top of windshield frame.
� 1st design 84 - Early 86 28.5�
� 2nd design Late 86-88 31.5�
� 3rd design 89-96 32.5�
1984 - 1996 Roof Panel Hardware Detail
We have established the structural importance of the C4 targa style roof and it�s different designs. Now we can discuss how to properly install it, or better yet, how not to. Start by parking your vehicle on flat ground, and inflating all tires to factory specs then follow the instructions below per your specific vehicle year.
1st design 84-Early 86 front adjustments-
1. Make sure front cone / plate assembly is loose enough to move by hand.
2. Set the roof on the car and tighten rear center bolts. If bolts are being difficult to start, recheck to make sure roof is centered, and have a second person push roof towards back of car to help compress the new weatherstrip.
3. Tighten the outer two rear locator bolts.
4. Tighten front mounting bolts. You may need to move the plate assembly around while trying to line up and tighten front mounting bolts with other hand.
5. Tighten cones with thin 1 1/8� installation wrench as seen here:
- 84-E86 Install wrench
6. Loosen center front mounting bolts. Retighten front bolts paying close attention to when front of the roof�s lens makes an even contact with the windshield weatherstrip. The front edge should only put approximately 1/8� of pressure on the weatherstrip for proper sealing as front bolts are tightened. Too much pressure may cause warps, cracks, or other problems. Too little pressure may result in air or water leaks. If you feel there is too much pressure being put onto the front of the lens please refer to 2nd design install instruction below to adjust front roof mounting brackets.
2nd design Late 86-96 front adjustments
1. Drop front upper windshield trim panel by removing 5 Phillips screws (1 rear view mirror screw and 4 outer)
2. Remove front upper roof mounting bracket covers via 2 Phillip screws per side
3. Remove 5/16� visor nuts and pop off spring retaining washers using a flat screwdriver
4. Visors will slide out and allow entire trim panel, mirror, and visors to hang
5. Go to roof and make sure front plate assembly on roof is loose enough to move by hand.
6. Set the roof on the car and tighten rear center bolts. If bolts are being difficult to start, recheck to make sure roof os centered, and have a second person push roof towards back of car to help compress the new weathertstrip.
7. Tighten the outer two rear locator bolts.
8. Tighten center front mounting bolts. You may need to move the plate assembly around while trying to line up and tighten front mounting bolts with other hand
9. Tighten outer front roof plate bolts
10. Loosen center front mounting bolts. Retighten front bolts paying close attention to when front of the roof�s lens makes an even contact with the windshield weatherstrip. The front edge should only put approximately 1/8� of pressure on the westherstrip for proper sealing as front bolts are tightened. Too much pressure may cause warps, cracks, or other problems. Too little pressure may result in air or water leaks.
11. If you feel there is too much pressure on the front of the lens, loosen the front mounting brackets and move upward as necessary. (Tip- mark the windshield frame where bracket is sitting before you loosen it, so you have a origin to return to if needed)
12. Once roof is adjusted reassemble trim parts in reverse order. Pay attention to rear view mirror wires so they don�t get pinched.
Note-
� There are many people installing cheap aftermarket weatherstrips on their cars these days. Sometimes you don�t have a choice, but if you do, always try to find something as close to the factory latex covered foam type weatherstripping. Avoid the rubber (gummy bear) feeling stuff. It doesn�t compress very well and causes damage in many cases to Corvette transparent roofs. If you install these on your car you must readjust your front mounting brackets.
� Shims may be added or removed behind rear brackets to adjust rear roof gap, though this is most often not needed. Drop rear trim panel to access rear mounting brackets.
Instructor

Joined: Dec 2008
Posts: 228
Likes: 1
From: Atlanta GA
This may not be the correct way but on the 89+ ones I have found it easier to do it another way.
Loosen the two front plates (two screws in each) so that the plates move freely.
Use 2 - 16" pieces of blue painters tape and stick it in the middle of the tape section to the plates (glue side facing up) and go ahead and create a hole in the tape where the captive bolt needs to screw into.
Put the top on the car; attach the rear bolts like you did in the other procedure. The tape pieces should be draped over the windshield (glue is up) and hanging from the roof on the inside.
Hold each end of the tape strips, one at a time and you will be able to use the tape to align the plates (moves the plates since that is the only thing the tape is stuck to) on the roof with the front captive mounting bolts.
Once you are able to start the threads on both front captive bolts, take the ends of the tape on the windshield and fold them over and affix to the roof. Also affix the tape on the inside to the top of the targa top. This will keep the plates in the spot you just aligned them in.
Remove the top, tighten the 4 retaining bolts on the 2 brackets on the targa and you are done.
This allows you to adjust multiple tops to the car without moving the brackets on the car. It also prevents you from having to drop all the trim and stuff (mine is brittle enough as it is).
Thread Starter
Collections Ban
Joined: Aug 2003
Posts: 331
Likes: 2
From: Name calling begins in the absence of fact and reason
This may not be the correct way but on the 89+ ones I have found it easier to do it another way.
Loosen the two front plates (two screws in each) so that the plates move freely.
Use 2 - 16" pieces of blue painters tape and stick it in the middle of the tape section to the plates (glue side facing up) and go ahead and create a hole in the tape where the captive bolt needs to screw into.
Put the top on the car; attach the rear bolts like you did in the other procedure. The tape pieces should be draped over the windshield (glue is up) and hanging from the roof on the inside.
Hold each end of the tape strips, one at a time and you will be able to use the tape to align the plates (moves the plates since that is the only thing the tape is stuck to) on the roof with the front captive mounting bolts.
Once you are able to start the threads on both front captive bolts, take the ends of the tape on the windshield and fold them over and affix to the roof. Also affix the tape on the inside to the top of the targa top. This will keep the plates in the spot you just aligned them in.
Remove the top, tighten the 4 retaining bolts on the 2 brackets on the targa and you are done.
This allows you to adjust multiple tops to the car without moving the brackets on the car. It also prevents you from having to drop all the trim and stuff (mine is brittle enough as it is).
Loosen the two front plates (two screws in each) so that the plates move freely.
Use 2 - 16" pieces of blue painters tape and stick it in the middle of the tape section to the plates (glue side facing up) and go ahead and create a hole in the tape where the captive bolt needs to screw into.
Put the top on the car; attach the rear bolts like you did in the other procedure. The tape pieces should be draped over the windshield (glue is up) and hanging from the roof on the inside.
Hold each end of the tape strips, one at a time and you will be able to use the tape to align the plates (moves the plates since that is the only thing the tape is stuck to) on the roof with the front captive mounting bolts.
Once you are able to start the threads on both front captive bolts, take the ends of the tape on the windshield and fold them over and affix to the roof. Also affix the tape on the inside to the top of the targa top. This will keep the plates in the spot you just aligned them in.
Remove the top, tighten the 4 retaining bolts on the 2 brackets on the targa and you are done.
This allows you to adjust multiple tops to the car without moving the brackets on the car. It also prevents you from having to drop all the trim and stuff (mine is brittle enough as it is).
The reason I posted was to inform Corvette owners how to do it the correct way. I have put hundreds of tops on by bolting the roof on and marking the plate location with a colored pencil, but it sometimes causes problems in the end. It really doesn't take that much longer to drop the trim panel, and it will insure correct fitment.
Corvette Stories
The Best of Corvette for Corvette Enthusiasts

Top 10 Most Expensive Corvettes Ever Sold on Bring A Trailer
Brett Foote
10 Things Every Corvette Owner Needs (2026 Edition)
Michael S. Palmer
8 Most "Only Corvette Owners Understand" Quirks and Problems
Pouria Savadkouei
10 Reasons the C6 Z06 is Still A Performance Benchmark After 20 Years
Joe Kucinski
How Much Horsepower Every Corvette Engine "LOST" in 1972
Joe Kucinski
Top 10 DOs and DON'Ts for Protecting Your Convertible Top!
Michael S. Palmer
Top 10 Most Explosive Corvettes Ever Made: Power-to-Weight Ratio Ranked!
Joe Kucinski
150 hp to 1,250 hp: Every Corvette Generation Compared by the Specs That Matter
Joe Kucinski
8 Coolest Corvette Pace Cars (and Replicas) of All Time
Verdad GallardoRace Director


Joined: Nov 2003
Posts: 12,221
Likes: 446
From: Overland Park Kansas
2020 Corvette of the Year Finalist (appearance mods)
C4 of Year Winner (appearance mods) 2019
What about cases where a 2nd roof is added later? If a solid roof has already been installed and running for years, would the only necessary adjustment be to the 2nd (clear) roof?
Thread Starter
Collections Ban
Joined: Aug 2003
Posts: 331
Likes: 2
From: Name calling begins in the absence of fact and reason
Most often if your simply just adding a transparent roof as an option you won't have to adjust the brackets. Some people however replace their weatherstrips with metro, or supersoft rubbery (gummy bear) gaskets, and put their fiberglass top back on the car. Those gaskets don't compress like the factory latex covered foam gaskets, and when it comes time to put the transparent roof on the car those gaskets will damage the lens if the brackets are not adjusted to compensate for the extra thickness. The fiberglass panel is much stronger so the gasket won't affect it much.
Le Mans Master


Joined: May 2004
Posts: 5,866
Likes: 60
From: Hellinois
Finalist 2020 C4 of the Year - Modified
My original top was always a hassle to put back on but when I picked up my new top at Melrose they did it just like described and now the top is a piece of cake to put back on. I just sit it down and it just slips right into place. I do have a question though, is there a certain way to tighten down an already fitted roof? I usually do the fronts first then tighten the rears.
Thread Starter
Collections Ban
Joined: Aug 2003
Posts: 331
Likes: 2
From: Name calling begins in the absence of fact and reason
My original top was always a hassle to put back on but when I picked up my new top at Melrose they did it just like described and now the top is a piece of cake to put back on. I just sit it down and it just slips right into place. I do have a question though, is there a certain way to tighten down an already fitted roof? I usually do the fronts first then tighten the rears.

Le Mans Master
Joined: Feb 1999
Posts: 6,470
Likes: 2
From: levittown pa. usa Even a bad day with my `Vette, is better than a good day at work
St. Jude Donor '10


Advanced
Joined: Oct 2007
Posts: 82
Likes: 0
From: California
RR4.
Somewhere at the top of your browser, there is a Menu item that says "Favorites" (Or "Bookmark). With this tread open, click on the menu item. You will get a sub-menu. Usually the first item on the sub-menu is "Add to favorites" or "Bookmark". Click on that and it will give you a dialog box. Just click on the button that says "Save", "Add" or similar and the thread will be bookmarked.
When you want to read it, just open your browser, click on the "Favorites" or "Bookmark" menu and this tread will be somewhere on the the sub-menu.
Hope this helps.
Norm.
Thread Starter
Collections Ban
Joined: Aug 2003
Posts: 331
Likes: 2
From: Name calling begins in the absence of fact and reason
MY Dad takes a dollar bill and places it under the front of the roof between the lens and the upper windshield gasket and tightens the roof. If you can't pull it out with two fingers or w/o ripping the bill it's way too tight. If it comes out fairly easy the roof should be tightened down a bit.

Safety Car

Joined: Jan 2004
Posts: 3,759
Likes: 8
MY Dad takes a dollar bill and places it under the front of the roof between the lens and the upper windshield gasket and tightens the roof. If you can't pull it out with two fingers or w/o ripping the bill it's way too tight. If it comes out fairly easy the roof should be tightened down a bit.