


harmonic balancer a struggle to get on
Thread Starter
Racer


Joined: Jul 2007
Posts: 462
Likes: 21
From: Kansas City Missouri
Hey guys. I am having a hard time with the harmonic balancer. We cleaned it up and lubricated it a little, but it doesn't seem to want to draw up like it is supposed to. Is it normal for these to be so tough to get back on, or should it pretty much just slide into place? I was just using the bolt to draw it up rather than an installer. Will the installer really make any difference?
Le Mans Master


Joined: Feb 2000
Posts: 9,715
Likes: 27
From: Kempner Texas
Using just the bolt to try to press on the damper is the wrong way to go about it. That often leads to stripped threads. You need an installer. AutoZone loans them.
Jake
Jake
Last edited by JAKE; Jan 7, 2010 at 07:40 PM.
Melting Slicks


Joined: Dec 2009
Posts: 2,244
Likes: 290
Yeah, the install tool is the way to go. All the friction is greatly reduced by the bearing on the tool. I like to put assemebly lube on the crank snout to easy the procedure. The problem w/ using the bolt is that it's only 7/16 dia. so it's kinda small.

Drifting

Joined: Dec 2005
Posts: 1,360
Likes: 3
From: NORTHEAST
Thread Starter
Racer
Joined: Jul 2007
Posts: 462
Likes: 21
From: Kansas City Missouri
As always....thanks guys. That is what my brother said as well. He works for a restoration shop and has some pretty good skills when it comes to these things. Got a picture of my boy sitting in front of a 67 427 when I was there a week or so ago......and it had air conditioning so it was worth some money. What a beautiful ride that was. The guy had twinkie 87 callaways too.  Anyways, thanks for the advice. The project is coming along. The heads are on and the cam is in, so we are making good progress. No one has a set of long tubes sitting around that they would want to give me do they.
Anyways, thanks for the advice. The project is coming along. The heads are on and the cam is in, so we are making good progress. No one has a set of long tubes sitting around that they would want to give me do they.
Team Owner


Joined: Jan 2003
Posts: 20,335
Likes: 264
From: Summerland B.C. Canada
I went with the Mcgiver method, long bolt and nut with 2 greased washers. Thread the bolt into crank and use the nut and washers to pull the hub on. It's not that I'm cheap, oh wait, it is because I'm cheap. 

Melting Slicks
Joined: Feb 2006
Posts: 2,753
Likes: 15
From: backwoods upstate ny
smear a bit of 'go-joe' hand cleaner or any similar hand treatment that contains 'lanolin' (check wif's 'hand lotion', don't tell) on both parts, press on before the stuff evaps

Pro

Joined: Nov 2005
Posts: 602
Likes: 0
From: North Bay Ontario
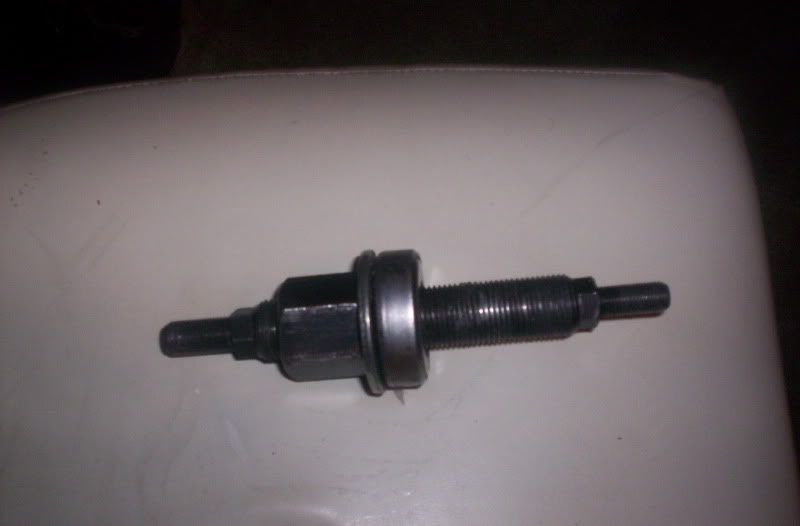
Use the proper tool on this job - even with the crank stub and the inside of the HB lubed, it is a pretty tight fit and takes some torque. If you look closely on the threads of the installer shown in the picture, you can see how they have lost their pitch. Not sure how many times that installer has been used, but you don't want to take the threads out of the end of the crank or snap the stud. Even more important is the HB butts up against the lower timing chain gear to keep in lined up with the upper gear so if you don't get the HB all the way on, you could end up doing a lot more damage.
Corvette Stories
The Best of Corvette for Corvette Enthusiasts

5 Best & 5 Worst Corvette Daily Drivers
Joe Kucinski
The Headlights of Every Corvette Generation Explained
Joe Kucinski
5 Best & 5 Most Overrated Corvette Track Packages of All Time!
Joe Kucinski
Every 2027 Corvette Engine Explained
Joe Kucinski
Designer Imagines A Corvette That Looks More Like a Corvette Than the Corvette
Verdad Gallardo
10 Ugly Corvettes That We Still Kinda Love
Joe Kucinski
Top 10 Most Expensive Corvettes Ever Sold on Bring A Trailer
Brett Foote
10 Things Every Corvette Owner Needs (2026 Edition)
Michael S. Palmer
8 Most "Only Corvette Owners Understand" Quirks and Problems
Pouria SavadkoueiRace Director

Joined: Nov 2003
Posts: 12,221
Likes: 446
From: Overland Park Kansas
2020 Corvette of the Year Finalist (appearance mods)
C4 of Year Winner (appearance mods) 2019
Wow, Shaun...you must have a warmer place to work than me! Brrrrrrr.....
Sounds like you're making good progress based on your description! And, I see by your sig that you're doing ported SLPs.
Where's the pics, man. We need pics!

gp
Sounds like you're making good progress based on your description! And, I see by your sig that you're doing ported SLPs.
Where's the pics, man. We need pics!
gp
Race Director
Joined: Jan 2006
Posts: 10,039
Likes: 0
From: CA
 That's exactly what I used and it worked perfectly.Or you can pay big bucks for a Kent Moore tool that will do the same thing.


Safety Car


Joined: Dec 2007
Posts: 3,616
Likes: 5
From: Sandhills of North Carolina
Use the proper tool on this job - even with the crank stub and the inside of the HB lubed, it is a pretty tight fit and takes some torque. If you look closely on the threads of the installer shown in the picture, you can see how they have lost their pitch. Not sure how many times that installer has been used, but you don't want to take the threads out of the end of the crank or snap the stud. Even more important is the HB butts up against the lower timing chain gear to keep in lined up with the upper gear so if you don't get the HB all the way on, you could end up doing a lot more damage.
I've had my hub off several times in the past few months. At first I was using the bolt like you are because I thought I was only going to do it once, not the case unfortunately. On the third time I tried reinstalling it with the bolt the crank threads started to fail. I was lucky and got a tap and ran it in the crank snout to salvage the threads. I now have a Kent Moore tool I bought on ebay to do this with. Works great and pulls the hub up tight with little work. The secret is the thrust bearing. It takes the load off of the threads. It's also best to use some high pressure grease on the threads to help protect them. You do not want to ruin the crank snout threads! Rent a tool or buy one!
Last edited by Weav's Vet; Jan 8, 2010 at 07:10 AM.
Le Mans Master
Joined: Feb 2000
Posts: 9,715
Likes: 27
From: Kempner Texas
Jake
Last edited by JAKE; Apr 1, 2010 at 06:21 PM.
Thread Starter
Racer
Joined: Jul 2007
Posts: 462
Likes: 21
From: Kansas City Missouri
I keep saying that I am going to post pics, but the project keeps dragging out for one problem or another......or just time. It is stinking nasty cold right now. They are saying that we might hit 14 below in ol' kc tonight. 
Thanks for all of the above advice. I will do a start to finish photo show for you when she is done, but here is a teaser just for you Gregg.


Thanks for all of the above advice. I will do a start to finish photo show for you when she is done, but here is a teaser just for you Gregg.
Last edited by Bensons86; Jan 8, 2010 at 11:56 AM.
Thread Starter
Racer
Joined: Jul 2007
Posts: 462
Likes: 21
From: Kansas City Missouri
Alright guys. I will be hitting it again this Saturday. Wish me luck and really good progress. I have to get the balancer on there, set the valve lash, install the new intake, and then figure out what to do with the 2000 vacuum hoses.
Hopefully she runs good, because I didn't want to have to do a tune until after I eventually installed headers...........that is unless Gregg wants to be a good friend and help me tune it in the short game just because.
Hopefully she runs good, because I didn't want to have to do a tune until after I eventually installed headers...........that is unless Gregg wants to be a good friend and help me tune it in the short game just because.
Thread Starter
Racer
Joined: Jul 2007
Posts: 462
Likes: 21
From: Kansas City Missouri
Alright. after breaking off two easy outs and putting in way too many hours on this thing, we finally got it where I could install the balancer again. I have it 3/4 of the way on with the installer tool and it won't draw up any further. I am putting an amazing amount of torque on the thing with a cheater bar, but I am scarred to go any further. Now what?
Le Mans Master
Joined: Feb 2000
Posts: 9,715
Likes: 27
From: Kempner Texas
Alright. after breaking off two easy outs and putting in way too many hours on this thing, we finally got it where I could install the balancer again. I have it 3/4 of the way on with the installer tool and it won't draw up any further. I am putting an amazing amount of torque on the thing with a cheater bar, but I am scarred to go any further. Now what?
Jake
Race Director

Joined: Feb 1999
Posts: 12,772
Likes: 17
From: Indianapolis IN
Take the balancer to a local engine shop and have them hone a .0005-.001" out of the ID .... they will know what to do and how much to take out
I have mine honed to make it easier to install, takes 5 minutes to hone.
its pretty crazy that they make them so hard to press on...
I have mine honed to make it easier to install, takes 5 minutes to hone.
its pretty crazy that they make them so hard to press on...