


Dash Light Repair
Thread Starter
Safety Car

Joined: Nov 2008
Posts: 4,328
Likes: 15
From: Jacksonville FL
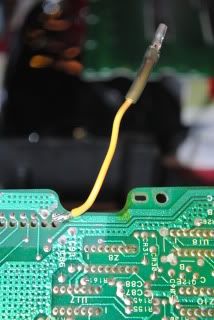
While grounds are the main culprit of dash light failure, sometimes its the power side. After running a new ground wire and following thru all the power sources externally, I opened up the dash cluster to see if I could find any obvious problem. This is what I found:

The 10 pin connector was badly scorched and not really making a good contact so I looked closer at the circuit board's path. I found that the burnt pin was connected to the power side of the lighting circuit.
The power side here is highlighted in red. This photo shows the circuit on the back side of the board:

The circuit swaps from the back to the front side highlited in red in this photo.

Since the burnt pin on the 10 pin connector seemed to be the problem and the power circuit, I soldered in a lead on each side of the bad pin

I crimped pin and socket coupling connectors on the other end of the new leads so the boards can be separated if need be.
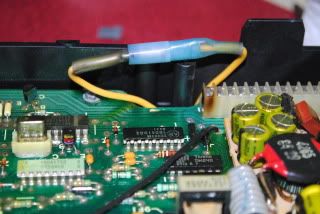
After assembly I tucked the connected wires safely away and put the metal cover back on reinstalled the dash and Let There Be LIGHT!!
I hope this helps someone else.
The 10 pin connector was badly scorched and not really making a good contact so I looked closer at the circuit board's path. I found that the burnt pin was connected to the power side of the lighting circuit.
The power side here is highlighted in red. This photo shows the circuit on the back side of the board:
The circuit swaps from the back to the front side highlited in red in this photo.
Since the burnt pin on the 10 pin connector seemed to be the problem and the power circuit, I soldered in a lead on each side of the bad pin
I crimped pin and socket coupling connectors on the other end of the new leads so the boards can be separated if need be.
After assembly I tucked the connected wires safely away and put the metal cover back on reinstalled the dash and Let There Be LIGHT!!
I hope this helps someone else.
Race Director


Joined: Nov 2003
Posts: 12,221
Likes: 446
From: Overland Park Kansas
2020 Corvette of the Year Finalist (appearance mods)
C4 of Year Winner (appearance mods) 2019
Interesting. How hard was it to r/r the Atari dash? I'd considered removing mine to replace the light sockets (as I saw in another thread). Did you consider doing this will it was out? It looks like the sockets aren't that expensive.
Also, I note (and tried) a 194 bulb to replace an intermittent issue. Though another thread said they won't work, they do in my 89. They just aren't as bright as the OEM 888's. OTOH, they're a lot cheaper. The only place I can find 882's is thru the dealer for $18/ea.
After I cleaned and replaced the original bulb, it's been working ever since.
FWIW, I used small heater hose (3/8"?) to r/r the bulbs. With a 15" piece, I stuck one end over the bulb. Then, I used my mouth to create a suction. Not lungs. (Kinda like you might suck poision from a snake wound for lack of a better description). Anyway, I found I could create a LOT of suction this way. After that, the bulb pulls out with a mild yank of the hose.
To reinstall (and avoid touching the halogen/glass), I transferred it to a short 2" section of hose. With it, I lined up the base of the bulb with the base of the socket and used the eraser end of a pencil to push in back into the socket.
While out, I also added a very tiny dab of dielectric grease to improve connection. But, someday, I bet the sockets will need to be replaced. Hope they're still available when that happens.
Last edited by GREGGPENN; Jun 27, 2011 at 01:12 AM.
Thread Starter
Safety Car
Joined: Nov 2008
Posts: 4,328
Likes: 15
From: Jacksonville FL
Good write up on R&R of the bulbs, Gregg. The break down of the dash wasnt that hard, just a crap load of 7/32 screws. The bulb sockets are on the inner board so you hafta take the metal back off and separate the two circuit boards. When you remove the board that has the sockets in it be careful as the LCD's are "connected" to the board with little conductive blocks that look like graphite sandwiches. These blocks may be stuck to either the board or LCD but a little upward pressure will separate them. Actually now that I think about it before separating the LCD and board see if the sockets remove from the back as I dont remember right now.
One warning, use extreme care when handling the LCD's. They are pretty old at this point and not easily obtained to replace them. If your only replacing the sockets you shouldnt have to get that deep anyway.
One warning, use extreme care when handling the LCD's. They are pretty old at this point and not easily obtained to replace them. If your only replacing the sockets you shouldnt have to get that deep anyway.
Le Mans Master


Joined: Jul 2007
Posts: 5,043
Likes: 8
From: Tampa Florida
 well done!
I think Zip or maybe Corvette Central sells the 10 pin connectors (both sides) for a reasonable price if you wanted to skip the "jumper" repair.
These clusters are pretty simple to reassemble/diassemble once you've done a few. Those LCDs are stronger than you think - just watch out for the metal spring/tension clip for the center LCD - take a good look at it and how it "sits/fits" before you pull center LCD. Ensure that all the LCDs are totally flat againts the front part of the cluster's case before PCB reassembly.

Thread Starter
Safety Car
Joined: Nov 2008
Posts: 4,328
Likes: 15
From: Jacksonville FL
Thanks. I would like to replace the connector but am scared to get into the board that deeply. I can solder pretty well, use a multimeter, read wiring diagrams and fix harnesses but PCB are a little too involved. If I have more problem out of it maybe.
Pro

Joined: Jan 2011
Posts: 580
Likes: 8
From: Clemson SC
I understand about the board connector kind of issues having done some similar repairs to the ac/heater control, but can someone tell me how to actually get to the dash light bulbs? My LCD's seem to all work fine but my lights only light up the tach portion and the right set of the switches to the right of the tach. I know I need to avoid touching the bulbs when installing and have read about taking heat shrink tubing or the hose as in this thread to take them out, but how do I actually get to the bulbs? My car is an 88 C4 that is pretty stock except the radio. Thanks for any insight.
Race Director
Joined: Nov 2003
Posts: 12,221
Likes: 446
From: Overland Park Kansas
2020 Corvette of the Year Finalist (appearance mods)
C4 of Year Winner (appearance mods) 2019
I understand about the board connector kind of issues having done some similar repairs to the ac/heater control, but can someone tell me how to actually get to the dash light bulbs? My LCD's seem to all work fine but my lights only light up the tach portion and the right set of the switches to the right of the tach. I know I need to avoid touching the bulbs when installing and have read about taking heat shrink tubing or the hose as in this thread to take them out, but how do I actually get to the bulbs? My car is an 88 C4 that is pretty stock except the radio. Thanks for any insight.
The easiest way to get it out is to remove the top dash first. Removed 2 screws by defroster vent and the 2 under the front center. (Their may be another one on each end but I don't think so.)
Pull straight rearward to get the dash out. (I like to stand outside the car and reach in to do this. I pull the PS out, then the DS. After it's out you'll see the pressure clips that provide resistance to removal.)
Finally, remove all the screws you see in that speedo bezel. (4 side and about 4 on the front.) The bezel will come out easily. The bulbs are behind 4 silver "caps". I described how to r/r them above.
Replace all 4 with the 194's to get even lighting. Some have said the 194's produce MORE heat than the OEM 882's. I don't know.
Good luck.
Corvette Stories
The Best of Corvette for Corvette Enthusiasts

Every 2027 Corvette Engine Explained
Joe Kucinski
Designer Imagines A Corvette That Looks More Like a Corvette Than the Corvette
Verdad Gallardo
10 Ugly Corvettes That We Still Kinda Love
Joe Kucinski
Top 10 Most Expensive Corvettes Ever Sold on Bring A Trailer
Brett Foote
10 Things Every Corvette Owner Needs (2026 Edition)
Michael S. Palmer
8 Most "Only Corvette Owners Understand" Quirks and Problems
Pouria Savadkouei
10 Reasons the C6 Z06 is Still A Performance Benchmark After 20 Years
Joe Kucinski
How Much Horsepower Every Corvette Engine "LOST" in 1972
Joe Kucinski
Top 10 DOs and DON'Ts for Protecting Your Convertible Top!
Michael S. Palmer
Melting Slicks

Joined: Nov 2008
Posts: 2,765
Likes: 5
Carquest sells- stocks the correct "882" instrument cluster bulbs for the 1984- 1989 C4's with Full LCD clusters.
Carquest is where I found & bought the 882 halogen light bulbs for my 87.
I think $20 with sales tax at my mechanic's good guy cost is what I paid for 4 of them back in 2008.
BR
Carquest is where I found & bought the 882 halogen light bulbs for my 87.
I think $20 with sales tax at my mechanic's good guy cost is what I paid for 4 of them back in 2008.
BR
Pro
Joined: Jan 2011
Posts: 580
Likes: 8
From: Clemson SC
Thanks, I got my dash off - actually came out pretty easily since some of the screws were missing. Advance Auto is supposed to have my new 882 bulbs first thing tomorrow morning. They are $7.32 ea but supposed to get them fast so I can put it back together and hopefully be cruising tomorrow afternoon.
In the meantime, I am working on fixing my cracked dash while I have it off. I also need to replace bulbs in the DIC to light up the switching area. Replacing the foam around the air vent and near the bottom of the windshield which turned to dust when you touch it. Also, regluing a rubber strip. Trying to take care of all of this while I have it apart. Seems like a never ending saga once you start fixing one thing!
In the meantime, I am working on fixing my cracked dash while I have it off. I also need to replace bulbs in the DIC to light up the switching area. Replacing the foam around the air vent and near the bottom of the windshield which turned to dust when you touch it. Also, regluing a rubber strip. Trying to take care of all of this while I have it apart. Seems like a never ending saga once you start fixing one thing!
Race Director

Joined: Apr 2002
Posts: 10,036
Likes: 346
From: Anaheim CA
The right tool to remove the lamps from the front is this guy:
http://www.specialized.net/Specializ...-Tool-535.aspx
Watch out for the price if you shop around. I've seen these things going for more than $40.
http://www.specialized.net/Specializ...-Tool-535.aspx
Watch out for the price if you shop around. I've seen these things going for more than $40.
Pro
Joined: Jan 2011
Posts: 580
Likes: 8
From: Clemson SC
Got my 882 bulbs replaced with no real problems after figuring out how to get the dash apart. Appreciate the advice about taking off the top of the dash and the tilt lever. Seeing it properly lit up makes me think it is the first time ALL of the dash has been working since I got it. I also used the opportunity while all of this was apart to replace bulbs in the telltale and DIC as well as fixing a couple of cracks in the top of the dash and painting it and the fake speaker cover fabric. All in all, started one task and ended up doing a bunch of other little things that I had been putting off. I did notice that I can see the display some when it is turned off but not excessively.
I also added a manual switch for the fans in case the temp starting getting higher than I like, 200 doesn't bother me but 230 does lead to some stress. Not much buffer in case it doesn't work exactly right. With the manual switch, I can turn the fans on when I am in stop and go traffic on a hot day, and then turn off when I get back in the country. Seems to work pretty easily.
Again, the lights look really nice. Thanks for the advice and inspiring me to work on this over the holiday weekend.
Race Director
Joined: Nov 2003
Posts: 12,221
Likes: 446
From: Overland Park Kansas
2020 Corvette of the Year Finalist (appearance mods)
C4 of Year Winner (appearance mods) 2019
Got my 882 bulbs replaced with no real problems after figuring out how to get the dash apart. Appreciate the advice about taking off the top of the dash and the tilt lever. Seeing it properly lit up makes me think it is the first time ALL of the dash has been working since I got it. I also used the opportunity while all of this was apart to replace bulbs in the telltale and DIC as well as fixing a couple of cracks in the top of the dash and painting it and the fake speaker cover fabric. All in all, started one task and ended up doing a bunch of other little things that I had been putting off.
Again, the lights look really nice. Thanks for the advice and inspiring me to work on this over the holiday weekend.
Again, the lights look really nice. Thanks for the advice and inspiring me to work on this over the holiday weekend.
Race Director

Joined: Sep 2003
Posts: 16,839
Likes: 341
From: Database Error Indiana
My ground pins were fried like your power pins. I made a similar repair. Instead of a connector in the middle, I used a long wire that allows me to seperate the boards and work with them. Also had to do the ground repair shown on the batee web site. Just a short jumper soldered in for that. All nice and bright now.
Thread Starter
Safety Car
Joined: Nov 2008
Posts: 4,328
Likes: 15
From: Jacksonville FL
Yeah I started there as well. I even went a step further and ran a separate ground wire all the way to the frame. I was pretty disappointed that this didnt fix the lights but I shoulda thought about the telltale of lit blinker indicators not showing. Anyway I know I have a good solid dedicated ground so that should never be a problem.