


Dimmer switch rod actuator
Thread Starter
Burning Brakes


Joined: Apr 2011
Posts: 917
Likes: 25
From: College Station Tx
I started looking into why my dimmer switch would not engage, when the rod actuator fell out. I've spent most of the afternoon trying to get it back in..(grease on the end cap to hold it in place) but with no luck. All the posts i've been able to find here mention removing the steering wheel. Is it possible to install the switch actuator without removing the steering wheel, or am I just wasting my time trying????

Melting Slicks

Joined: Aug 1999
Posts: 2,240
Likes: 42
From: Baltimore, MD USA
Your tilt steering column probably has a lot of side ways play caused
by the two pivot pin holes elongating/wearing out.
That causes the dimmer actuator to fall out of place. It lays against
the column right below the multifunction lever. It's hidden by the
plastic steering column shroud which holds it against the column.
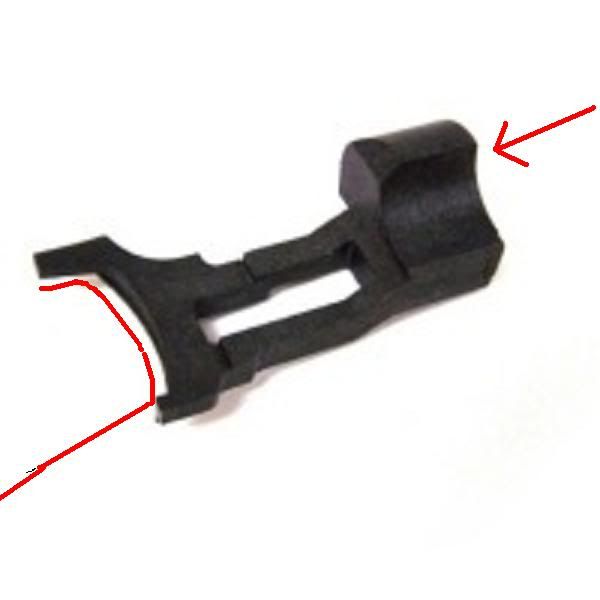
Here's a picture of what the dimmer actuator looks like.
The arrow points to where the multifunction lever pushes down ward
on it to activate or deactivate the dimmer switch.
The red curve shows how the dimmer rod meets the actuator.
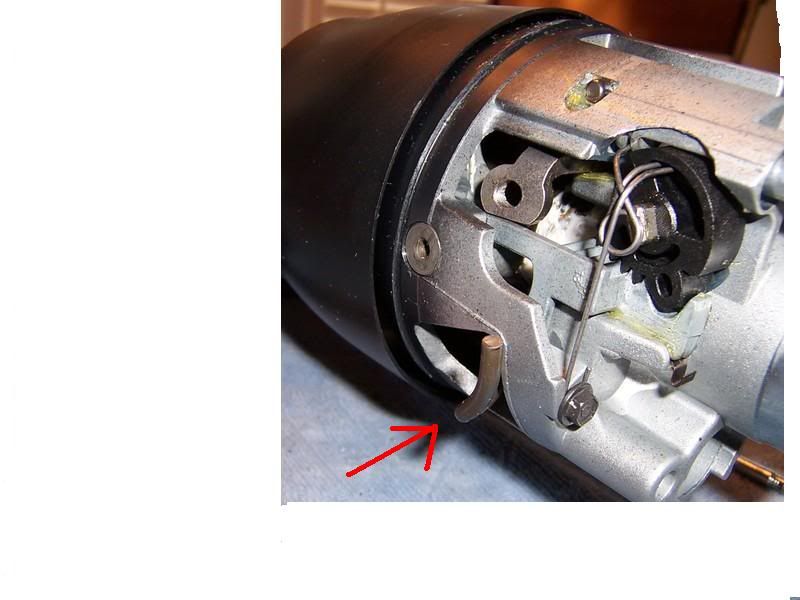
The 2nd picture shows the actual dimmer rod end which presses
against the actuator.
To put it back in place requires removing the air bag, steering wheel,
clock spring, multifunction switch and other parts until you can lift
up the lock housing cover assembly and slip the dimmer actuator
back in place behind the steering column shroud.
I've never tried it but tilt the wheel all the way up to create some
clearance. Unhook the rod from the dimmer switch. Try pulling
the dimmer rod down the column. Tape the dimmer actuator to
it. Then push it back in position.
There is a plastic cover piece that comes off of the back side/base
of the multifunction switch. If you remove that you might be able
to see the position of the dimmer actuator as you push it back in
position.
If it happens again you'll need to address the pivot pin problem or
keep the tilt wheel in the straight position.
by the two pivot pin holes elongating/wearing out.
That causes the dimmer actuator to fall out of place. It lays against
the column right below the multifunction lever. It's hidden by the
plastic steering column shroud which holds it against the column.
Here's a picture of what the dimmer actuator looks like.
The arrow points to where the multifunction lever pushes down ward
on it to activate or deactivate the dimmer switch.
The red curve shows how the dimmer rod meets the actuator.
The 2nd picture shows the actual dimmer rod end which presses
against the actuator.
To put it back in place requires removing the air bag, steering wheel,
clock spring, multifunction switch and other parts until you can lift
up the lock housing cover assembly and slip the dimmer actuator
back in place behind the steering column shroud.
I've never tried it but tilt the wheel all the way up to create some
clearance. Unhook the rod from the dimmer switch. Try pulling
the dimmer rod down the column. Tape the dimmer actuator to
it. Then push it back in position.
There is a plastic cover piece that comes off of the back side/base
of the multifunction switch. If you remove that you might be able
to see the position of the dimmer actuator as you push it back in
position.
If it happens again you'll need to address the pivot pin problem or
keep the tilt wheel in the straight position.
Last edited by Hooked on Vettes; Feb 27, 2012 at 08:21 AM.
Thread Starter
Burning Brakes
Joined: Apr 2011
Posts: 917
Likes: 25
From: College Station Tx
Thanks for the post. I've tried sticking the actuator to the end cap using heavy grease. Never thought of attaching it to the rod. I'll give that a try. Once again, thanks.
Thread Starter
Burning Brakes
Joined: Apr 2011
Posts: 917
Likes: 25
From: College Station Tx
"Hooked On Vettes" Thanks a million for the pic of how the actuator fits on the rod. I used a mirror to figure out how the other end fits up into the column. Using a little duct tape and a lot of patience I was able to get the actuator back in its place. I now have hi beams. Thanks again....saved me over $300 bucks (what the shop would have charged to replace it) since I don't feel comfortable removing the airbag.
Corvette Stories
The Best of Corvette for Corvette Enthusiasts

5 Best & 5 Worst Corvette Daily Drivers
Joe Kucinski
The Headlights of Every Corvette Generation Explained
Joe Kucinski
5 Best & 5 Most Overrated Corvette Track Packages of All Time!
Joe Kucinski
Every 2027 Corvette Engine Explained
Joe Kucinski
Designer Imagines A Corvette That Looks More Like a Corvette Than the Corvette
Verdad Gallardo
10 Ugly Corvettes That We Still Kinda Love
Joe Kucinski
Top 10 Most Expensive Corvettes Ever Sold on Bring A Trailer
Brett Foote
10 Things Every Corvette Owner Needs (2026 Edition)
Michael S. Palmer
8 Most "Only Corvette Owners Understand" Quirks and Problems
Pouria Savadkouei

Advanced


Joined: Jul 2009
Posts: 84
Likes: 1
From: SalemPortland Oregon
Revisiting this also....
Model: 1993 C4 LT1
On removing the multi-function switch....Is this supposed to be the pain that it seems to be to get it out of the "Lock Housing Cover"???? As they do, the FSM puts it so "simply" stating (p. 3F3 of 1993 FSM, book 1) "Pull toward driver door to release detent/multifunction turn signal lever".
Suuuurrrrrrrreeee.....thus far I've pulled on it where it was near a breaking point. And THIS must be done prior to completing Sub Section B "Housing Cover" removal (p. 3F5B-9 of that same FSM). I'll attempt to upload a picture from the FSM--the view is as seen from the instrument cluster. When I preview this post, it appears to be sideways and I modified it to be the right way before uploading it.
So I have the 'accuator' in my hand, but only after it fell out as I loosened the lock housing cover. It sure would be easier if I could get that multi-function switch off to fully see what I'm doing.
Last edited by whobub; Oct 5, 2016 at 08:32 PM.
Thread Starter
Burning Brakes
Joined: Apr 2011
Posts: 917
Likes: 25
From: College Station Tx
Assuming the 93 and 95 are similar, you can't remove the switch without removing the steering wheel first. You can remove the steering switch lever by pulling it out. It should pop out like the FSM said. But, at the risk of damaging the switch and making your job much more difficult, I would not recommend trying to force it out. Besides, just pulling out the lever does not help with reinstalling the switch rod actuator.
Advanced
Joined: Jul 2009
Posts: 84
Likes: 1
From: SalemPortland Oregon
But I DO have the steering wheel off, all the way down to removing the ignition switch and all that it entailed. I absolutely need to get that multi-function switch (hereafter the MFS) off in order to get the Lock Housing Cover off so that I can have a clear shot at getting the 'actuator' properly installed.
The FSM over simplifies things as usual. I just can't figure out what sort of "detent" they speak of when pulling 'toward the door'--I've tried push-pull at the base of the MFS, twist, lefty-loosy, righty-tighty,even put my little finger in my ear and jumped up and down at sundown. Nothing!!!!
Anyone ever gotten this out without breaking it? It is a GOOD, functional (currently) switch and I don't want to damage it by doing the wrong thing. I need to re-use it as I don't have another $200+ to get a new one of these if I break it.
Thanks to all for input.
Advanced
Joined: Jul 2009
Posts: 84
Likes: 1
From: SalemPortland Oregon
I wanted to share with MY solution with keeping the dimmer 'rod' and actuator in place whilst putting everything back together. I've read everything from others putting more grease and duct tape on it to hold it in place. Not wanting to attempt that, I put in place a neat trick I utilized while working on the tight confines of a Harley V-Rod. Dental Floss! That's right, preferably the unwaxed kind to make a more secure knot when the time comes.
There DOES have to be some mitigation in keeping that extremely light piece of plastic (actuator) together while holding it to the 'rod'. When referencing my attached pictures, please note "HookedOnVettes" contribution of great pics on the actual rod & actuator--these were nice and clean--your mileage may vary as mine was FULL of grease and I couldn't even recognize there was the rod there at all at first.
As the pictures I took of the process will depict, the reader should note that a piece of floss was tied to the 'rod' and the connecting end of the plastic actuator (holding it to the rod)--go ahead and tie a knot on this one as it will be key in keeping the top/bottom secured to the actual dimmer rod. Another piece of floss was looped through the opening in the "front" of the plastic actuator so as to allow it to be pulled through the steering column components and the opening near the front (closer to the where the steering wheel will be).
Sorry I was unable to edit or outline the parts in some way, that's why I want you to reference the aforementioned nice pics from 'HookedOnVettes". When I went to "preview post" this side showed it as needing a "right rotation". Again, sorry if this is what you also see, but I DID upload them properly orientated as a 'side view' of the steering column.
If you would like the full series of pics that I took of this process (8 in total I believe), feel free to PM me and I'll forward them onto you.
I need to wrap so I hope I didn't forget anything in my hurried prose.
Thread Starter
Burning Brakes
Joined: Apr 2011
Posts: 917
Likes: 25
From: College Station Tx
Excellent idea. Great job. I wish I would have thought about tying the actuator to the rod. And, yes, without those diagrams from hooked, I would never have gotten it back together without pulling the steering wheel.
Last edited by csthews; Oct 14, 2016 at 10:25 PM.
Instructor
Joined: Nov 2012
Posts: 242
Likes: 4
From: Grand Island - Nebraska
But I DO have the steering wheel off, all the way down to removing the ignition switch and all that it entailed. I absolutely need to get that multi-function switch (hereafter the MFS) off in order to get the Lock Housing Cover off so that I can have a clear shot at getting the 'actuator' properly installed.
The FSM over simplifies things as usual. I just can't figure out what sort of "detent" they speak of when pulling 'toward the door'--I've tried push-pull at the base of the MFS, twist, lefty-loosy, righty-tighty,even put my little finger in my ear and jumped up and down at sundown. Nothing!!!!
Anyone ever gotten this out without breaking it? It is a GOOD, functional (currently) switch and I don't want to damage it by doing the wrong thing. I need to re-use it as I don't have another $200+ to get a new one of these if I break it.
Thanks to all for input.
The FSM over simplifies things as usual. I just can't figure out what sort of "detent" they speak of when pulling 'toward the door'--I've tried push-pull at the base of the MFS, twist, lefty-loosy, righty-tighty,even put my little finger in my ear and jumped up and down at sundown. Nothing!!!!
Anyone ever gotten this out without breaking it? It is a GOOD, functional (currently) switch and I don't want to damage it by doing the wrong thing. I need to re-use it as I don't have another $200+ to get a new one of these if I break it.
Thanks to all for input.
Pro

Joined: Jan 2017
Posts: 702
Likes: 55
From: West Deptford New Jersey
I realize this is an old thread but hopefully I get a response. mine are stuck on high beam. (93) is there a way to jet get it to low beam and leave alone? I dont drive my car on the street often and if I do it is usually daytime. so I would like to just get to low beam and leave it there. thanks

Team Owner


Joined: Sep 2003
Posts: 25,419
Likes: 2,746
I realize this is an old thread but hopefully I get a response. mine are stuck on high beam. (93) is there a way to jet get it to low beam and leave alone? I dont drive my car on the street often and if I do it is usually daytime. so I would like to just get to low beam and leave it there. thanks
Pro
Joined: Jan 2017
Posts: 702
Likes: 55
From: West Deptford New Jersey