


Removing Upper Control Arm Bushings
Thread Starter
Team Owner


Joined: Jan 2003
Posts: 20,306
Likes: 242
From: Summerland B.C. Canada
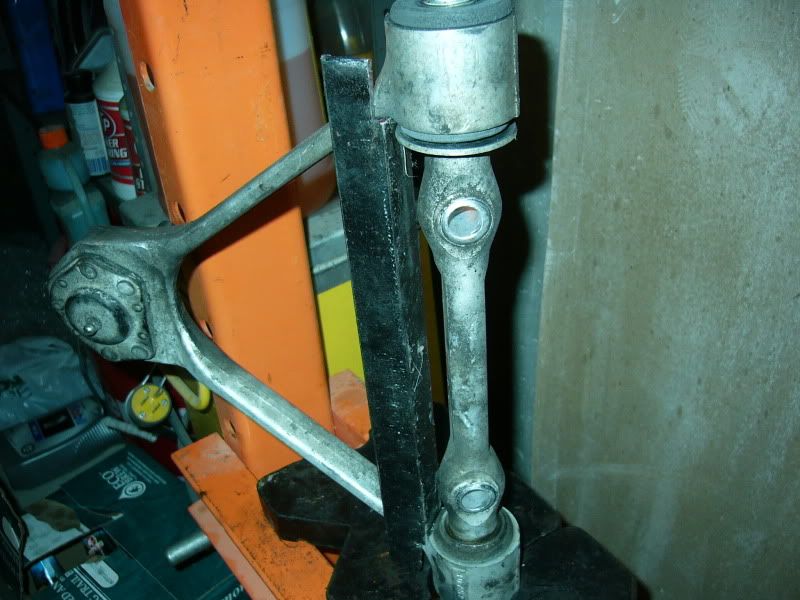
Doing my front bushing install and I thought I would pass on what worked for me.
I have read about using a press or drilling out the bushing and pulling out the sleeve.
After cutting the shoulder off bushing using a lubed zip blade, I drilled around the bushing to relieve tension. I then lubed my awl and slid it between the bushing and arm. Took my spray lube (has a thin tube nozzle) and injected some in the gap created by awl. Did that at 90* positions.
Using vise grips, I grabbed the inner sleeve and rotated the whole bushing to spread the lube, then twisted the whole bushing out.
Took less than 5 minutes a bushing.
.jpg)
.jpg)
I have read about using a press or drilling out the bushing and pulling out the sleeve.
After cutting the shoulder off bushing using a lubed zip blade, I drilled around the bushing to relieve tension. I then lubed my awl and slid it between the bushing and arm. Took my spray lube (has a thin tube nozzle) and injected some in the gap created by awl. Did that at 90* positions.
Using vise grips, I grabbed the inner sleeve and rotated the whole bushing to spread the lube, then twisted the whole bushing out.
Took less than 5 minutes a bushing.

Burning Brakes


Joined: Nov 2011
Posts: 841
Likes: 1
Doing my front bushing install and I thought I would pass on what worked for me.
I have read about using a press or drilling out the bushing and pulling out the sleeve.
After cutting the shoulder off bushing using a lubed zip blade, I drilled around the bushing to relieve tension. I then lubed my awl and slid it between the bushing and arm. Took my spray lube (has a thin tube nozzle) and injected some in the gap created by awl. Did that at 90* positions.
Using vise grips, I grabbed the inner sleeve and rotated the whole bushing to spread the lube, then twisted the whole bushing out.
Took less than 5 minutes a bushing.
 That's probably easier than a press, it looks like those control arms wouldn't agree with a press.
Thread Starter
Team Owner
Joined: Jan 2003
Posts: 20,306
Likes: 242
From: Summerland B.C. Canada
I have a press at work, but this worked so easily. Probably would have spent more time to look for something to make a brace so I could press them out. 
The GF calls me McGruber
The GF calls me McGruber
Thread Starter
Team Owner
Joined: Jan 2003
Posts: 20,306
Likes: 242
From: Summerland B.C. Canada
Corvette Stories
The Best of Corvette for Corvette Enthusiasts

How Much Horsepower Every Corvette Engine "LOST" in 1972
Joe Kucinski
Top 10 DOs and DON'Ts for Protecting Your Convertible Top!
Michael S. Palmer
Top 10 Most Explosive Corvettes Ever Made: Power-to-Weight Ratio Ranked!
Joe Kucinski
150 hp to 1,250 hp: Every Corvette Generation Compared by the Specs That Matter
Joe Kucinski
8 Coolest Corvette Pace Cars (and Replicas) of All Time
Verdad Gallardo
Top 10 Corvette Engines RANKED by Peak Torque (70+ Years of Muscle!)
Joe Kucinski
Corvette ZR1X Will Be Pacing the Indy 500, And Could Probably Race, Too!
Verdad Gallardo
Top 10 Corvettes Coming to Mecum Indy 2026!
Brett Foote
Top 10 C9 Corvette MUST-HAVES to Fix These C8 Generation Flaws!
Michael S. Palmer


Le Mans Master


Joined: May 2004
Posts: 5,866
Likes: 60
From: Hellinois
Finalist 2020 C4 of the Year - Modified
I already had this tool, http://www.harborfreight.com/four-wh...-kit-4065.html so I used it, works great but Dan's method is a lot cheaper. Can't beat this tool for u joints though.
Race Director

Joined: Apr 2002
Posts: 10,036
Likes: 346
From: Anaheim CA
I need to do that. Got the new bushings sitting on the shelf in the garage. I guess fear of the unknown is holding me back. I've never taken apart the front suspension. I'm afraid I'll get it apart and not be able to get it back together.
Thread Starter
Team Owner
Joined: Jan 2003
Posts: 20,306
Likes: 242
From: Summerland B.C. Canada

Nothing to fear here, get out there and do it.

Thread Starter
Team Owner
Joined: Jan 2003
Posts: 20,306
Likes: 242
From: Summerland B.C. Canada
I already had this tool, http://www.harborfreight.com/four-wh...-kit-4065.html so I used it, works great but Dan's method is a lot cheaper. Can't beat this tool for u joints though.
That looks like something I could use at work

Better let my boss know

Burning Brakes


Joined: Jun 2005
Posts: 1,189
Likes: 13
From: Wallingford Vermont
i think mine where on my shelf even longer. Interesting method Dan used. I used my HF press-of-love. The support for the A-arm was a piece of angle iron cut to length; 'worked great and stayed in place.
Race Director
Joined: Apr 2002
Posts: 10,036
Likes: 346
From: Anaheim CA
I saw "somewhere on the Internet" where a guy used the back of his vise and squeezed the A arm between the vise and the wall. I tried that when I was rebuilding my 700r4 and ripped my workbench off the wall. It's a lot more robust now...