


Distributor modification for clamp down HEI Cap Rotor

Thread Starter
Advanced

Joined: Jul 2015
Posts: 91
Likes: 4
From: Denver, CO
1990 L98
A previous owner had a MSD HEI distributor ignition installed, and I suspect they passed down a problem for me to inherit...
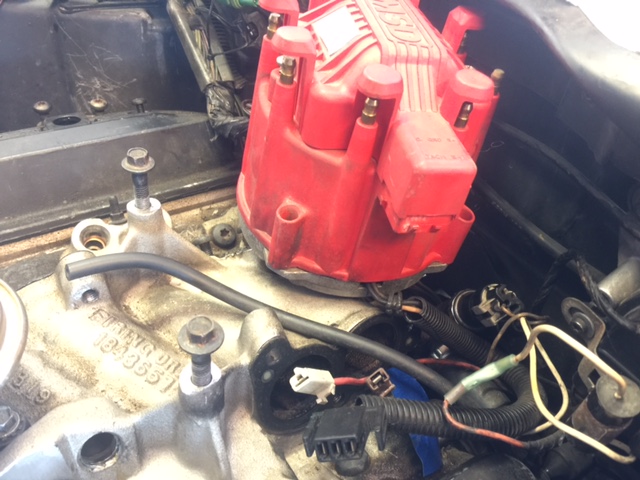
It appears the original distributor cap 'bolted' down to the base, but the MSD distributor caps are designed to 'clamp' down with 'L' shaped bolts on a spring that rotate 180 degrees to slide under the bottom part of the distributor that holds the cap. Apparently this issue was solved previously by removing the clamping bolts and spring that came with the MSD cap and replacing them with regular hex head bolts to bolt down the cap (recessing them down in the deep wells). This became a problem for me after I pulled the distributor to do a head gasket repair and had to reset the timing. The wells were too narrow to fit a 1/4" socket down to loosen the bolts (I have no idea how they were tightened in the first place). I had to cut the wells off the cap to get to the bolts, and I have ordered a new cap which is coming with the 'clamp down' bolts in it.
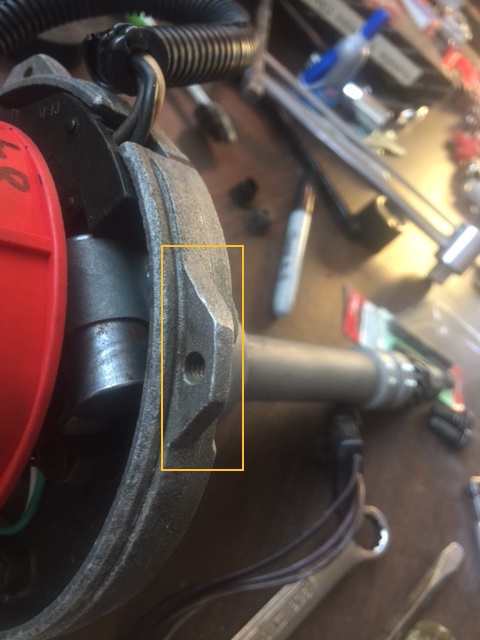
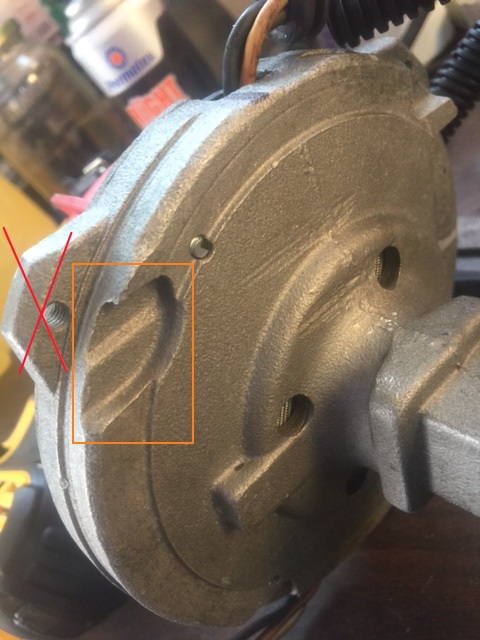
This all brings me to a decision I have to make. The base of the distributor appears to have been molded with tabs to 'bolt down' to, but also have the recessed areas to be clamped to, but the recessed clamping locations cant be accessed unless the bolt tabs are ground off. So, the question is do I grind off the tabs, so I can install the new cap in stock condition? or, do I modify the cap with new bolts to go into the distributor base as-is?
A previous owner had a MSD HEI distributor ignition installed, and I suspect they passed down a problem for me to inherit...
It appears the original distributor cap 'bolted' down to the base, but the MSD distributor caps are designed to 'clamp' down with 'L' shaped bolts on a spring that rotate 180 degrees to slide under the bottom part of the distributor that holds the cap. Apparently this issue was solved previously by removing the clamping bolts and spring that came with the MSD cap and replacing them with regular hex head bolts to bolt down the cap (recessing them down in the deep wells). This became a problem for me after I pulled the distributor to do a head gasket repair and had to reset the timing. The wells were too narrow to fit a 1/4" socket down to loosen the bolts (I have no idea how they were tightened in the first place). I had to cut the wells off the cap to get to the bolts, and I have ordered a new cap which is coming with the 'clamp down' bolts in it.
This all brings me to a decision I have to make. The base of the distributor appears to have been molded with tabs to 'bolt down' to, but also have the recessed areas to be clamped to, but the recessed clamping locations cant be accessed unless the bolt tabs are ground off. So, the question is do I grind off the tabs, so I can install the new cap in stock condition? or, do I modify the cap with new bolts to go into the distributor base as-is?
Last edited by cache1; Apr 20, 2017 at 01:47 PM.
Thread Starter
Advanced
Joined: Jul 2015
Posts: 91
Likes: 4
From: Denver, CO
I agree that would be the ideal, but it doesn't appear to be an option to do that and try to keep some of the existing parts. The MSD website, O'Reillys, and Summit Racing came up with no MSD 'bolt down' cap that would match with the existing coil/rotor/dustcap.

Team Owner


Joined: Sep 2003
Posts: 25,394
Likes: 2,741
Then just match a machine screw with the correct thread and a head that has dimensions that will drop into the "wells" (your terminology) of the cap that you already have and maybe haven't ruined or use a new cap MSD, or whatever!
Last edited by WVZR-1; Apr 19, 2017 at 07:45 PM.
Melting Slicks


Joined: Sep 2008
Posts: 2,376
Likes: 111
From: Cherokee National Forest TN
Some Caddy's also use the screw on cap.
If you want to keep the MSD brand cap:
Whiz wheel the 4 "L" tabs off, whiz wheel a slot for a screw driver in the head of each stock bolt.
If you want to keep the MSD brand cap:
Whiz wheel the 4 "L" tabs off, whiz wheel a slot for a screw driver in the head of each stock bolt.
Burning Brakes


Joined: Jan 2017
Posts: 961
Likes: 237
From: Diamondhead Mississippi
St. Jude Donor '17-'18-'19-'20-'21-'22
Biggest problem is too many places list the incorrect clamp down style cap as the correct cap, Rock Auto, Advance Auto, etc. The only local store I found that had the correct cap was Autozone.
Corvette Stories
The Best of Corvette for Corvette Enthusiasts

Top 10 Most Expensive Corvettes Ever Sold on Bring A Trailer
Brett Foote
10 Things Every Corvette Owner Needs (2026 Edition)
Michael S. Palmer
8 Most "Only Corvette Owners Understand" Quirks and Problems
Pouria Savadkouei
10 Reasons the C6 Z06 is Still A Performance Benchmark After 20 Years
Joe Kucinski
How Much Horsepower Every Corvette Engine "LOST" in 1972
Joe Kucinski
Top 10 DOs and DON'Ts for Protecting Your Convertible Top!
Michael S. Palmer
Top 10 Most Explosive Corvettes Ever Made: Power-to-Weight Ratio Ranked!
Joe Kucinski
150 hp to 1,250 hp: Every Corvette Generation Compared by the Specs That Matter
Joe Kucinski
8 Coolest Corvette Pace Cars (and Replicas) of All Time
Verdad Gallardo
Thread Starter
Advanced
Joined: Jul 2015
Posts: 91
Likes: 4
From: Denver, CO

I did already ruin the old cap by slicing off the recessed bolt holes (aka 'wells'). I had to, to get the cap off to access the rotor and set the initial start position for timing. The new cap hasn't arrived yet, but when it does, I'm going to see if I can straighten the 'L' shape bolts that come with the new cap and thread them to screw into the existing distributor base. No grinding, and everything a near to stock condition as possible. (grinding was never sitting right with me anyway, but you know how it goes when brainstorming for solutions, sometimes they are
 ).
).
Thread Starter
Advanced
Joined: Jul 2015
Posts: 91
Likes: 4
From: Denver, CO

Thread Starter
Advanced
Joined: Jul 2015
Posts: 91
Likes: 4
From: Denver, CO
CONCLUSION:
I removed the 'L' shape bolts that came with the new cap and replaced them with a socket (aka allen) bolt, with a low profile head, so it could recess down into the 'wells' and compress the springs, ultimately holding everything snug.
In hind site, it may have been better to just put an OEM cap and rotor back in, and undo the hi performance one installed, because the 'upgrade' is bigger in diameter and makes things very tight (you have to bend the rubber seal for the hood back, and the plenum can get in the way for adjusting the tuning). Oh well live and learn. A professional mechanic friend of mine said "'Spark is spark', you probably are not gaining anything with the aftermarket 'hot rod' cap and rotor".
Team Owner
Joined: Sep 2003
Posts: 25,394
Likes: 2,741
CONCLUSION:
I removed the 'L' shape bolts that came with the new cap and replaced them with a socket (aka allen) bolt, with a low profile head, so it could recess down into the 'wells' and compress the springs, ultimately holding everything snug.
In hind site, it may have been better to just put an OEM cap and rotor back in, and undo the hi performance one installed, because the 'upgrade' is bigger in diameter and makes things very tight (you have to bend the rubber seal for the hood back, and the plenum can get in the way for adjusting the tuning). Oh well live and learn. A professional mechanic friend of mine said "'Spark is spark', you probably are not gaining anything with the aftermarket 'hot rod' cap and rotor".
I removed the 'L' shape bolts that came with the new cap and replaced them with a socket (aka allen) bolt, with a low profile head, so it could recess down into the 'wells' and compress the springs, ultimately holding everything snug.
In hind site, it may have been better to just put an OEM cap and rotor back in, and undo the hi performance one installed, because the 'upgrade' is bigger in diameter and makes things very tight (you have to bend the rubber seal for the hood back, and the plenum can get in the way for adjusting the tuning). Oh well live and learn. A professional mechanic friend of mine said "'Spark is spark', you probably are not gaining anything with the aftermarket 'hot rod' cap and rotor".
OEM cap certainly a maybe better option!!


Thread Starter
Advanced
Joined: Jul 2015
Posts: 91
Likes: 4
From: Denver, CO
Sorry, I saw your question above but didn't know the answer, and still don't, exactly. I took the old bolts to Ace Hardware, and they have a size gauge on the wall so you can determine the size and thread, which I did, but cant remember what the numbers are now. I know the new ones I bought are 2" long. And If I were to guess the thread and diameter I'd say 10-24.