When you click on links to various merchants on this site and make a purchase, this can result in this site earning a commission. Affiliate programs and affiliations include, but are not limited to, the eBay Partner Network.
Made a little progress today, but super slow going. Jigging up the manifold on this tiny mill proved to be a pain and I had to flip it around a ton to work on it. Got all 6 drivers side intake manifold holes drilled. I used a 1/2" diameter end mill bit vs the 0.450" that I measured the factory holes to be.
With the intake manifold bolts being 3/8" diameter, 0.375" I think these 0.500" clearance holes should have plenty of room to all line up.
I drilled them normal/perpendicular to the plane of the manifold to cylinder head sealing surface. This was verified with a high precision digital level.
First I drilled the most rearward and then the most forward corner holes. I located them by just centering on the existing LT1 manifold bolt hole.
Then using the gasket I located the centers of the other 4 holes. Made sure to orient the gasket correctly before marking.
My plan is to fill the old holes with JB weld.
I still need to drill the other 6 holes on the passenger side, and mill down the topside of the flange so that the intake manifold bolts can clamp correctly.
Also still need to drill the distributor hole as well as the holes for the coolant lines.
Still trying to decide how to do the coolant and the porting.
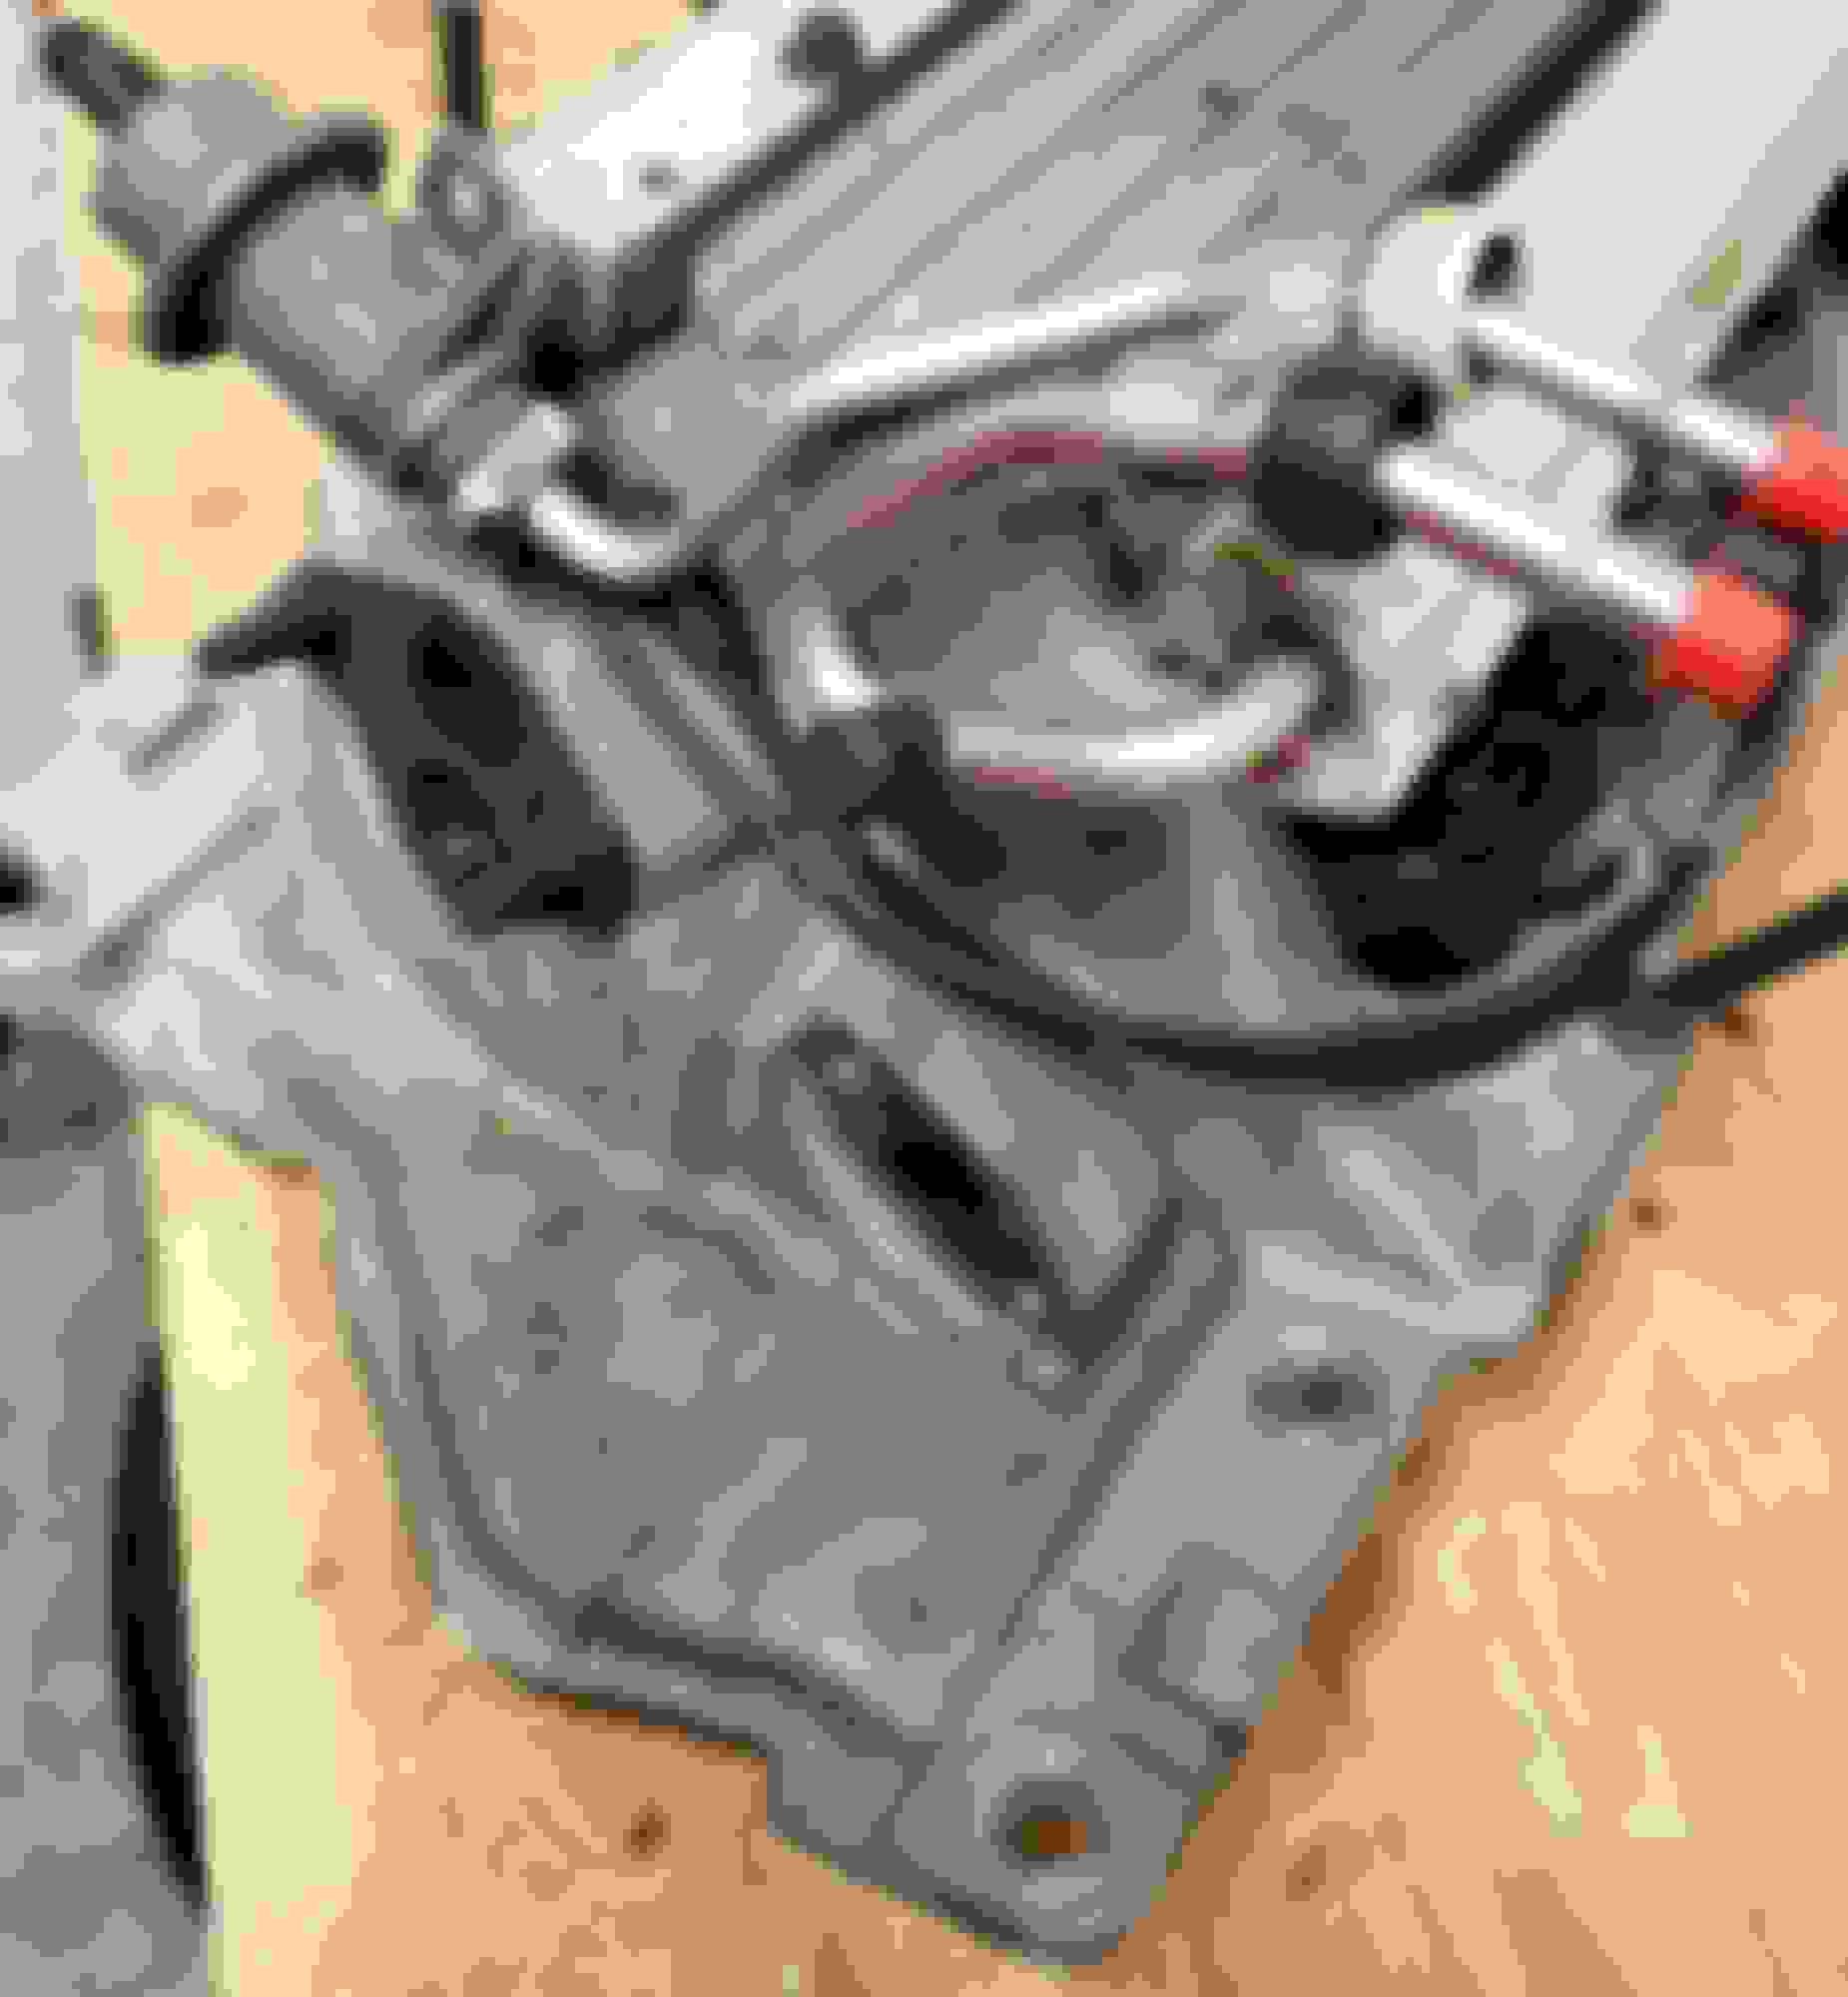
Originally I wanted to do the manifold conversion without ANY welding, but while I was tapping the 1/2 NPT pipe threads for the coolant outlet hose fittings.... the aluminum flange of the manifold cracked!
I resigned to welding, so I asked my friend's father if I could use his nice shop. He's got a full size bridgeport mill and several welders including a nice AC TIG welder than can do aluminum. I've got a TIG welder, but it is DC only so no go on aluminum.
I've welded steel before, but never aluminum. It behaves very differently. My first time, definitely rough going, but got it done! I repaired the crack and added material around the coolant outlet 1/2 NPT holes so ensure that I can get a good seal around the coolant passages.
I also plugged up the old angled LT1 intake manifold to cylinder head bolt holes.
After that was done, I jigged the manifold up on the mill, and got to milling the topside of the mounting flange flat/parallel with the intake manifold to cylinder head sealing surface. This is important so that the 90 degree intake manifold to cylinder head bolts can clamp the flange at the right angle.
I then used the jig provided by an internet TPI friend to locate the pilot hole for the distributor. The jig didn't line up very well, and it appeared to put the distributor hole WAY to close to the china wall. The 1-3/8" (1.375") Klein Tools carbide hole cutting bit I was using would have cut away easily 0.025" of china wall if I had gone with the hole location provided by the jig. I opted to just do things by eye instead... The distributor itself is 1.25" OD where it goes into the manifold, and most SBC 350 Gen 2 intake manifolds have 1.375-1.400" or so distributor hole IDs. Point is, the location isn't too critical obviously. My plan is to machine the spacer, locate that during mock up, then permanently affix the spacer to locate the actual distributor hole.
Making progress! One of the most frustrating aspects is jigging the manifold up to mill on it. Angle plates, straps and T nuts galore. Even the full sized bridgeport wasn't big enough to jig the manifold up just once. I had to keep rotating it, flipping it, and redoing the jig setup along with leveling. This was a SERIOUS time sink.
A BIG mill would help a lot.
Last edited by yakmastermax; 04-16-2023 at 01:03 AM.
Made more progress today. Fabricated the angled spacer shim to angle the distributor correctly, and to raise the deck of the LT1 intake manifold to the correct height. Did a little more aluminum welding to secure a square of aluminum to the angled spacer shim in order to drill and tap for the distributor hold down bolt. I sorta messed it up and put it too far from the distributor hole. Does anyone make an extended reach distributor hold down fork?
The plan is to drill and tab the LT1 intake manifold in three spots to bolt the angled shim spacer plate to the manifold deck. I'll cut a custom gasket and seal the deck to the angled shim spacer plate with that gasket plus RTV.
I also am looking for recommendations for a thread filler sealant for the 1/2 NPT pipe fittings. There are very few threads in the intake manifold flange for the heater hose 1/2 NPT fittings to secure to, and since I tapped them myself by hand, they're not very tight. I'm worried about leaking cooling from there.
What about just JB welding the fitting in via the threads? Coat the threads liberally with JB weld then torque the fitting in? That should seal right? Any suggestions for that?
Also with the distributor angle shim plate fabbed up, I could finally check fitment and clearance with the small cap 1992 Camaro distributor.
Much to my annoyance, it doesn't clear the rear EGR area of the LT1, nor did it clear the LT1 fuel lines.
I had to grind down the EGR area of the manifold, and I'll have to either weld in a block off plate back there, or drill and tap another hole to secure the block off plate as the area that needed to be ground down for clearance is exactly where the EGR valve bolt goes.
Additionally I had to rotate then bend the passenger steel fuel line so that the fuel pressure check port cleared the distributor. If it wasn't for that port, or if I was okay cutting it off then welding that shut, I wouldn't have had to bend the line. But being able to check fuel pressure is important, so I opted to rotate then bend the line. Hopefully it still seals where it interfaces with the fuel rail.
Overall a bit annoyed that the small cap distributor doesn't actually bolt in clear back there. If it were just a bit smaller, it would have cleared the EGR bit of the manifold AND the fuel line. Really frustrating that no one makes a plug and play MINI distributor.
The hope is that I can use the factory LT1 flexible fuel lines still.
Few questions... My plan is to use the LT1 fuel pressure regulator. I believe 1994 LT1 fuel pressure is pretty close to my 1991 L98 regulator. I'm trying to decide if I should run the 24 lb/hr LT1 fuel injectors, or install my L98 22 lb/hr injectors....
I'm trying to see if I can get the car to run okay without tuning. Current tune is a chip from PCM of NC that was set up for the cam and roller rockers on the L98. The LT1 intake manifold obviously will flow more air at high RPM but less at low RPM? So which injectors to go with?
Anyway... Slow going, but it is going.
Last edited by yakmastermax; 04-17-2023 at 02:25 AM.
Interesting, thanks for sharing. Those threads.. I'd probably weld more material/reinforce there. In the photo the area around the threads look porous too. For thread sealant I like Hylomar. Permatex or Loctite will work just as well, I'd use one for coarse threads/high performance.
I think the condition of the injectors is more important than the nominal flow.
Yeah if it leaks coolant from those threads, I will pull the manifold, weld material, and then re-tap...
For this first attempt, is there a high fill high temp and pressure epoxy thread sealant you can recommend? This Hylomar stuff? What about just coating the NPT fitting in tons of JB weld then threading that in?
Best way to check the condition of the injectors?
I have two sets basically, the ones in the car currently and then these LT1 ones.
I don't have experience with JB Weld but in general the chemical metals haven't lasted very long with heat cycles and vibrations. You have so few threads on one side it might be you-don't-lose-much trying with JB Weld?
Edit: could you make a spacer/support between the fitting and intake?
Injectors really require a flow test bench for spray pattern and volume, many have built their own. At least measure the ohm's of the injectors, if one is very different to others that's a bad one. Cold testing doesn't really tell if the injector is good but will show a bad one.
You've already demonstrated your welding skills, why not just add more metal to the coolant bung area?
I was using my friend's father's welder and his bridgeport. I would have to weld more material then jig the manifold back up and mill the area more, then re-drill and re-tap....
I already have spent over 20 hours using his shop and materials and they live an hour away...
If JB weld can do it, I want to try that first lol
I already have spent over 20 hours using his shop and materials and they live an hour away...
...And this is why for those of us who don't have those skills and resources the Super Ram or other aftermarket intake begins to make sense. PLEASE don't take that as a negative comment! You are doing great work, and you will undoubtedly end up with great results for not much more than gas money! But even half that time at a normal shop rate is over a thousand dollars worth of work. But dang it, man - you're actually doing the work to answer all the questions I've had for years! I've always wondered what it would take to drop a factory LT1 intake on a SBC, and I've thought for years that it would be a cool replacement for the L98 intake. So bravo! Please forge ahead to the end!
I am in grad school and on a budget soo $1400 for a miniram was a bit of a stretch... but more importantly I wanted to go this route for the aesthetics of the LT1/LT4 intake. I think the LT1/LT4 intake looks rather different than the miniram. I got LT4 valve covers for this car, and the cam is the LT4 cam too soo...
Many others have done this conversion before but I like to think that by going this route I also have answered some questions that haven't been explicitly answered yet or discovered some interesting things that others might find useful.
For example I believe now that if maximum cooling performance is desired there are gains to be made by pulling coolant from the motor at both the front AND the rear of the intake manifold, so that when doing this mod on say. Race car, one should install coolant outlet fittings at all 4 corners of the manifold.
Additionally I am excited to see if the LT1 fuel lines bolt up to the L98 fuel lines down underneath the car near the fuel filter. If so, that would be REALLY cool as it means that the fuel can be run for an LT1 intake swap with no custom fittings, something I haven't seen anyone do.
Also for the small cap distributor, I haven't seen anyone document explicitly the actual necessary clearancing work to the EGR area for it to fit. I believe I have done that.
But yeah, thanks for the support!
Last edited by yakmastermax; 04-19-2023 at 02:37 AM.
Just realized I think there are three holes on the front of the TPI manifold base that I haven't addressed.
One I believe is a coolant outlet (I think 1/2" NPT) that sends coolant to the throttle body (the subject of the bypass mod) and that coolant then goes from the throttle body to the heater core inlet?
What do I do about this guy? How should I send coolant to the heater core? Maybe from an oulet I place at the rear of the manifold or T off from one of the lines that goes from the front fittings to the remote thermostat?
The other hole I think (could use confirmation please) is a 3/8" NPT (I think?) For the fan temperature switch sensor? What should I do for this guy? Wire in a hard switch? Drill and tap somewhere for this sensor?
The third hole looks biggest? Maybe 1/2" NPT
Not sure what this one is? Return from the heater core?
Also still BADLY need an inexpensive suggestion for a remote coil I can just order off the web (fast shipping ideal) and some ideas on where and how to mount said coil!
Also still BADLY need an inexpensive suggestion for a remote coil I can just order off the web (fast shipping ideal) and some ideas on where and how to mount said coil!
Thanks all!
I already gave you a great idea for a coil. I don't "get it"...but here it is again.
Walk into a junk yard. Find a late '80's to mid '90's chevy truck....those are easy to find. Pull the coil off of it. Go to the counter and pay for it. Probably <$15 BUX. Walk out. You got a coil. Easy button.
I explicitly asked for a web order option. What is easy, convenient, or preferable for some, is not necessarily easy, convenient, or preferable for others.
Thank you for suggesting a particular vendor from which I might order a remote coil! I actually have used Summit before, they're pretty solid.
I did however ask not for a suggestion for a vendor, but rather asked for a particular model/part number, and more importantly am looking for ideas on how/where to mount said remote coil.
For what it is worth, the current relevant parts I have on hand are an aftermarket 1992 Camaro small cap distributor and the Michigan Motorsports adapter harness.
Also I still had those questions about the holes on the front of the TPI base... hopefully those questions don't get lost in the back and forth
I did however ask not for a suggestion for a vendor, but rather asked for a particular model/part number,
It doesn't matter what model. Application. Application is what matters.
Originally Posted by yakmastermax
....more importantly am looking for ideas on how/where to mount said remote coil.
Have you checked POST #17 & 27 ? Otherwise, you don't really need suggestions; mount it where ever the f- YOU want it.
Also, if you pulled on from a yard, you'd SEE where GM mounted it (ugly) and you'd be able to get the bracketry and hardware as well. Just sayin'....
Originally Posted by yakmastermax
Also I still had those questions about the holes on the front of the TPI base... hopefully those questions don't get lost in the back and forth
One hole is for the CTS, one is for the heater core. Only other hole I recall is for the thermostat. EDIT; third hole is for the cold start injector. Plug it.
The application is for a converted LT1 intake on a 1991 L98 C4 vette. Not exactly typical. I don't see that option on the drop down menu on Summit
Also while I appreciate your suggestion for mounting the remote coil on the other side of the firewall, and while I have considered your suggestions three times now, I continue to ask because I have chosen not to go with your suggestion for mounting the remote coil on the other side of the firewall because I want it in the engine bay.
Also I thought the cold start injector was up at the 9th injector hole near where the runners go into the base? I am talking about the 3rd hole at the front of the base, facing forward. Also not sure why I would plug that hole on the base of the TPI manifold when I am removing the manifold entirely and replacing it with the converted LT1 manifold.
Soo...
Still looking for remote coil and remote coil mounting suggestions as well as what that third hole is for!
Thanks!
The application is for a converted LT1 intake on a 1991 L98 C4 vette. Not exactly typical. I don't see that option on the drop down menu on Summit
Ha ha ha....No. The application is what you got the distributor from. The application for your COIL, that you're asking about has to be compatible with the distributor, that you bought.....not the intake that you're putting on the car. The intake has nothing to do with the coil.
Early '90's chev truck. Try that in the drop down.
It also has to be compatible with the "application" where by "application" I am referring to the converted LT1 manifold with aftermarket Camaro 92 small cap and Michigan Motorsports large cap to small cap adapter harness and the specifics of whatever mounting is advisable for this "application".
Probably gonna go with this guy and secure it near the brake booster somehow!
 04-10-2023, 08:35 PM