Rear Alternator Bracket & Headers. Sick of breaking Alternators!!!
 07-13-2003, 10:54 PM
#21
Drifting


............... and the A/C compressor has a similar bracket on the other side. Don't sweat the small stuff. :)
That one fits and so does the dipstick one!!! :D
That one fits and so does the dipstick one!!! :D
Just a small step for a big stepper! :rofl:
Dan
 07-13-2003, 10:59 PM
#23
Drifting

Member Since: Aug 2000
Location: West Islip New York
Posts: 1,521
Likes: 0
Received 0 Likes
on
0 Posts
Scorp / Ski
Both of you guys have the air pump eliminator bracket ? Just wondering if you think that may be causing some additional movement to break the case.
I also don't have a rear bracket on my alternator because of the hookers but with the air pump bracket it seems pretty stiff.
Both of you guys have the air pump eliminator bracket ? Just wondering if you think that may be causing some additional movement to break the case.
I also don't have a rear bracket on my alternator because of the hookers but with the air pump bracket it seems pretty stiff.
07-13-2003, 11:01 PM
#24
Team Owner

Thread Starter
Both of you guys have the air pump eliminator bracket ? Just wondering if you think that may be causing some additional movement to break the case.
07-13-2003, 11:18 PM
#25
Drifting
Member Since: Aug 2000
Location: West Islip New York
Posts: 1,521
Likes: 0
Received 0 Likes
on
0 Posts
The AIR pump bracket comes down on both sides of the alternator and the elminator bracket only comes over the front side.
07-13-2003, 11:19 PM
#26
Drifting
Both of you guys have the air pump eliminator bracket ? Just wondering if you think that may be causing some additional movement to break the case.
Yes!!!!!! I've mentioned this before I think. The AIR pump bracket comes down on both sides of the alternator and the elminator bracket only comes over the front side.
Yes!!!!!! I've mentioned this before I think. The AIR pump bracket comes down on both sides of the alternator and the elminator bracket only comes over the front side.
Dan
07-14-2003, 09:05 AM
#27
Race Director

We had the same problem when installing headers on the 84 and 89. We custom made a bracket out of 1/4" pipe.

This is the 89 bracket. Pipe cut to length, flatten the ends and drill appropriate holes.
This is the 89 bracket. Pipe cut to length, flatten the ends and drill appropriate holes.
07-14-2003, 09:08 AM
#28
Safety Car


Scorp....did you use an air pump eliminator kit? If so, the bracket it uses is why your breaking alternators.
I did mine the cheap way, I just took apart the air pump and removed the vanes inside it for the same effect.
BTW: I have not used the bracket on mine since I put in the 140 amp alternator, and it's had no problems at all, it also has a bigger housing that looks stronger than the original POS alternator.
[Modified by BBA, 9:13 AM 7/14/2003]
07-14-2003, 09:17 AM
#29
Race Director
Dude I broke my alternator bracket this weekend too, I will order one today from Last Detail.
My brace boltss on just like the pics above but I decide to leave it off for the looks, dumb move on my part.
Just get a piece of thick wall tubing and heli-arc weld it to a couple of pieces of hollow tube that will allow for the manifold bolt and the alternator bolt to go thru.
If you send me the prices I can get it welded but I'm sure someone local could do it too.
07-14-2003, 09:29 AM
#30
Former Vendor

Why go through the trouble to get it welded etc and pay more money than necessary. Reuse the original blacket arm and do it the way I did. It cost probably under $1. Takes about 10 minutes to install and you can't even see it once its on.
I wouldn't want that big godie brace going back my engines side. That is just my $.02. once everything is bolts tight. There is no way your going to move that alternator now. The bracket is in tension and compression when you try to move the alternaor. You would have to crush that bracket to get any movement.
It easy and only you have all the parts already. It pretty much a no-brainer if you ask me.
:crazy:
07-14-2003, 10:23 AM
#31
Team Owner
Thread Starter
I'm thinking ski's idea is the cheapest & easiest so far.
Well I drove it to work this morning with my "backup" alternator on the car. As luck would have it the freaking thing started off getting 11.1 volts at cruise and when I rolled into work 10.5. I guess I'm not getting home with this one either. :lol: I wonder if I toasted my battery because this one worked when I took it off the car before. The battery light wasn't even coming on and it did yesterday. Aww hell that probably blew out too!
I looked and doesn't it figure, not a single pepboys on the way home. :rolleyes: AAA Gold may be getting a call this evening. :)
Well at least things are back to normal!! :D
07-14-2003, 01:50 PM
#32
Safety Car
Hey...since your going to make a new bracket anyway...this time around...buy the 140 Amp from the 93-96 LT1. You wont be sorry and it only cost slightly more thant eh POS L98 style junk alternator.
07-14-2003, 04:14 PM
#33
Team Owner
Thread Starter
Alright just dropped a reman unit from Autozon ($88 + $30 core) in the parking lot here at work. I brought the tools with me, lol. Looks like I'm back in business till I manage to make another bracket. I now have 2 bad units to bring back to pepboys, i think i'll go to different stores. :)

 02-03-2012, 08:06 AM
#35
2nd Gear


Member Since: Feb 2012
Posts: 2
Likes: 0
Received 0 Likes
on
0 Posts
Scorp.
Easy solution I did the other day....as I ripped the housing right off an alternator at the track
I took the bracket, that you typically have there. Straightened out the one end so it had no bend. I ran it right down just past the back of the alternator. You need to use a longer bolt and use nuts for jam nuts to get the proper spacing. So it runs just past the back of the alternator.
The bracket will then go to the first bolt hole in the header for the #1 cylinder. THere you will need to again use threaded rod and a series of jam nuts to get the proper spacing.
It took me about 30 minutes to do it, and the results are a very clean lookin setup. It keeps everything real tight together rather then the other ones that go back the block further.
I was going to make a tech article with pictures to help out others. Just havent got a chance to have Dad take some pictures of it. That reminds me...I need a digi camera
I will see if he can take some quick shots for me to help you out. I think you will see what I did if you look at it. Its really easy.
02-03-2012, 08:20 AM
#36
2nd Gear
Member Since: Feb 2012
Posts: 2
Likes: 0
Received 0 Likes
on
0 Posts
Scorp.
Easy solution I did the other day....as I ripped the housing right off an alternator at the track
I took the bracket, that you typically have there. Straightened out the one end so it had no bend. I ran it right down just past the back of the alternator. You need to use a longer bolt and use nuts for jam nuts to get the proper spacing. So it runs just past the back of the alternator.
The bracket will then go to the first bolt hole in the header for the #1 cylinder. THere you will need to again use threaded rod and a series of jam nuts to get the proper spacing.
It took me about 30 minutes to do it, and the results are a very clean lookin setup. It keeps everything real tight together rather then the other ones that go back the block further.
I was going to make a tech article with pictures to help out others. Just havent got a chance to have Dad take some pictures of it. That reminds me...I need a digi camera
I will see if he can take some quick shots for me to help you out. I think you will see what I did if you look at it. Its really easy.
02-03-2012, 09:22 AM
#37
Safety Car
If you resurrect a 9 year old thread dont expect the original poster to help you out. Odds are they have moved on to another generation or out of Vettes completely. It would be easier to start a new thread asking for pics of any rear alternator bracket modifications for headers. Include what type of headers you bought as well.
The mods will close this thread when they see it is as old as it is.
IBTL.
The mods will close this thread when they see it is as old as it is.
IBTL.
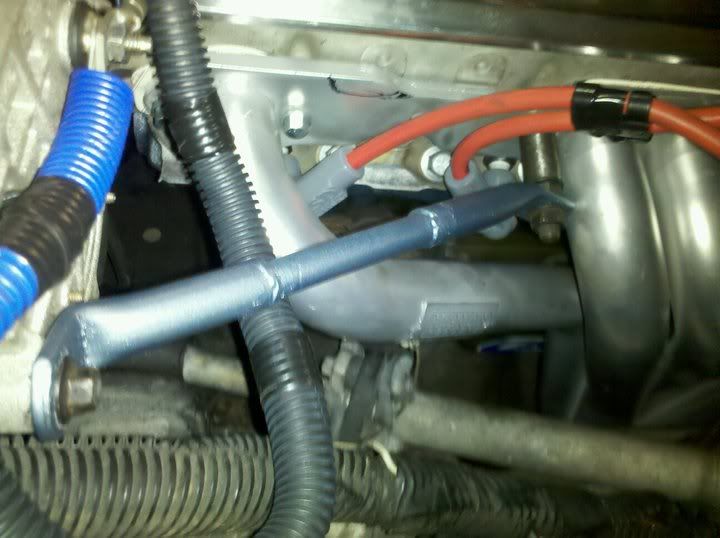
02-03-2012, 01:25 PM
#38
Suckin' gas, haulin' ass.


Member Since: Apr 2010
Location: Newport News Virginia
Posts: 1,100
Likes: 0
Received 8 Likes
on
7 Posts
This is what I did on my 89. I cut the existing bracket and welded a rod cut to length. I also cut the bolt tube from the stock manifold and used the stock bolt with the stud on the end.