





Blackout Taillights
Thread Starter
Pro

Joined: Jan 2005
Posts: 612
Likes: 0
From: Myakka City Florida
 Blackout Taillights
I am thinking of getting a blackout kit for my 2001 black coupe. But I'm not sure if I want to spend $80-$90 on a set. And I don't really want to get the static clings. Is there anyway to paint the taillight covers? And if there is: What kind of paint should I use? Hopefully just something quick, easy, and cheap. Thanks.

Le Mans Master


Joined: Nov 2000
Posts: 5,210
Likes: 104
From: Fort Worth TX
St. Jude Donor '06
Father & Son St. Jude Donor '09
I've painted several set of lights for friends and some folks off this and another vette forum. I use clear paint that I tint with ~18% black. Without a paint gun and compressor, I don't think you can recreate what I've been doing. If you have a paint gun, I'll be happy to talk you through everything involved.
Since the paint quantity is low, I prefer to use House of Kolor products, best paint available IMHO.
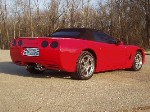
Here's a pic of my lights.

Since the paint quantity is low, I prefer to use House of Kolor products, best paint available IMHO.
Here's a pic of my lights.

Melting Slicks


Joined: Oct 2004
Posts: 3,293
Likes: 0
From: Big Bear City CA
St. Jude Donor '06-'07-'08-'09
[QUOTE=74-Roadster]I've painted several set of lights for friends and some folks off this and another vette forum. I use clear paint that I tint with ~18% black. Without a paint gun and compressor, I don't think you can recreate what I've been doing. If you have a paint gun, I'll be happy to talk you through everything involved.
Since the paint quantity is low, I prefer to use House of Kolor products, best paint available IMHO.QUOTE]
Way cool, then we could do the side marker light as well since no kits seem to cover them. I paint regularly and have all the required equipment. Did you mask and shoot them in place, or remove them? Also if you can provide a description of the paint you use, or a link? It would be greatly appreciated. Did you scotch-bright your lenses before painting?
Thanks,
Richard
Since the paint quantity is low, I prefer to use House of Kolor products, best paint available IMHO.QUOTE]
Way cool, then we could do the side marker light as well since no kits seem to cover them. I paint regularly and have all the required equipment. Did you mask and shoot them in place, or remove them? Also if you can provide a description of the paint you use, or a link? It would be greatly appreciated. Did you scotch-bright your lenses before painting?
Thanks,
Richard
Le Mans Master
Joined: Nov 2000
Posts: 5,210
Likes: 104
From: Fort Worth TX
St. Jude Donor '06
Father & Son St. Jude Donor '09
Originally Posted by C5VetteLS1
Way cool, then we could do the side marker light as well since no kits seem to cover them. I paint regularly and have all the required equipment. Did you mask and shoot them in place, or remove them? Also if you can provide a description of the paint you use, or a link? It would be greatly appreciated. Did you scotch-bright your lenses before painting? Thanks, Richard
1. Wetsand off the raised letters with 220 grit.
2. Sand the entire lights with 400 grit, then 600, then 800.
3. Mix up House of Kolor Proflow clear ~ 6 parts clear to 1 part jet black in a clean pint container. Shake the h e l l out of the stuff after mixing and let it sit over night before using. Shake again for 1-2 mintues before spraying.
4. Wash the lights with dawn and wipe off with a clean towel.
5. Tack rag just before painting.
6. Spay 3-4 light to medium coats on the lights allowing 3-4 minutes of flash dry time. Make sure you have enough light and use even consistent strokes or you'll get uneven shading.
7. You can be done or you can let them sit for 24 hours and wetsand with 2000 grit and then spray 3-4 coats again with pure clear. Mine in the picture don't have extra clear over them.
8. Whenever you decide you're done painting, let them dry for 36-48 hours depending on drying temperature. Then wetsand with 1200, 1500 and finally 2000.
9. After the paint is smooth and flat, use a highspeed buffer and I use a mix of 3M polishing compound and 3M swirl remover. I clamp my buffer in a vice so I can hold the lights, not the buffer.
10. After you have a nice gloss, let them sit overnight and then buff again using only swirl remover.
And don't use anything on them but a foam pad on the buffer or a microfiber towel to wipe them off. In the 1st few days, the paint can still be scratched very easy.
Good luck!

Melting Slicks
Joined: Oct 2004
Posts: 3,293
Likes: 0
From: Big Bear City CA
St. Jude Donor '06-'07-'08-'09
Awesome Bud, thank you. I had no idea that you could mix clear with black and get a translusent effect. Great information! I'll hope to do mine soon and post some pictures.
Have a good day,
Richard
Have a good day,
Richard
Le Mans Master
Joined: Nov 2000
Posts: 5,210
Likes: 104
From: Fort Worth TX
St. Jude Donor '06
Father & Son St. Jude Donor '09
Originally Posted by C5VetteLS1
Awesome Bud, thank you. I had no idea that you could mix clear with black and get a translusent effect. Great information! I'll hope to do mine soon and post some pictures.
Have a good day,
Richard
Have a good day,
Richard
Also, I found a detail gun or quality airbrush is much easier allowing the painter to apply the paint evenly.
Thread Starter
Pro
Joined: Jan 2005
Posts: 612
Likes: 0
From: Myakka City Florida
Originally Posted by 74-Roadster
I've painted several set of lights for friends and some folks off this and another vette forum. I use clear paint that I tint with ~18% black. Without a paint gun and compressor, I don't think you can recreate what I've been doing. If you have a paint gun, I'll be happy to talk you through everything involved.
Since the paint quantity is low, I prefer to use House of Kolor products, best paint available IMHO.
Here's a pic of my lights.
Since the paint quantity is low, I prefer to use House of Kolor products, best paint available IMHO.
Here's a pic of my lights.

Corvette Stories
The Best of Corvette for Corvette Enthusiasts

Top 10 Most Explosive Corvettes Ever Made: Power-to-Weight Ratio Ranked!
Joe Kucinski
150 hp to 1,250 hp: Every Corvette Generation Compared by the Specs That Matter
Joe Kucinski
8 Coolest Corvette Pace Cars (and Replicas) of All Time
Verdad Gallardo
Top 10 Corvette Engines RANKED by Peak Torque (70+ Years of Muscle!)
Joe Kucinski
Corvette ZR1X Will Be Pacing the Indy 500, And Could Probably Race, Too!
Verdad Gallardo
Top 10 Corvettes Coming to Mecum Indy 2026!
Brett Foote
Top 10 C9 Corvette MUST-HAVES to Fix These C8 Generation Flaws!
Michael S. Palmer
10 Revolutionary 'Corvette Firsts' Most People Don't Know
Joe Kucinski
