
Scissor Lift Ramp - For Bend-Pak. (No Dial Up)


 10-18-2006, 07:59 AM
#42
Melting Slicks

Thread Starter
Originally Posted by Rob 99
Very nice, two questions, since you cant stand up straight underneath how comfortable is it to work under there hunched, crouched, or sitting on a mechanics seat,whats the best way you do it
second, how is it attached to the garage floor if it is, i cant see in your pics the tires are blocking that view.
thanks for posting your setup very much appreciated
second, how is it attached to the garage floor if it is, i cant see in your pics the tires are blocking that view.
thanks for posting your setup very much appreciated
No, you can't stand upright under the car (unless you're about 43" tall
 )..
).. 
I use a Craftsman mechanics stool:
http://www.sears.com/sr/javasr/produ...id=00951828000
It works great.. I think Sears has one with a back on it that might work better for some folks.
Re your question on attachment - I'm assuming you mean the 'ramp' setup.. not attached at all. It just sits on the floor - the crossmembers (2x4's) keep it from moving forward or backward when you drive on it.
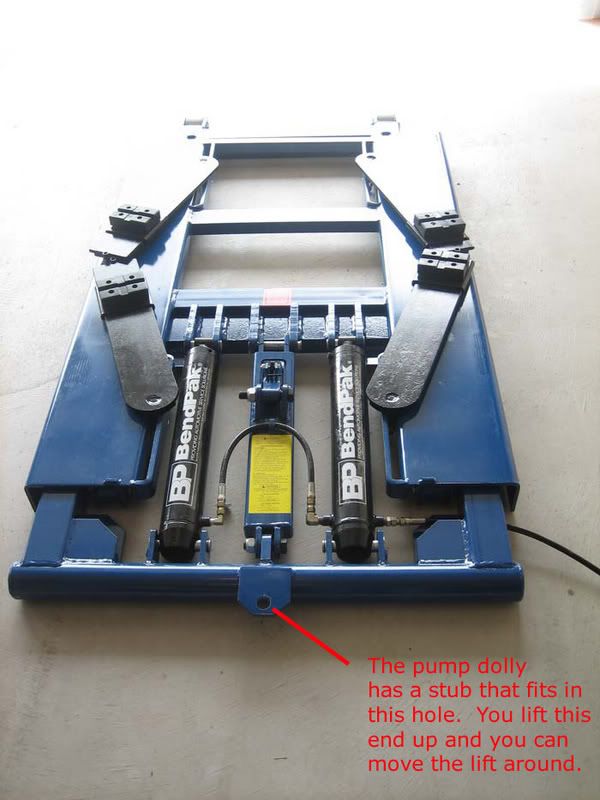
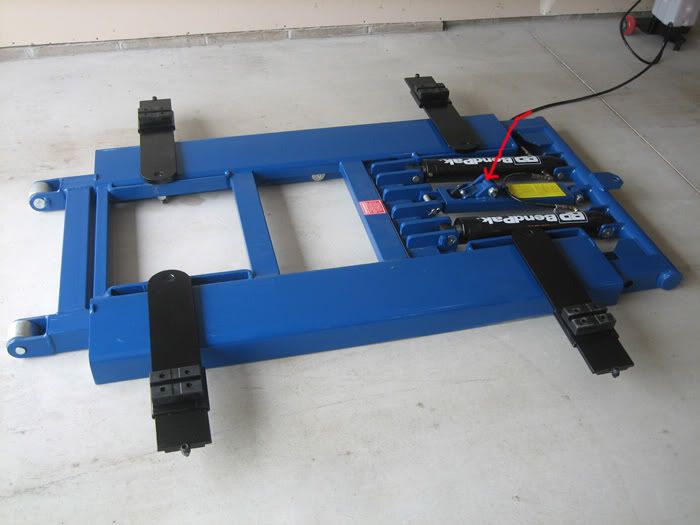
If you're referring to the lift itself, that's not attached to the floor either.. It has wheels on the 'bottom' end - the pump-dolly can cleverly be used to pick up the 'top' end and you can wheel it around. It's pretty heavy, but once you get it moving it's a piece of cake.


Chris


 03-06-2010, 08:46 AM
#46
Le Mans Master


Have to give you a first class ATTA BOY !!! I have always been a creative DIY guy,,,and I really enjoy seeing other DIY guys solutions for their problems!! A slick set up for sure!! I here by bestow the official itzza427 "WELL DONE AWARD"
 !! Just came up with that one,,,you are the first recipient!! More rare than an oscar
 !!
!! :cheers :
!!! I have always been a creative DIY guy,,,and I really enjoy seeing other DIY guys solutions for their problems!! A slick set up for sure!! I here by bestow the official itzza427 "WELL DONE AWARD"!! Just came up with that one,,,you are the first recipient!! More rare than an oscar!!:cheers :
03-06-2010, 09:19 AM
#47
Drifting

This is the link found , What is your model number for the BenPak sisscor lift? (RX-12AE) ? I had contemplated just recently adding a 2 post , low ceiling at $1,400 plus $350 shipping from Texas ( weight was 1500 pounds). The two post lift is lectric with chain drive , I prefer mechnical over hydraulic in the long term. I had an in-ground Rotary lift for years but they are not as precise ( when lowering and lifting )
Rj-6 rolling jacks encluded with front urn plates and rear slip plates included.
Problem is the $13,000 price tag ( shipped) wt 553 pounds. You lost me. 5 grand I can obtain anoth Rotary inground lif.
Rj-6 rolling jacks encluded with front urn plates and rear slip plates included.
Problem is the $13,000 price tag ( shipped) wt 553 pounds. You lost me. 5 grand I can obtain anoth Rotary inground lif.
03-06-2010, 07:08 PM
#48
Guest
Posts: n/a
Hi all,
Some of you may have read my post about the Bend-Pak scissor lift. I promised more detail on the ramp, so here it is:
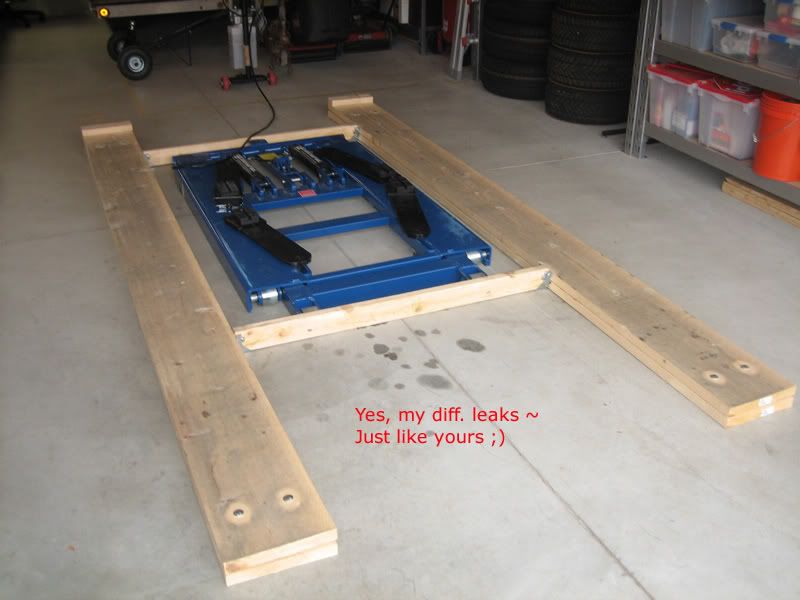
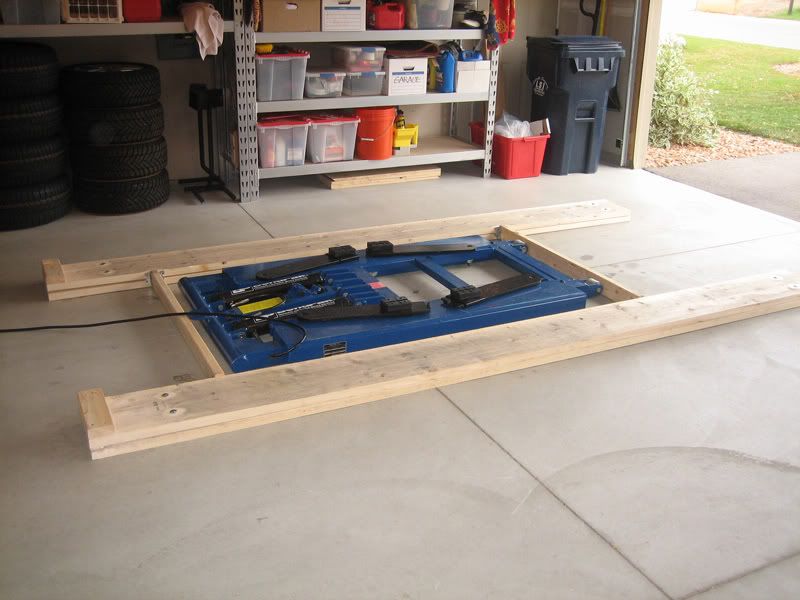
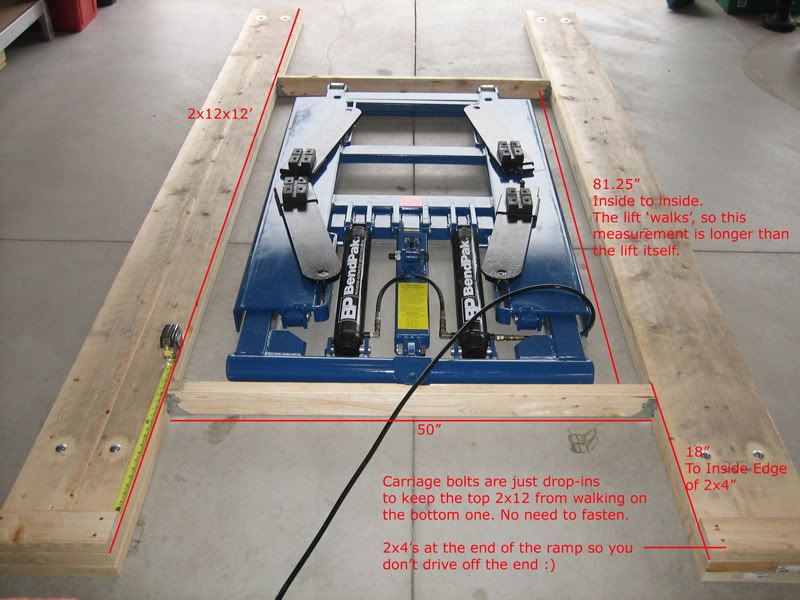
If you have a stock C5 (or I would guess a C6) and you buy a Bend-Pak mid-rise scissor lift, you're going to need to get the Vette's ground clearance up at least another 1.5". The C5 ground clearance is +/- 5" and the air-dam is lower than that.
The lift's highest point is +/- 6.5" (safety mechanism) and the lifting pad minimum height is 4.75". That said, you need some room to get your hand/arm under the car to move the lifting arms of the Bend-Pak.
This is why you can't drive a stock C5 over this lift:
Trust me, you're not going to be able to do use this lift without using some type of ramp to raise the car's center-line clearance.
There are various ways to build the ramp: If you haven't lowered your C5, you can probably just put down a 2x12" on either side of the lift and drive over that. The boards may slip and slide around with this method, but it will work in a pinch.
Since my C5 is lowered about an inch, I needed to go up at least 2" and since a 2x is 1.5" high, it forced me to use 2-2x12's stacked to give me enough clearance.
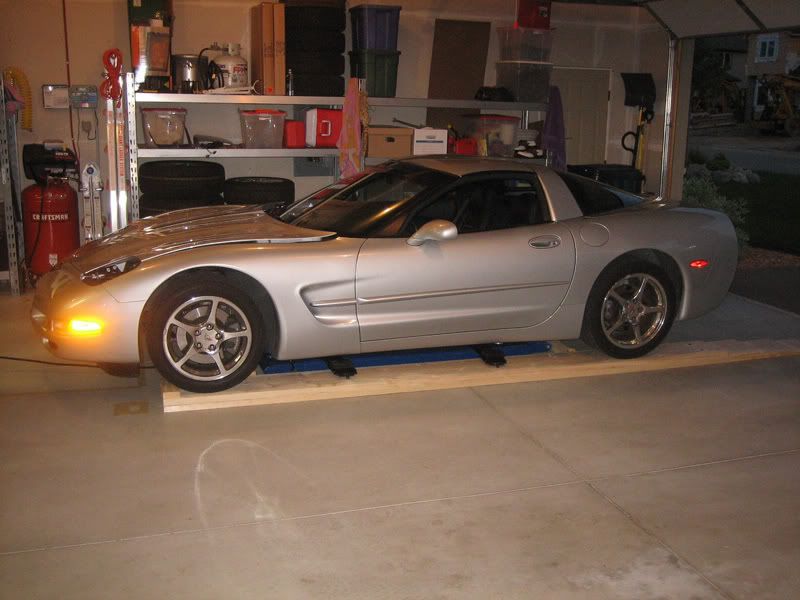
This ramp setup centers the C5 perfectly over the lift and the crossmember 2x4's ensure that the ramp doesn't walk forward or backward as your drive on/off. There is about 1/2" extra room on either side of the 2x12's for tire clearance. You'll be surprised at how good you can get at centering the car - I park on it every night.
Scissor lifts are fun

The materials list:
Qty 4 - 2x12x12' Pine (the sides)
Qty 2 - 2x4x6' Pine (the cross members)
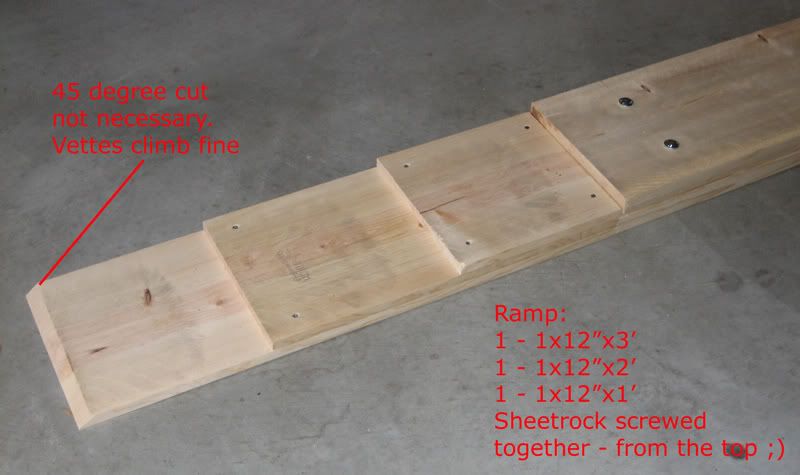
Qty 2 - 1x12x8 Pine (the 'ramps')
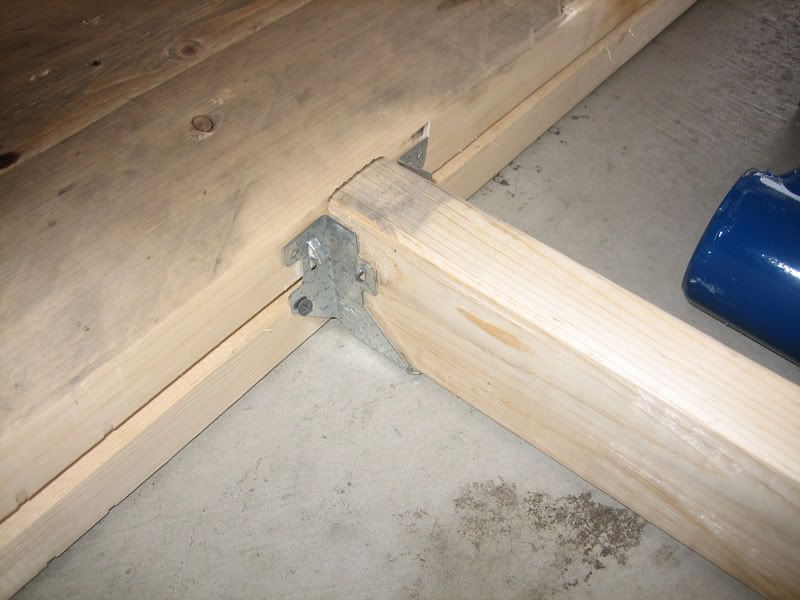
Qty 4 - 2x4 deck hangers (flat bottom)
Qty 8 - 1/2 x 2.5 Carriage Bolts (no nut necessary)
Qty 8 - 3" Drywall Screws (for stops)
Qty 8 - 2" Drywall Screws (for ramps)
Qty 8 - 1" Drywall Screws (for ramps)
PM me or post here with any questions.. The pics should help. Trust me, if I can do this, you can
Chris
Some of you may have read my post about the Bend-Pak scissor lift. I promised more detail on the ramp, so here it is:
If you have a stock C5 (or I would guess a C6) and you buy a Bend-Pak mid-rise scissor lift, you're going to need to get the Vette's ground clearance up at least another 1.5". The C5 ground clearance is +/- 5" and the air-dam is lower than that.
The lift's highest point is +/- 6.5" (safety mechanism) and the lifting pad minimum height is 4.75". That said, you need some room to get your hand/arm under the car to move the lifting arms of the Bend-Pak.
This is why you can't drive a stock C5 over this lift:
Trust me, you're not going to be able to do use this lift without using some type of ramp to raise the car's center-line clearance.
There are various ways to build the ramp: If you haven't lowered your C5, you can probably just put down a 2x12" on either side of the lift and drive over that. The boards may slip and slide around with this method, but it will work in a pinch.
Since my C5 is lowered about an inch, I needed to go up at least 2" and since a 2x is 1.5" high, it forced me to use 2-2x12's stacked to give me enough clearance.
This ramp setup centers the C5 perfectly over the lift and the crossmember 2x4's ensure that the ramp doesn't walk forward or backward as your drive on/off. There is about 1/2" extra room on either side of the 2x12's for tire clearance. You'll be surprised at how good you can get at centering the car - I park on it every night.
Scissor lifts are fun
The materials list:
Qty 4 - 2x12x12' Pine (the sides)
Qty 2 - 2x4x6' Pine (the cross members)
Qty 2 - 1x12x8 Pine (the 'ramps')
Qty 4 - 2x4 deck hangers (flat bottom)
Qty 8 - 1/2 x 2.5 Carriage Bolts (no nut necessary)
Qty 8 - 3" Drywall Screws (for stops)
Qty 8 - 2" Drywall Screws (for ramps)
Qty 8 - 1" Drywall Screws (for ramps)
PM me or post here with any questions.. The pics should help. Trust me, if I can do this, you can
Chris
I have been looking into getting one of these.
Thanks.
Pat
 03-06-2010, 07:54 PM
#49


I have the Rotary equivalent to this set-up. I find it is excellent for tire and brake work. But I cannot work under mine, hydraulic rams, braces and supports. I have been looking at the type that is open in the middle. It seems to run about the same price. Has anyone used one? I have a centerpost inground lift in a finished shop/garage. I opened and braced the ceiling so as the car goes up the top goes into the attic. This works for oil changes and jobs at the 4 corners but, again no open center.
03-09-2010, 10:51 PM
#50
Melting Slicks
Thread Starter
03-09-2010, 10:53 PM
#51
Melting Slicks
Thread Starter
Have to give you a first class ATTA BOY!!! I have always been a creative DIY guy,,,and I really enjoy seeing other DIY guys solutions for their problems!! A slick set up for sure!! I here by bestow the official itzza427 "WELL DONE AWARD"!! Just came up with that one,,,you are the first recipient!! More rare than an oscar!!:cheers :
!!! I have always been a creative DIY guy,,,and I really enjoy seeing other DIY guys solutions for their problems!! A slick set up for sure!! I here by bestow the official itzza427 "WELL DONE AWARD"!! Just came up with that one,,,you are the first recipient!! More rare than an oscar!!:cheers :
03-10-2010, 12:17 AM
#52
Melting Slicks

Member Since: Jun 2008
Location: Lower, Slower Delaware, formerly from Mobtown, MD (Baltimore)
Posts: 2,500
Likes: 0
Received 0 Likes
on
0 Posts
Very nice, good job on the ramps. I had that same setup at my old house, the new one, put in a pit.
Last edited by C5C6Norm; 11-13-2010 at 05:33 PM.
03-10-2010, 02:01 AM
#53
Burning Brakes


Way too complicated
Use longer bolts that go into holes in the cement and you don't need any cross braces
These will also keep the wood from sliding
Then you can just cut a single 45 degree cut on the ends of the long boards and not need any "steps"
Mush simpler , cheaper , quicker to move if need be and easier to make
The materials list:
Qty 4 - 2x12x12' Pine (the sides)
Qty 2 - 2x4x6' Pine (the cross members) delete
Qty 2 - 1x12x8 Pine (the 'ramps') delete
Qty 4 - 2x4 deck hangers (flat bottom) delete
Qty 8 - 1/2 x 2.5 Carriage Bolts (no nut necessary)you can use (4) 1/2 "4" , 1 at each end
Qty 8 - 3" Drywall Screws (for stops)
Qty 8 - 2" Drywall Screws (for ramps) delete
Qty 8 - 1" Drywall Screws (for ramps) delete
03-10-2010, 11:18 AM
#54
Melting Slicks
Thread Starter
^^^ works if you only plan on having the lift in one place and if you feel like drilling into the concrete. If you lived in a wet/snowy climate, you'd realize that's not a bright idea.
Also, if you look closely you'll see wheels on the lift. Moving it around is a feature.
Also, if you look closely you'll see wheels on the lift. Moving it around is a feature.
03-10-2010, 11:47 AM
#55
Burning Brakes
^^^ works if you only plan on having the lift in one place and if you feel like drilling into the concrete. If you lived in a wet/snowy climate, you'd realize that's not a bright idea.
Also, if you look closely you'll see wheels on the lift. Moving it around is a feature.
Also, if you look closely you'll see wheels on the lift. Moving it around is a feature.
How in the hell are you going to move it if it's boxed in ?
No , you don't screw it down.
You just slide them in
You can also move the boards out of the way once the car is airborne.
This can be a huge advantage.
What is the issue with drilling concrete ?
It's indoors.
I do it all the time.

 03-11-2010, 11:59 PM
#60
Burning Brakes
still waiting 
^^^ works if you only plan on having the lift in one place and if you feel like drilling into the concrete. If you lived in a wet/snowy climate, you'd realize that's not a bright idea.
Also, if you look closely you'll see wheels on the lift. Moving it around is a feature.
Also, if you look closely you'll see wheels on the lift. Moving it around is a feature.
Wrong , it works either way , and as I said , quicker to move
How in the hell are you going to move it if it's boxed in ?
No , you don't screw it down.
You just slide them in
You can also move the boards out of the way once the car is airborne.
This can be a huge advantage.
What is the issue with drilling concrete ?
It's indoors.
I do it all the time.
How in the hell are you going to move it if it's boxed in ?
No , you don't screw it down.
You just slide them in
You can also move the boards out of the way once the car is airborne.
This can be a huge advantage.
What is the issue with drilling concrete ?
It's indoors.
I do it all the time.