
How to Replace a Defective Retractable Antenna (Convertible) for $13
 08-11-2007, 12:06 PM
#1
Tech Contributor
Thread Starter
Member Since: Dec 2003
Location: Horncastle Lincolnshire, England
Posts: 19,384
Likes: 0
Received 79 Likes
on
61 Posts
2023 C5 of the Year Finalist - Unmodified

How To Replace a Defective Telescopic Antenna
Now this is a simple mod and the OEM assembly with motor is $130+. You'll know you have the problem because the antenna won't fully retract

Parts:
Adjustable wrench
GM OEM Power Antenna Replacement ($13 E Bay).

Make sure the antenna is fully retracted and that the radio is off
Remove the antenna mounting nut located on the base of the mast on the outside of the car. If the mast is bent it may be necessary to cut off the old mast). If you can't all of the plastic cable out as one piece, (sometimes the plastic gets really hard and breaks into pieces then falls down into the motor), you can just pull the motor after you have pulled the mast out and get all of the pieces out. To do that you'll need to take out the outer right turn signal housing.
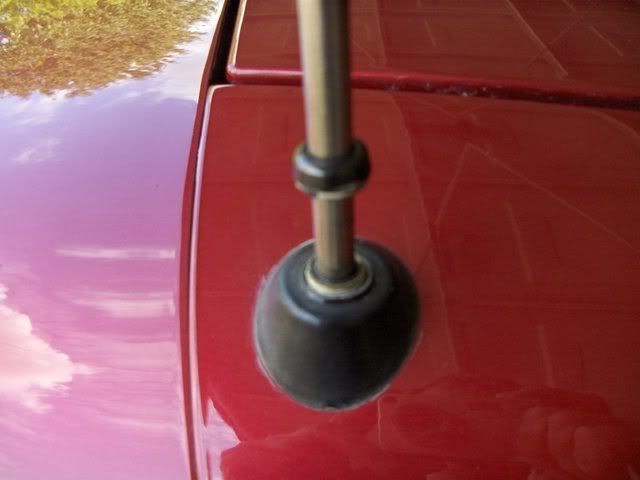
Turn on the radio and pull out the old mast and serrated cable completely out of the antenna motor. (Note which way the serrations on the cable are facing)
Feed the serrated cable of the new mast into the antenna hole and stop when resistance is felt. (about 12”). Make sure the cable is fed in with the teeth the same way the old cable came out.

Turn the radio off to lower the antenna until the serrated cable catches.. You may have to cycle the antenna a few times until the cable catches the gear mechanism and retracts into the antenna motor.
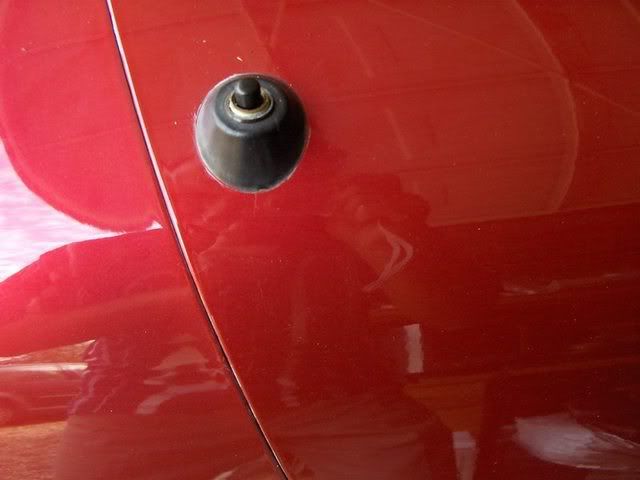
Replace and tighten the antenna nut into the mast base.
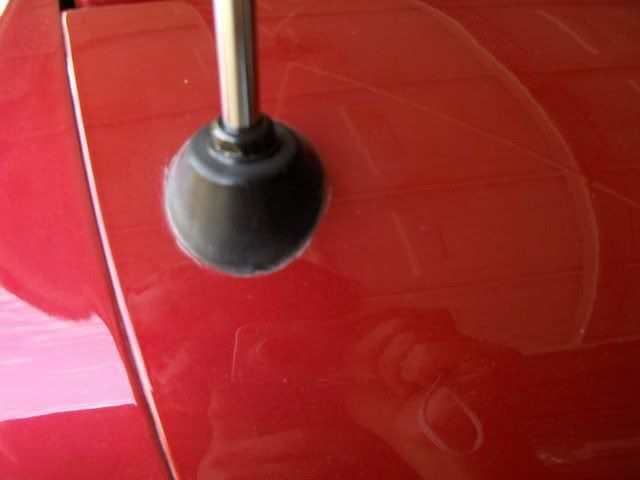
Turn on and make sure that the mast fully extends without binding. Clean the surface of the antenna to remove any adhesive etc.
10 minute job.

Now this is a simple mod and the OEM assembly with motor is $130+. You'll know you have the problem because the antenna won't fully retract
Parts:
Adjustable wrench
GM OEM Power Antenna Replacement ($13 E Bay).
Make sure the antenna is fully retracted and that the radio is off
Remove the antenna mounting nut located on the base of the mast on the outside of the car. If the mast is bent it may be necessary to cut off the old mast). If you can't all of the plastic cable out as one piece, (sometimes the plastic gets really hard and breaks into pieces then falls down into the motor), you can just pull the motor after you have pulled the mast out and get all of the pieces out. To do that you'll need to take out the outer right turn signal housing.
Turn on the radio and pull out the old mast and serrated cable completely out of the antenna motor. (Note which way the serrations on the cable are facing)
Feed the serrated cable of the new mast into the antenna hole and stop when resistance is felt. (about 12”). Make sure the cable is fed in with the teeth the same way the old cable came out.
Turn the radio off to lower the antenna until the serrated cable catches.. You may have to cycle the antenna a few times until the cable catches the gear mechanism and retracts into the antenna motor.
Replace and tighten the antenna nut into the mast base.
Turn on and make sure that the mast fully extends without binding. Clean the surface of the antenna to remove any adhesive etc.
10 minute job.
Last edited by DeeGee; 08-12-2007 at 03:12 AM.

The following users liked this post:
HeyLoosie (06-12-2016)
08-11-2007, 12:14 PM
#3
Le Mans Master


OMG! Dave this repair kit is "Golden". It's much better than the response to one of your earlier posts that I responded too. I'll get one of these just to have around IF. Thanks for posting, and with great pics too.


 08-11-2007, 03:48 PM
#8
Drifting


Member Since: Oct 2005
Location: Saint Louis MO
Posts: 1,435
Likes: 0
Received 0 Likes
on
0 Posts
Thanks for the post and pics. I just installed the same thing a week ago. I backed our '03 AE under the lift with the antenna up. I was really bummed out. This is a really easy, inexpensive way to replace the mast. I'm going to install a toggle switch for the antenna. Mostly I use my Ipod and never use the radio. David
08-11-2007, 06:43 PM
#9
Team Owner


Member Since: May 2001
Location: Virginia
Posts: 24,998
Received 1,227 Likes
on
874 Posts
St. Jude Donor '11

How To Replace a Defective Telescopic Antenna
Now this is a simple mod and the OEM assembly with motor is $130+. You'll know you have the problem because the antenna won't fully retract
Parts:
Adjustable wrench
GM OEM Power Antenna Replacement ($13 E Bay).
Make sure the antenna is fully retracted and that the radio is off
Remove the antenna mounting nut located on the base of the mast on the outside of the car. If the mast is bent it may be necessary to cut off the old mast).
Turn on the radio and pull out the old mast and serrated cable completely out of the antenna motor. (Note which way the serrations on the cable are facing)
Feed the serrated cable of the new mast into the antenna hole and stop when resistance is felt. (about 12�). Make sure the cable is fed in with the teeth the same way the old cable came out.
Turn the radio off to lower the antenna until the serrated cable catches.. You may have to cycle the antenna a few times until the cable catches the gear mechanism and retracts into the antenna motor.
Replace and tighten the antenna nut into the mast base.
Turn on and make sure that the mast fully extends without binding. Clean the surface of the antenna to remove any adhesive etc.
10 minute job.
This is a great thread and I'm sure it will help a lot of Vette owners...good job
08-11-2007, 07:29 PM
#10
Intermediate


Member Since: Aug 2007
Location: Austin Tx
Posts: 48
Likes: 0
Received 0 Likes
on
0 Posts
Great tutorial.
I would like to add something if I could: If you can't all of the plastic cable out as one piece, sometimes the plastic gets really hard and breaks into pieces then falls down into the motor, you can just pull the motor after you have pulled the mast out and get all of the pieces out.
I would like to add something if I could: If you can't all of the plastic cable out as one piece, sometimes the plastic gets really hard and breaks into pieces then falls down into the motor, you can just pull the motor after you have pulled the mast out and get all of the pieces out.
08-11-2007, 08:21 PM
#11
Melting Slicks

My antenna has just started doing this. Usually I can cycle the radio a couple of times and it goes down but I know I will have to fix it.
Should I just search Ebay for Corvette antenna mast? TIA
Should I just search Ebay for Corvette antenna mast? TIA


 08-12-2007, 03:02 AM
#15
Tech Contributor
Thread Starter
Member Since: Dec 2003
Location: Horncastle Lincolnshire, England
Posts: 19,384
Likes: 0
Received 79 Likes
on
61 Posts
2023 C5 of the Year Finalist - Unmodified
Not sure if any of the Forum vendors can get just the mast. I think the OEM part includes the motor. May be worth checking with Gene.
Being a good Forum member I wont post an E Bay link but if anyone would like the link to the vendors site just PM me. The one I got seems reasonable quality and has an anodised tip. Looks like the stock one I took out.
Being a good Forum member I wont post an E Bay link but if anyone would like the link to the vendors site just PM me. The one I got seems reasonable quality and has an anodised tip. Looks like the stock one I took out.
Last edited by DeeGee; 08-12-2007 at 03:07 AM.
08-12-2007, 03:13 AM
#16
Tech Contributor
Thread Starter
Member Since: Dec 2003
Location: Horncastle Lincolnshire, England
Posts: 19,384
Likes: 0
Received 79 Likes
on
61 Posts
2023 C5 of the Year Finalist - Unmodified
Great tutorial.
I would like to add something if I could: If you can't all of the plastic cable out as one piece, sometimes the plastic gets really hard and breaks into pieces then falls down into the motor, you can just pull the motor after you have pulled the mast out and get all of the pieces out.
I would like to add something if I could: If you can't all of the plastic cable out as one piece, sometimes the plastic gets really hard and breaks into pieces then falls down into the motor, you can just pull the motor after you have pulled the mast out and get all of the pieces out.
08-27-2007, 01:11 PM
#19
Melting Slicks

It costs $13.50 plus $6.00 shipping for any C5 OEM vert mast. Their website shows you how to do it too and they are very knowledgable on the phone. BIGHANK
BIGHANK
09-04-2007, 11:01 AM
#20
Melting Slicks
Not a 10 minute job if the cable has broken off INSIDE the motor.
You must remove the right most tail light lens, the grounding wires and straps held onto the mast by phillips screws and then guide the whole antenna motor and mast out of the rear tail light hole so you can work on it. Remove the bracked on the bottom of the motor. Cut the tiewrap on the top of the rubber boot and push the boot up. VERY CAREFULLY drilll out the plastic rivets on the cover which is almost completely round. I went with a very small drill at first and increased sizes until I JUST drilled out the rivet not any larger. Remove the cover CAREFULLY so you don't drop any parts. Pull out the broken piece (I had about 6 inches of cable inside mine) and lubricate the gears and moving parts with some white lithium grease. Make sure everyting goes in to the place where it was before and watch the orientation of the inside parts as well as the plastic cover. Find 4 suitable self tapping screws to hold the cover on. Run the motor a few times by turning the ignition and radio on. Turn the radio off and wait for the motor to run in the opposite direction. Make sure you haven't jammed anything before proceeding. Then feed the new riobbon in so it will engage the gear
with the radio ON. Turn it off and it should DRAW the mast in with almost all of it in the housing. Put on the new "CONTACT SPRING" or reuse your old one (the sleve with the flange on one end which stops the mast from popping oout when you extend it). Replace the nut and then reinstall everything inside the fender. Total time including taking my kid to the bank before it closed was about 3 hours. but I think you can do it in 2. Get the GREASE off of your hands before reassembling the beast. $20 fix instead of $100 or more and have the same function.
 BIGHANK
You must remove the right most tail light lens, the grounding wires and straps held onto the mast by phillips screws and then guide the whole antenna motor and mast out of the rear tail light hole so you can work on it. Remove the bracked on the bottom of the motor. Cut the tiewrap on the top of the rubber boot and push the boot up. VERY CAREFULLY drilll out the plastic rivets on the cover which is almost completely round. I went with a very small drill at first and increased sizes until I JUST drilled out the rivet not any larger. Remove the cover CAREFULLY so you don't drop any parts. Pull out the broken piece (I had about 6 inches of cable inside mine) and lubricate the gears and moving parts with some white lithium grease. Make sure everyting goes in to the place where it was before and watch the orientation of the inside parts as well as the plastic cover. Find 4 suitable self tapping screws to hold the cover on. Run the motor a few times by turning the ignition and radio on. Turn the radio off and wait for the motor to run in the opposite direction. Make sure you haven't jammed anything before proceeding. Then feed the new riobbon in so it will engage the gear
with the radio ON. Turn it off and it should DRAW the mast in with almost all of it in the housing. Put on the new "CONTACT SPRING" or reuse your old one (the sleve with the flange on one end which stops the mast from popping oout when you extend it). Replace the nut and then reinstall everything inside the fender. Total time including taking my kid to the bank before it closed was about 3 hours. but I think you can do it in 2. Get the GREASE off of your hands before reassembling the beast. $20 fix instead of $100 or more and have the same function.
BIGHANK
Last edited by bighank; 09-06-2007 at 01:17 PM.