


[Z06] Hardwire, Rewire, Insulation
Thread Starter
Cherish your Hopes...


Joined: Feb 2002
Posts: 13,074
Likes: 236
From: West Palm Beach FL
Cruise-In VII Veteran
St. Jude Donor '05-'06-'07
I insulated the rear portion of the Z06 and finally got a round to insulating the front...
While the front was undone I hardwired the Valentine 1
...Then rewired the Eclipse audio system (Cruisin' Concepts helped!)
They installed a replacement SIR-ECL1 for Sirius Radio...
So now I have AM, FM, DVD, CD, VTR, MP3, NAV...and Satelite radio...
Began the process last week...

Refelctix over the tunnel...


...and on top

Then used Frost King over the Reflectix and over the remaining interior


Then jammed everything under the carpet and interior trim


Done! ...one week later...


OH and the wire to the Video IPod is here...

While the front was undone I hardwired the Valentine 1
...Then rewired the Eclipse audio system (Cruisin' Concepts helped!)
They installed a replacement SIR-ECL1 for Sirius Radio...
So now I have AM, FM, DVD, CD, VTR, MP3, NAV...and Satelite radio...
Began the process last week...
Refelctix over the tunnel...
...and on top
Then used Frost King over the Reflectix and over the remaining interior
Then jammed everything under the carpet and interior trim
Done! ...one week later...
OH and the wire to the Video IPod is here...
Last edited by StuzVette; Sep 1, 2007 at 11:22 PM.
Thread Starter
Cherish your Hopes...
Joined: Feb 2002
Posts: 13,074
Likes: 236
From: West Palm Beach FL
Cruise-In VII Veteran
St. Jude Donor '05-'06-'07
Team Owner


Joined: Mar 2007
Posts: 35,227
Likes: 2,143
From: Right Corner Pocket of Illinois
No-IL Events Coordinator
2026 Corvette of the Year Finalist - Unmodified
2025 C6 of the Year Winner - Unmodified
2020 C6 of the Year Finalist - Unmodified
2020 Corvette of the Year Finalist (appearance mods)
2019 C6 of Year Winner (appearance mods)
2018 C6 of Year Finalist
St. Jude Donor '12 thru '26
Excellent job StuzVette!  I have never ridden in a Z06 that has been insulated, makes a big difference I suppose?
Great opportunity to deep clean the carpet and fix a rocking seat too. Thanks for the pics!
Adding the cargo divider made it good enough for my tastes but then a again I don't have your killer audio/video system.
I have never ridden in a Z06 that has been insulated, makes a big difference I suppose?Great opportunity to deep clean the carpet and fix a rocking seat too.
Thanks for the pics!Adding the cargo divider made it good enough for my tastes but then a again I don't have your killer audio/video system.
Drifting

Joined: Jul 2005
Posts: 1,506
Likes: 5
From: Milpitas CA
I did the insulation in my car with RAAM mat. I did everything behind the drivers seat, the rear wheel wells and wheel liners. Here is a cut and paste from a previous post with my results:
Before I installed the sound deadener my buddy and I took readings with his sound meter under different driving conditions. Not super scientific, just trying to see how much difference there is.
Here are my sound test results before and after the sound insulation. The tests were performed a few days apart with the windows up, on the same roads/freeway. My buddy held his sound meter in front of him at about chest level. The before numbers are for my stock car with a partition installed. The after numbers are with sound insulation and partition.
Before / After
Parked at idle: 85-86 db / 83 db
30 mph in 4th gear 92 db / 87 db
80 mph in 4th gear 103 db / 97 db
80 mph in 6th gear 101-102 db / 96 db
Full throttle accel 2nd/3rd gear 104 db / 104 db
This number came out wierd, but here it is;
60 mph at idle in neutral 87 db / 92 db
I attribute this reverse result to going the other way on the freeway on rain grooved concrete vs smooth pavement. This is also a good indication of how loud the car is from tire noise on the rain grooved concrete, as if any Z06 driver didn't already know it's a lot louder on concrete.
Not only does the stereo sound way better, now I can actually hear faint wind noise from outside the car at freeway speed. You can see that under acceleration it's pretty much the same, the exhaust sound dominates from the back.
Let me just say that 5 db's is a lot. My buddy noticed the obvious difference in the car as soon as he got in. My wife likes it a lot better too. And if you knew my wife you'd know that keeping her happy means my life is much more pleasant. When she's happy it allows me more freedom with the dollars for future mods.
For people concerned about the weight, I estimate 20-24 lbs is the maximum weight added, based on how much my buddy used before he gave me the roll. I also installed the euro headlights last night – which added 3 more pounds compared to stock plastic lights. I don't know how much the Brey Krause bar and Simpson belts weighed, but they're also in there now.
Dog
P.S. That car is gone and I have another one. In about a month I plan to do the whole insulation job on the new car, front and rear. It should be even better than my previous results. I'm hoping for a 10 db drop.
Last edited by meldog21; Sep 2, 2007 at 09:18 AM.
Melting Slicks

Joined: Sep 2001
Posts: 3,420
Likes: 0
From: Lancaster County PA
St. Jude Donor '06-'07-'08-'09-'10
 The interior also stays much cooler, this is definitely evident in the torque tube tunnel/console area. It is well worth the effort!
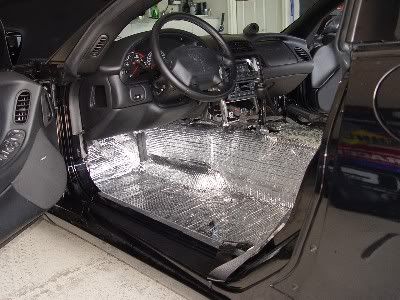

Melting Slicks
Joined: Oct 2006
Posts: 2,193
Likes: 156
From: Navarre FL
Stuzvette, Great job! seeing those pics reminds me of the nightmare I had doing it, my hands ached for weeks! I did the full raamat and ensolite, with some frost king on top of all that just on the tunel. I dont have any sound test with it, but I can tell you it is MUCH quieter now.
BTW, I see you were smart and had the knee pad to kneel on! I didnt figure that one out until halfway through 
BTW, I see you were smart and had the knee pad to kneel on! I didnt figure that one out until halfway through
Thread Starter
Cherish your Hopes...
Joined: Feb 2002
Posts: 13,074
Likes: 236
From: West Palm Beach FL
Cruise-In VII Veteran
St. Jude Donor '05-'06-'07
Excellent job StuzVette! I have never ridden in a Z06 that has been insulated, makes a big difference I suppose?
Great opportunity to deep clean the carpet and fix a rocking seat too. Thanks for the pics!
Adding the cargo divider made it good enough for my tastes but then a again I don't have your killer audio/video system.
I have never ridden in a Z06 that has been insulated, makes a big difference I suppose?Great opportunity to deep clean the carpet and fix a rocking seat too.
Thanks for the pics!Adding the cargo divider made it good enough for my tastes but then a again I don't have your killer audio/video system.
Thanks..
...Jami and I went for a spin and it was definitely quieter...
And felt tighter...
The audio system (Eclipse) is really great! ...actually inherited the parts and the Alpine amplifier is great...
Cruisin' Concepts said that the audio/visual stuff parts would have set me back around $3500 before installation...
...make the purchase of my 2001 Z06 just that much better
Corvette Stories
The Best of Corvette for Corvette Enthusiasts

5 Best & 5 Worst Corvette Daily Drivers
Joe Kucinski
The Headlights of Every Corvette Generation Explained
Joe Kucinski
5 Best & 5 Most Overrated Corvette Track Packages of All Time!
Joe Kucinski
Every 2027 Corvette Engine Explained
Joe Kucinski
Designer Imagines A Corvette That Looks More Like a Corvette Than the Corvette
Verdad Gallardo
10 Ugly Corvettes That We Still Kinda Love
Joe Kucinski
Top 10 Most Expensive Corvettes Ever Sold on Bring A Trailer
Brett Foote
10 Things Every Corvette Owner Needs (2026 Edition)
Michael S. Palmer
8 Most "Only Corvette Owners Understand" Quirks and Problems
Pouria Savadkouei
Thread Starter
Cherish your Hopes...
Joined: Feb 2002
Posts: 13,074
Likes: 236
From: West Palm Beach FL
Cruise-In VII Veteran
St. Jude Donor '05-'06-'07
I did the insulation in my car with RAAM mat. I did everything behind the drivers seat, the rear wheel wells and wheel liners. Here is a cut and paste from a previous post with my results:
Dog
P.S. That car is gone and I have another one. In about a month I plan to do the whole insulation job on the new car, front and rear. It should be even better than my previous results. I'm hoping for a 10 db drop.
Dog
P.S. That car is gone and I have another one. In about a month I plan to do the whole insulation job on the new car, front and rear. It should be even better than my previous results. I'm hoping for a 10 db drop.
...I finished the rear and double up the Frostking in the rear because there is plent enough room to spare...
The result was good and probably would give similar results or perhaps a little better...
The added insulation in the front with double portions in the floor and the rear really adds to the quiet ride for sure!
peace
Stu
Thread Starter
Cherish your Hopes...
Joined: Feb 2002
Posts: 13,074
Likes: 236
From: West Palm Beach FL
Cruise-In VII Veteran
St. Jude Donor '05-'06-'07
I insulated my Z06 last fall using Frost King and Refectix, one layer of each. The lack of road noise, especially in the rear cargo area is immediately noticeable...ask my wife. The interior also stays much cooler, this is definitely evident in the torque tube tunnel/console area. It is well worth the effort!
The interior also stays much cooler, this is definitely evident in the torque tube tunnel/console area. It is well worth the effort! ...the material is great stuff... the only thing we differently was that I doubled the rear..
...and doubled a strip in the floor and behind the seats...
...and I also layered the frontking over the reflectix on the tunnel...
I had to jump up and down on the console pieces to make them go on...
..its always that way the first time after installing the insulatoin...
Everything goes on almost like usual after the first time

Im starting early tomorrow on the wheel wells...
...going to need some insulating glass for the fuel tank tunnel...
but I insulate the wheel liner as well as the underside area of the wheel cavity...
Thread Starter
Cherish your Hopes...
Joined: Feb 2002
Posts: 13,074
Likes: 236
From: West Palm Beach FL
Cruise-In VII Veteran
St. Jude Donor '05-'06-'07
Stuzvette, Great job! seeing those pics reminds me of the nightmare I had doing it, my hands ached for weeks! I did the full raamat and ensolite, with some frost king on top of all that just on the tunel. I dont have any sound test with it, but I can tell you it is MUCH quieter now.
BTW, I see you were smart and had the knee pad to kneel on! I didnt figure that one out until halfway through
BTW, I see you were smart and had the knee pad to kneel on! I didnt figure that one out until halfway through
Thanks.......yea it is already Much quieter as you put it...
...Tomorrow the wheel wells and I can you from the work I did in StuzVette...
...it made a big impact to insulate but the biggest impact was observed after the rear wheel well was insulated
Melting Slicks
Joined: Oct 2006
Posts: 2,193
Likes: 156
From: Navarre FL
BTW Raamat is really light. Maybe a total of 35lbs added and I covered everything with it, including the backside of all the plastic trim!
Thread Starter
Cherish your Hopes...
Joined: Feb 2002
Posts: 13,074
Likes: 236
From: West Palm Beach FL
Cruise-In VII Veteran
St. Jude Donor '05-'06-'07
Can you do a step by step of the rear wheel well insulation. Im curious about this one. May get rid of the little road noise I have left.
BTW Raamat is really light. Maybe a total of 35lbs added and I covered everything with it, including the backside of all the plastic trim!
BTW Raamat is really light. Maybe a total of 35lbs added and I covered everything with it, including the backside of all the plastic trim!
...it does reduce tire/road noise!
With StuzVette the more I couild insulate the more I could talk to passengers

In the Z06...
- I removed the wheel
- Remove 7 screws holding on wheel liner (7mm socket driver)
-To extricate the liner remove the portion toward the rear of the vette first...
- I ran insulation across the top and inside toward the middle...
(I was more thorough with StuzVette due to the B&B bullets
 )
)I did not double up but I covered all the portion that would be beneath the Wheelliner...
- Then I covered the wheelliner over all of the portion that is against the inner wheel well...
With the Z06 the brake vent can be difficult to deal with when reinstalling the wheelliner...
...dont try to install the wheel liner with the vent in place.
Rather install the wheel liner with the brake vent just placed in the slot designed for the vent to come through in the liner...
..OR (this is what I did) if you want you can put the liner in place and put the vent in...
..however, you will have to do some fancy maneuvering to get it through the slot...
After the wheel liner is in place...
THEN...reach in and pull out out on the slotted area of the liner and looking through the rocker panel brake screen to align and push the vent in place...
I used a poker like an ice pick to determine the alignment so that I could get all the screws back in place..
...and they will all go back in
Note: to get the holes to align does require so pressure to coax the liner into place ...I even used a rubber mallet to exercise the greatest
influence...
Also note that reinstallation of the Wheelliner was a little tighter but I found that putting the front in first and then the top and then the rear portion could work..
...or as I discoverd it seemed easier to manipulate the front then the middle top and the rear portion which would leave a small portion of the liner under the lip of the fender...
...then shove the liner from underneath firmly and it went in...
The most time spent on the two rear wheelwells was on cleaning the mess and wiping down the underneath so that my frost king would stick.
I used aluminum tape to cover all pieces that met or overlapped...
I hope this helps...
...it is a big job by yourself... but I said I would do it again...
...and now I have
...and I would do it again pics in later...
peace
Stu
Melting Slicks
Joined: Sep 2001
Posts: 3,420
Likes: 0
From: Lancaster County PA
St. Jude Donor '06-'07-'08-'09-'10
..I have pics that I will post tonight...
...it does reduce tire/road noise!
With StuzVette the more I couild insulate the more I could talk to passengers
In the Z06...
- I removed the wheel
- Remove 7 screws holding on wheel liner (7mm socket driver)
-To extricate the liner remove the portion toward the rear of the vette first...
- I ran insulation across the top and inside toward the middle...
(I was more thorough with StuzVette due to the B&B bullets )
I did not double up but I covered all the portion that would be beneath the Wheelliner...
- Then I covered the wheelliner over all of the portion that is against the inner wheel well...
With the Z06 the brake vent can be difficult to deal with when reinstalling the wheelliner...
...dont try to install the wheel liner with the vent in place.
Rather install the wheel liner with the brake vent just placed in the slot designed for the vent to come through in the liner...
..OR (this is what I did) if you want you can put the liner in place and put the vent in...
..however, you will have to do some fancy maneuvering to get it through the slot...
After the wheel liner is in place...
THEN...reach in and pull out out on the slotted area of the liner and looking through the rocker panel brake screen to align and push the vent in place...
I used a poker like an ice pick to determine the alignment so that I could get all the screws back in place..
...and they will all go back in
Note: to get the holes to align does require so pressure to coax the liner into place ...I even used a rubber mallet to exercise the greatest
influence...
Also note that reinstallation of the Wheelliner was a little tighter but I found that putting the front in first and then the top and then the rear portion could work..
...or as I discoverd it seemed easier to manipulate the front then the middle top and the rear portion which would leave a small portion of the liner under the lip of the fender...
...then shove the liner from underneath firmly and it went in...
The most time spent on the two rear wheelwells was on cleaning the mess and wiping down the underneath so that my frost king would stick.
I used aluminum tape to cover all pieces that met or overlapped...
I hope this helps...
...it is a big job by yourself... but I said I would do it again...
...and now I have ...and I would do it again
pics in later...
peace
Stu
...it does reduce tire/road noise!
With StuzVette the more I couild insulate the more I could talk to passengers
In the Z06...
- I removed the wheel
- Remove 7 screws holding on wheel liner (7mm socket driver)
-To extricate the liner remove the portion toward the rear of the vette first...
- I ran insulation across the top and inside toward the middle...
(I was more thorough with StuzVette due to the B&B bullets
)I did not double up but I covered all the portion that would be beneath the Wheelliner...
- Then I covered the wheelliner over all of the portion that is against the inner wheel well...
With the Z06 the brake vent can be difficult to deal with when reinstalling the wheelliner...
...dont try to install the wheel liner with the vent in place.
Rather install the wheel liner with the brake vent just placed in the slot designed for the vent to come through in the liner...
..OR (this is what I did) if you want you can put the liner in place and put the vent in...
..however, you will have to do some fancy maneuvering to get it through the slot...
After the wheel liner is in place...
THEN...reach in and pull out out on the slotted area of the liner and looking through the rocker panel brake screen to align and push the vent in place...
I used a poker like an ice pick to determine the alignment so that I could get all the screws back in place..
...and they will all go back in
Note: to get the holes to align does require so pressure to coax the liner into place ...I even used a rubber mallet to exercise the greatest
influence...
Also note that reinstallation of the Wheelliner was a little tighter but I found that putting the front in first and then the top and then the rear portion could work..
...or as I discoverd it seemed easier to manipulate the front then the middle top and the rear portion which would leave a small portion of the liner under the lip of the fender...
...then shove the liner from underneath firmly and it went in...
The most time spent on the two rear wheelwells was on cleaning the mess and wiping down the underneath so that my frost king would stick.
I used aluminum tape to cover all pieces that met or overlapped...
I hope this helps...
...it is a big job by yourself... but I said I would do it again...
...and now I have
...and I would do it again pics in later...
peace
Stu
That is one area I did not get to do...hopefully next weekend.
Thread Starter
Cherish your Hopes...
Joined: Feb 2002
Posts: 13,074
Likes: 236
From: West Palm Beach FL
Cruise-In VII Veteran
St. Jude Donor '05-'06-'07
Thanks
I was going to try to avoid the wheel wells...
...but the results add a great improvement in the overall quietness of the drive...
IF you want to dampen the road noise ever so slightly more...
...stuff the rocker panels and the fuel tube tunnel/cavity with R-19 ro R-20
I didnt do that but it does make a very small difference..
...$22 for a roll of R-19 deterred me from the addon insulation idea...
peace
Stu
...I still owe everyone the pics... I know.... :o
Last edited by StuzVette; Sep 7, 2007 at 10:33 AM.