


Headlight Question

Thread Starter
Advanced

Joined: Sep 2007
Posts: 93
Likes: 0
Hi all. I want to aim both my headlight low beams and my fog lights. i know I need a t15 hex screw. For the FOG LIGHTS- which way do i have to turn them to raiser/lower? Looking at the light face on do i turn left to lower and right to raise?
For the HEADLIGHTS... Which moves them up and down? There is a post here that instructs how to but for euro headlights. It is confusing. Are there three points where the lights can be aimed? Thanks for your time
P.S- My headlights are aimed wayyy too low and my passenger fog light is aimed wayyyy to low. Thanks
Night Owl for life


Joined: Nov 2003
Posts: 24,707
Likes: 4,549
From: Bugs Bunny should'a made a left turn here
For the HEADLIGHTS... Which moves them up and down? There is a post here that instructs how to but for euro headlights. It is confusing. Are there three points where the lights can be aimed? Thanks for your time
P.S- My headlights are aimed wayyy too low and my passenger fog light is aimed wayyyy to low. Thanks
P.S- My headlights are aimed wayyy too low and my passenger fog light is aimed wayyyy to low. Thanks
the long golden rod will move the headlights up and down.
Tech Contributor

Joined: Dec 2003
Posts: 19,384
Likes: 87
From: Horncastle Lincolnshire, England
2023 C5 of the Year Finalist - Unmodified
The instructions for the Euros is the same principle it's just a different bulb. Hopefully this will help:
Aiming your Head Lights
Preparation:
Prepare the aiming area. You can use the garage wall providing its at least 25’ from the car and the ground is level.
Mark some calibration lines using chalk or masking tape:
Find the center of the headlight and measure the distance to the ground. Mark a horizontal line on the surface (garage door or wall) using masking tape at the same distance from the ground.
Stick a piece of tape in the center of the windscreen and another on the rear glass to use as reference marks.
Line these up from behind the car and use them to mark the centerline of the car on the .
Measure the distance between the center of both headlight lenses and use this to measure from the center point you just marked on the surface.
Make sure the tire pressures are correct and the tank is full or the calibration may be out. Park the vehicle square with the aiming surface. Close the doors and rock the car to stabilise the suspension.
Adjustment
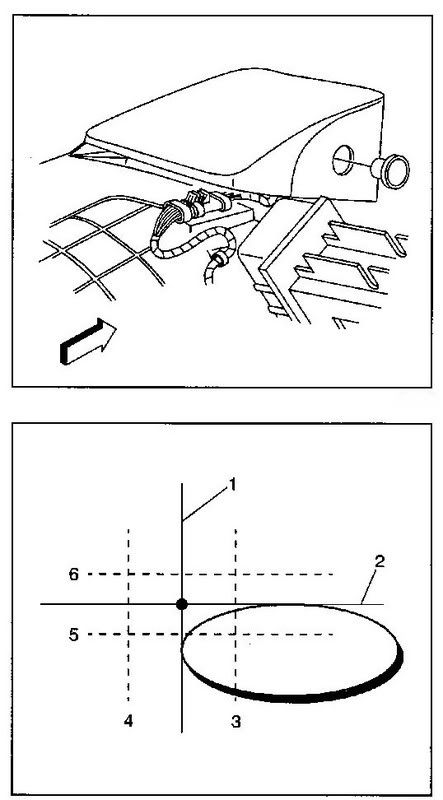
Horizontal and vertical aiming is done by moving the adjusting screws which moves the headlamp capsule in relation to the headlamp frame. The horizontal adjustment screw is located on the inboard side of each of the headlight assemblies and covered by a plug. The vertical adjustment screw is located on the inboard side of each of the headlight assemblies below the lower edge of the headlamp bezel. Its a long golden rod. I think it’s a #15 torx.
Raise the hood.
Raise the headlamps.
Remove the headlamp adjustment screw plug from the headlamp bezel. Reach under the headlamp bezel and push out the plug from behind.
Turn ON the low beam lamps. Block the light from the passenger lamp to allow you to adjust the drivers lamp. Don’t cover the headlight or it may get too hot.
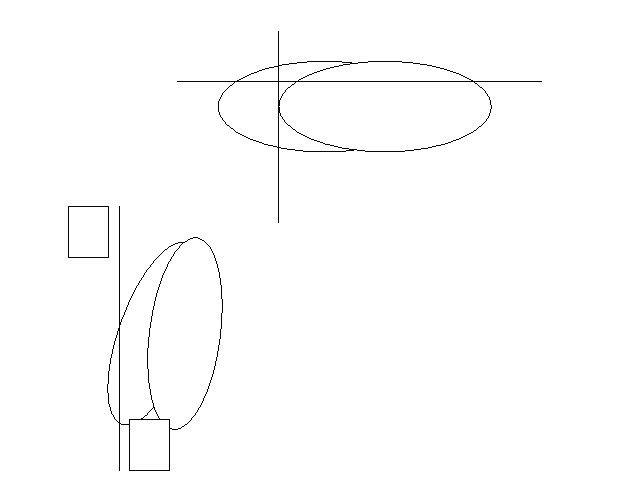
Inspect the horizontal aim. Make the adjustments with reference to the lines and numbers on the aiming chart below
Adjust the aim using the horizontal adjusting screw, to align the break point (3) of the high intensity zone to the headlamp vertical centerline (1), within the range of 38 mm (1.5 in) to the left (5) of the lamp vertical centerline (1), to 38 mm (1.5 in) to the right (4) of the lamp vertical centerline (1) on the aiming screen.
Inspect the vertical aim.
Adjust the aim using the vertical adjusting screw, to align the upper edge of the beam horizontal cut off line 114 mm (4.5 in) below (7) the headlamp horizontal centerline (2), within the range of 76 mm (3 in) below (8) the lamp horizontal centerline (2), to 191 mm (7.5 in) below (6) the lamp horizontal centerline (2) on the aiming screen.
Install the headlamp adjustment screw plug. Push to secure.
Turn OFF the headlamps.
Lower the hood.
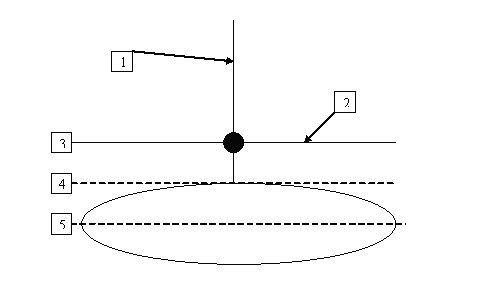
Your light pattern should look roughly like this when you’re done.
Aiming your Head Lights
Preparation:
Prepare the aiming area. You can use the garage wall providing its at least 25’ from the car and the ground is level.
Mark some calibration lines using chalk or masking tape:
Find the center of the headlight and measure the distance to the ground. Mark a horizontal line on the surface (garage door or wall) using masking tape at the same distance from the ground.
Stick a piece of tape in the center of the windscreen and another on the rear glass to use as reference marks.
Line these up from behind the car and use them to mark the centerline of the car on the .
Measure the distance between the center of both headlight lenses and use this to measure from the center point you just marked on the surface.
Make sure the tire pressures are correct and the tank is full or the calibration may be out. Park the vehicle square with the aiming surface. Close the doors and rock the car to stabilise the suspension.
Adjustment
Horizontal and vertical aiming is done by moving the adjusting screws which moves the headlamp capsule in relation to the headlamp frame. The horizontal adjustment screw is located on the inboard side of each of the headlight assemblies and covered by a plug. The vertical adjustment screw is located on the inboard side of each of the headlight assemblies below the lower edge of the headlamp bezel. Its a long golden rod. I think it’s a #15 torx.
Raise the hood.
Raise the headlamps.
Remove the headlamp adjustment screw plug from the headlamp bezel. Reach under the headlamp bezel and push out the plug from behind.
Turn ON the low beam lamps. Block the light from the passenger lamp to allow you to adjust the drivers lamp. Don’t cover the headlight or it may get too hot.
Inspect the horizontal aim. Make the adjustments with reference to the lines and numbers on the aiming chart below
Adjust the aim using the horizontal adjusting screw, to align the break point (3) of the high intensity zone to the headlamp vertical centerline (1), within the range of 38 mm (1.5 in) to the left (5) of the lamp vertical centerline (1), to 38 mm (1.5 in) to the right (4) of the lamp vertical centerline (1) on the aiming screen.
Inspect the vertical aim.
Adjust the aim using the vertical adjusting screw, to align the upper edge of the beam horizontal cut off line 114 mm (4.5 in) below (7) the headlamp horizontal centerline (2), within the range of 76 mm (3 in) below (8) the lamp horizontal centerline (2), to 191 mm (7.5 in) below (6) the lamp horizontal centerline (2) on the aiming screen.
Install the headlamp adjustment screw plug. Push to secure.
Turn OFF the headlamps.
Lower the hood.
Your light pattern should look roughly like this when you’re done.
Last edited by DeeGee; Mar 14, 2008 at 01:59 PM.
Tech Contributor
Joined: Dec 2003
Posts: 19,384
Likes: 87
From: Horncastle Lincolnshire, England
2023 C5 of the Year Finalist - Unmodified
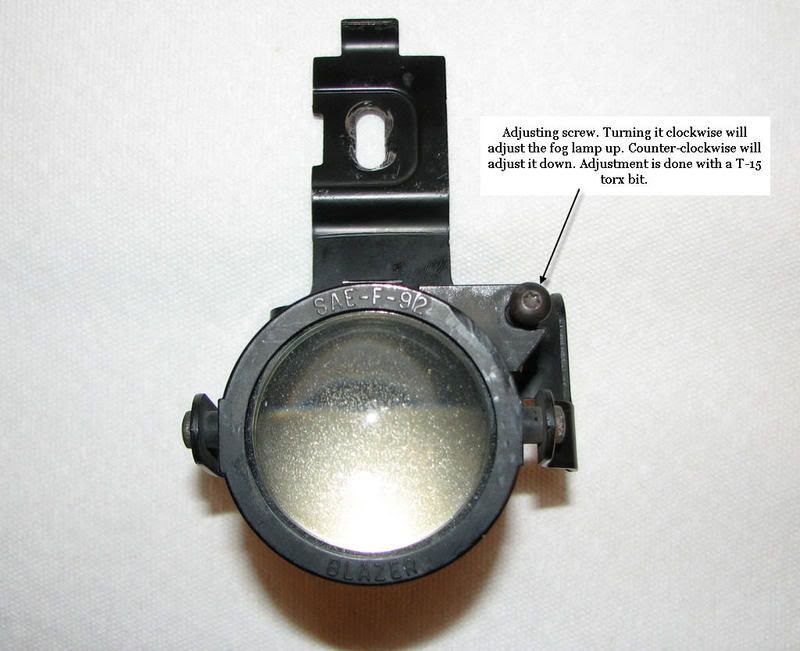
Fog Lamp Aiming
There is no horizontal aiming for the C5 foglamps
Preparation:
Prepare the aiming area. You can use the garage wall providing its at least 25� from the car and the ground is level. Make sure the tire pressures are correct and the tank is full or the calibration may be out. Park the vehicle square with the aiming surface. Close the doors and rock the car to stabilise the suspension.
Mark some calibration lines using chalk or masking tape:
Find the center of the headlight and measure the distance to the ground. Mark a horizontal line on the surface (garage door or wall) using masking tape at the same distance from the ground.
Stick a piece of tape in the center of the windscreen and another on the rear glass to use as reference marks.
Line these up from behind the car and use them to mark the centerline of the car on the wall.
Measure the distance between the center of both headlight lenses and use this to measure from the center point you just marked on the surface.
Adjustment
Raise the hood.
Raise the headlamps.
Turn ON the low beam lamps. Block the light from both headlamps to allow you to adjust the fog lights. Don�t cover the headlights or they may get too hot.
Turn on the fog lamps
Insert a torx driver through the front fascia deflector access hole to reach the fog lamp vertical adjustment screw
Adjust the fog lamp up or down until the top edge of the high intensity zone is 4� below the horizontal centre line.
Turn off all the lights
Safety Car


Joined: Jul 2007
Posts: 4,333
Likes: 6
From: Louisville Kentucky
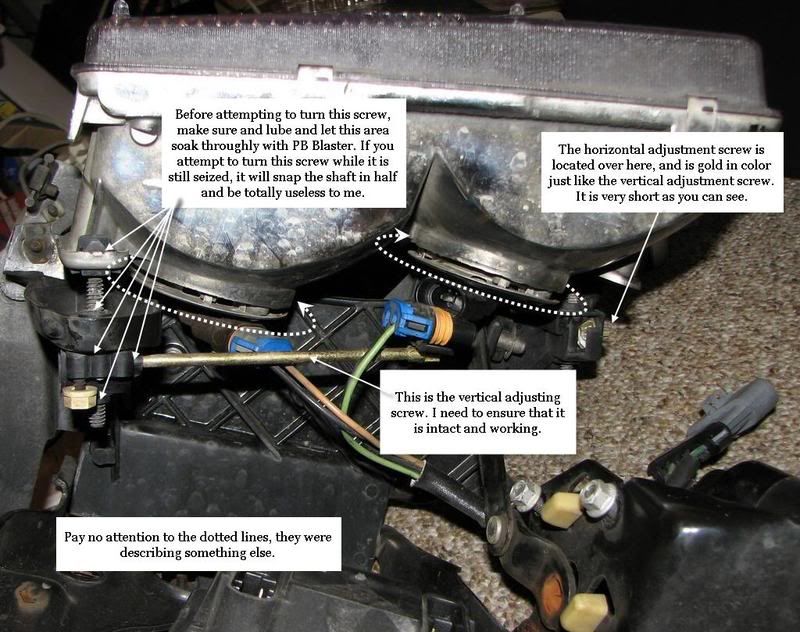
Maybe this picture will help for those of us to lazy to read:

As for the headlights:

I used this picture to describe something to someone else but you get the gist of it. Whatever you do, don't turn any of the headlight adjusting screws without lubing them first!!! There is no fix after you break the adjusting screw. You have to buy another headlight at a whopping $700 give or take!
As for the headlights:
I used this picture to describe something to someone else but you get the gist of it. Whatever you do, don't turn any of the headlight adjusting screws without lubing them first!!! There is no fix after you break the adjusting screw. You have to buy another headlight at a whopping $700 give or take!
Last edited by Junkman2008; Mar 14, 2008 at 05:37 AM.
Corvette Stories
The Best of Corvette for Corvette Enthusiasts

8 Coolest Corvette Pace Cars (and Replicas) of All Time
Verdad Gallardo
Top 10 Corvette Engines RANKED by Peak Torque (70+ Years of Muscle!)
Joe Kucinski
Corvette ZR1X Will Be Pacing the Indy 500, And Could Probably Race, Too!
Verdad Gallardo
Top 10 Corvettes Coming to Mecum Indy 2026!
Brett Foote
Top 10 C9 Corvette MUST-HAVES to Fix These C8 Generation Flaws!
Michael S. Palmer
10 Revolutionary 'Corvette Firsts' Most People Don't Know
Joe Kucinski
5 Reasons to Upgrade to an LS6-Powered Corvette; 5 Reasons to Stay LT2
Michael S. Palmer
2027 Corvette vs The World: Every C8 vs Its Closest Competitor
Joe Kucinski
10 Most Common Corvette Problems of the Last 20 Years!
Joe Kucinski


Tech Contributor
Joined: Dec 2003
Posts: 19,384
Likes: 87
From: Horncastle Lincolnshire, England
2023 C5 of the Year Finalist - Unmodified
I might feed those pics into my write up Junkman if you dont mind. that way we can post up again next time the question comes up
Safety Car
Joined: Jul 2007
Posts: 4,333
Likes: 6
From: Louisville Kentucky


Tech Contributor
Joined: Dec 2003
Posts: 19,384
Likes: 87
From: Horncastle Lincolnshire, England
2023 C5 of the Year Finalist - Unmodified
Here are the revised DeeGee/Junkman How Tos
Aiming your Head Lights
Preparation:
Prepare the aiming area. You can use the garage wall providing its at least 25� from the car and the ground is level.
Mark some calibration lines using chalk or masking tape:
Find the center of the headlight and measure the distance to the ground. Mark a horizontal line on the surface (garage door or wall) using masking tape at the same distance from the ground.
Stick a piece of tape in the center of the windscreen and another on the rear glass to use as reference marks.
Line these up from behind the car and use them to mark the centerline of the car on the wall.
Measure the distance between the center of both headlight lenses and use this to measure from the center point you just marked on the surface.
Make sure the tire pressures are correct and the tank is full or the calibration may be out. Park the vehicle square with the aiming surface. Close the doors and rock the car to stabilise the suspension.
Adjustment
Horizontal and vertical aiming is done by moving the adjusting screws which moves the headlamp capsule in relation to the headlamp frame. The horizontal adjustment screw is located on the inboard side of each of the headlight assemblies and covered by a plug. The vertical adjustment screw is located on the inboard side of each of the headlight assemblies below the lower edge of the headlamp bezel. Its a long golden rod. I think it�s a #15 torx.
Raise the hood.
Raise the headlamps.
Remove the headlamp adjustment screw plug from the headlamp bezel. Reach under the headlamp bezel and push out the plug from behind.
Turn ON the low beam lamps. Block the light from the passenger lamp to allow you to adjust the drivers lamp. Don�t cover the headlight or it may get too hot.
Inspect the horizontal aim. Make the adjustments with reference to the lines and numbers on the aiming chart below
Adjust the aim using the horizontal adjusting screw, to align the break point (3) of the high intensity zone to the headlamp vertical centerline (1), within the range of 38 mm (1.5 in) to the left (5) of the lamp vertical centerline (1), to 38 mm (1.5 in) to the right (4) of the lamp vertical centerline (1) on the aiming screen.
Inspect the vertical aim.
Adjust the aim using the vertical adjusting screw, to align the upper edge of the beam horizontal cut off line 114 mm (4.5 in) below (7) the headlamp horizontal centerline (2), within the range of 76 mm (3 in) below (8) the lamp horizontal centerline (2), to 191 mm (7.5 in) below (6) the lamp horizontal centerline (2) on the aiming screen.
Install the headlamp adjustment screw plug. Push to secure.
Turn OFF the headlamps.
Lower the hood.
Your light pattern should look roughly like this when you�re done.
Fog Lamp Aiming
There is no horizontal aiming for the C5 foglamps
Preparation:
Prepare the aiming area. You can use the garage wall providing its at least 25� from the car and the ground is level. Make sure the tire pressures are correct and the tank is full or the calibration may be out. Park the vehicle square with the aiming surface. Close the doors and rock the car to stabilise the suspension.
Mark some calibration lines using chalk or masking tape:
Find the center of the headlight and measure the distance to the ground. Mark a horizontal line on the surface (garage door or wall) using masking tape at the same distance from the ground.
Stick a piece of tape in the center of the windscreen and another on the rear glass to use as reference marks.
Line these up from behind the car and use them to mark the centerline of the car on the wall.
Measure the distance between the center of both headlight lenses and use this to measure from the center point you just marked on the surface.
Adjustment
Raise the hood.
Raise the headlamps.
Turn ON the low beam lamps. Block the light from both headlamps to allow you to adjust the fog lights. Don�t cover the headlights or they may get too hot.
Turn on the fog lamps
Insert a torx driver through the front fascia deflector access hole to reach the fog lamp vertical adjustment screw
Adjust the fog lamp up or down until the top edge of the high intensity zone is 4� below the horizontal centre line.
Turn off all the lights


Racer
Joined: Mar 2007
Posts: 401
Likes: 0
From: Down in the west Texas town of El Paso TX
Maybe this picture will help for those of us to lazy to read:
As for the headlights:
I used this picture to describe something to someone else but you get the gist of it. Whatever you do, don't turn any of the headlight adjusting screws without lubing them first!!! There is no fix after you break the adjusting screw. You have to buy another headlight at a whopping $700 give or take!
 Don't want to break those $$$$ lights.

Advanced

Joined: Oct 2005
Posts: 71
Likes: 6
From: Sugar Land Texas
I'm preparing myself mentally to try to adjust my headlamps without breaking the 'Golden Rod'. I'm reading all the suggestions and they make great sense. One thing I'm seeing right off that would help loosen up the stubborn gearing, without using the Golden Rod to do it, would be to put a wrench to work on the end of the threaded shaft running the the gearing that the Golden Rod controls. Sure, you might mess up some threads on the very end of the shaft but that area doesn't come into play anyhow, does it? And using a wrench with copious amounts of WD40 should loosen it up rather easily anyway it seems.
Any thoughts on using this process?
One other thing - the long Golden Rod apparently controls the vertical adjustment. I understand there is a shorter screw controlling the horizontal. Does that shorter screw have the same problems the longer Golden Rod does?
Any thoughts on using this process?
One other thing - the long Golden Rod apparently controls the vertical adjustment. I understand there is a shorter screw controlling the horizontal. Does that shorter screw have the same problems the longer Golden Rod does?
Last edited by Hooker; Dec 15, 2008 at 10:19 PM.
Former Vendor
Joined: Nov 2005
Posts: 8,995
Likes: 2
From: Spring Texas
St. Jude Donor '08
Note: I STRONGLY reccomend squirting WD-40 (or similar) on the gear mechanism for the adjusters or they WILL break. This may require taking the headlight out to get at it.... but the extra 5 minutes is worth having a functional headlight adjuster.