


C5 Headlight Adjustment

Thread Starter
Heel & Toe


Joined: Jul 2006
Posts: 20
Likes: 0
The bright light on the driver side of my C5 Coupe points to the trees. I have had it looked at by two different shops and all that has happened is it cost me $$. Any advise on getting it pointed back to the road?

Burning Brakes


Joined: Feb 2005
Posts: 1,190
Likes: 0
From: Fayetteville AR
Yeah, fix it your self. If your lights are not damaged and you mean your "bright light" is your head light (or high beams) then adjust them your self. Adjusting them will move both the low and high beams together. If your lights are busted then purchase new assembly though one of our support vendors like GM parts direct and install yourself.
For adjusting:
Park your car 10 ft or so in front of a wall or garage doors. Put your headlights in the upright position (but lights are still off) and remove the 3 screws (if I remember all of this correctly � I did this 3 years ago) with a Phillips head screwdriver and remove cover. Don�t drop screws � very hard to find. You will see two screws that you can adjust with a star point driver (available at any auto parts store � just ask them which size you need to adjust gm headlights and save your receipt if they are wrong). Most large tool kits have one included � I had two diff. sizes.
One screw will be at the outside of the head light assembly (for left to right adjustments) and the other is at the bottom (if I remember correctly) for up and down adjustments. Now turn lights on (day time works fine since you are so close to the door and allows you to see the adjustment screws) adjust them to what you think is right � usually a couple of turns will do it. Adjust both lights evenly on the door/wall - back down the drive and watch the position of the lights � if they are out of whack then adjust them again. If you like the new position; then replace covers and screws and test headlights at night (or you could leave off the covers until you know you like the adjustment and replace cover later). If you don�t get bright lighted and you�re happy with the position then great otherwise go back to the garage and adjust again if needed. Just remember that one twist of the adjusting screws can move the light quit bit. Now enjoy the extra cash you saved! If I missed anything then I�m sure others will correct me (don�t you love the forum!).
If your lights are busted then adjusting may not help. I would also look into the aftermarket HID kit � they cost $$ but they are very bright and you will have a good reason to tell your significant other for purchasing new HID headlights. Don�t forget to throw in the "safety" reason - which is so true.

Melting Slicks

Joined: Apr 2005
Posts: 3,469
Likes: 4
If the high and low beam seem way out of whack (one is higher than the other) check to make sure each bulb is seated properly. It's pretty easy to put one in just a hair away from flush with the housing, and if it's off just a little bit it will make a significant difference in projection accuracy.

Le Mans Master

Joined: Sep 2007
Posts: 7,604
Likes: 8
From: Belleville Il
If the high and low beam seem way out of whack (one is higher than the other) check to make sure each bulb is seated properly. It's pretty easy to put one in just a hair away from flush with the housing, and if it's off just a little bit it will make a significant difference in projection accuracy.
 That is what popped into my head when I read this,,that the bulb may not have been twisted in and properly seated which could send the light off in a cockeyed direction. Let us know if that was it,,just curious

Tech Contributor


Joined: Dec 2003
Posts: 19,384
Likes: 87
From: Horncastle Lincolnshire, England
2023 C5 of the Year Finalist - Unmodified
Good write up from Jeep
Hers one I posted a while ago
Aiming your Head Lights
Preparation:
Prepare the aiming area. You can use the garage wall providing its at least 25� from the car and the ground is level.
Mark some calibration lines using chalk or masking tape:
Find the center of the headlight and measure the distance to the ground. Mark a horizontal line on the surface (garage door or wall) using masking tape at the same distance from the ground.
Stick a piece of tape in the center of the windscreen and another on the rear glass to use as reference marks.
Line these up from behind the car and use them to mark the centerline of the car on the wall.
Measure the distance between the center of both headlight lenses and use this to measure from the center point you just marked on the surface.
Make sure the tire pressures are correct and the tank is full or the calibration may be out. Park the vehicle square with the aiming surface. Close the doors and rock the car to stabilise the suspension.
Adjustment
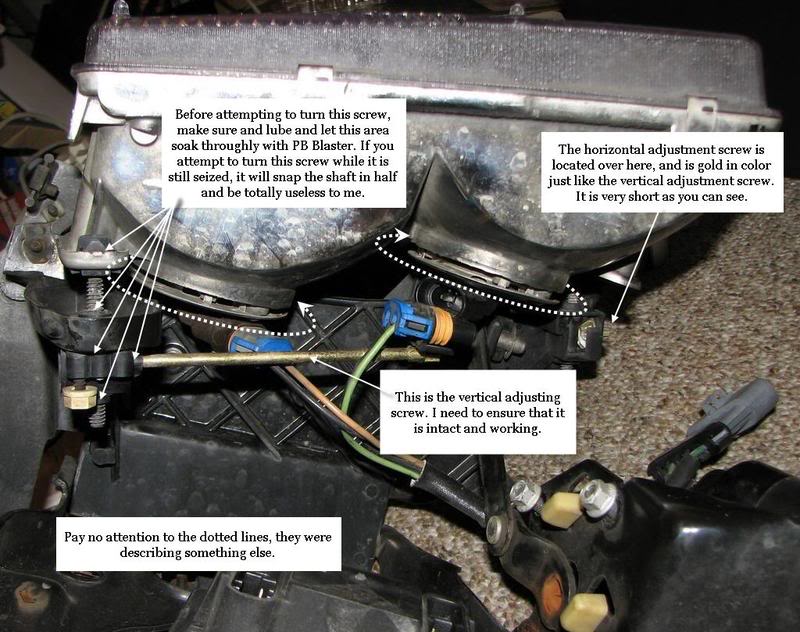
Horizontal and vertical aiming is done by moving the adjusting screws which moves the headlamp capsule in relation to the headlamp frame. The horizontal adjustment screw is located on the inboard side of each of the headlight assemblies and covered by a plug. The vertical adjustment screw is located on the inboard side of each of the headlight assemblies below the lower edge of the headlamp bezel. Its a long golden rod. I think it�s a #15 torx.
Raise the hood.
Raise the headlamps.
Remove the headlamp adjustment screw plug from the headlamp bezel. Reach under the headlamp bezel and push out the plug from behind.
Turn ON the low beam lamps. Block the light from the passenger lamp to allow you to adjust the drivers lamp. Don�t cover the headlight or it may get too hot.
Inspect the horizontal aim. Make the adjustments with reference to the lines and numbers on the aiming chart below
Adjust the aim using the horizontal adjusting screw, to align the break point (3) of the high intensity zone to the headlamp vertical centerline (1), within the range of 38 mm (1.5 in) to the left (5) of the lamp vertical centerline (1), to 38 mm (1.5 in) to the right (4) of the lamp vertical centerline (1) on the aiming screen.
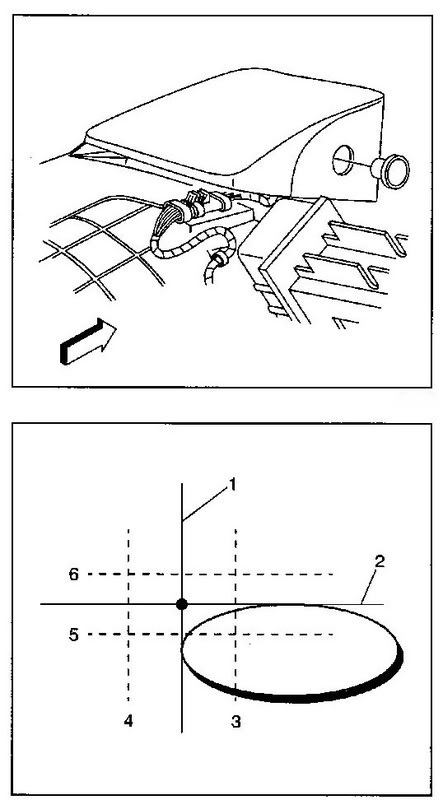
Inspect the vertical aim.
Adjust the aim using the vertical adjusting screw, to align the upper edge of the beam horizontal cut off line 114 mm (4.5 in) below (7) the headlamp horizontal centerline (2), within the range of 76 mm (3 in) below (8) the lamp horizontal centerline (2), to 191 mm (7.5 in) below (6) the lamp horizontal centerline (2) on the aiming screen.
Install the headlamp adjustment screw plug. Push to secure.
Turn OFF the headlamps.
Lower the hood.
Your light pattern should look roughly like this when you�re done.
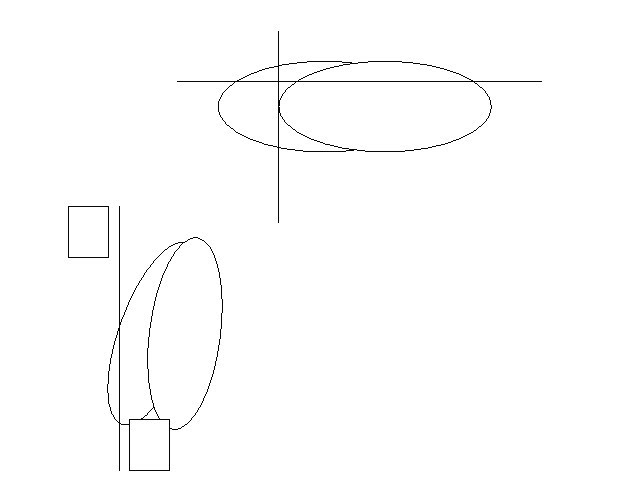
Thanks to Junkman for his pics
Hers one I posted a while ago
Aiming your Head Lights
Preparation:
Prepare the aiming area. You can use the garage wall providing its at least 25� from the car and the ground is level.
Mark some calibration lines using chalk or masking tape:
Find the center of the headlight and measure the distance to the ground. Mark a horizontal line on the surface (garage door or wall) using masking tape at the same distance from the ground.
Stick a piece of tape in the center of the windscreen and another on the rear glass to use as reference marks.
Line these up from behind the car and use them to mark the centerline of the car on the wall.
Measure the distance between the center of both headlight lenses and use this to measure from the center point you just marked on the surface.
Make sure the tire pressures are correct and the tank is full or the calibration may be out. Park the vehicle square with the aiming surface. Close the doors and rock the car to stabilise the suspension.
Adjustment
Horizontal and vertical aiming is done by moving the adjusting screws which moves the headlamp capsule in relation to the headlamp frame. The horizontal adjustment screw is located on the inboard side of each of the headlight assemblies and covered by a plug. The vertical adjustment screw is located on the inboard side of each of the headlight assemblies below the lower edge of the headlamp bezel. Its a long golden rod. I think it�s a #15 torx.
Raise the hood.
Raise the headlamps.
Remove the headlamp adjustment screw plug from the headlamp bezel. Reach under the headlamp bezel and push out the plug from behind.
Turn ON the low beam lamps. Block the light from the passenger lamp to allow you to adjust the drivers lamp. Don�t cover the headlight or it may get too hot.
Inspect the horizontal aim. Make the adjustments with reference to the lines and numbers on the aiming chart below
Adjust the aim using the horizontal adjusting screw, to align the break point (3) of the high intensity zone to the headlamp vertical centerline (1), within the range of 38 mm (1.5 in) to the left (5) of the lamp vertical centerline (1), to 38 mm (1.5 in) to the right (4) of the lamp vertical centerline (1) on the aiming screen.
Inspect the vertical aim.
Adjust the aim using the vertical adjusting screw, to align the upper edge of the beam horizontal cut off line 114 mm (4.5 in) below (7) the headlamp horizontal centerline (2), within the range of 76 mm (3 in) below (8) the lamp horizontal centerline (2), to 191 mm (7.5 in) below (6) the lamp horizontal centerline (2) on the aiming screen.
Install the headlamp adjustment screw plug. Push to secure.
Turn OFF the headlamps.
Lower the hood.
Your light pattern should look roughly like this when you�re done.
Thanks to Junkman for his pics

4th Gear
Joined: Oct 2010
Posts: 4
Likes: 0
From: Clovis ca
If the high and low beam seem way out of whack (one is higher than the other) check to make sure each bulb is seated properly. It's pretty easy to put one in just a hair away from flush with the housing, and if it's off just a little bit it will make a significant difference in projection accuracy.
Safety Car


Joined: Sep 2005
Posts: 4,064
Likes: 104
From: Southeast, Tennessee
St. Jude Donor '09 thru '26
not sure about that, but it would seem that being that far from a wall would spread the beam out way too much to create any kind of "focal" point to adjust to. just my opinion.
Corvette Stories
The Best of Corvette for Corvette Enthusiasts

5 Best & 5 Worst Corvette Daily Drivers
Joe Kucinski
The Headlights of Every Corvette Generation Explained
Joe Kucinski
5 Best & 5 Most Overrated Corvette Track Packages of All Time!
Joe Kucinski
Every 2027 Corvette Engine Explained
Joe Kucinski
Designer Imagines A Corvette That Looks More Like a Corvette Than the Corvette
Verdad Gallardo
10 Ugly Corvettes That We Still Kinda Love
Joe Kucinski
Top 10 Most Expensive Corvettes Ever Sold on Bring A Trailer
Brett Foote
10 Things Every Corvette Owner Needs (2026 Edition)
Michael S. Palmer
8 Most "Only Corvette Owners Understand" Quirks and Problems
Pouria Savadkouei


Burning Brakes
Joined: Apr 2009
Posts: 1,163
Likes: 4
From: Concord California
Great write up, and thanks for he name of the tool to adjust them... Question, what happens when you strip out the Torqes center on the adjusting rod, do they sell a tool that fits the outer STAR rod, not inner Torge hole.. Both of my center Torqe are stripped, but the star outer is fine, I'm looking for anything that will grab the outer dia. of the rod.. Another member said he "dremeled a straight line so a flate head screw driver can adjust it now", I can do that but that means taking out the headlight assembly (I don't really want to do that). Any help would be great.
Last edited by Jesse Asis; Aug 21, 2011 at 01:25 AM.


Advanced
Joined: May 2013
Posts: 97
Likes: 10
From: Minnesota
Be very careful when making adjustments, the "golden" rods are fragile and easily broken; and it's very difficult (or impossible) to find replacements.
Search this site for (headlight adjustment) or (golden rods) for more info.
Search this site for (headlight adjustment) or (golden rods) for more info.