
help changing antanna


Pro

Joined: Sep 2007
Posts: 735
Likes: 7
From: Bucks County Pa
Hi, see below, also there are threads with instructions.
Good Luck
++++++++++++++++++++++++++++++++++
Document ID# 384262
2002 Chevrolet Corvette
--------------------------------------------------------------------------------
Power Antenna Assembly Replacement
Removal Procedure
Open the rear compartment lid.
Check to be sure that the ignition switch is in the OFF position.
Remove the RR end/corner carpet trim panel. Refer to Trim Panel Carpet Replacement - Rear Corner in Interior Trim.
Remove the RH decklid support trim panel. Pull to release the retaining clips.
Pull back the edge of the rear compartment floor carpet from behind the RH decklid support, then reposition the RH side of the carpet.
Release the antenna coaxial cable and wiring harness from the retaining clip on the rear of the wheelhouse.
Disconnect the power antenna coaxial cable from the power antenna coaxial extension cable.
Disconnect the antenna electrical connector from the front body wiring harness connector.
Remove the screws retaining both of the RH taillamps.
Remove both of the RH taillamps.
Disconnect the antenna ground connector from the rear body wiring harness.
Important
Use care not to twist and damage the ground straps when removing the retaining nut.
Remove the nut retaining the antenna dual cable strap (1) and antenna short braided ground strap (2) to the rear fascia retaining stud, then reposition the straps.
Remove the nut retaining the antenna long braided ground strap to the rear bumper impact bar stud, then reposition the strap.
Remove the antenna bracket retaining nuts.
Release the antenna bracket from the mounting studs.
Reposition the antenna body (with bracket) toward the RR tire.
Using a slight twisting motion, pull down to release the antenna from the antenna bezel.
Release the antenna wiring harness grommet from the rear compartment panel, toward the outside of the vehicle.
Starting from the outer lip of the grommet, on the outside of the vehicle, begin to unseat the bottom right area of the grommet.
Using a flat bladed screwdriver or other suitable tool as an aid if necessary, work around the base of the tapered lip of the grommet on the inside of the vehicle, while simultaneously finessing the outer lip of the grommet on the outside of the vehicle, in order to release the grommet completely from the rear compartment panel.
Remove the antenna wiring harness and grommet from the opening in the rear compartment panel toward the outside of the vehicle.
Carefully remove the power antenna from the vehicle through one of the taillamp openings.
Remove the bolts retaining the antenna bracket to the antenna, if bracket removal is necessary.
Remove the antenna bracket from the antenna, if necessary.
Remove the antenna bezel upward through the quarter panel, if necessary.
Installation Procedure
Install the antenna bezel to the quarter panel, if removed. Align the locating tab on the antenna bezel to the notch in the quarter panel, then insert the bezel and push to secure.
Install the antenna bracket to the antenna, if removed.
Notice
Use the correct fastener in the correct location. Replacement fasteners must be the correct part number for that application. Fasteners requiring replacement or fasteners requiring the use of thread locking compound or sealant are identified in the service procedure. Do not use paints, lubricants, or corrosion inhibitors on fasteners or fastener joint surfaces unless specified. These coatings affect fastener torque and joint clamping force and may damage the fastener. Use the correct tightening sequence and specifications when installing fasteners in order to avoid damage to parts and systems.
Important
Use care not to twist and damage the ground straps when tightening the retaining nut.
Install the bolts retaining the antenna bracket to the antenna, if the bracket was removed. Tighten
Tighten the radio power antenna bracket retaining bolts to 10 N�m (89 lb in).
Carefully install the power antenna to the vehicle through one of the taillamp openings.
Apply sealer to the groove on the antenna wiring harness grommet.
Apply a light coating of lubricant to the narrow end of the antenna wiring harness grommet to aid in seating the grommet.
Install the antenna wiring harness and grommet through the opening in the rear compartment panel toward the inside of the vehicle.
Fully seat the antenna wiring harness grommet to the rear compartment panel.
Position the antenna upright, toward the RR tire and align the top of the antenna with the opening in the antenna bezel.
Install the antenna to the bezel. Insert the antenna up through the opening in the bezel, then check that the antenna and the bezel are seated properly.
Position the antenna and install the antenna bracket onto the mounting studs.
Install the antenna bracket retaining nuts. Tighten
Tighten the radio power antenna bracket retaining nuts to 12 N�m (106 lb in).
Install the antenna long braided ground strap to the rear bumper impact bar stud.
Install the nut retaining the antenna long braided ground strap to the rear bumper impact bar stud. Tighten
Tighten the radio power antenna long braided ground strap retaining nut to 5.8 N�m (51 lb in).
Install the antenna short braided ground strap (2), then the antenna dual cable strap (1), to the rear fascia retaining stud.
Install the nut retaining the straps to the rear fascia retaining stud. Tighten
Tighten the radio power antenna short braided ground strap and dual cable strap retaining nut to 5.8 N�m (51 lb in).
Connect the antenna ground connector to the rear body wiring harness.
Install both of the RH taillamps.
Install the screws retaining both of the RH taillamps. Tighten
Tighten the taillamp retaining screws to 2 N�m (18 lb in).
Secure the antenna coaxial cable and wiring harness to the retaining clip on the rear of the wheelhouse.
Connect the antenna wiring harness electrical connector to the front body wiring harness connector.
Connect the antenna coaxial cable to the antenna coaxial extension cable.
Install the edge of the rear compartment floor carpet behind the RH decklid support.
Install the RR end/corner carpet trim panel. Refer to Trim Panel Carpet Replacement - Rear Corner in Interior Trim.
Install the RH decklid support trim panel. Align the panel, then push to secure the retaining clips.
Close the rear compartment lid.
++++++++++++++++++++++++++++++++++
Document ID# 656905
2002 Chevrolet Corvette
--------------------------------------------------------------------------------
Trim Panel Carpet Replacement - Rear Corner Convertible
Removal Procedure
Remove the rear floor side stowage compartment cover.
Slide the cargo lamp up out of the trim panel, if equipped.
Remove the rear cargo net, if equipped.
Remove the cargo net attaching nuts.
Remove the corner carpet trim panel.
Installation Procedure
Install the corner carpet trim panel.
Install the cargo net attachment nuts.
Install the cargo net, if equipped.
Snap the cargo lamp into the carpet panel. if equipped.
Install the rear floor side stowage compartment cover.
Tech Contributor


Joined: Dec 2003
Posts: 19,384
Likes: 87
From: Horncastle Lincolnshire, England
2023 C5 of the Year Finalist - Unmodified
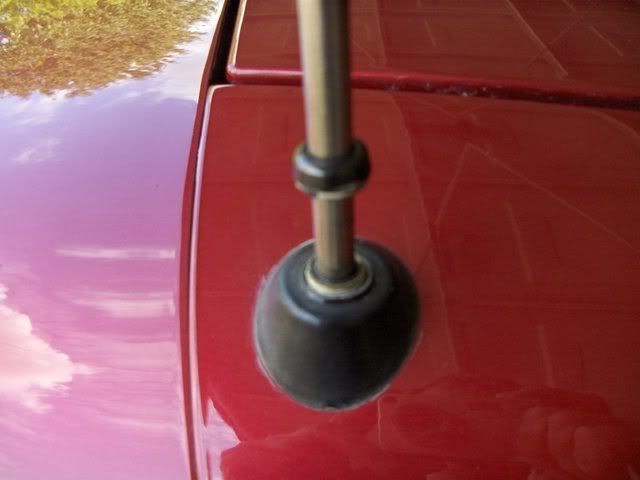
How To Replace a Defective Telescopic Antenna
Now this is a simple mod and the OEM assembly with motor is $130+. You'll know you have the problem because the antenna won't fully retract

Parts:
Adjustable wrench
GM OEM Power Antenna Replacement ($13 E Bay).

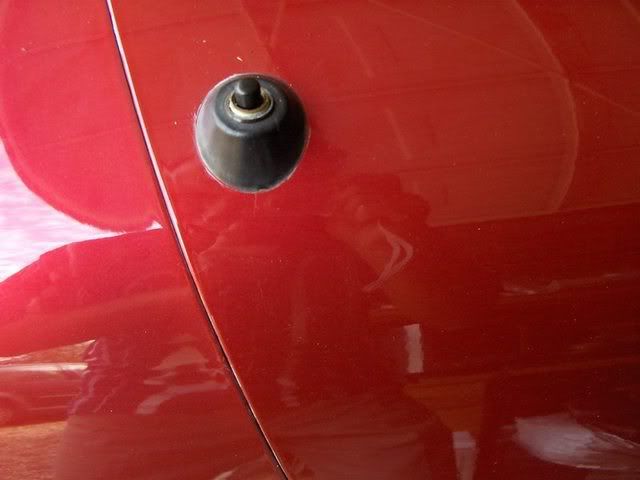
Make sure the antenna is fully retracted and that the radio is off
Remove the antenna mounting nut located on the base of the mast on the outside of the car. If the mast is bent it may be necessary to cut off the old mast). If you can't all of the plastic cable out as one piece, (sometimes the plastic gets really hard and breaks into pieces then falls down into the motor), you can just pull the motor after you have pulled the mast out and get all of the pieces out. To do that you'll need to take out the outer right turn signal housing.
Turn on the radio and pull out the old mast and serrated cable completely out of the antenna motor. (Note which way the serrations on the cable are facing)
Feed the serrated cable of the new mast into the antenna hole and stop when resistance is felt. (about 12”). Make sure the cable is fed in with the teeth the same way the old cable came out.

Turn the radio off to lower the antenna until the serrated cable catches.. You may have to cycle the antenna a few times until the cable catches the gear mechanism and retracts into the antenna motor.
Replace and tighten the antenna nut into the mast base.
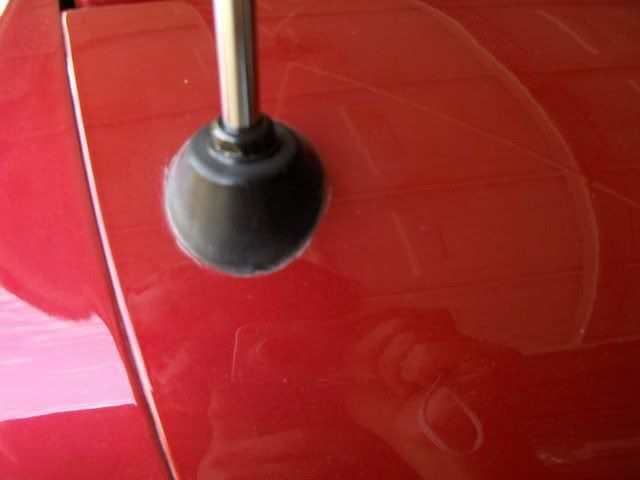
Turn on and make sure that the mast fully extends without binding. Clean the surface of the antenna to remove any adhesive etc.
10 minute job.

If you encounter a stuck mast here’s advice from the mast vendor:
You see the new "Retaining Sleeve" (silver, 2 inches or so, with slots) on the shaft of the new antenna mast, the original one is most likely a little corroded/frozen into the shaft of your antenna No problem : You are in need of what I refer to as the "snap and tap" technique of mast removal
Turn radio on and let cycle to as much extension as is currently possible
Take hold of the thickest metal mast section (closest to fender) with you thumb and forefinger about 2-3 inches above the top of the antenna shaft hole
Push the thickest mast section into the shaft (as much as it will go within that 2-3 inches)
Hold tightly with thumb and forefinger and Snap your Wrist upward.....you will here the mast bottom "tap" the bottom of the frozen in place retaining sleeve (what this is all about) Repeat this over and over again In-Snap-Tap-Repeat Short Firm Bursts of Energy Focusing the energy blow to the point of the tap This will free the retaining sleeve little by little till it comes out completely
Drifting


Joined: Oct 2005
Posts: 1,435
Likes: 0
From: Saint Louis MO
Why are you changing it? If its because the antenna won't stow you can change the mast in most cases and save some serious $$
How To Replace a Defective Telescopic Antenna
Now this is a simple mod and the OEM assembly with motor is $130+. You'll know you have the problem because the antenna won't fully retract
Parts:
Adjustable wrench
GM OEM Power Antenna Replacement ($13 E Bay).
Make sure the antenna is fully retracted and that the radio is off
Remove the antenna mounting nut located on the base of the mast on the outside of the car. If the mast is bent it may be necessary to cut off the old mast). If you can't all of the plastic cable out as one piece, (sometimes the plastic gets really hard and breaks into pieces then falls down into the motor), you can just pull the motor after you have pulled the mast out and get all of the pieces out. To do that you'll need to take out the outer right turn signal housing.
Turn on the radio and pull out the old mast and serrated cable completely out of the antenna motor. (Note which way the serrations on the cable are facing)
Feed the serrated cable of the new mast into the antenna hole and stop when resistance is felt. (about 12�). Make sure the cable is fed in with the teeth the same way the old cable came out.
Turn the radio off to lower the antenna until the serrated cable catches.. You may have to cycle the antenna a few times until the cable catches the gear mechanism and retracts into the antenna motor.
Replace and tighten the antenna nut into the mast base.
Turn on and make sure that the mast fully extends without binding. Clean the surface of the antenna to remove any adhesive etc.
10 minute job.
If you encounter a stuck mast here�s advice from the mast vendor:
You see the new "Retaining Sleeve" (silver, 2 inches or so, with slots) on the shaft of the new antenna mast, the original one is most likely a little corroded/frozen into the shaft of your antenna No problem : You are in need of what I refer to as the "snap and tap" technique of mast removal
Turn radio on and let cycle to as much extension as is currently possible
Take hold of the thickest metal mast section (closest to fender) with you thumb and forefinger about 2-3 inches above the top of the antenna shaft hole
Push the thickest mast section into the shaft (as much as it will go within that 2-3 inches)
Hold tightly with thumb and forefinger and Snap your Wrist upward.....you will here the mast bottom "tap" the bottom of the frozen in place retaining sleeve (what this is all about) Repeat this over and over again In-Snap-Tap-Repeat Short Firm Bursts of Energy Focusing the energy blow to the point of the tap This will free the retaining sleeve little by little till it comes out completely
 That's the way I did it. Thanks DeeGee!!!!! David
Burning Brakes


Joined: Apr 2008
Posts: 1,007
Likes: 196
From: Sullivan Illinois
2025 C5 of the Year Finalist - Modified
2023 C7 of the Year Finalist - Modified
2022 C7 of the Year Finalist - Modified
2022 C5 of the Year Finalist - Modified
2019 C5 of Year Finalist (performance mods)
2017 C5 of the Year Finalist
Tech Contributor
Joined: Dec 2003
Posts: 19,384
Likes: 87
From: Horncastle Lincolnshire, England
2023 C5 of the Year Finalist - Unmodified
RT*Q

Now thats a lot harder. No profile info so we need to know if its coupe, Z06 or FRC.
You'd need a power feed, an auto extend command wire and use the existing antenna cable and ground. Not straight forward.
Last edited by DeeGee; Jul 4, 2008 at 01:13 PM.


