


Mods for my 1st Corvette?
Thread Starter
Advanced

Joined: Dec 2008
Posts: 83
Likes: 0
From: El Mirage AZ
 Thanks for all the advice, I ordered a bunch of Zaino products and look forward to trying them this weekend weather and golf permitting!
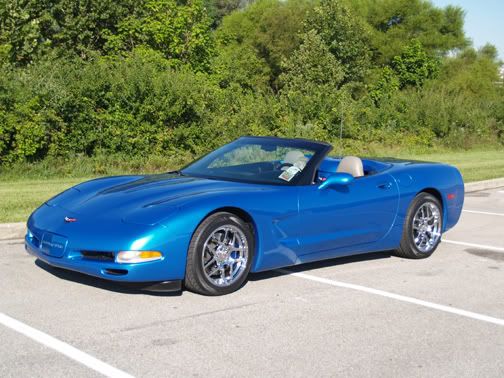
Guess I have to take the wife out as she signed off on the Vette as my Xmas present! Pics will follow next week as the camera is busted. I see a lot of aftermarket products for sale eg Skid plate savers, side bumper savers and much more, my question is there any mods out there that should definatly be done? I am thinking of removing the side body moldings what do you think? I think the car looks cleaner without them but am worried about damaging the paintwork. I am putting some wheel locking nuts on the weekend, what is the best way to jack the car up as I may as well do a good clean up while Im there.
Again many thanks for all your help
Clive
Hooked on Corvettes for life after only a week!!!!!!!!!!!

Burning Brakes

Joined: Sep 2007
Posts: 860
Likes: 3
if you have a 6 speed you'll want a skip shift eliminator, and if your column lock mechanism is still active you'll want a column lock bypass. Beyond that I would suggest you grab your wallet, cause once you start down the mod path, there is no turning back.
Melting Slicks


Joined: Feb 2002
Posts: 2,956
Likes: 2
From: Indianapolis In
Before you put ANY Zaino on da car, put your hand in a walmart bag & rub across the hood. If you feel any sticking of the plastic to the finish of the car, you will need to clay bar it before a Zaino application. You spent a bit of $$ to buy Zaino so that tells me you want it to look it's best. If the plastic "grabs " the finish or sticks, that means there is minute grit, dirt, dust what ever, embedded in the clear coat. If you put a coat of ZAino over the top of it, well.........you guess.........
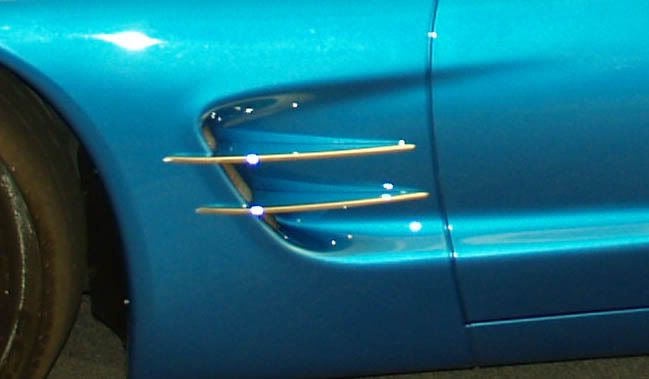
I removed the BSM (body side moldings) from my car also for a cleaner look. Then added chrome.......go figure........
As far as mods go, it all depends on what you want to do. Most guys either lean towards cosmetics (for shows) or added power (testostrone). The first thing I added was chrome wheels then after market cat backs for the sound. The sound did it in for me & started the testostrone level increase. Just remember that family (wife) come first. I forget that from time to time & usually get n trouble for it.

Banned Scam/Spammer
Joined: Feb 2007
Posts: 50,093
Likes: 267
From: Oklahoma City
St. Jude Donor '09-'10-'11-'12-'13-'14-'15-'16-'17,'19,'22
Burning Brakes
Joined: Sep 2007
Posts: 860
Likes: 3
Part of the security system is a mechanism that locks the steering wheel, and they have had a lot of problems with that mechanism. The column lock bypass kit (CLB) disables this locking mechanism so you are not left stranded.
Burning Brakes
Joined: Sep 2007
Posts: 832
Likes: 0
From: PSL FL
Hey Clive you will have to be more specific as far as what you are asking. Do you want to go for the looks, power, or both. If you snoop around a little in the forum you will get some very good ideas on what suits you best. Good luck and welcome. 
Corvette Stories
The Best of Corvette for Corvette Enthusiasts

Top 10 Most Expensive Corvettes Ever Sold on Bring A Trailer
Brett Foote
10 Things Every Corvette Owner Needs (2026 Edition)
Michael S. Palmer
8 Most "Only Corvette Owners Understand" Quirks and Problems
Pouria Savadkouei
10 Reasons the C6 Z06 is Still A Performance Benchmark After 20 Years
Joe Kucinski
How Much Horsepower Every Corvette Engine "LOST" in 1972
Joe Kucinski
Top 10 DOs and DON'Ts for Protecting Your Convertible Top!
Michael S. Palmer
Top 10 Most Explosive Corvettes Ever Made: Power-to-Weight Ratio Ranked!
Joe Kucinski
150 hp to 1,250 hp: Every Corvette Generation Compared by the Specs That Matter
Joe Kucinski
8 Coolest Corvette Pace Cars (and Replicas) of All Time
Verdad Gallardo


Burning Brakes
Joined: Mar 2008
Posts: 1,170
Likes: 0
From: Obama says I'm a bitter white guy clinging to my guns and religon and he's right
As to mods, it depends on what your looking for. For me I am not looking for HP for now but I am going fo the looks. I just started modding the motor department. I will purchase a new exhaust system by this time next year but it isn't a pressing issue for me. I will be going to shows and when I pop the hood, people will see the work in progress. Take your time and decide what you want. Everyone has their own opinion on what you should do, but it's your car and you can do whatever you wish. Remember this, once the mod bugg hits you there is no turning back.
Thread Starter
Advanced
Joined: Dec 2008
Posts: 83
Likes: 0
From: El Mirage AZ
Thanks
Clive
Thread Starter
Advanced
Joined: Dec 2008
Posts: 83
Likes: 0
From: El Mirage AZ
As to mods, it depends on what your looking for. For me I am not looking for HP for now but I am going fo the looks. I just started modding the motor department. I will purchase a new exhaust system by this time next year but it isn't a pressing issue for me. I will be going to shows and when I pop the hood, people will see the work in progress. Take your time and decide what you want. Everyone has their own opinion on what you should do, but it's your car and you can do whatever you wish. Remember this, once the mod bugg hits you there is no turning back.
Clive
Melting Slicks
Joined: Feb 2002
Posts: 2,956
Likes: 2
From: Indianapolis In
Here is what it looked like when I bought it.

2-3 weeks later.......
And then some other stuff...........
I painted the FRC & radiator cover....

Chrome emblems...

Chrome grills & letters.....

Then I decided I needed a HUD unit.......

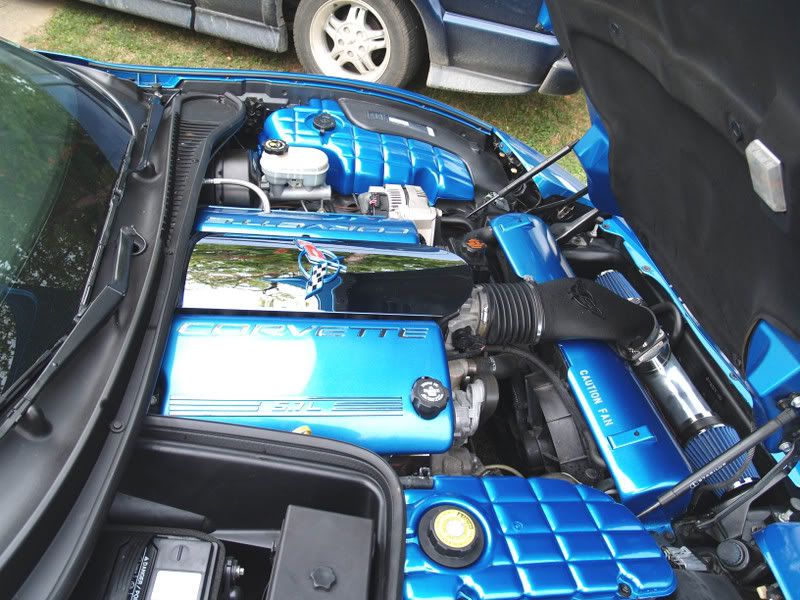
More engine compartment goodies.....
Chrome side spears....
Then I needed new interior because I needed sport seats instead of standard........


And the latest.........engine work including stage II heads, cam, 3.42 gears, LS6 intake, long tube headers, 30# injectors, P/P throttle body & MAS, Blackwing & dyno tune.
Read the sig..........
BTW,
My wife is about ready to kill me...........
Thread Starter
Advanced
Joined: Dec 2008
Posts: 83
Likes: 0
From: El Mirage AZ
I here what you are saying. When I bought my car, I wasn't going to do a lot to it. Slowly.......that changed.
Here is what it looked like when I bought it.
2-3 weeks later.......
And then some other stuff...........
I painted the FRC & radiator cover....
Chrome emblems...
Chrome grills & letters.....
Then I decided I needed a HUD unit.......
More engine compartment goodies.....
Chrome side spears....
Then I needed new interior because I needed sport seats instead of standard........
And the latest.........engine work including stage II heads, cam, 3.42 gears, LS6 intake, long tube headers, 30# injectors, P/P throttle body & MAS, Blackwing & dyno tune.
Read the sig..........
BTW,
My wife is about ready to kill me...........
Car looks a lot cleaner without the BSM'S did they come off ok?
Thanks
Clive

Melting Slicks
Joined: Feb 2002
Posts: 2,956
Likes: 2
From: Indianapolis In
They are put on with 3m sided tape. I used fishing line to get behind the molding itself until I could get a grip to pull off. Half of the tape came off with the molding & the other halh I had to "roll" off with my thumbs. Blisters were in effect b-4 I realized it.


Racer

Joined: Nov 2008
Posts: 412
Likes: 1
From: Lampasas Texas
A must...
If the wheel does not turn with the key off then do this.
Not my post, I am just passing along some good info for you.
Steering Column Lock Repair
http://www.vetteweb.com/tech/vemp_08...air/index.html
Accessing the electro-mechanical lock motor and performing the repair should take less than one hour. Start by removing the driver-side sill plate; it simply snaps out. This makes it easier to get the knee bolster out on some Corvettes
Now you can begin to remove the knee bolster. Using a flathead screwdriver, pry out the bottom of the fog lamp/trunk-release switch. Once it pops out, disconnect the wiring harness attached to the switch. Inside this cavity is a screw you'll need to remove
Pry off the panel on the other side of the steering wheel using the same method. This area houses the temperature sensor in some cars. If the vehicle's equipped with a temperature sensor, unplug the wiring to the sensor and remove the screw. At the very bottom of the knee bolster are two more screws you'll need to remove.
With the knee bolster unscrewed, pull the panel gently until it pops free. The right side of the bolster can be tricky. Pull back the trim that goes around the temperature-sensor hole as much as possible, then work the panel downwards.
Remove the clamshell from around the steering column; it's attached with two torx-headed screws. This will expose the electro-mechanical lock motor.
We chose to use this Column Lock Simulator Kit from Mid America Motorworks(www.doctordons.com). The kit eliminates the steering-lock mechanism while mimicking its operation to the Corvette's computer.
If the steering column is in the locked position, try to free it by gently tapping on the lock motor with a hammer while turning the key to the "Run" position. This should unlock the wheel.
Remove this Styrofoam-covered panel; it's attached with four bolts. This will provide access to the wiring-harness connectors.
Next, find the wiring-harness connector for the lock motor. It will have four wires-black, green, orange, and purple. Once you've located it, disconnect the lock-motor pigtail from the dash wiring harness.
Plug the Column Lock Simulator Kit into the connector that was previously linked to the lock motor (on the dash harness side).
The column-lock mechanism must now be disengaged using the lighter-plug assembly supplied in the kit. Simply connect the lighter-plug assembly to the lock motor.
Insert the lighter plug into the lighter receptacle. Once this is done, you'll hear the lock motor actuate, indicating that the steering column is free. Remove the lighter plug and the pigtail running to the lock motor. Start the vehicle to verify that the steering is indeed free and that the "Service Column Lock" light is not illuminated. If the warning light is on, turn the engine off, remove the key from the ignition, and remove fuses 25 and 29 from the fuse panel. Wait 15 minutes and replace the fuses. Start your vehicle and verify that the error message is no longer displayed.
Other web site for the Steering Column Lock Repair Kit
http://www.corvettesofhouston.com/pr...products_id=54
http://www.ls1howto.com/index.php?article=24
http://www.thunderracing.com/catalog...d=220&pcid=156
Last edited by Boulty1961; Jan 7, 2009 at 11:00 PM.