


Antenna question/tire sensor question
Thread Starter
Pro


Joined: Jan 2003
Posts: 730
Likes: 45
From: kansas city mo.
I changed my mast on the antenna after reading in the search area on the problem. I though that I did what was said but have the mast sticking up about 3". If I cut off 3'' of the white plastic teeth would that work? I had removed the motor and tryed to do what was said but screwed something up.
I had a low tire on the dash that said lower RR tire. I checked the right side but it was the driver side that was low. Can someone explain how this is posible. Do the rims make it left and right. Thanks for any information. Frank
I had a low tire on the dash that said lower RR tire. I checked the right side but it was the driver side that was low. Can someone explain how this is posible. Do the rims make it left and right. Thanks for any information. Frank
Le Mans Master


Joined: Jun 2006
Posts: 6,979
Likes: 31
From: Wichita KS
I changed my mast on the antenna after reading in the search area on the problem. I though that I did what was said but have the mast sticking up about 3". If I cut off 3'' of the white plastic teeth would that work? I had removed the motor and tryed to do what was said but screwed something up.
I had a low tire on the dash that said lower RR tire. I checked the right side but it was the driver side that was low. Can someone explain how this is posible. Do the rims make it left and right. Thanks for any information. Frank
I had a low tire on the dash that said lower RR tire. I checked the right side but it was the driver side that was low. Can someone explain how this is posible. Do the rims make it left and right. Thanks for any information. Frank
Tech Contributor

Joined: Dec 2003
Posts: 19,384
Likes: 87
From: Horncastle Lincolnshire, England
2023 C5 of the Year Finalist - Unmodified
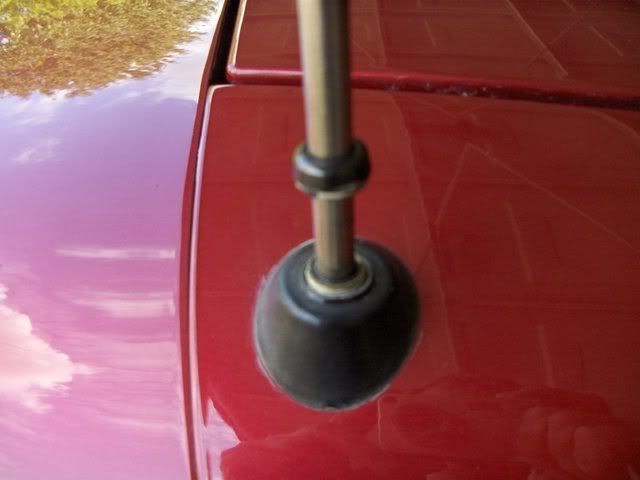
Heres the fix for the antenna. If you followed the procedure and it still sits up proud, start over.
How To Replace a Defective Telescopic Antenna
Now this is a simple mod and the OEM assembly with motor is $130+. You'll know you have the problem because the antenna won't fully retract

Parts:
Adjustable wrench
GM OEM Power Antenna Replacement ($13 E Bay).

Make sure the antenna is fully retracted and that the radio is off
Remove the antenna mounting nut located on the base of the mast on the outside of the car. If the mast is bent it may be necessary to cut off the old mast). If you can't all of the plastic cable out as one piece, (sometimes the plastic gets really hard and breaks into pieces then falls down into the motor), you can just pull the motor after you have pulled the mast out and get all of the pieces out. To do that you'll need to take out the outer right turn signal housing.
Turn on the radio and pull out the old mast and serrated cable completely out of the antenna motor. (Note which way the serrations on the cable are facing)
Feed the serrated cable of the new mast into the antenna hole and stop when resistance is felt. (about 12”). Make sure the cable is fed in with the teeth the same way the old cable came out.

Turn the radio off to lower the antenna until the serrated cable catches.. You may have to cycle the antenna a few times until the cable catches the gear mechanism and retracts into the antenna motor.
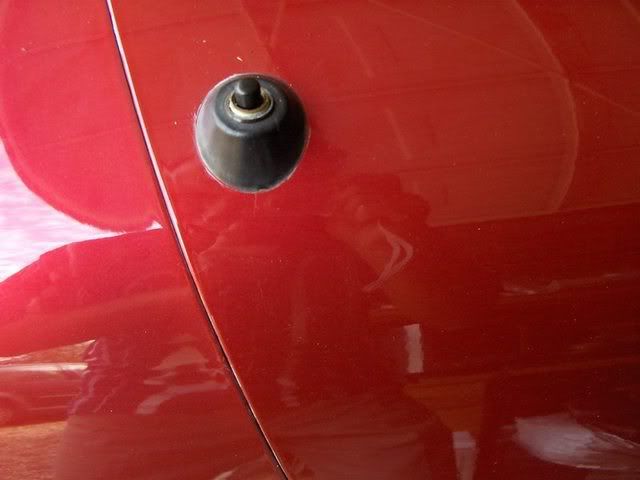
Replace and tighten the antenna nut into the mast base.
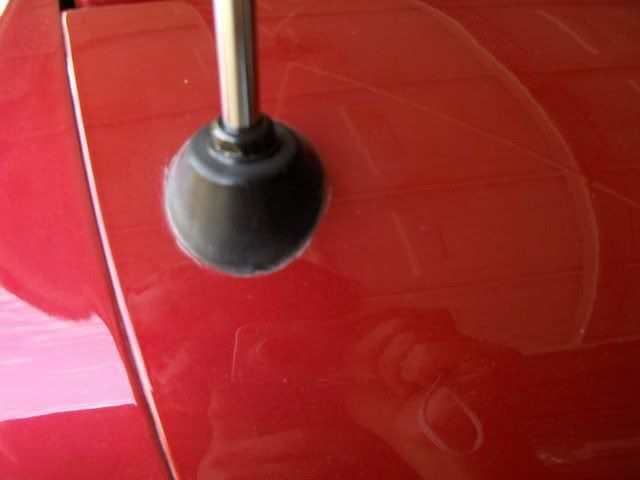
Turn on and make sure that the mast fully extends without binding. Clean the surface of the antenna to remove any adhesive etc.
10 minute job.

If you encounter a stuck mast here’s advice from the mast vendor:
You see the new "Retaining Sleeve" (silver, 2 inches or so, with slots) on the shaft of the new antenna mast, the original one is most likely a little corroded/frozen into the shaft of your antenna No problem : You are in need of what I refer to as the "snap and tap" technique of mast removal
Turn radio on and let cycle to as much extension as is currently possible
Take hold of the thickest metal mast section (closest to fender) with you thumb and forefinger about 2-3 inches above the top of the antenna shaft hole
Push the thickest mast section into the shaft (as much as it will go within that 2-3 inches)
Hold tightly with thumb and forefinger and Snap your Wrist upward.....you will here the mast bottom "tap" the bottom of the frozen in place retaining sleeve (what this is all about) Repeat this over and over again In-Snap-Tap-Repeat Short Firm Bursts of Energy Focusing the energy blow to the point of the tap This will free the retaining sleeve little by little till it comes out completely
How To Replace a Defective Telescopic Antenna
Now this is a simple mod and the OEM assembly with motor is $130+. You'll know you have the problem because the antenna won't fully retract
Parts:
Adjustable wrench
GM OEM Power Antenna Replacement ($13 E Bay).
Make sure the antenna is fully retracted and that the radio is off
Remove the antenna mounting nut located on the base of the mast on the outside of the car. If the mast is bent it may be necessary to cut off the old mast). If you can't all of the plastic cable out as one piece, (sometimes the plastic gets really hard and breaks into pieces then falls down into the motor), you can just pull the motor after you have pulled the mast out and get all of the pieces out. To do that you'll need to take out the outer right turn signal housing.
Turn on the radio and pull out the old mast and serrated cable completely out of the antenna motor. (Note which way the serrations on the cable are facing)
Feed the serrated cable of the new mast into the antenna hole and stop when resistance is felt. (about 12”). Make sure the cable is fed in with the teeth the same way the old cable came out.
Turn the radio off to lower the antenna until the serrated cable catches.. You may have to cycle the antenna a few times until the cable catches the gear mechanism and retracts into the antenna motor.
Replace and tighten the antenna nut into the mast base.
Turn on and make sure that the mast fully extends without binding. Clean the surface of the antenna to remove any adhesive etc.
10 minute job.
If you encounter a stuck mast here’s advice from the mast vendor:
You see the new "Retaining Sleeve" (silver, 2 inches or so, with slots) on the shaft of the new antenna mast, the original one is most likely a little corroded/frozen into the shaft of your antenna No problem : You are in need of what I refer to as the "snap and tap" technique of mast removal
Turn radio on and let cycle to as much extension as is currently possible
Take hold of the thickest metal mast section (closest to fender) with you thumb and forefinger about 2-3 inches above the top of the antenna shaft hole
Push the thickest mast section into the shaft (as much as it will go within that 2-3 inches)
Hold tightly with thumb and forefinger and Snap your Wrist upward.....you will here the mast bottom "tap" the bottom of the frozen in place retaining sleeve (what this is all about) Repeat this over and over again In-Snap-Tap-Repeat Short Firm Bursts of Energy Focusing the energy blow to the point of the tap This will free the retaining sleeve little by little till it comes out completely
Last edited by DeeGee; Mar 20, 2009 at 01:45 PM.

Drifting

Joined: May 2007
Posts: 1,515
Likes: 14
From: Gig Harbor WA
The above writeup is good information. To answer your question: DO NOT cut off any of the white nylon strip. Turn your radio on and off a few times, and the mast should retract fully. If it doesn't, you have a piece of the old (hard) nylon strip inside the motor assembly. Pull the motor, unscrew the "round" section on the side, remove the broken-off old piece, lightly lubricate the cavity with white grease, re-assemble and install. Be sure to also put a light coat of white grease on the new antenna mast nylon part before re-installing as decribed above. Simple fix -- I did it a couple of weeks ago.
Tech Contributor
Joined: Dec 2003
Posts: 19,384
Likes: 87
From: Horncastle Lincolnshire, England
2023 C5 of the Year Finalist - Unmodified

6th Gear

Joined: Jul 2008
Posts: 6
Likes: 0
Corvette Stories
The Best of Corvette for Corvette Enthusiasts

Every 2027 Corvette Engine Explained
Joe Kucinski
Designer Imagines A Corvette That Looks More Like a Corvette Than the Corvette
Verdad Gallardo
10 Ugly Corvettes That We Still Kinda Love
Joe Kucinski
Top 10 Most Expensive Corvettes Ever Sold on Bring A Trailer
Brett Foote
10 Things Every Corvette Owner Needs (2026 Edition)
Michael S. Palmer
8 Most "Only Corvette Owners Understand" Quirks and Problems
Pouria Savadkouei
10 Reasons the C6 Z06 is Still A Performance Benchmark After 20 Years
Joe Kucinski
How Much Horsepower Every Corvette Engine "LOST" in 1972
Joe Kucinski