


Seat Heaters

Thread Starter
Melting Slicks


Joined: Feb 2008
Posts: 2,977
Likes: 4
From: Delmar Delaware
 Seat Heaters
I am preparing for my new leather install and would like to add seat heaters when I do the install. Where is the best place to get them? How hard is the install? I know a long time ago I saw someone added them. Can you post pics and a writeup if you have one?Thanks in advance.

Tech Contributor


Joined: Dec 2003
Posts: 19,384
Likes: 87
From: Horncastle Lincolnshire, England
2023 C5 of the Year Finalist - Unmodified
Here you go:
http://forums.corvetteforum.com/show...ghlight=heated
How To Fit Heated Seats to a Corvette C5
Those of us who drive convertibles know only too well that on a sunny Winter’s day there’s nothing better than to drop the roof, wrap up warm and take off for a drive. Even so, even the hardiest of us would like that little touch of luxury that comes with heated seats. Fitting them to the C5 is an easy mod that’s well within the capabilities of the average DIY’er.
What You’ll need:
A heated seat kit
Basic Tools
A Dremel
Shears (to cut the heater pads)
The Fit
I bought my kit from Sports Imports. They have a good range and I went for the Universal Model (Product Code SIL-01) which at the time cost $160. It was particularly good because the element design allows you to trim the pads to fit the seat without damaging any of the electrical elements. Some kits have to be fitted as they are as you’d break the circuit if you trim the pad. Make sure you know which pad you’ve bought. The kit came with very clear installation instructions and included a 9” x 18” back pad, a 9” x 18” seat pad, an electronic temperature control module, two dual temperature (high/low) two-colour illuminated round switches and cable ties and insulating tape.
First disconnect the battery. Make sure you can reactivate your radio if you have the security feature set or, better still, deactivate the security feature before you start. If you forget, there are instructions online on the Corvette Forum on how to solve this problem.
The kit comes with a good wiring diagram which shows how to connect up the leads and gives you a good idea of the overall scope of the modification.
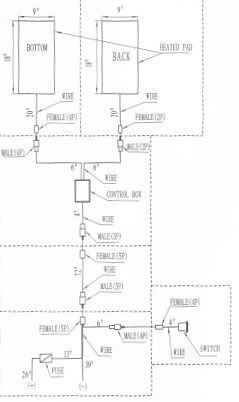
The Wiring Diagram Which Comes With The Kit
Next you need to take out both seats. This sounds much worse than it really is. All you need to do is unhook the electrical connections under the seats and remove the main bolts. There are great instructions on the Vette Essentials Website online and I’ve included a link below. Follow the Vette Essentials instructions to step 17c but stop before removing the bottom covers as you can fit the heating pads with the covers still on the seats. Next, work the Velcro fastening loose inside the seat covers. This fastening sculpts the stock seat cover so you’ll lose this definition with the pads in place. A small price to pay. Take care because the Velcro hooks are very sharp. Work out the size of heating pads you want and trim the pads to size using some shears. Slide the lower seat pad into the gap between the seat cover and the foam pad and route the wires out of the back of the seat. My kit was adhesive backed to hold the elements in place. There are connectors on the wiring harness which allow you to connect to the rest of the wiring loom later. Fit the back pad element into place and replace the seat cover by reversing the Vette Essentials instructions.
Next step is to remove the console. Again follow the Vette Essentials instructions to step 3 to allow you to run the wires forward underneath the console to the switch mounting position. You may feel you can route the wires without completely stripping the console out. I found it easier to work with the console out of the car and there was less risk of a pinched wire. Run the wiring harness to the ashtray area from the rear of the console making sure you leave enough wire at the rear to connect to the seat/heater looms. Run the live wire under the edge of the console area and down into the passenger footwell to emerge next to the lower fuse panel. This is a bit fiddly so I used a wire coat hanger to thread the wire down behind the dash trim panel. An alternative would be to route it directly under the carpet from the rear of the seats to the passenger footwell.
Now we need to fit the switches and you have two choices where to mount them. If your car doesn’t have the selective ride control switch you could mount them on the active handling panel. The advantage here is that they are easily accessible and look very neat. The down side is that you need to trim a section of the circuit board which sits behind the AH panel to give enough room for the switches. It’s not for the faint hearted and there could be tears!
The hole you need for mounting the switches is about the size of a US 5 cent piece or a Brit Penny. Check the size before you cut plastic. A tiny piece of double sided tape will hold them in place while you mark the panel. Best advice is to start smaller than you need and slowly enlarge the hole until you get a tight fit. If you have a Dremel, drill a tiny 1/2" diameter hole using the sanding drum. You can see from this picture that the back side of the AH plate is very busy. There’s considerable trial and error trimming to get the circuit board to clear the switches although none of it is visible once the panel is refitted. Make sure you don’t cut something important in the process.
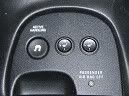
The Switches Mounted on the Active Handling Panel
The safer option is to fit them as I did in the ashtray unit. Dismantle the ashtray unit. The outer door which is fitted to the console bezel will cover the switches once you’ve finished the fit. Remove the inner door of the ashtray. You could use this to mount the switches as it fits the hole perfectly. If you do, be very careful as you drill the material as it’s very brittle. Cut a slot in the rear side of the ashtray mount using a hacksaw or Dremel cutting wheel. This allows the wires and connectors to route out from the switches. Again be very careful as you cut as the Bakelite material is brittle and easily broken.
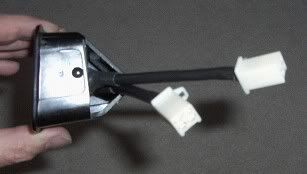
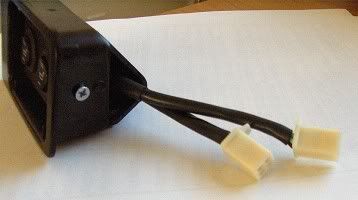
The Switches Mounted in the Ashtray
I used a small black plastic faceplate to mount the switches. Drill two holes (5/8”) for the switches to sit snug on the plate. Pull the main wiring connector through the hole and attach it to the switch. Fit the switch snug in the hole until it clicks in place then fit the faceplate into the ashtray and screw in from the sides to hold it in place.
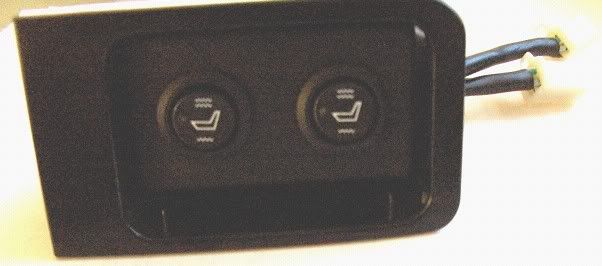
The Switches in Place on the Panel
Reassemble the console taking care not to pinch any wires. Pull the wires through the ashtray hole. Connect to the switches. Slot the ashtray back into place. This is how the switches should look once they are mounted.
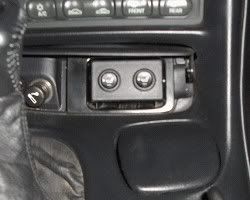
The Final Switch Installation
Reinstall the seats leaving access to the wires which are protruding from behind the seat base. Connect those wires to the main harness connectors and secure the wires to the carpet if you feel the need.
Next we need to hook up the power by connecting the live red wire to a switched power supply. Again there are 2 choices. You can buy spade type connectors from the Company who sell the seats which splice onto the power lead and will slot directly into a spare fuse slot in the fuse panel in the footwell. You can see from this picture a wire attached to fuse number 22.
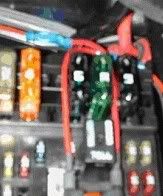
Alternatively you can hook up at a spare connector in the passenger footwell. Pull out the cover and look in the top left corner above the computer module. There’s a small plug with three wires (orange, yellow, & black) that are taped up. The yellow wire is the +12V switched supply. Splice into that using an online electrical connector.
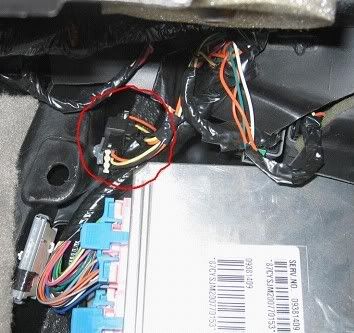
Connecting to the Footwell Switched Power Supply
Next you need to ground the installation. Connect the ground wire to a suitable ground point. The grounds can be tied together on one ring lug and grounded under a 10mm screw. I ran through the bulkhead to the ground behind the passenger headlight. This is fiddly and you need to thread the wire through the bulkhead through the firewall behind the battery. You need to remove the battery to get access if you choose this option.

Bulkhead Earthing Point
Much easier is to use one of the other grounds nearby. One is located under the bulge of rug found beneath the dash panel on the passenger side. It’s that little overhang of carpeting located just off to the left-bottom corner of the glovebox.
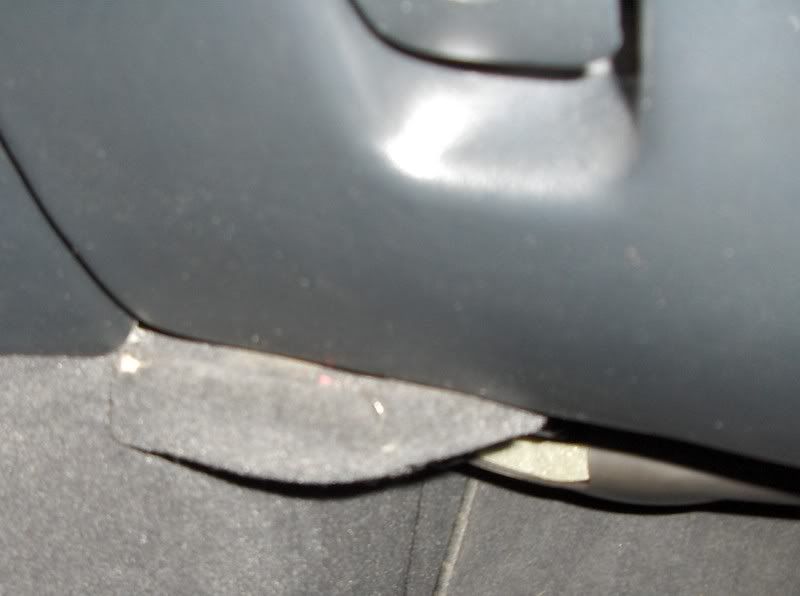
Glovebox Earthing Point
All that leaves you to do is reconnect the battery and test the seats. There are two settings low and high. Low is toasty and High is a definite “Bottom Burner”!
All in all this is a fairly straight forward modification but I have to say, on a cold day it’s one of my all time favourites
I used some pictures provided by members over the years. if your pic is there I hope you dont mind me using it
Internet Links:
Heated Seat Kit from Sports Imports:
http://www.seatheater-heatedseats.co...OVMTC=standard
How to Remove the Seats:
http://www.vetteessentials.com/instr...er_change.html
How To Remove the Console:
http://www.vetteessentials.com/instr...t_install.html
http://forums.corvetteforum.com/show...ghlight=heated
How To Fit Heated Seats to a Corvette C5
Those of us who drive convertibles know only too well that on a sunny Winter’s day there’s nothing better than to drop the roof, wrap up warm and take off for a drive. Even so, even the hardiest of us would like that little touch of luxury that comes with heated seats. Fitting them to the C5 is an easy mod that’s well within the capabilities of the average DIY’er.
What You’ll need:
A heated seat kit
Basic Tools
A Dremel
Shears (to cut the heater pads)
The Fit
I bought my kit from Sports Imports. They have a good range and I went for the Universal Model (Product Code SIL-01) which at the time cost $160. It was particularly good because the element design allows you to trim the pads to fit the seat without damaging any of the electrical elements. Some kits have to be fitted as they are as you’d break the circuit if you trim the pad. Make sure you know which pad you’ve bought. The kit came with very clear installation instructions and included a 9” x 18” back pad, a 9” x 18” seat pad, an electronic temperature control module, two dual temperature (high/low) two-colour illuminated round switches and cable ties and insulating tape.
First disconnect the battery. Make sure you can reactivate your radio if you have the security feature set or, better still, deactivate the security feature before you start. If you forget, there are instructions online on the Corvette Forum on how to solve this problem.
The kit comes with a good wiring diagram which shows how to connect up the leads and gives you a good idea of the overall scope of the modification.
The Wiring Diagram Which Comes With The Kit
Next you need to take out both seats. This sounds much worse than it really is. All you need to do is unhook the electrical connections under the seats and remove the main bolts. There are great instructions on the Vette Essentials Website online and I’ve included a link below. Follow the Vette Essentials instructions to step 17c but stop before removing the bottom covers as you can fit the heating pads with the covers still on the seats. Next, work the Velcro fastening loose inside the seat covers. This fastening sculpts the stock seat cover so you’ll lose this definition with the pads in place. A small price to pay. Take care because the Velcro hooks are very sharp. Work out the size of heating pads you want and trim the pads to size using some shears. Slide the lower seat pad into the gap between the seat cover and the foam pad and route the wires out of the back of the seat. My kit was adhesive backed to hold the elements in place. There are connectors on the wiring harness which allow you to connect to the rest of the wiring loom later. Fit the back pad element into place and replace the seat cover by reversing the Vette Essentials instructions.
Next step is to remove the console. Again follow the Vette Essentials instructions to step 3 to allow you to run the wires forward underneath the console to the switch mounting position. You may feel you can route the wires without completely stripping the console out. I found it easier to work with the console out of the car and there was less risk of a pinched wire. Run the wiring harness to the ashtray area from the rear of the console making sure you leave enough wire at the rear to connect to the seat/heater looms. Run the live wire under the edge of the console area and down into the passenger footwell to emerge next to the lower fuse panel. This is a bit fiddly so I used a wire coat hanger to thread the wire down behind the dash trim panel. An alternative would be to route it directly under the carpet from the rear of the seats to the passenger footwell.
Now we need to fit the switches and you have two choices where to mount them. If your car doesn’t have the selective ride control switch you could mount them on the active handling panel. The advantage here is that they are easily accessible and look very neat. The down side is that you need to trim a section of the circuit board which sits behind the AH panel to give enough room for the switches. It’s not for the faint hearted and there could be tears!
The hole you need for mounting the switches is about the size of a US 5 cent piece or a Brit Penny. Check the size before you cut plastic. A tiny piece of double sided tape will hold them in place while you mark the panel. Best advice is to start smaller than you need and slowly enlarge the hole until you get a tight fit. If you have a Dremel, drill a tiny 1/2" diameter hole using the sanding drum. You can see from this picture that the back side of the AH plate is very busy. There’s considerable trial and error trimming to get the circuit board to clear the switches although none of it is visible once the panel is refitted. Make sure you don’t cut something important in the process.
The Switches Mounted on the Active Handling Panel
The safer option is to fit them as I did in the ashtray unit. Dismantle the ashtray unit. The outer door which is fitted to the console bezel will cover the switches once you’ve finished the fit. Remove the inner door of the ashtray. You could use this to mount the switches as it fits the hole perfectly. If you do, be very careful as you drill the material as it’s very brittle. Cut a slot in the rear side of the ashtray mount using a hacksaw or Dremel cutting wheel. This allows the wires and connectors to route out from the switches. Again be very careful as you cut as the Bakelite material is brittle and easily broken.
The Switches Mounted in the Ashtray
I used a small black plastic faceplate to mount the switches. Drill two holes (5/8”) for the switches to sit snug on the plate. Pull the main wiring connector through the hole and attach it to the switch. Fit the switch snug in the hole until it clicks in place then fit the faceplate into the ashtray and screw in from the sides to hold it in place.
The Switches in Place on the Panel
Reassemble the console taking care not to pinch any wires. Pull the wires through the ashtray hole. Connect to the switches. Slot the ashtray back into place. This is how the switches should look once they are mounted.
The Final Switch Installation
Reinstall the seats leaving access to the wires which are protruding from behind the seat base. Connect those wires to the main harness connectors and secure the wires to the carpet if you feel the need.
Next we need to hook up the power by connecting the live red wire to a switched power supply. Again there are 2 choices. You can buy spade type connectors from the Company who sell the seats which splice onto the power lead and will slot directly into a spare fuse slot in the fuse panel in the footwell. You can see from this picture a wire attached to fuse number 22.
Alternatively you can hook up at a spare connector in the passenger footwell. Pull out the cover and look in the top left corner above the computer module. There’s a small plug with three wires (orange, yellow, & black) that are taped up. The yellow wire is the +12V switched supply. Splice into that using an online electrical connector.
Connecting to the Footwell Switched Power Supply
Next you need to ground the installation. Connect the ground wire to a suitable ground point. The grounds can be tied together on one ring lug and grounded under a 10mm screw. I ran through the bulkhead to the ground behind the passenger headlight. This is fiddly and you need to thread the wire through the bulkhead through the firewall behind the battery. You need to remove the battery to get access if you choose this option.
Bulkhead Earthing Point
Much easier is to use one of the other grounds nearby. One is located under the bulge of rug found beneath the dash panel on the passenger side. It’s that little overhang of carpeting located just off to the left-bottom corner of the glovebox.
Glovebox Earthing Point
All that leaves you to do is reconnect the battery and test the seats. There are two settings low and high. Low is toasty and High is a definite “Bottom Burner”!
All in all this is a fairly straight forward modification but I have to say, on a cold day it’s one of my all time favourites
I used some pictures provided by members over the years. if your pic is there I hope you dont mind me using it
Internet Links:
Heated Seat Kit from Sports Imports:
http://www.seatheater-heatedseats.co...OVMTC=standard
How to Remove the Seats:
http://www.vetteessentials.com/instr...er_change.html
How To Remove the Console:
http://www.vetteessentials.com/instr...t_install.html



Administrator


Joined: Mar 2001
Posts: 368,108
Likes: 24,732
From: In a parallel universe. Currently own 2014 Stingray Coupe.
C7 of the Year - Modified Finalist 2021
MO Events Coordinator
St. Jude Co-Organizer
St. Jude Donor '03 thru '25
NCM Sinkhole Donor
CI 5, 8 & 11 Veteran
I've got a couple of Word files that explains the install procedure too. If you want a copy, PM me your e-mail address and I'll forward them to you.










