


DLR Socket

Thread Starter
6th Gear


Joined: Feb 2007
Posts: 6
Likes: 0
Hey,
does anyone know the part number for the DRL socket for '00 model? I had a lighbulb explode in it and now it's all melted and unusable. Have been trying to find a replacement ever since, but the dealership wants $70 for that piece of plastic..kind of steep. Thanks!
does anyone know the part number for the DRL socket for '00 model? I had a lighbulb explode in it and now it's all melted and unusable. Have been trying to find a replacement ever since, but the dealership wants $70 for that piece of plastic..kind of steep. Thanks!
Administrator


Joined: Mar 2001
Posts: 368,389
Likes: 24,795
From: In a parallel universe. Currently own 2014 Stingray Coupe.
C7 of the Year - Modified Finalist 2021
MO Events Coordinator
St. Jude Co-Organizer
St. Jude Donor '03 thru '26
NCM Sinkhole Donor
CI 5, 8 & 11 Veteran
Not sure what the part number is, but here's a suggestion - give Gene at www.gmpartshouse.com a call and check the price with him. I'd bet he can give you a much better price than your local dealer.
Le Mans Master

Joined: May 2006
Posts: 5,383
Likes: 2
From: The real question is; When you turn your car on, does it return the favor..
Cruise-In VIII & IX Veteran
St. Jude Donor '07-'08
Not sure what the part number is, but here's a suggestion - give Gene at www.gmpartshouse.com a call and check the price with him. I'd bet he can give you a much better price than your local dealer.


Pro

Joined: Oct 2005
Posts: 623
Likes: 0
From: SpringHill Florida
I had the same problem it is caused by the hole caused by heat in the top of your lens assy. I went to a u pull it and looked for a match in a gm car the sockets are common in all the 1998 and up cars. I got mine out of a pontiac grand am or a malibu they are the directional socket. GM did not make this socket common to the vette. We are not that special. The only thing you will have to do is cut splice and solder the wires.
The socket from GM only comes as a complete harness thus the higher price. By the way the u pull it place let me take 2 for free. It took me about 30 minutes to complete the fix. I also repaired the hole in the lens with clear epoxy.I took the lens out and turned it top side down on a half dollar size amount of epoxy and let it set up. Good luck.
The socket from GM only comes as a complete harness thus the higher price. By the way the u pull it place let me take 2 for free. It took me about 30 minutes to complete the fix. I also repaired the hole in the lens with clear epoxy.I took the lens out and turned it top side down on a half dollar size amount of epoxy and let it set up. Good luck.
Tech Contributor


Joined: Dec 2003
Posts: 19,384
Likes: 87
From: Horncastle Lincolnshire, England
2023 C5 of the Year Finalist - Unmodified
Here's the info from the Shop Manual

As Jack says, Gene will hook you up with a discounted OEM part. I'm sure Autozone would have an aftermarket alternative if you take the damaged one in.
BTW NEVERL8C5 is spot on. Make sure you pull the lamp housing and check for leaks. Otherwise you'll fit the new unit, it'll leak and you'll be back to Square One.
Document ID# 655625
2002 Chevrolet Corvette
________________________________________
Park/Turn Signal/Side Marker Lamp Replacement
Removal Procedure
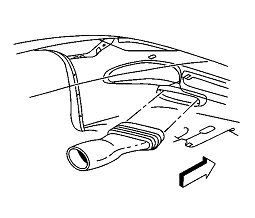
1. Raise and support the vehicle. Refer to Lifting and Jacking the Vehicle in General Information.
2. Remove the front fascia lower closeout panel.

3. Release the brake caliper cooling duct from the front fascia, and position the duct aside.
4. Remove the front turn signal lamp bracket retaining spring from the lamp bracket.
5. Remove the lamp bracket retaining spring from the front fascia.
6. Remove the front turn signal lamp bracket retaining screws.
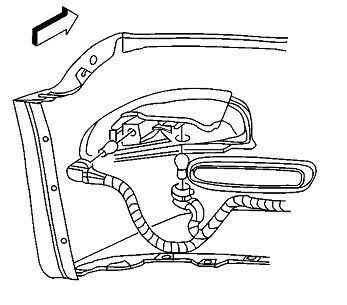
7. Disconnect the sockets from the lamp.
8. Remove the lamp, with the bracket, from the vehicle.
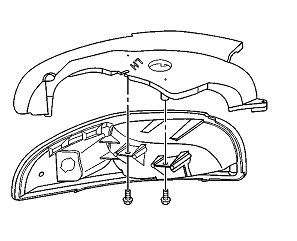
9. Remove the lamp to bracket retaining screws.
10. Remove the lamp from the bracket.
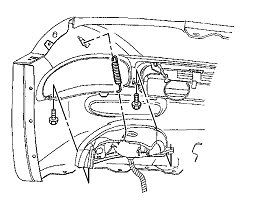
Installation Procedure
1. Install the front park/turn signal and sidemarker lamp into position on the front turn signal lamp bracket.
Notice
Use the correct fastener in the correct location. Replacement fasteners must be the correct part number for that application. Fasteners requiring replacement or fasteners requiring the use of thread locking compound or sealant are identified in the service procedure. Do not use paints, lubricants, or corrosion inhibitors on fasteners or fastener joint surfaces unless specified. These coatings affect fastener torque and joint clamping force and may damage the fastener. Use the correct tightening sequence and specifications when installing fasteners in order to avoid damage to parts and systems.
2. Install the front park/turn signal and sidemarker lamp to bracket retaining screws.
Tighten
Tighten the front park/turn signal and sidemarker lamp to bracket retaining screws to 2 N•m (18 lb in).
3. Install the sockets to the lamp.
4. Install the lamp, with the bracket, to the front fascia.
5. Align the lamp to the opening in the front fascia and hold the lamp firmly in place against the fascia, while installing the front turn signal lamp bracket retaining screws.
Tighten
Tighten the front turn signal lamp bracket retaining screws to 3 N•m (27 lb in).
6. Install the lamp bracket retaining spring to the front fascia.
7. Install the front turn signal lamp bracket retaining spring to the lamp bracket.
8. Position the brake caliper cooling duct to the front fascia and press the duct toward the fascia to secure.
9. Install the front fascia lower closeout panel. Refer to Close Out Panel - Front Bumper Fascia Lower in Bumpers.
As Jack says, Gene will hook you up with a discounted OEM part. I'm sure Autozone would have an aftermarket alternative if you take the damaged one in.
BTW NEVERL8C5 is spot on. Make sure you pull the lamp housing and check for leaks. Otherwise you'll fit the new unit, it'll leak and you'll be back to Square One.
Document ID# 655625
2002 Chevrolet Corvette
________________________________________
Park/Turn Signal/Side Marker Lamp Replacement
Removal Procedure
1. Raise and support the vehicle. Refer to Lifting and Jacking the Vehicle in General Information.
2. Remove the front fascia lower closeout panel.
3. Release the brake caliper cooling duct from the front fascia, and position the duct aside.
4. Remove the front turn signal lamp bracket retaining spring from the lamp bracket.
5. Remove the lamp bracket retaining spring from the front fascia.
6. Remove the front turn signal lamp bracket retaining screws.
7. Disconnect the sockets from the lamp.
8. Remove the lamp, with the bracket, from the vehicle.
9. Remove the lamp to bracket retaining screws.
10. Remove the lamp from the bracket.
Installation Procedure
1. Install the front park/turn signal and sidemarker lamp into position on the front turn signal lamp bracket.
Notice
Use the correct fastener in the correct location. Replacement fasteners must be the correct part number for that application. Fasteners requiring replacement or fasteners requiring the use of thread locking compound or sealant are identified in the service procedure. Do not use paints, lubricants, or corrosion inhibitors on fasteners or fastener joint surfaces unless specified. These coatings affect fastener torque and joint clamping force and may damage the fastener. Use the correct tightening sequence and specifications when installing fasteners in order to avoid damage to parts and systems.
2. Install the front park/turn signal and sidemarker lamp to bracket retaining screws.
Tighten
Tighten the front park/turn signal and sidemarker lamp to bracket retaining screws to 2 N•m (18 lb in).
3. Install the sockets to the lamp.
4. Install the lamp, with the bracket, to the front fascia.
5. Align the lamp to the opening in the front fascia and hold the lamp firmly in place against the fascia, while installing the front turn signal lamp bracket retaining screws.
Tighten
Tighten the front turn signal lamp bracket retaining screws to 3 N•m (27 lb in).
6. Install the lamp bracket retaining spring to the front fascia.
7. Install the front turn signal lamp bracket retaining spring to the lamp bracket.
8. Position the brake caliper cooling duct to the front fascia and press the duct toward the fascia to secure.
9. Install the front fascia lower closeout panel. Refer to Close Out Panel - Front Bumper Fascia Lower in Bumpers.
Last edited by DeeGee; Aug 11, 2009 at 12:54 AM.
Thread Starter
6th Gear
Joined: Feb 2007
Posts: 6
Likes: 0
Alright, thanks guys! I actually already replaced the lamp housings on both sides (decided to switch to LEDs) that's when I actually got close enough to the socket to see that it's a mess. I will try your suggestions in the order received 
Thread Starter
6th Gear
Joined: Feb 2007
Posts: 6
Likes: 0
Just a little update..www.gmpartshouse.com quoted this part for $47. And the local Kragen's Auto, once they were able to find it in their catalog (thanks for the Malibu tip), ordered it for me for $37, which compared to the dealership is half the price. So I ordered two
Thanks again for your help.
Thanks again for your help.

1st Gear
Joined: Sep 2008
Posts: 1
Likes: 0
From: Cathedral City Ca
Just purchased a replacement DRL socket from NAPA for $27 ($24 shop cost) that is an almost exact, even the wire colors are the same, come with a new sealing gasket, part #LS 6515. I just finished wiring it into the loom and it works great.
Corvette Stories
The Best of Corvette for Corvette Enthusiasts

Top 10 Most Expensive Corvettes Ever Sold on Bring A Trailer
Brett Foote
10 Things Every Corvette Owner Needs (2026 Edition)
Michael S. Palmer
8 Most "Only Corvette Owners Understand" Quirks and Problems
Pouria Savadkouei
10 Reasons the C6 Z06 is Still A Performance Benchmark After 20 Years
Joe Kucinski
How Much Horsepower Every Corvette Engine "LOST" in 1972
Joe Kucinski
Top 10 DOs and DON'Ts for Protecting Your Convertible Top!
Michael S. Palmer
Top 10 Most Explosive Corvettes Ever Made: Power-to-Weight Ratio Ranked!
Joe Kucinski
150 hp to 1,250 hp: Every Corvette Generation Compared by the Specs That Matter
Joe Kucinski