
Blinker defeat

Thread Starter
Gr8Corvette


Joined: Jun 2003
Posts: 1,139
Likes: 2
From: Indian Harbour Beach Florida
My front passenger side blinker burned out. As long as I was going to replace the yellow bulb, I bought the little clear one too. I did a search on the C5 forum to find out how to replace the blinker bulbs. There are basically four methods:
1. Let someone else do it: not much fun or self satisfaction!
2. Go in through the headlight: most thought this to be the hardest method and produced the worst results.
3. Go in from the bottom by removing paneling: Seemed to be the most popular and favorite.
4. Go in through the brake cooling duct: Mentioned by a few, did not seem very popular.
So I get set to do number 3. After a lot of muttering, I finally got the paneling off. I easily found the socket for the small clear bulb. I replaced it easily. After some searching, I found the socket for the yellow bulb (forgot to mention that I did not jack up the car or use ramps so getting my fat head under there to see was not easy). Anyway, I tried to get the socket out. I pulled, I twisted, I felt for release levers. It did not come out! As I was very frustrated, I decided to try method 4 so that I could maybe see better. As long as you have average size arms, number 4 is by far much easier!!!! Even though I could see the socket better and I could easily reach it, I still could not get it out. I pulled, I twisted, and I felt for release levers. It did not come out!
What is the secret to getting the socket out so I can replace the yellow bulb? I am afraid to using too much muscle and breaking something.
I have also heard that I should look for scorching and black marks as this often happens when water gets there. It was bright white. No signs of scorching at all!
Any advice would be appreciated!!
Tech Contributor

Joined: Dec 2003
Posts: 19,384
Likes: 87
From: Horncastle Lincolnshire, England
2023 C5 of the Year Finalist - Unmodified
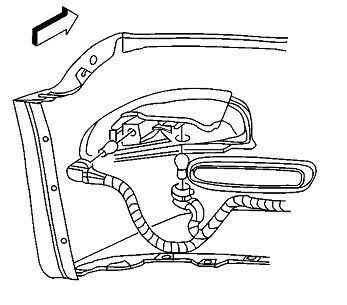
I'm assuming by yellow bulb you mean the DRL
Its a twist fit with a small lever on the top. Here's a pic. Its not the exact bulb holder but similar. Squeeze the lever and rotate counter-clockwise and it should come out.

This is what you're looking at on the DRL mounting. Its the lower of the two. The outer one is the parking lamp
Its a twist fit with a small lever on the top. Here's a pic. Its not the exact bulb holder but similar. Squeeze the lever and rotate counter-clockwise and it should come out.
This is what you're looking at on the DRL mounting. Its the lower of the two. The outer one is the parking lamp
Last edited by DeeGee; Oct 24, 2009 at 02:05 PM.
Thread Starter
Gr8Corvette
Joined: Jun 2003
Posts: 1,139
Likes: 2
From: Indian Harbour Beach Florida
DeeGee,
Thanks, your picture picture helped trmendously! I went back in through the front brake vent and pulled down the socket in less than three minutes. In five minutes I was done and tested!

So, through the air vent is the way to go!!!
Thanks, your picture picture helped trmendously! I went back in through the front brake vent and pulled down the socket in less than three minutes. In five minutes I was done and tested!
So, through the air vent is the way to go!!!
Tech Contributor
Joined: Dec 2003
Posts: 19,384
Likes: 87
From: Horncastle Lincolnshire, England
2023 C5 of the Year Finalist - Unmodified
Thread Starter
Gr8Corvette
Joined: Jun 2003
Posts: 1,139
Likes: 2
From: Indian Harbour Beach Florida


Tech Contributor
Joined: Dec 2003
Posts: 19,384
Likes: 87
From: Horncastle Lincolnshire, England
2023 C5 of the Year Finalist - Unmodified
I have a Z06 with screens also. I am referring to the opening to the lower outside part of the front bumper. There is a black plastic tube connected to that opening. The tube pushes back just enough to miss the rib of the bumper holding it in place. I then pushed the tube down and could easily reach the blinkers. This would not work with fat arms though. Fortunately, all my fat is on my belly, which did not get in the way of this repair!


