


Painted intake/plenum covers? Pics?
Melting Slicks


Joined: Apr 2002
Posts: 2,631
Likes: 2
From: Clever, MO aka SOMO
 I've learned alot from their threads about LS1 motor work.
Last edited by fixvet; Nov 3, 2009 at 08:25 PM.

Former Vendor
Joined: Dec 2006
Posts: 11,573
Likes: 0
From: The AutoBuffs Army is unmatched in the Custom world! www.autobuffs.net
S. Jersey Events Coordinator
St. Jude Co-Organizer
St. Jude Donor '08-'09-'10
Cruise-In IX Veteran
[QUOTE=Shirl;1572031832]
Getting painted and clearcoated right now..shipping out monday morning 

John@autobuffs
Auto Buffs LLC.
2 Kerry Ct,; Suite E
Southampton, NJ 08088
OFFICE_609-859-0900
CELL_856-776-3079
www.autobuffs.net
Custom Painting & Airbrushing
Pinstriping
Custom Detailing
Car Audio
Mobile Electronics & Video
Remote Car Starters / Alarms
Authorized HRE / IFORGED Dealer
Authorized East Coast Supercharging Dealer
Authorized TireRack Dealer
Thread Starter
Safety Car


Joined: Apr 2008
Posts: 4,833
Likes: 1,850
From: NJ
2025 C8 of the Year Finalist - Modified
2023 C8 of the Year Finalist - Unmodified
2022 C7 of the Year Finalist - Modified
2021 C7 of the Year Finalist - Unmodified
 Can't wait to get it! Thanks again for everything!!
Melting Slicks

Joined: Jul 2007
Posts: 2,939
Likes: 7
From: Simpsonville SC
St. Jude Donor '09-'10
You can always ask the person that did mine:
http://www.thepowdercoater.com/
Corvette Stories
The Best of Corvette for Corvette Enthusiasts

Top 10 Most Expensive Corvettes Ever Sold on Bring A Trailer
Brett Foote
10 Things Every Corvette Owner Needs (2026 Edition)
Michael S. Palmer
8 Most "Only Corvette Owners Understand" Quirks and Problems
Pouria Savadkouei
10 Reasons the C6 Z06 is Still A Performance Benchmark After 20 Years
Joe Kucinski
How Much Horsepower Every Corvette Engine "LOST" in 1972
Joe Kucinski
Top 10 DOs and DON'Ts for Protecting Your Convertible Top!
Michael S. Palmer
Top 10 Most Explosive Corvettes Ever Made: Power-to-Weight Ratio Ranked!
Joe Kucinski
150 hp to 1,250 hp: Every Corvette Generation Compared by the Specs That Matter
Joe Kucinski
8 Coolest Corvette Pace Cars (and Replicas) of All Time
Verdad Gallardo
Thread Starter
Safety Car
Joined: Apr 2008
Posts: 4,833
Likes: 1,850
From: NJ
2025 C8 of the Year Finalist - Modified
2023 C8 of the Year Finalist - Unmodified
2022 C7 of the Year Finalist - Modified
2021 C7 of the Year Finalist - Unmodified
That's mean looking! I painted some parts myself too. I'll get the pics posted up later on..
I painted some parts myself too. I'll get the pics posted up later on..


Former Vendor
Joined: Dec 2006
Posts: 11,573
Likes: 0
From: The AutoBuffs Army is unmatched in the Custom world! www.autobuffs.net
S. Jersey Events Coordinator
St. Jude Co-Organizer
St. Jude Donor '08-'09-'10
Cruise-In IX Veteran


Thread Starter
Safety Car
Joined: Apr 2008
Posts: 4,833
Likes: 1,850
From: NJ
2025 C8 of the Year Finalist - Modified
2023 C8 of the Year Finalist - Unmodified
2022 C7 of the Year Finalist - Modified
2021 C7 of the Year Finalist - Unmodified
SWEEEET!! VERY nice!! Looking forward to getting it!! Thanks for the pic!
Looking forward to getting it!! Thanks for the pic!
Thread Starter
Safety Car
Joined: Apr 2008
Posts: 4,833
Likes: 1,850
From: NJ
2025 C8 of the Year Finalist - Modified
2023 C8 of the Year Finalist - Unmodified
2022 C7 of the Year Finalist - Modified
2021 C7 of the Year Finalist - Unmodified


Thread Starter
Safety Car
Joined: Apr 2008
Posts: 4,833
Likes: 1,850
From: NJ
2025 C8 of the Year Finalist - Modified
2023 C8 of the Year Finalist - Unmodified
2022 C7 of the Year Finalist - Modified
2021 C7 of the Year Finalist - Unmodified
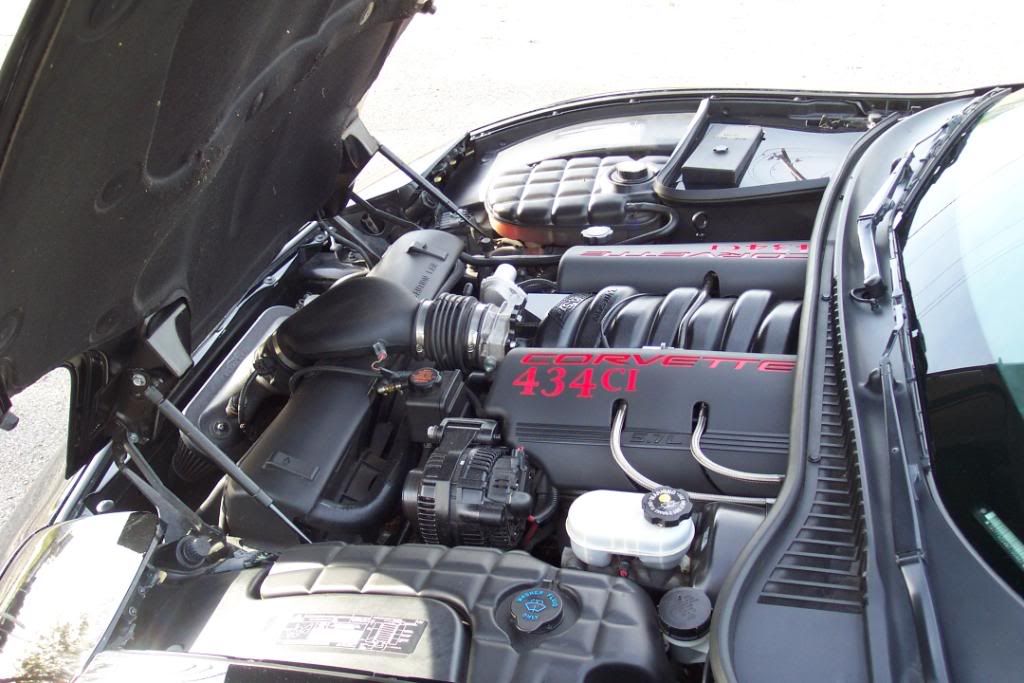
Can anyone give me some input on how to install this intake cover? I removed the four bolts, but how do I get the center fuel rail up??? (The cover goes underneath). thanks..
Race Director

Joined: Jul 2007
Posts: 18,681
Likes: 47
From: Reno is so close to Hell you can see Sparks , State Of Confusion
St. Jude Donor '12-'13-'14
Thread Starter
Safety Car
Joined: Apr 2008
Posts: 4,833
Likes: 1,850
From: NJ
2025 C8 of the Year Finalist - Modified
2023 C8 of the Year Finalist - Unmodified
2022 C7 of the Year Finalist - Modified
2021 C7 of the Year Finalist - Unmodified
Thanks Mr. Bill. Is there a "how to" anywhere? I can't seem to find one and don't want to mess anything up..
Race Director
Joined: Jul 2007
Posts: 18,681
Likes: 47
From: Reno is so close to Hell you can see Sparks , State Of Confusion
St. Jude Donor '12-'13-'14
REMOVAL OF EXISTING FUEL RAILS (If applicable)
1. Disconnect the ground connection to your vehicle's battery. This is a safety
precaution. Allow engine to cool before proceeding.
2. Your stock fuel rails will have a valve on them that looks like a tire valve.
This will usually be at the front end of one rail and will have a black plastic
cap on it. Remove the cap. If you press on the core of the valve, it will
release the pressure in the fuel rails. Caution!! Fuel will spray out and you
should have a towel or other absorbent cloth to catch any fuel that is
released. Bleed system until flow stops. Wipe up any spills that may occur.
3. Remove any bolts or screws that hold the rails to the engine. New stainless
screws are provided in the kit for reattaching our rails.
4. Remove fuel inlet and return line from the rails. A special tool available at
most auto parts stores is required to remove the fuel lines. (You may not need to remove this)
5. Detach electrical connections from each injector. Disconnect anything
attached to fuel rails. Remove the fuel rail assembly. Each injector has an oring
on each end of it. One end fits tightly into the rail and the other end fits
tightly into the manifold. When you lift up on the rails, it may pull off of the
injectors or it may bring some of them with it. If so, be careful that they do
not drop out and become damaged. Handle injectors with care.
6. Inspect the o-rings on the injectors. If you see any deterioration or cuts or
slices, they must be replaced. It's not a bad idea to replace them in any event
if the vehicle is not new.
Guest
Posts: n/a

I can do the hydro covers or real carbon or the actual intake in CF or just color.


Pat