


Daytime driving lights

Thread Starter
6th Gear

Joined: Oct 2008
Posts: 6
Likes: 0
From: Missouri City TX
Maybe it is me but trying to change these bulbs is no easy task. Right side blew out I had to take it to the dealership. Now the left blew out. Does anyone have a easy way on changing these lights PLEASE.
Administrator


Joined: Mar 2001
Posts: 367,946
Likes: 24,703
From: In a parallel universe. Currently own 2014 Stingray Coupe.
C7 of the Year - Modified Finalist 2021
MO Events Coordinator
St. Jude Co-Organizer
St. Jude Donor '03 thru '25
NCM Sinkhole Donor
CI 5, 8 & 11 Veteran
Pro


Joined: Aug 2009
Posts: 580
Likes: 0
From: Fort Lauderdale Florida
You can go in through the access panel like everyone above me said. You can also go in through the headlight. You just have to take off the black housing around the head light (three screws) and you will be able to get to the bulbs. But if you have bulbs that keep going out then it might be that there is a crack on the top of the housing that is letting in water. This is what happened to me. The heat from the bulb actually melted the plastic of the housing right over the bulb and water dripped on the bulb. My bulb actually shattered inside the housing.
I just took out the whole housing (There are posts on how to do this) and put RTV high temp on the crack. Working fine so far... knock on wood
I just took out the whole housing (There are posts on how to do this) and put RTV high temp on the crack. Working fine so far... knock on wood
Tech Contributor


Joined: Dec 2003
Posts: 19,384
Likes: 87
From: Horncastle Lincolnshire, England
2023 C5 of the Year Finalist - Unmodified
You'll get three suggestions
Go in through the brake ducts - not easy with a Z06 or if you have screens
Go in through the bottom by taking out the bottom panel

The one that works for me is:
Turn on the headlights and back off one position to kill the lights.
Unscrew the 3 small screws on the black plastic housing around the headlight. Gently pull the housing clear. Reach down around the headlight unit and release the bulb holder. It comes out by turning the bulb holder a � turn counter clockwise but it has a plastic clip which you need to squeeze to release it. Here�s how the bulb fits into the lamp unit. The DRL bulb is the lower of the two.
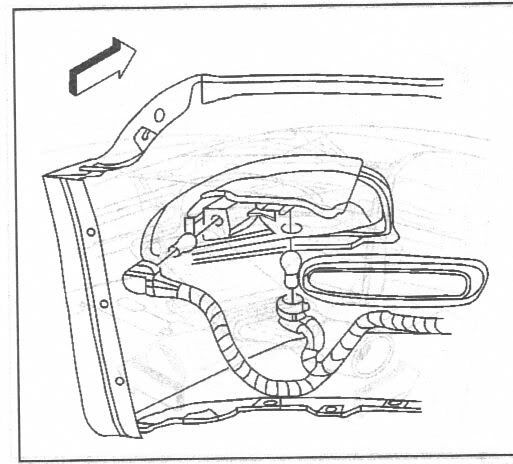
Here�s the light socket. This one�s after market but it gives you the idea. You can see the clip you need to squeeze.

Change the bulb. It�s a push fit into the lamp holder. Push it home firmly but don�t handle the glass. Use latex gloves if you have them. Reseat the bulb holder and turn clockwise until it clicks back in place. Put the plastic headlight housing back in place making sure to locate the small plastic tab in the bracket on the headlamp cover. Replace the 3 screws and close the lights.
It�s a 10 minute job. Some guys have had the lights close if they�ve taken a while to do the fix. If you�re worried about that, disconnect the battery once the lights are up.
The bulb is a 4157NA
Some guys with big arms remove the hood adjusting screw for better access. Guys with even bigger arms have had to take off the headlight cover. Four torx screws (2 back, 1 each side). Take the back ones off first with the lamps down. Raise the lights and take the side ones out.
Go in through the brake ducts - not easy with a Z06 or if you have screens
Go in through the bottom by taking out the bottom panel
The one that works for me is:
Turn on the headlights and back off one position to kill the lights.
Unscrew the 3 small screws on the black plastic housing around the headlight. Gently pull the housing clear. Reach down around the headlight unit and release the bulb holder. It comes out by turning the bulb holder a � turn counter clockwise but it has a plastic clip which you need to squeeze to release it. Here�s how the bulb fits into the lamp unit. The DRL bulb is the lower of the two.
Here�s the light socket. This one�s after market but it gives you the idea. You can see the clip you need to squeeze.
Change the bulb. It�s a push fit into the lamp holder. Push it home firmly but don�t handle the glass. Use latex gloves if you have them. Reseat the bulb holder and turn clockwise until it clicks back in place. Put the plastic headlight housing back in place making sure to locate the small plastic tab in the bracket on the headlamp cover. Replace the 3 screws and close the lights.
It�s a 10 minute job. Some guys have had the lights close if they�ve taken a while to do the fix. If you�re worried about that, disconnect the battery once the lights are up.
The bulb is a 4157NA
Some guys with big arms remove the hood adjusting screw for better access. Guys with even bigger arms have had to take off the headlight cover. Four torx screws (2 back, 1 each side). Take the back ones off first with the lamps down. Raise the lights and take the side ones out.
Pro
Joined: Aug 2009
Posts: 580
Likes: 0
From: Fort Lauderdale Florida
You'll get three suggestions
Go in through the brake ducts - not easy with a Z06 or if you have screens
Go in through the bottom by taking out the bottom panel
The one that works for me is:
Turn on the headlights and back off one position to kill the lights.
Unscrew the 3 small screws on the black plastic housing around the headlight. Gently pull the housing clear. Reach down around the headlight unit and release the bulb holder. It comes out by turning the bulb holder a � turn counter clockwise but it has a plastic clip which you need to squeeze to release it. Here’s how the bulb fits into the lamp unit. The DRL bulb is the lower of the two.
Here’s the light socket. This one’s after market but it gives you the idea. You can see the clip you need to squeeze.
Change the bulb. It’s a push fit into the lamp holder. Push it home firmly but don’t handle the glass. Use latex gloves if you have them. Reseat the bulb holder and turn clockwise until it clicks back in place. Put the plastic headlight housing back in place making sure to locate the small plastic tab in the bracket on the headlamp cover. Replace the 3 screws and close the lights.
It’s a 10 minute job. Some guys have had the lights close if they’ve taken a while to do the fix. If you’re worried about that, disconnect the battery once the lights are up.
The bulb is a 4157NA
Some guys with big arms remove the hood adjusting screw for better access. Guys with even bigger arms have had to take off the headlight cover. Four torx screws (2 back, 1 each side). Take the back ones off first with the lamps down. Raise the lights and take the side ones out.
Instead of disconnecting the battery i find it much easier to just manually raise the lights. All you have to do is take off the rubber cover over the motor wheel (not really sure what to call it) on the back side of the headlight and then you can use a regular allen wrench to turn the wheel and the head light will rise. I forget which way you turn it but you can just have someone turn on the head lights and you can watch which way the wheel turns and then just turn them back off and manually turn it.
If this is your first time changing this bulb I would definitely recommend either disconnecting the battery or manually raising the head light. It might take a little longer than you think. But definitely a very easy DIY
Last edited by SFL_driver; Dec 13, 2009 at 01:53 AM.
Corvette Stories
The Best of Corvette for Corvette Enthusiasts

150 hp to 1,250 hp: Every Corvette Generation Compared by the Specs That Matter
Joe Kucinski
8 Coolest Corvette Pace Cars (and Replicas) of All Time
Verdad Gallardo
Top 10 Corvette Engines RANKED by Peak Torque (70+ Years of Muscle!)
Joe Kucinski
Corvette ZR1X Will Be Pacing the Indy 500, And Could Probably Race, Too!
Verdad Gallardo
Top 10 Corvettes Coming to Mecum Indy 2026!
Brett Foote
Top 10 C9 Corvette MUST-HAVES to Fix These C8 Generation Flaws!
Michael S. Palmer
10 Revolutionary 'Corvette Firsts' Most People Don't Know
Joe Kucinski
5 Reasons to Upgrade to an LS6-Powered Corvette; 5 Reasons to Stay LT2
Michael S. Palmer
2027 Corvette vs The World: Every C8 vs Its Closest Competitor
Joe Kucinski
Le Mans Master


Joined: Sep 2007
Posts: 7,604
Likes: 8
From: Belleville Il
 I is defiantly doable ,,just allow plenty of time for the first time. I had a fog and a turn signal bulb go around the same time. I figured I don't want to keep going back,,so I bought all new ones and did both sides. Kind of a PIA if you have large hands,,and they don't give you a lot of slack on the harnesses!!

Le Mans Master
Joined: May 2006
Posts: 5,987
Likes: 18
From: DuBois PA
St. Jude Donor '11-'12-'13-'14-'15
Saw a slick video from the Junkman, (miss that guy!) And he pushed the Brake Duct in and upward I believe and reached in, untwisted the bulb from the housing and had it changed in 2 minutes! Of course I saw the Video after going at it from underneath... 
Try it, what have you got to loose, I would recommend the bottom attack just to get the housing out and check/repair for bulb burn thru of the housing which will allow water in and blow the bulb again...
Try it, what have you got to loose, I would recommend the bottom attack just to get the housing out and check/repair for bulb burn thru of the housing which will allow water in and blow the bulb again...
Melting Slicks

Joined: Jun 2007
Posts: 3,011
Likes: 2
From: Greenville SC
St. Jude Donor '10
I go through the brake duct. As stated above, push the duct back and out of the way and then you can slide your hand in there, very simple. I only got my hand stuck in there once!

Veteran


Joined: Jan 2000
Posts: 2,082
Likes: 1
From: Louisville KY
Tech Contributor
Joined: Dec 2003
Posts: 19,384
Likes: 87
From: Horncastle Lincolnshire, England
2023 C5 of the Year Finalist - Unmodified


Race Director


Joined: Aug 1999
Posts: 11,115
Likes: 671
From: SE Pennsylvania
St. Jude Donor '03 thru '26
Oldtimer
What is the number of the bulb for the fog lights, and the daytime running lights? Can I put anything extra bright in the fog light? I couldn't find in in my oweners manual. Thank you.

Banned Scam/Spammer
Joined: Feb 2007
Posts: 50,093
Likes: 267
From: Oklahoma City
St. Jude Donor '09-'10-'11-'12-'13-'14-'15-'16-'17,'19,'22
Perfect time to upgrade to LED Switchbacks which will last longer
Watch the video of this bulb in action
Order here: http://www.shop.jwmotoring.com/produ...&productId=139
Watch the video of this bulb in action
Order here: http://www.shop.jwmotoring.com/produ...&productId=139
Banned Scam/Spammer
Joined: Feb 2007
Posts: 50,093
Likes: 267
From: Oklahoma City
St. Jude Donor '09-'10-'11-'12-'13-'14-'15-'16-'17,'19,'22
The DRLS are 4157. If you go with an LED it is 3157.
Here is a good bulb reference:
http://www.sylvania.com/ConsumerProd...placementGuide
Racer
Joined: Dec 2007
Posts: 342
Likes: 0
From: Port Orange FL
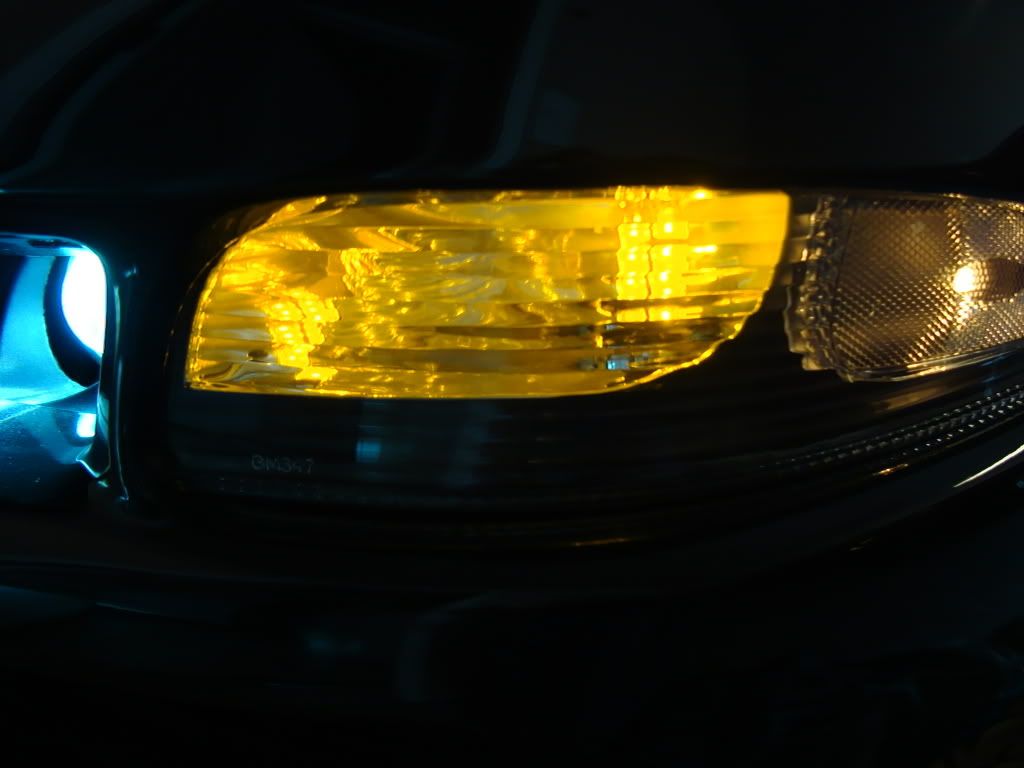
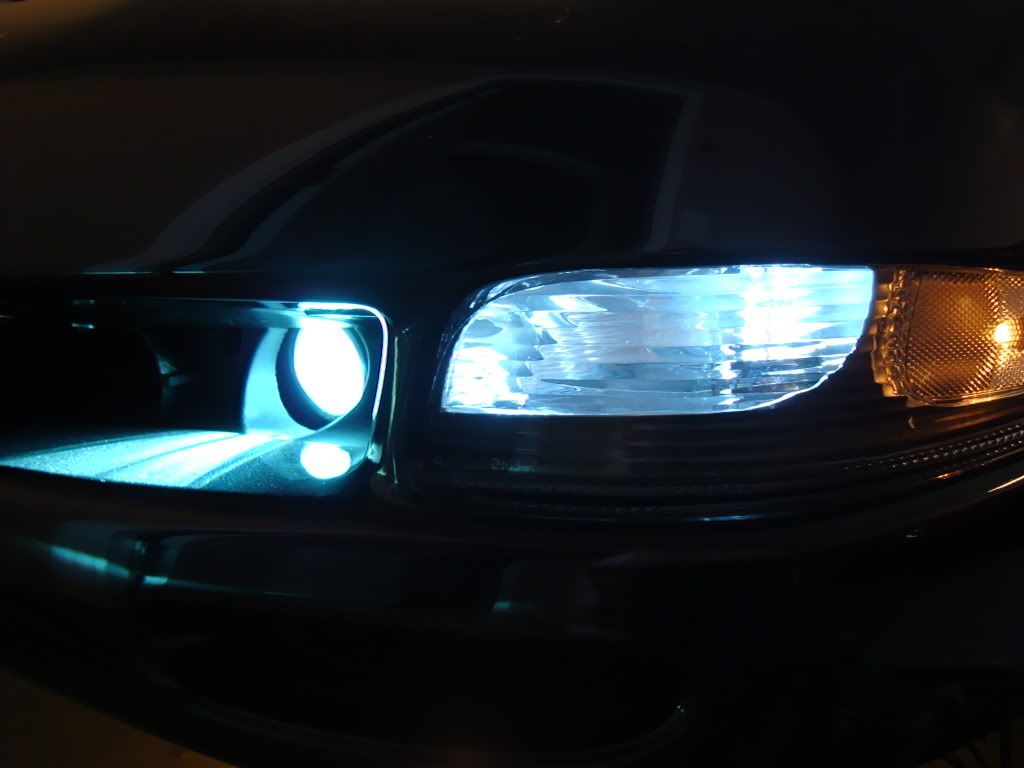
When my bulb blew I went with the DRLs from JW. I also added LEDs in the 194 socket (side marker light) as well. LEDs are so much brighter and look sweet!!!!
And if you reall wanted to do something cool you can add an LED strip to your housings which looks like an Audi or Porsche. JW has pics on his site!!
And if you reall wanted to do something cool you can add an LED strip to your housings which looks like an Audi or Porsche. JW has pics on his site!!