


Electronic Gremblins = Flickering Lights

Thread Starter
Cruising

Joined: Jun 2010
Posts: 12
Likes: 0
Hello Gang, I've been a long time lurker but this is my first post. I've had my 97 automatic Coupe for about 5 years now, and it's been a great trouble free car until recently. As soon as I start the car, all interior & exterior lights begin sporadically flickering. It didn't happen while I was driving, it just started one day when I started my car. This flickering stops when I turn on the parking or headlights. Another weird issue that started with this flickering is that if I lock the doors with the remote, the alarm sounds off and can't be stopped until I unlock the car. The "check engine" light is also on now. I've tried doing several searches with different key words but could not find any threads with the same problems.
I'd take it to a shop for repairs but cash flow is real tight right now, so I was hoping I might be able to do the repair myself ... if it's something fairly simple.
Thanks for any help that can be offered
I'd take it to a shop for repairs but cash flow is real tight right now, so I was hoping I might be able to do the repair myself ... if it's something fairly simple.
Thanks for any help that can be offered
Le Mans Master


Joined: Jul 2004
Posts: 7,727
Likes: 7
From: Twilight zone
St. Jude Donor '05-'06
I had an issue with my lights flickering at one time.It turned out to be a bad connection on the battery cable. I had replaced the battery,and the cables seemed tight,but the bolt actually bottomed out in the new battery. It caused them to feel tight by the wrench,but not actually snug the contacts up tight. It was weird,really weird,but it does happen.
I had to actually add a washer to snug it up properly,then bingo,all was good.I am only bringing this up to point out the obvious,check the simple things first.
My new battery type was exide orbital, just in case you replaced your battery recently.
I had to actually add a washer to snug it up properly,then bingo,all was good.I am only bringing this up to point out the obvious,check the simple things first.
My new battery type was exide orbital, just in case you replaced your battery recently.
Last edited by flynbya2; Jun 12, 2010 at 11:49 PM.
Team Owner


Joined: May 2006
Posts: 21,473
Likes: 356
From: Palmdale, Ca----- 2009 Cyber Gray 4LT A6 F55 452 RWHP 422 RWTQ- RIP 1998 C5 734 RWHP & 585 RWTQ-----
Hello Gang, I've been a long time lurker but this is my first post. I've had my 97 automatic Coupe for about 5 years now, and it's been a great trouble free car until recently. As soon as I start the car, all interior & exterior lights begin sporadically flickering. It didn't happen while I was driving, it just started one day when I started my car. This flickering stops when I turn on the parking or headlights. Another weird issue that started with this flickering is that if I lock the doors with the remote, the alarm sounds off and can't be stopped until I unlock the car. The "check engine" light is also on now. I've tried doing several searches with different key words but could not find any threads with the same problems.
I'd take it to a shop for repairs but cash flow is real tight right now, so I was hoping I might be able to do the repair myself ... if it's something fairly simple.
Thanks for any help that can be offered
I'd take it to a shop for repairs but cash flow is real tight right now, so I was hoping I might be able to do the repair myself ... if it's something fairly simple.
Thanks for any help that can be offered
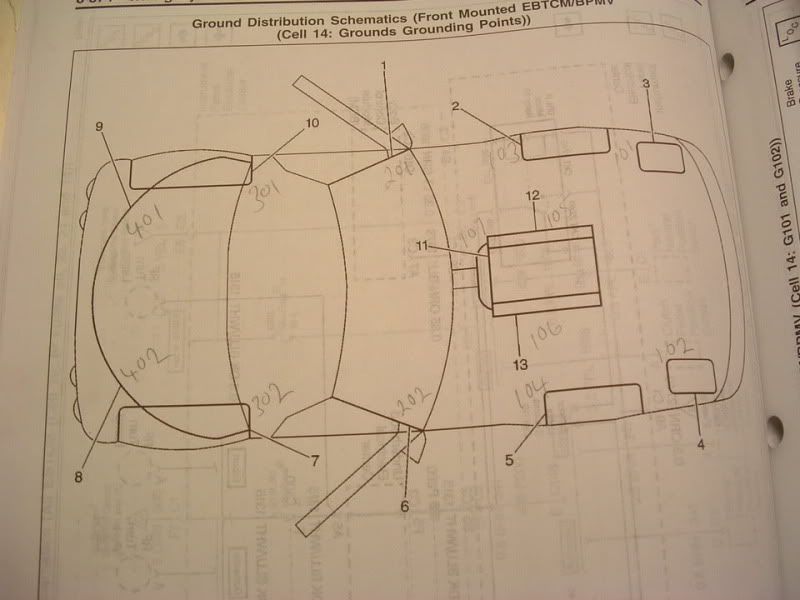
Here are all the ground connections:
You also need to check here for more information, this thread is packed and it is a STICK on the Tech side - you need to make yourself familiar with it, it will save you bacon bigtime

Thanks,Matt
Thread Starter
Cruising
Joined: Jun 2010
Posts: 12
Likes: 0
I had an issue with my lights flickering at one time.It turned out to be a bad connection on the battery cable. I had replaced the battery,and the cables seemed tight,but the bolt actually bottomed out in the new battery. It caused them to feel tight by the wrench,but not actually snug the contacts up tight. It was weird,really weird,but it does happen.
I had to actually add a washer to snug it up properly,then bingo,all was good.I am only bringing this up to point out the obvious,check the simple things first.
My new battery type was exide orbital, just in case you replaced your battery recently.
I had to actually add a washer to snug it up properly,then bingo,all was good.I am only bringing this up to point out the obvious,check the simple things first.
My new battery type was exide orbital, just in case you replaced your battery recently.
Thanks for the help.
Thread Starter
Cruising
Joined: Jun 2010
Posts: 12
Likes: 0
You need to check all you ground connections. You will see that they are in a weather proof connector. You will need to seperate them and check inside the connector and the lug, clean up a needed.
You also need to check here for more information, this thread is packed and it is a STICK on the Tech side - you need to make yourself familiar with it, it will save you bacon bigtime
Thanks,Matt
You also need to check here for more information, this thread is packed and it is a STICK on the Tech side - you need to make yourself familiar with it, it will save you bacon bigtime
Thanks,Matt
Tech Contributor

Joined: Dec 2003
Posts: 19,384
Likes: 87
From: Horncastle Lincolnshire, England
2023 C5 of the Year Finalist - Unmodified
That's an unusual one
I agree that I'd be starting with the connections at the battery and make sure they are clean and torqued correctly. Reattach the positive cable and torque to 15 N-m (11 lb ft). Reattach the negative cable and torque to 16 N-m (12 lb ft).
Checking the grounds is also a good idea. As the headlights may be part of the issue check the ground for those specifically. It sits on the engine frame just behind the passenger headlight. Another problem that comes up regularly is the rubber gaiter in the door hinge area. the wires can chafe and ground out causing weird electrical issues. Pull back the gaiter and check for damage to the wires. Pull, clean and reseat the connector and see if that helps.
If you have a check engine light you need to pull the codes and see whats causing it. Are you happy how to do that?
Such a strange problem may be tricky to track down but HTH
Last edited by DeeGee; Jun 13, 2010 at 03:04 AM.
Pro

Joined: Mar 2009
Posts: 648
Likes: 1
From: South Jersey
I agree that's it's likely a loose battery terminal. I had flickering lights on my radio and my
headlights would not pop up with the motor running (only with the motor off)...just needed to tighten up one terminal and that solved both problems instantly.
Jerry
headlights would not pop up with the motor running (only with the motor off)...just needed to tighten up one terminal and that solved both problems instantly.
Jerry
Team Owner
Joined: May 2006
Posts: 21,473
Likes: 356
From: Palmdale, Ca----- 2009 Cyber Gray 4LT A6 F55 452 RWHP 422 RWTQ- RIP 1998 C5 734 RWHP & 585 RWTQ-----
I hope it is a simple fix but it needs to be checked regardless to eliminate the possibility

Grounds do some crazy things on our Vettes so b aware
Thanks,Matt
Corvette Stories
The Best of Corvette for Corvette Enthusiasts

Top 10 Most Explosive Corvettes Ever Made: Power-to-Weight Ratio Ranked!
Joe Kucinski
150 hp to 1,250 hp: Every Corvette Generation Compared by the Specs That Matter
Joe Kucinski
8 Coolest Corvette Pace Cars (and Replicas) of All Time
Verdad Gallardo
Top 10 Corvette Engines RANKED by Peak Torque (70+ Years of Muscle!)
Joe Kucinski
Corvette ZR1X Will Be Pacing the Indy 500, And Could Probably Race, Too!
Verdad Gallardo
Top 10 Corvettes Coming to Mecum Indy 2026!
Brett Foote
Top 10 C9 Corvette MUST-HAVES to Fix These C8 Generation Flaws!
Michael S. Palmer
10 Revolutionary 'Corvette Firsts' Most People Don't Know
Joe Kucinski
5 Reasons to Upgrade to an LS6-Powered Corvette; 5 Reasons to Stay LT2
Michael S. Palmer
Thread Starter
Cruising
Joined: Jun 2010
Posts: 12
Likes: 0
Alright guys, I'll start checking the grounds today, thanks. No DeeGee, I don't know how to check the codes. I don't know how to find the meaning of any codes either. Is it done with the DIC?
Many thanks guys.
Many thanks guys.
Team Owner

Joined: May 1999
Posts: 22,830
Likes: 13
From: Columbus Ohio
CI 3-4, 8-9-10 Veteran
St. Jude Donor '06-'08-'10
Reading Engine Diagnostic Codes
The Diagnostic Display Mode is entered with the following procedure:
1) Turn on the ignition but don't start the engine.
2) Press the RESET button to turn off any warning messages. (i.e. door or trunk open etc)
3) Press and hold OPTIONS
4) While holding OPTIONS, press FUEL four times within a 10-second period.
Initially, on-board diagnostics go into an Automatic Mode which shows diagnostic codes in a pre-set sequence: PCM - TCS - RTD - BCM - IPC - RADIO - HVAC - LDCM - RDCM - SCM - RFA. All codes will be displayed for each. ( i.e. PCM = 4 codes)
If none are present in a given module, you will see No More Codes on the display.
There are two kinds of diagnostic codes, Current and History designated with a letter suffix, C or ;H.
A current code indicates a malfunction is present in the module displaying data.
A history code indicates a problem existed sometime in the last 40 or 50 ignition cycles. When not accompanied by a current code of the same number, it's potential evidence of a previous problem, now resolved, that was not removed by clearing the codes. More likely it's an indication of an intermittent malfunction.
Intermittent codes are the most challenging of the diagnostics. An intermittent code may have happened once, may have happened more than once but is inconsistent or may be happening on a regular basis but not at the time the codes are displayed. History codes can also be caused by a current malfunction in a system that is not operating at the time codes are displayed. An example is the rear window defogger which doesn't operate until the Body Control Module detects engine rpm. For history codes set by a module that does not operate with the key on and engine off, a special diagnostic tool called a Scan Tester is necessary to properly diagnose the malfunction.
Once the system has displayed all modules, it goes into the manual mode which allows selection of each module using combinations of Driver Information Center buttons. Manual mode can also be entered during the automatic sequence by pressing any button except E/M.
Once the display shows Manual Diagnostics, select a module by pressing the OPTIONS button to go forward or the TRIP button to go back. Once a module is selected, a code is displayed, and if more than one are present;
press GAGES to go forward or FUEL to go back.
To exit the diagnostic mode at any time, press E/M. If you want to erase codes in a given module, press RESET
To reset the codes once in manual mode, press and hold RESET until it displays NO CODES Press OPTIONS to go to the next module. Repeat the steps until you have reset the codes in all the computer modules.
NOTE!! Only reset the codes IF you want to - it is NOT necessary to do this. Clearing a code does not repair a problem. You are simply erasing the evidence of it in the module's memory. If you clear the code/s, and extinguish the Check Engine Light, your emissions status ready will NOT allow you to pass an emissions test until you have completed the required driving cycles.
Once you have the codes, the next question is: What to do with the information?
First, consult the factory service manual. Any serious C5 Do-It-Yourself owner should invest in the Corvette Service Manual of the appropriate model year. The Service Manual is really a requirement if you want to understand and work on your C5.
Thread Starter
Cruising
Joined: Jun 2010
Posts: 12
Likes: 0
Thanks again, I really appreciate the help guys
Le Mans Master
Joined: Jul 2004
Posts: 7,727
Likes: 7
From: Twilight zone
St. Jude Donor '05-'06
It went on for quite some time,as I checked the cable bolts and they were tight.
As a matter of fact, one day I reached down for some reason,and noticed I could rotate the cable with relative ease.I then proceeded to CRANK on the battery terminal( not a good idea
 ) until I thought it was going to strip out.I could still rotate the cable though.It was then I rechecked and found it was flickering still.
I did some real head scratching for a while until I figured it out.
I really hope it is this easy for you. If not, I would persue the grounds next.
It is likely a bad connection somewhere....
Electrical gremlins are strange things to decifer at times
Last edited by flynbya2; Jun 13, 2010 at 02:33 PM.
Tech Contributor
Joined: Dec 2003
Posts: 19,384
Likes: 87
From: Horncastle Lincolnshire, England
2023 C5 of the Year Finalist - Unmodified
Post those codes up. U codes are typical of battery problems or ground issues. As Blue 92 says, look for "C" codes which are current problems.
Thread Starter
Cruising
Joined: Jun 2010
Posts: 12
Likes: 0
Yes it was,it drove fine and I would not even notice it until night time when the display was brighter.Actually, it was one evening when I had left my car running with the lights on that I initially noticed it. The tail lights were flickering sporatically,and then as I got in the car,I noticed the dash was too.
It went on for quite some time,as I checked the cable bolts and they were tight.
As a matter of fact, one day I reached down for some reason,and noticed I could rotate the cable with relative ease.I then proceeded to CRANK on the battery terminal( not a good idea) until I thought it was going to strip out.I could still rotate the cable though.It was then I rechecked and found it was flickering still.
I did some real head scratching for a while until I figured it out.
I really hope it is this easy for you. If not, I would persue the grounds next.
It is likely a bad connection somewhere....
Electrical gremlins are strange things to decifer at times
It went on for quite some time,as I checked the cable bolts and they were tight.
As a matter of fact, one day I reached down for some reason,and noticed I could rotate the cable with relative ease.I then proceeded to CRANK on the battery terminal( not a good idea
) until I thought it was going to strip out.I could still rotate the cable though.It was then I rechecked and found it was flickering still.I did some real head scratching for a while until I figured it out.
I really hope it is this easy for you. If not, I would persue the grounds next.
It is likely a bad connection somewhere....
Electrical gremlins are strange things to decifer at times

Burning Brakes


Joined: Oct 2007
Posts: 1,093
Likes: 33
From: Morristown TN
Sounds like a bad ground. I went to autozone and got a new bolt that is made for car stereo instillation's, it has an extra bolt/nut at the back side that makes it easier to install aftermarket wiring, it is really made for the positive side and amps.
I then ran another ground cable to another good ground point on the car.
This next thing I am sure some people will not agree with but I also got a small car stereo capacitor (1 farad) and installed it at the power block on the fuse box.
In theory it will absorb any voltage spikes as well as help when you need an extra bump of power.
I have had this set up for a couple years now and had no problems.
A guy that was more of a ricer at heart but loved vettes talked me into doing it.
Thread Starter
Cruising
Joined: Jun 2010
Posts: 12
Likes: 0
Sorry for the delay in getting back to the forum guys, I got called out of state on biz Monday & just got back.
I tried to tighten the battery connections, they were lose enough to move by hand. I cranked them down real tight but the lights are still flickering. I didn't disconnect to clean the terminals because I couldn't figure out how to keep voltage to the terminal with a charger being that everything is insulated. I understand that if I disconnect the voltage from the car that I will have other problems? With the Radio & Alarm or something? So how do I keep voltage running through the car while disconnecting the battery?
I also pulled the Codes. Four Codes showed up in the following order:
P0131 H
P0141 H C
P0151 H
P1571 H
I guess from what I'm being told that P0141 H C would be a current problem?
Thanks for any further advice
Le Mans Master
Joined: Jul 2004
Posts: 7,727
Likes: 7
From: Twilight zone
St. Jude Donor '05-'06
Sorry for the delay in getting back to the forum guys, I got called out of state on biz Monday & just got back.
I tried to tighten the battery connections, they were lose enough to move by hand. I cranked them down real tight but the lights are still flickering.
Thanks for any further advice
I tried to tighten the battery connections, they were lose enough to move by hand. I cranked them down real tight but the lights are still flickering.
Thanks for any further advice
If so,you may have the same issue I did.If not,proceed with other options.
And you can disconnect the battery just fine,I know I did....
Thread Starter
Cruising
Joined: Jun 2010
Posts: 12
Likes: 0
No, since I tightened them, I can no longer turn the cables, they're very snug. Should I disconnect the battery to clean the contacts of the cables & battery?
Team Owner
Joined: May 2006
Posts: 21,473
Likes: 356
From: Palmdale, Ca----- 2009 Cyber Gray 4LT A6 F55 452 RWHP 422 RWTQ- RIP 1998 C5 734 RWHP & 585 RWTQ-----
Here is a list of codes for our Vettes
http://www.stengel.net/diccodes.htm
P0131 Heated Oxygen Sensor (HO2S) Circuit Low Voltage Bank 1 Sensor 1
P0141 Heated Oxygen Sensor (HO2S) Heater Circuit Bank 1 Sensor 2
P0151 Heated Oxygen Sensor (HO2S) Circuit Low Voltage Bank 2 Sensor 1
P1571 ASR Desired Torque
Thee is a common issue wrong with the 02 Sensors, do a search with the codes here on the forum and see what comes up. I can't right now.
Thanks,Matt