


How to replace the parking auto Lamp

Thread Starter
Pro

Joined: Apr 2010
Posts: 528
Likes: 0
From: Chicago IL
I had purchased a 2002 corvette almost a year ago. I have done very little to it. The only thing I have done to it so far was tinted the windows at 15%. My wife recently purchased some new auto lamps for me. I wanted to put them on although I cannot understand on how to remove the old ones. I had looked under the front right and left side to see how to remove it. Will I need to remove the front bumper? Any help would be great.
Thank you in advance
Thank you in advance

Banned Scam/Spammer
Joined: Feb 2007
Posts: 50,093
Likes: 267
From: Oklahoma City
St. Jude Donor '09-'10-'11-'12-'13-'14-'15-'16-'17,'19,'22
Last edited by JW Motorsports; Jun 22, 2010 at 12:55 PM.

Le Mans Master

Joined: May 2007
Posts: 5,383
Likes: 6
From: hagerstown md
St. Jude Donor '08-'09


Banned Scam/Spammer
Joined: Feb 2007
Posts: 50,093
Likes: 267
From: Oklahoma City
St. Jude Donor '09-'10-'11-'12-'13-'14-'15-'16-'17,'19,'22
Administrator


Joined: Mar 2001
Posts: 368,294
Likes: 24,776
From: In a parallel universe. Currently own 2014 Stingray Coupe.
C7 of the Year - Modified Finalist 2021
MO Events Coordinator
St. Jude Co-Organizer
St. Jude Donor '03 thru '25
NCM Sinkhole Donor
CI 5, 8 & 11 Veteran
Access panel under the front fascia can be re;moved and you have full access to all that is behind the front end, including the DRLs and parking lights.
Melting Slicks

Joined: Nov 2006
Posts: 2,431
Likes: 3
From: Iowa City Iowa
I hope your wife bought you LED replacement bulbs because that's the only bulb I'd consider using in my running/corner lights. Standard bulbs ( even OEM) get too hot and can actually melt the light housing or burn the bulb sockets. Best LED's for my money come from Johnathon at JW Motoring (vendor right here on this forum).
Corvette Stories
The Best of Corvette for Corvette Enthusiasts

Top 10 Most Expensive Corvettes Ever Sold on Bring A Trailer
Brett Foote
10 Things Every Corvette Owner Needs (2026 Edition)
Michael S. Palmer
8 Most "Only Corvette Owners Understand" Quirks and Problems
Pouria Savadkouei
10 Reasons the C6 Z06 is Still A Performance Benchmark After 20 Years
Joe Kucinski
How Much Horsepower Every Corvette Engine "LOST" in 1972
Joe Kucinski
Top 10 DOs and DON'Ts for Protecting Your Convertible Top!
Michael S. Palmer
Top 10 Most Explosive Corvettes Ever Made: Power-to-Weight Ratio Ranked!
Joe Kucinski
150 hp to 1,250 hp: Every Corvette Generation Compared by the Specs That Matter
Joe Kucinski
8 Coolest Corvette Pace Cars (and Replicas) of All Time
Verdad GallardoSafety Car


Joined: Jun 2009
Posts: 4,738
Likes: 15
From: OC Calif
St. Jude Donor '10
I hope your wife bought you LED replacement bulbs because that's the only bulb I'd consider using in my running/corner lights. Standard bulbs ( even OEM) get too hot and can actually melt the light housing or burn the bulb sockets. Best LED's for my money come from Johnathon at JW Motoring (vendor right here on this forum).
Banned Scam/Spammer
Joined: Feb 2007
Posts: 50,093
Likes: 267
From: Oklahoma City
St. Jude Donor '09-'10-'11-'12-'13-'14-'15-'16-'17,'19,'22
Usually someone psots up wondering why the bulb is burning out all the time and then once they take the housing out they see a hole that was caused by the hot DRLS (allowing water in).
It's probably number 3 behind which oil is the best and will C6 wheels fit my C5.
Burning Brakes

Joined: Aug 2007
Posts: 992
Likes: 3
From: Chesterfield Michigan
St. Jude Donor '08-'09-'10-'11-'12-'13-'14
My parking lights last 4-6 months max. Blow out all the time in touch free car washes with the "underbody" spray. Always melted, black bulbs.
Thread Starter
Pro
Joined: Apr 2010
Posts: 528
Likes: 0
From: Chicago IL
I was looking at the head lights if I remove both the left and right side it appears that the corner lense is right there...
1) Can I put my new corner lenses in from removing the head lights.
2) If so how hard is it to remove the head lights???
1) Can I put my new corner lenses in from removing the head lights.
2) If so how hard is it to remove the head lights???
Burning Brakes
Joined: Aug 2007
Posts: 992
Likes: 3
From: Chesterfield Michigan
St. Jude Donor '08-'09-'10-'11-'12-'13-'14
It's really easy to just feel around and give the bulb a half turn and remove it.
Thread Starter
Pro
Joined: Apr 2010
Posts: 528
Likes: 0
From: Chicago IL
No need to remove the headlights. Just raise them, and you can fit your arm in the little opening on the inside. I lift weights regularly and have a large upper body, and my arm fits, so most anyone should be able to just fine.
It's really easy to just feel around and give the bulb a half turn and remove it.
It's really easy to just feel around and give the bulb a half turn and remove it.
Tech Contributor


Joined: Dec 2003
Posts: 19,384
Likes: 87
From: Horncastle Lincolnshire, England
2023 C5 of the Year Finalist - Unmodified
Here ya go
Document ID# 655625
2002 Chevrolet Corvette
________________________________________
Park/Turn Signal/Side Marker Lamp Replacement
Removal Procedure
1. Raise and support the vehicle. Refer to Lifting and Jacking the Vehicle in General Information.
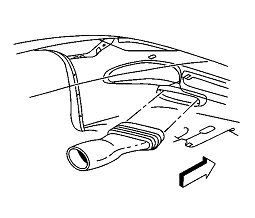
2. Remove the front fascia lower closeout panel.

3. Release the brake caliper cooling duct from the front fascia, and position the duct aside.
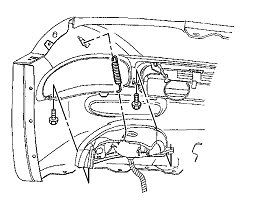
4. Remove the front turn signal lamp bracket retaining spring from the lamp bracket.
5. Remove the lamp bracket retaining spring from the front fascia.
6. Remove the front turn signal lamp bracket retaining screws.
7. Disconnect the sockets from the lamp.
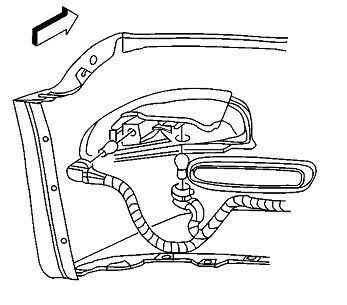
8. Remove the lamp, with the bracket, from the vehicle.
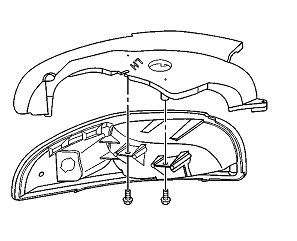
9. Remove the lamp to bracket retaining screws.
10. Remove the lamp from the bracket.
Installation Procedure
1. Install the front park/turn signal and sidemarker lamp into position on the front turn signal lamp bracket.
Notice
Use the correct fastener in the correct location. Replacement fasteners must be the correct part number for that application. Fasteners requiring replacement or fasteners requiring the use of thread locking compound or sealant are identified in the service procedure. Do not use paints, lubricants, or corrosion inhibitors on fasteners or fastener joint surfaces unless specified. These coatings affect fastener torque and joint clamping force and may damage the fastener. Use the correct tightening sequence and specifications when installing fasteners in order to avoid damage to parts and systems.
2. Install the front park/turn signal and sidemarker lamp to bracket retaining screws.
Tighten
Tighten the front park/turn signal and sidemarker lamp to bracket retaining screws to 2 N�m (18 lb in).
3. Install the sockets to the lamp.
4. Install the lamp, with the bracket, to the front fascia.
5. Align the lamp to the opening in the front fascia and hold the lamp firmly in place against the fascia, while installing the front turn signal lamp bracket retaining screws.
Tighten
Tighten the front turn signal lamp bracket retaining screws to 3 N�m (27 lb in).
6. Install the lamp bracket retaining spring to the front fascia.
7. Install the front turn signal lamp bracket retaining spring to the lamp bracket.
8. Position the brake caliper cooling duct to the front fascia and press the duct toward the fascia to secure.
9. Install the front fascia lower closeout panel. Refer to Close Out Panel - Front Bumper Fascia Lower in Bumpers.
Document ID# 655625
2002 Chevrolet Corvette
________________________________________
Park/Turn Signal/Side Marker Lamp Replacement
Removal Procedure
1. Raise and support the vehicle. Refer to Lifting and Jacking the Vehicle in General Information.
2. Remove the front fascia lower closeout panel.
3. Release the brake caliper cooling duct from the front fascia, and position the duct aside.
4. Remove the front turn signal lamp bracket retaining spring from the lamp bracket.
5. Remove the lamp bracket retaining spring from the front fascia.
6. Remove the front turn signal lamp bracket retaining screws.
7. Disconnect the sockets from the lamp.
8. Remove the lamp, with the bracket, from the vehicle.
9. Remove the lamp to bracket retaining screws.
10. Remove the lamp from the bracket.
Installation Procedure
1. Install the front park/turn signal and sidemarker lamp into position on the front turn signal lamp bracket.
Notice
Use the correct fastener in the correct location. Replacement fasteners must be the correct part number for that application. Fasteners requiring replacement or fasteners requiring the use of thread locking compound or sealant are identified in the service procedure. Do not use paints, lubricants, or corrosion inhibitors on fasteners or fastener joint surfaces unless specified. These coatings affect fastener torque and joint clamping force and may damage the fastener. Use the correct tightening sequence and specifications when installing fasteners in order to avoid damage to parts and systems.
2. Install the front park/turn signal and sidemarker lamp to bracket retaining screws.
Tighten
Tighten the front park/turn signal and sidemarker lamp to bracket retaining screws to 2 N�m (18 lb in).
3. Install the sockets to the lamp.
4. Install the lamp, with the bracket, to the front fascia.
5. Align the lamp to the opening in the front fascia and hold the lamp firmly in place against the fascia, while installing the front turn signal lamp bracket retaining screws.
Tighten
Tighten the front turn signal lamp bracket retaining screws to 3 N�m (27 lb in).
6. Install the lamp bracket retaining spring to the front fascia.
7. Install the front turn signal lamp bracket retaining spring to the lamp bracket.
8. Position the brake caliper cooling duct to the front fascia and press the duct toward the fascia to secure.
9. Install the front fascia lower closeout panel. Refer to Close Out Panel - Front Bumper Fascia Lower in Bumpers.