


Blowing Blinker Bulbs??

Thread Starter
Heel & Toe

Joined: Aug 2008
Posts: 23
Likes: 0
On my 2002 vette the front blinker bulbs (orange 4157) are blowing. It may last months or only weeks. I just searched though the threads and did read about cracks in the housings allowing water to get in. I'll pull the housings this weekend and inspect them. While I got them out does anyone know of anything else to look at that may cause the bulbs to blow?
Thanks,
Jim
Thanks,
Jim
Thread Starter
Heel & Toe
Joined: Aug 2008
Posts: 23
Likes: 0
Tech Contributor


Joined: Dec 2003
Posts: 19,384
Likes: 87
From: Horncastle Lincolnshire, England
2023 C5 of the Year Finalist - Unmodified
Many members have sealed them successfully using silicon sealant. Some of us have disabled the DRLs (pull thr A2 fuse), which reduces the risk of burning the unit. Replacements can be picked up on E Bay quite cheaply if you decide to replace them..
Heres a How To from the shop manual to show hoe to get to them.
Document ID# 655625
2002 Chevrolet Corvette
________________________________________
Park/Turn Signal/Side Marker Lamp Replacement
Removal Procedure
1. Raise and support the vehicle. Refer to Lifting and Jacking the Vehicle in General Information.
2. Remove the front fascia lower closeout panel.

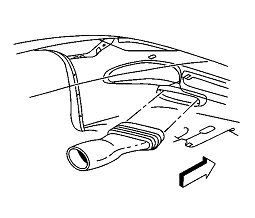
3. Release the brake caliper cooling duct from the front fascia, and position the duct aside.
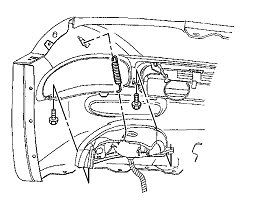
4. Remove the front turn signal lamp bracket retaining spring from the lamp bracket.
5. Remove the lamp bracket retaining spring from the front fascia.
6. Remove the front turn signal lamp bracket retaining screws.
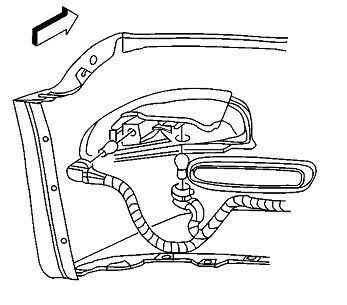
7. Disconnect the sockets from the lamp.
8. Remove the lamp, with the bracket, from the vehicle.
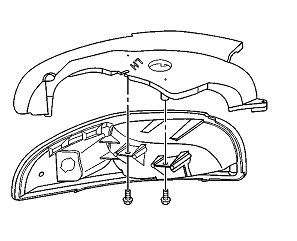
9. Remove the lamp to bracket retaining screws.
10. Remove the lamp from the bracket.
Installation Procedure
1. Install the front park/turn signal and sidemarker lamp into position on the front turn signal lamp bracket.
Notice
Use the correct fastener in the correct location. Replacement fasteners must be the correct part number for that application. Fasteners requiring replacement or fasteners requiring the use of thread locking compound or sealant are identified in the service procedure. Do not use paints, lubricants, or corrosion inhibitors on fasteners or fastener joint surfaces unless specified. These coatings affect fastener torque and joint clamping force and may damage the fastener. Use the correct tightening sequence and specifications when installing fasteners in order to avoid damage to parts and systems.
2. Install the front park/turn signal and sidemarker lamp to bracket retaining screws.
Tighten
Tighten the front park/turn signal and sidemarker lamp to bracket retaining screws to 2 N•m (18 lb in).
3. Install the sockets to the lamp.
4. Install the lamp, with the bracket, to the front fascia.
5. Align the lamp to the opening in the front fascia and hold the lamp firmly in place against the fascia, while installing the front turn signal lamp bracket retaining screws.
Tighten
Tighten the front turn signal lamp bracket retaining screws to 3 N•m (27 lb in).
6. Install the lamp bracket retaining spring to the front fascia.
7. Install the front turn signal lamp bracket retaining spring to the lamp bracket.
8. Position the brake caliper cooling duct to the front fascia and press the duct toward the fascia to secure.
9. Install the front fascia lower closeout panel. Refer to Close Out Panel - Front Bumper Fascia Lower in Bumpers.
Some of us have disabled the DRLs (pull thr A2 fuse), which reduces the risk of burning the unit. Replacements can be picked up on E Bay quite cheaply if you decide to replace them..Heres a How To from the shop manual to show hoe to get to them.
Document ID# 655625
2002 Chevrolet Corvette
________________________________________
Park/Turn Signal/Side Marker Lamp Replacement
Removal Procedure
1. Raise and support the vehicle. Refer to Lifting and Jacking the Vehicle in General Information.
2. Remove the front fascia lower closeout panel.
3. Release the brake caliper cooling duct from the front fascia, and position the duct aside.
4. Remove the front turn signal lamp bracket retaining spring from the lamp bracket.
5. Remove the lamp bracket retaining spring from the front fascia.
6. Remove the front turn signal lamp bracket retaining screws.
7. Disconnect the sockets from the lamp.
8. Remove the lamp, with the bracket, from the vehicle.
9. Remove the lamp to bracket retaining screws.
10. Remove the lamp from the bracket.
Installation Procedure
1. Install the front park/turn signal and sidemarker lamp into position on the front turn signal lamp bracket.
Notice
Use the correct fastener in the correct location. Replacement fasteners must be the correct part number for that application. Fasteners requiring replacement or fasteners requiring the use of thread locking compound or sealant are identified in the service procedure. Do not use paints, lubricants, or corrosion inhibitors on fasteners or fastener joint surfaces unless specified. These coatings affect fastener torque and joint clamping force and may damage the fastener. Use the correct tightening sequence and specifications when installing fasteners in order to avoid damage to parts and systems.
2. Install the front park/turn signal and sidemarker lamp to bracket retaining screws.
Tighten
Tighten the front park/turn signal and sidemarker lamp to bracket retaining screws to 2 N•m (18 lb in).
3. Install the sockets to the lamp.
4. Install the lamp, with the bracket, to the front fascia.
5. Align the lamp to the opening in the front fascia and hold the lamp firmly in place against the fascia, while installing the front turn signal lamp bracket retaining screws.
Tighten
Tighten the front turn signal lamp bracket retaining screws to 3 N•m (27 lb in).
6. Install the lamp bracket retaining spring to the front fascia.
7. Install the front turn signal lamp bracket retaining spring to the lamp bracket.
8. Position the brake caliper cooling duct to the front fascia and press the duct toward the fascia to secure.
9. Install the front fascia lower closeout panel. Refer to Close Out Panel - Front Bumper Fascia Lower in Bumpers.
Last edited by DeeGee; Oct 8, 2010 at 02:21 AM.

Banned Scam/Spammer
Joined: Feb 2007
Posts: 50,093
Likes: 267
From: Oklahoma City
St. Jude Donor '09-'10-'11-'12-'13-'14-'15-'16-'17,'19,'22
Check out our led replacements
White- http://www.shop.jwmotoring.com/produ...9&categoryId=4
Amber- http://www.shop.jwmotoring.com/produ...4&categoryId=4
Switchback- http://www.shop.jwmotoring.com/produ...9&categoryId=4
White- http://www.shop.jwmotoring.com/produ...9&categoryId=4
Amber- http://www.shop.jwmotoring.com/produ...4&categoryId=4
Switchback- http://www.shop.jwmotoring.com/produ...9&categoryId=4
Corvette Stories
The Best of Corvette for Corvette Enthusiasts

150 hp to 1,250 hp: Every Corvette Generation Compared by the Specs That Matter
Joe Kucinski
8 Coolest Corvette Pace Cars (and Replicas) of All Time
Verdad Gallardo
Top 10 Corvette Engines RANKED by Peak Torque (70+ Years of Muscle!)
Joe Kucinski
Corvette ZR1X Will Be Pacing the Indy 500, And Could Probably Race, Too!
Verdad Gallardo
Top 10 Corvettes Coming to Mecum Indy 2026!
Brett Foote
Top 10 C9 Corvette MUST-HAVES to Fix These C8 Generation Flaws!
Michael S. Palmer
10 Revolutionary 'Corvette Firsts' Most People Don't Know
Joe Kucinski
5 Reasons to Upgrade to an LS6-Powered Corvette; 5 Reasons to Stay LT2
Michael S. Palmer
2027 Corvette vs The World: Every C8 vs Its Closest Competitor
Joe Kucinski
Instructor
Joined: Jul 2005
Posts: 236
Likes: 0
From: CT
Same problem months ago. Like rebelheart said there is probably a hole in the top of the blinker housing. My housing had a quarter size hole. Took a piece of 1/8" plastic cut into a larger circle and used Peramtex black adhesive on it and covered it totally and haven't had a problem. hope that is your trouble also.
On my 2002 vette the front blinker bulbs (orange 4157) are blowing. It may last months or only weeks. I just searched though the threads and did read about cracks in the housings allowing water to get in. I'll pull the housings this weekend and inspect them. While I got them out does anyone know of anything else to look at that may cause the bulbs to blow?
Thanks,
Jim
Thanks,
Jim
Melting Slicks


Joined: Nov 2007
Posts: 3,092
Likes: 29
From: Federal Way WA
I just replaced mine last Sunday for the same reason bulb burned out twice way to soon. Got some new blacked out housings and LED bulbs from JW! When my housings came out both sides had cracks not to bad but enough for water to get in. If you bother taking them out to fix get some LED lights in there so they wont heat heat up and crack again.
Burning Brakes


Joined: Aug 2010
Posts: 930
Likes: 13
From: Aiken SC

Had the same problem with mine a few months back. The top of both housing were cracked allowing water/moisture to get in and blow the bulbs. Took both units out and used epoxy for plastic. Not a problem since.

Banned Scam/Spammer
Joined: Feb 2007
Posts: 50,093
Likes: 267
From: Oklahoma City
St. Jude Donor '09-'10-'11-'12-'13-'14-'15-'16-'17,'19,'22
I don't even have to respond. My customers do it for me!
Thanks by the way!
The hyperflash harness fixes it. I ran out of flashers this morning I'm afraid. Those are 2 weeks out.
Thanks by the way!
The hyperflash harness fixes it. I ran out of flashers this morning I'm afraid. Those are 2 weeks out.

Race Director


Joined: Aug 2003
Posts: 13,421
Likes: 8
From: Lake Mary Florida
Might want to check your owner's manual. I originally had 3157's from the factory, when mine went I checked the OM and it said 3057s.
So I used what the OM called for. (Probably just like the factory installed Denso Platinum plugs.)
Your problem is most likely a pin hole from a rock or something in the lens. They are around $38. for a new lens, I just replaced my driver's side. I tried to seal it but moisture kept getting in there and blowing bulbs. So I saw no reason to further mess with it, I just replaced the lens and was done with it.
There are tricks to replacing the lens if you decide so post up and I'll provide (or someone will) the steps to replace.
Oh yes... mine is a 2001.
Last edited by Jet-Jock; Oct 7, 2010 at 08:57 PM.


Tech Contributor
Joined: Dec 2003
Posts: 19,384
Likes: 87
From: Horncastle Lincolnshire, England
2023 C5 of the Year Finalist - Unmodified