
Hood pad insulator, P/N 10285631
 08-26-2011, 04:43 PM
#1
Drifting

Thread Starter

Has anyone purchased a hood pad insulator recently? Some of the quotes I'm getting,include ridiculous shipping charges. If you've heard of a good price, with shipping, please let me know! Also, I'm looking for
a used one, undamaged. If you've replaced your hood with a custom version, and no longer need the stock hood pad, let me know what you've got!
a used one, undamaged. If you've replaced your hood with a custom version, and no longer need the stock hood pad, let me know what you've got!
 08-26-2011, 04:51 PM
#2
Race Director


The shipping costs are what hurts because of the oversized box required. For hood insulators, I've found it's best to order from the local dealership. You (probably) won't pay shipping costs as it'll come with their regular parts order from a parts hub dealership. It might even arrive over night.
Don't do what some B-body Impala SS/Caprice owners did. They ordered from a certain supplier based entirely on the cheaper shipping quote. They received their hood insulator in a smaller box...because the insulator was folded in half.
Don't do what some B-body Impala SS/Caprice owners did. They ordered from a certain supplier based entirely on the cheaper shipping quote. They received their hood insulator in a smaller box...because the insulator was folded in half.
08-26-2011, 04:57 PM
#3
Le Mans Master

The shipping costs are what hurts because of the oversized box required. For hood insulators, I've found it's best to order from the local dealership. You (probably) won't pay shipping costs as it'll come with their regular parts order from a parts hub dealership. It might even arrive over night.
 This is the best way to go.
08-26-2011, 05:13 PM
This is the best way to go.
08-26-2011, 05:13 PM
#4
Administrator


Member Since: Mar 2001
Location: In a parallel universe. Currently own 2014 Stingray Coupe.
Posts: 342,986
Received 19,300 Likes
on
13,973 Posts
C7 of the Year - Modified Finalist 2021
MO Events Coordinator
St. Jude Co-Organizer
St. Jude Donor '03-'04-'05-'06-'07-'08-'09-'10-'11-'12-'13-'14-'15-'16-'17-'18-'19-
'20-'21-'22-'23-'24
NCM Sinkhole Donor
CI 5, 8 & 11 Veteran


The shipping costs are what hurts because of the oversized box required. For hood insulators, I've found it's best to order from the local dealership. You (probably) won't pay shipping costs as it'll come with their regular parts order from a parts hub dealership. It might even arrive over night.
and that's what I did when I replaced mine earlier this year. No shipping charges involved.And it helped that my nephew works for a car dealership and got it for me at their cost - I think I paid about $90 for it out the door.


 08-26-2011, 06:19 PM
#9
Drifting
Thread Starter
08-26-2011, 06:25 PM
#11
Drifting
Thread Starter
 08-27-2011, 12:18 AM
#15
Team Owner

Member Since: Mar 2004
Location: Oklahoma City OK
Posts: 58,259
Received 1,675 Likes
on
1,298 Posts
C6 of Year Finalist (appearance mods) 2019
I got one local a few years back when I got one for the 98 Coupe that I used to have. It saved me a ton on shipping.
08-27-2011, 02:16 AM
#16
Tech Contributor
Member Since: Dec 2003
Location: Horncastle Lincolnshire, England
Posts: 19,384
Likes: 0
Received 79 Likes
on
61 Posts
2023 C5 of the Year Finalist - Unmodified

Looks like you got some good answers to your question. The liner is very delicate so I can see why shipping costs would be high.
Just out of interest, is your insulator damaged? If not and it's just looking tired, it's possible to bring it back to life with a spray can of paint.
Heres a How To I did some time ago just in case its of any use:
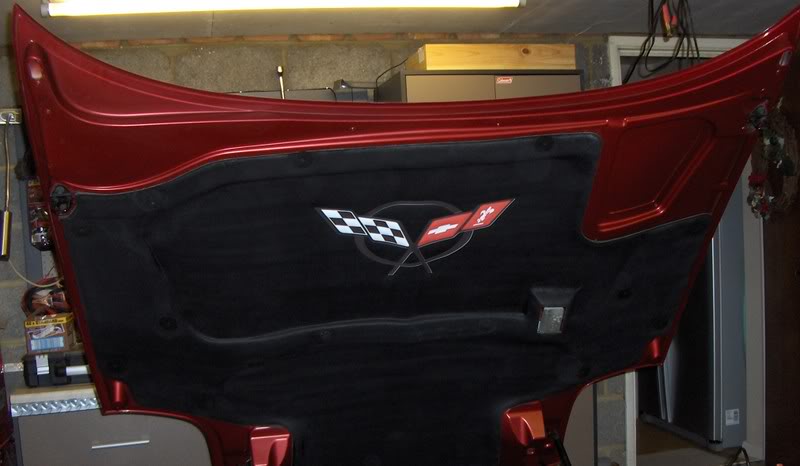
Refurbishing a Corvette C5 Hood Liner
The liner is made of a very delicate material so be careful in how you handle it once it’s removed. The surface is a fabric type finish and hard brushing will cause it to become rough and fibrous. It will also crack easily if you let it flex so if you take it outside beware of strong wind.
As you take the final fasteners out, support the liner so you don’t crack the liner around the eyelets.
The actual work takes only minutes. The drying time is the only slow process.
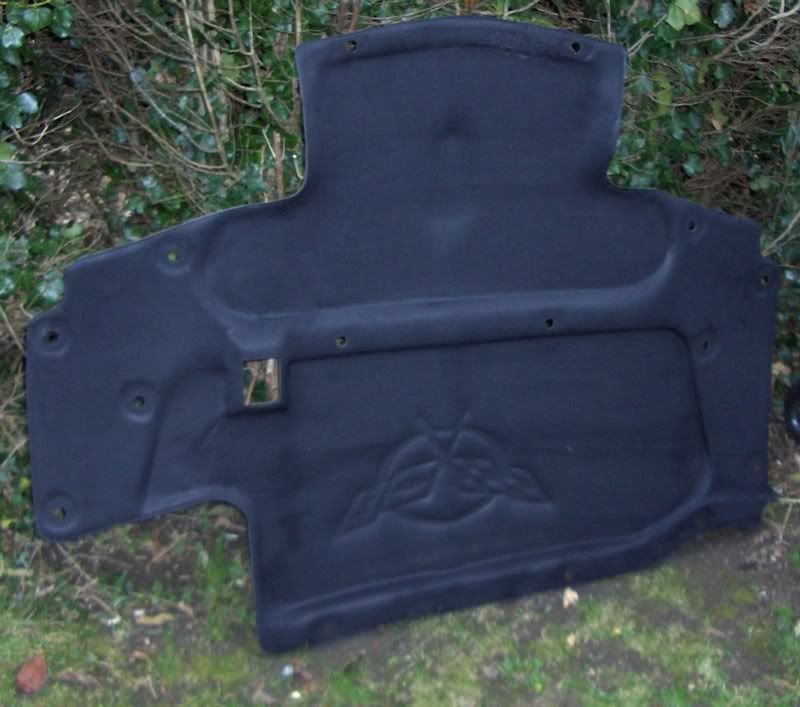
As you can see, the liner will have attracted quite a bit of dirt and grime.
OK here we go.
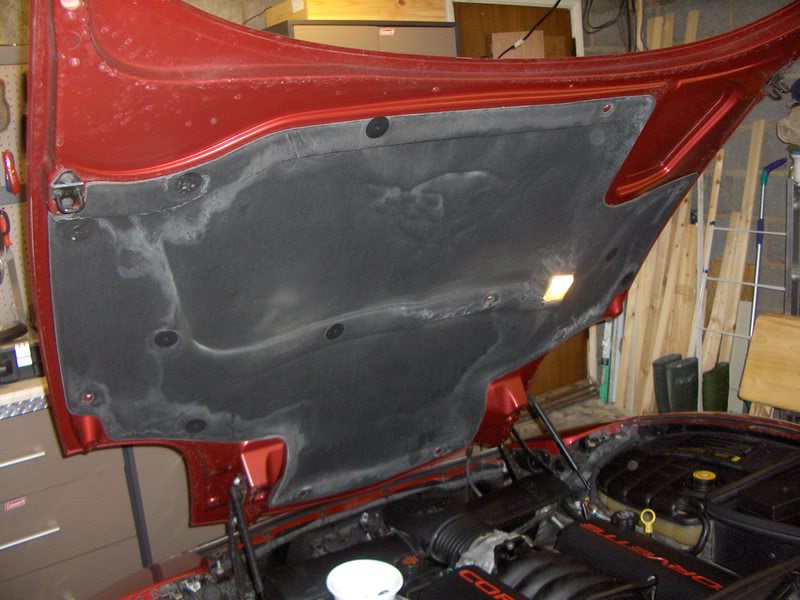
Lift the hood.
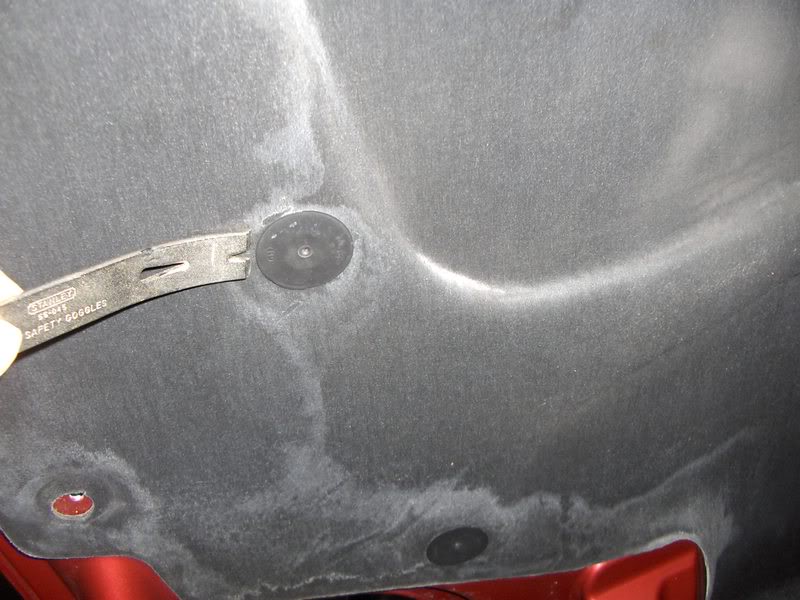
Remove the fasteners gently, top, then bottom and middle ones last. This will support the liner better as you take them out. Us a tool with a forked end. I’ve heard of a barbeque fork being used. I used a nail puller work in behind the fastener.
Take the liner outside and brush the surface gently with a soft brush to remove any dirt. Take care not to damage the surface of the liner.
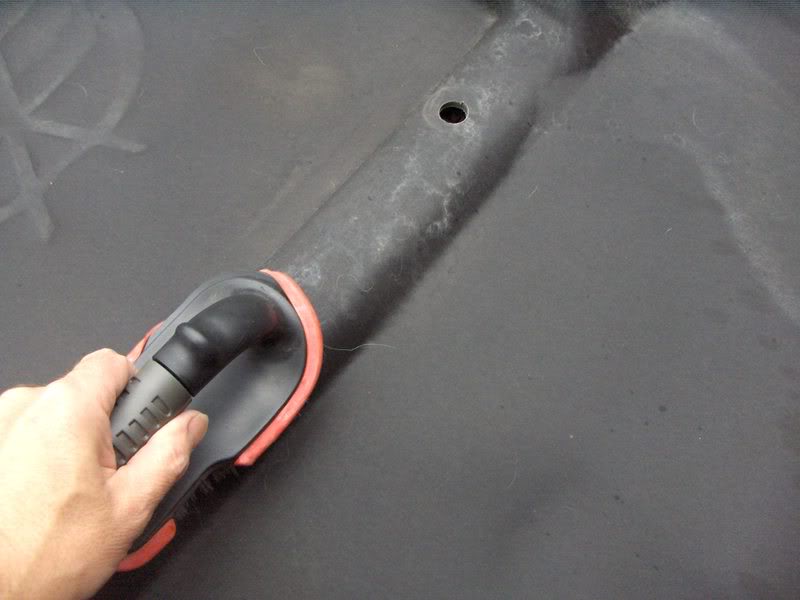
Spray the liner with black paint. The difference between the old and the new surface is immediately apparent.
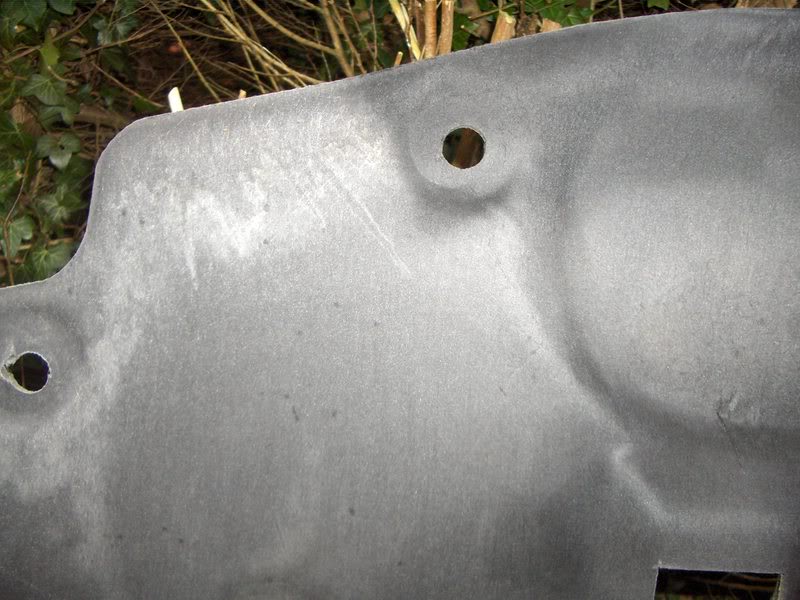
Use as many coats as you see fit. The liner is porous so it will take at least 3 coats to get good coverage. Leave it for 30 mins between coats to allow the paint to dry.

If you plan to paint the Corvette emblem, you may wish to apply extra paint around the embossed area on the liner. This will stop the liner absorbing the coloured paint.
Once the paint is dry (and you may wish to leave it overnight), you can either paint the emblem or apply a decal. I chose the decal which I picked up from RPI Designs (a Forum Vendor). Alternatively if you prefer, you can refit the liner and apply the decal when it’s back in place.
Refit the liner in the hood fitting the middle fasteners first to hold it in place, then refit the remaining fasteners. A gentle push fit is all it takes to reinsert the fastener.
The finished Hood Liner
Just out of interest, is your insulator damaged? If not and it's just looking tired, it's possible to bring it back to life with a spray can of paint.
Heres a How To I did some time ago just in case its of any use:
Refurbishing a Corvette C5 Hood Liner
The liner is made of a very delicate material so be careful in how you handle it once it’s removed. The surface is a fabric type finish and hard brushing will cause it to become rough and fibrous. It will also crack easily if you let it flex so if you take it outside beware of strong wind.
As you take the final fasteners out, support the liner so you don’t crack the liner around the eyelets.
The actual work takes only minutes. The drying time is the only slow process.
As you can see, the liner will have attracted quite a bit of dirt and grime.
OK here we go.
Lift the hood.
Remove the fasteners gently, top, then bottom and middle ones last. This will support the liner better as you take them out. Us a tool with a forked end. I’ve heard of a barbeque fork being used. I used a nail puller work in behind the fastener.
Take the liner outside and brush the surface gently with a soft brush to remove any dirt. Take care not to damage the surface of the liner.
Spray the liner with black paint. The difference between the old and the new surface is immediately apparent.
Use as many coats as you see fit. The liner is porous so it will take at least 3 coats to get good coverage. Leave it for 30 mins between coats to allow the paint to dry.
If you plan to paint the Corvette emblem, you may wish to apply extra paint around the embossed area on the liner. This will stop the liner absorbing the coloured paint.
Once the paint is dry (and you may wish to leave it overnight), you can either paint the emblem or apply a decal. I chose the decal which I picked up from RPI Designs (a Forum Vendor). Alternatively if you prefer, you can refit the liner and apply the decal when it’s back in place.
Refit the liner in the hood fitting the middle fasteners first to hold it in place, then refit the remaining fasteners. A gentle push fit is all it takes to reinsert the fastener.
The finished Hood Liner
08-27-2011, 11:45 AM
#17
Burning Brakes


Member Since: Mar 2009
Location: GRAYSLAKE IL
Posts: 1,028
Received 32 Likes
on
26 Posts
Oldtimer
St. Jude Donor '13

I got a kit that supplies material that you put over the orginal hood mat some yrs back. I had them embroider it w/C-5 logo & the word CORVETTE. Sorry, I've looked but can't find anything that tells me who the supplier was. Good luck!
08-27-2011, 06:22 PM
#18
Drifting
Thread Starter
Looks like you got some good answers to your question. The liner is very delicate so I can see why shipping costs would be high.
Just out of interest, is your insulator damaged? If not and it's just looking tired, it's possible to bring it back to life with a spray can of paint.
Heres a How To I did some time ago just in case its of any use:
Refurbishing a Corvette C5 Hood Liner
The liner is made of a very delicate material so be careful in how you handle it once it’s removed. The surface is a fabric type finish and hard brushing will cause it to become rough and fibrous. It will also crack easily if you let it flex so if you take it outside beware of strong wind.
As you take the final fasteners out, support the liner so you don’t crack the liner around the eyelets.
The actual work takes only minutes. The drying time is the only slow process.
As you can see, the liner will have attracted quite a bit of dirt and grime.

OK here we go.
Lift the hood.
Remove the fasteners gently, top, then bottom and middle ones last. This will support the liner better as you take them out. Us a tool with a forked end. I’ve heard of a barbeque fork being used. I used a nail puller work in behind the fastener.

Take the liner outside and brush the surface gently with a soft brush to remove any dirt. Take care not to damage the surface of the liner.

Spray the liner with black paint. The difference between the old and the new surface is immediately apparent.

Use as many coats as you see fit. The liner is porous so it will take at least 3 coats to get good coverage. Leave it for 30 mins between coats to allow the paint to dry.
If you plan to paint the Corvette emblem, you may wish to apply extra paint around the embossed area on the liner. This will stop the liner absorbing the coloured paint.
Once the paint is dry (and you may wish to leave it overnight), you can either paint the emblem or apply a decal. I chose the decal which I picked up from RPI Designs (a Forum Vendor). Alternatively if you prefer, you can refit the liner and apply the decal when it’s back in place.
Refit the liner in the hood fitting the middle fasteners first to hold it in place, then refit the remaining fasteners. A gentle push fit is all it takes to reinsert the fastener.
The finished Hood Liner

Just out of interest, is your insulator damaged? If not and it's just looking tired, it's possible to bring it back to life with a spray can of paint.
Heres a How To I did some time ago just in case its of any use:
Refurbishing a Corvette C5 Hood Liner
The liner is made of a very delicate material so be careful in how you handle it once it’s removed. The surface is a fabric type finish and hard brushing will cause it to become rough and fibrous. It will also crack easily if you let it flex so if you take it outside beware of strong wind.
As you take the final fasteners out, support the liner so you don’t crack the liner around the eyelets.
The actual work takes only minutes. The drying time is the only slow process.
As you can see, the liner will have attracted quite a bit of dirt and grime.
OK here we go.
Lift the hood.
Remove the fasteners gently, top, then bottom and middle ones last. This will support the liner better as you take them out. Us a tool with a forked end. I’ve heard of a barbeque fork being used. I used a nail puller work in behind the fastener.
Take the liner outside and brush the surface gently with a soft brush to remove any dirt. Take care not to damage the surface of the liner.
Spray the liner with black paint. The difference between the old and the new surface is immediately apparent.
Use as many coats as you see fit. The liner is porous so it will take at least 3 coats to get good coverage. Leave it for 30 mins between coats to allow the paint to dry.
If you plan to paint the Corvette emblem, you may wish to apply extra paint around the embossed area on the liner. This will stop the liner absorbing the coloured paint.
Once the paint is dry (and you may wish to leave it overnight), you can either paint the emblem or apply a decal. I chose the decal which I picked up from RPI Designs (a Forum Vendor). Alternatively if you prefer, you can refit the liner and apply the decal when it’s back in place.
Refit the liner in the hood fitting the middle fasteners first to hold it in place, then refit the remaining fasteners. A gentle push fit is all it takes to reinsert the fastener.
The finished Hood Liner
08-27-2011, 06:50 PM
#19
Race Director
There is another option. You can remove the hood insulator completely and (maybe) finish/clear the underneath side of the hood to make it look presentable. The cost can be reduced if you DIY. I've seen some done which look very nice. After market hoods don't use hood insulators.
The main purpose of the modern car hood insulator is to reduce annoying engine compartment noises from entering the cabin. That's the downside to removing it.
Wait, someone is going to say that the purpose of the hood insulator is to suppress fire. BS, maybe in the '40's, '50's, '60's, '70's and '80's cars with backfiring carburetors. Once fuel injection started to become the norm the chance of an engine compartment fire took a back seat to engine compartment noises which made talking on your cell phone and listening to your mega watt stereo more difficult.
