


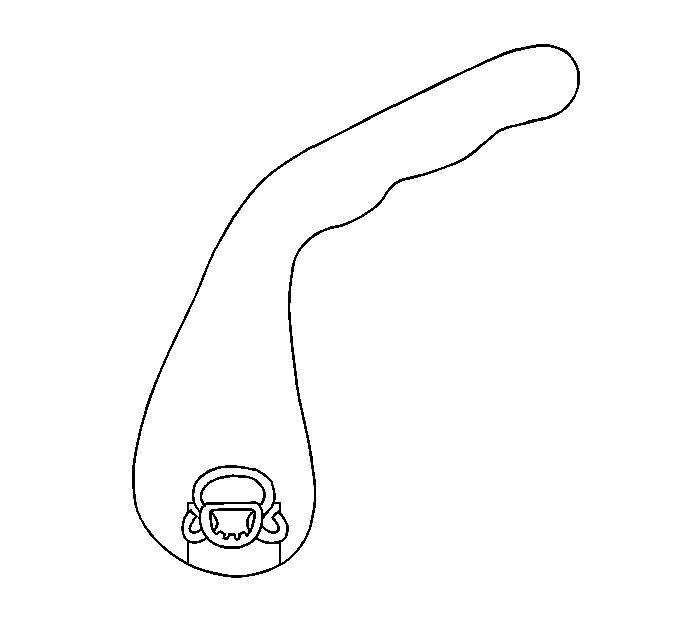


Driver Side Seat Adjuster

Thread Starter
Lifetime Member


Joined: Dec 2002
Posts: 10,702
Likes: 76
From: New Jersey
St. Jude Donor '05, '12-'13, '15-'16, '21
 Driver Side Seat Adjuster
The handle popped off the spindle and I'm trying to reattach. The spindle however pushes in a bit when I try to reattach the handle and consequently, the handle isn't grabbing. I'm thinking I will have to remove and see why the spindle has play. It looks like the cover where the seat controls are placed comes off of the seat and then I presume I will be able to access the spindle to see what's going on.
Anyone experience a similar problem and if so can you help me with the fix?
Anyone experience a similar problem and if so can you help me with the fix?

Administrator


Joined: Mar 2001
Posts: 368,747
Likes: 24,889
From: In a parallel universe. Currently own 2014 Stingray Coupe.
C7 of the Year - Modified Finalist 2021
MO Events Coordinator
St. Jude Co-Organizer
St. Jude Donor '03 thru '26
NCM Sinkhole Donor
CI 5, 8 & 11 Veteran
The handle is held on with a wire clip. Go to step 10 in the following link to see how things go together.
http://www.vetteessentials.com/instr...er_change.html
http://www.vetteessentials.com/instr...er_change.html

Burning Brakes

Joined: Feb 2007
Posts: 1,211
Likes: 4
From: Vancouver B.C.
The splined shaft that the handle slides onto is plastic and not very durable. If you use too much pressure on the lever when you are sitting in the car and adjusting the seat back, or if you sit on the edge of the seat getting in or out of the car and place any downward pressure on the recliner handle, the shaft will eventually break and you will need to replace the shaft and cables that control the seat recline mechanism - it's a one piece assembly. You have to pull the seat out of the car and remove upholstery and seat bottom foam pad to do the job. Ask me how I know. I have a bad back and tend to rest my butt on the edge of the seat getting in - I'm about to do it for the second time. Gene at GM Partshouse can order it for you . Part # for my 02: 10278650 "Cable-D/S". Gene's price - $47.24
I really want an alternative to the stock seats; the only thing about my Vette that tends to P**s me off.
I really want an alternative to the stock seats; the only thing about my Vette that tends to P**s me off.
Last edited by jornahow; Sep 6, 2011 at 01:37 AM. Reason: because I felt like it...

Tech Contributor

Joined: Dec 2003
Posts: 19,384
Likes: 87
From: Horncastle Lincolnshire, England
2023 C5 of the Year Finalist - Unmodified
Another procedure that might help
Document ID# 656467
2002 Chevrolet Corvette
________________________________________
Seat Back Recliner Mechanism Replacement - Front
Removal Procedure
Picture 1
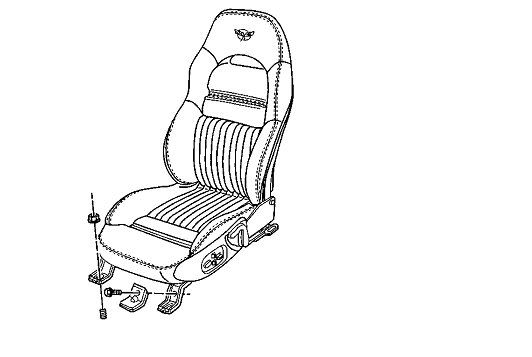
1. Raise the seat to the full up position (power seat).
2. Remove the seat. Refer to Seat Replacement .
Picture 2
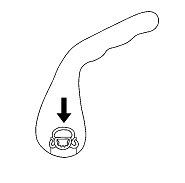
3. Remove the recliner handle.
A. With a suitable blunt ended tool inserted between the cushion and the handle push the handle retaining spring clip down.
B. Pull the handle from the shaft.
Picture 3
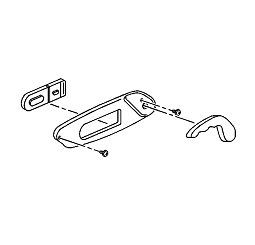
Remove the side trim panel. Refer to Trim Panel Replacement - Front Seat .
Picture 4
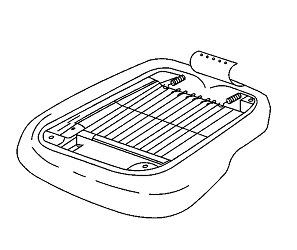
Remove the seat cushion cover. Refer to Seat Cushion Trim Cover and Pad Replacement .
Picture 5
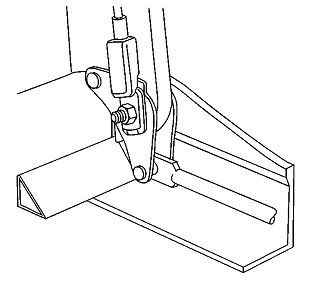
Remove the hinge pin nuts and the hinge pins.
Lay the seatback down
Remove the cables from the actuators.
Picture 6
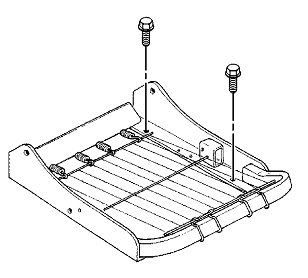
Remove the seat from the adjuster to access the recliner mechanism attaching screws (Base Seat only).
Picture 7
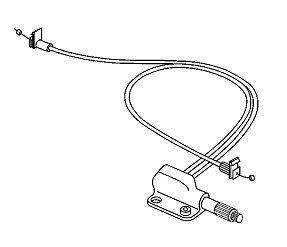
Remove the screws attaching the recliner mechanism.
Remove the recliner mechanism.
Installation Procedure
Important
Do not lubricate the seatback recliner mechanism.
Picture 7
1. Install the recliner mechanism to the seat frame.
2. Install the cables to the actuators.
3. Securely snap the cable retaining clips to the actuators with the tabs up.
Picture 6
4. Install the seat adjusters to the seat if removed.
Notice
Use the correct fastener in the correct location. Replacement fasteners must be the correct part number for that application. Fasteners requiring replacement or fasteners requiring the use of thread locking compound or sealant are identified in the service procedure. Do not use paints, lubricants, or corrosion inhibitors on fasteners or fastener joint surfaces unless specified. These coatings affect fastener torque and joint clamping force and may damage the fastener. Use the correct tightening sequence and specifications when installing fasteners in order to avoid damage to parts and systems.
5. Apply Loctite™ 271 to the bolts and secure the adjuster to the seat.
Tighten
Tighten the bolts to 24 N•m (18 lb in).
Picture 5
Important
Use a tread locking compound on the hinge bolts.
6. Install the hinge bolts, seatback release cables, and nuts.
Tighten
Tighten the hinge bolt nuts to 24 N•m (18 lb ft).
Picture 4
7. Install the seat cushion trim cover. Refer to Seat Cushion Trim Cover and Pad Replacement .
Picture 3
8. Install the side trim panel. Refer to Trim Panel Replacement - Front Seat .
Picture 2
9. Install the recliner handle.
A. Position the handle retaining spring clip into the lock position.
B. Snap the handle onto the reclining mechanism shaft.
Picture 1
Install the seat. Refer to Seat Replacement
Document ID# 656467
2002 Chevrolet Corvette
Document ID# 656467
2002 Chevrolet Corvette
________________________________________
Seat Back Recliner Mechanism Replacement - Front
Removal Procedure
Picture 1
1. Raise the seat to the full up position (power seat).
2. Remove the seat. Refer to Seat Replacement .
Picture 2
3. Remove the recliner handle.
A. With a suitable blunt ended tool inserted between the cushion and the handle push the handle retaining spring clip down.
B. Pull the handle from the shaft.
Picture 3
Remove the side trim panel. Refer to Trim Panel Replacement - Front Seat .
Picture 4
Remove the seat cushion cover. Refer to Seat Cushion Trim Cover and Pad Replacement .
Picture 5
Remove the hinge pin nuts and the hinge pins.
Lay the seatback down
Remove the cables from the actuators.
Picture 6
Remove the seat from the adjuster to access the recliner mechanism attaching screws (Base Seat only).
Picture 7
Remove the screws attaching the recliner mechanism.
Remove the recliner mechanism.
Installation Procedure
Important
Do not lubricate the seatback recliner mechanism.
Picture 7
1. Install the recliner mechanism to the seat frame.
2. Install the cables to the actuators.
3. Securely snap the cable retaining clips to the actuators with the tabs up.
Picture 6
4. Install the seat adjusters to the seat if removed.
Notice
Use the correct fastener in the correct location. Replacement fasteners must be the correct part number for that application. Fasteners requiring replacement or fasteners requiring the use of thread locking compound or sealant are identified in the service procedure. Do not use paints, lubricants, or corrosion inhibitors on fasteners or fastener joint surfaces unless specified. These coatings affect fastener torque and joint clamping force and may damage the fastener. Use the correct tightening sequence and specifications when installing fasteners in order to avoid damage to parts and systems.
5. Apply Loctite™ 271 to the bolts and secure the adjuster to the seat.
Tighten
Tighten the bolts to 24 N•m (18 lb in).
Picture 5
Important
Use a tread locking compound on the hinge bolts.
6. Install the hinge bolts, seatback release cables, and nuts.
Tighten
Tighten the hinge bolt nuts to 24 N•m (18 lb ft).
Picture 4
7. Install the seat cushion trim cover. Refer to Seat Cushion Trim Cover and Pad Replacement .
Picture 3
8. Install the side trim panel. Refer to Trim Panel Replacement - Front Seat .
Picture 2
9. Install the recliner handle.
A. Position the handle retaining spring clip into the lock position.
B. Snap the handle onto the reclining mechanism shaft.
Picture 1
Install the seat. Refer to Seat Replacement
Document ID# 656467
2002 Chevrolet Corvette

Team Owner


Joined: May 2001
Posts: 36,836
Likes: 244
From: Dear Karma, I have a list of people you missed.
St. Jude Donor '08-'09-'10-'11-'12-'13-'14-'15-'16
Another procedure that might help
Document ID# 656467
2002 Chevrolet Corvette
________________________________________
Seat Back Recliner Mechanism Replacement - Front
Removal Procedure
Picture 1
1. Raise the seat to the full up position (power seat).
2. Remove the seat. Refer to Seat Replacement .
Picture 2
3. Remove the recliner handle.
A. With a suitable blunt ended tool inserted between the cushion and the handle push the handle retaining spring clip down.
B. Pull the handle from the shaft.
Picture 3
Remove the side trim panel. Refer to Trim Panel Replacement - Front Seat .
Picture 4
Remove the seat cushion cover. Refer to Seat Cushion Trim Cover and Pad Replacement .
Picture 5
Remove the hinge pin nuts and the hinge pins.
Lay the seatback down
Remove the cables from the actuators.
Picture 6
Remove the seat from the adjuster to access the recliner mechanism attaching screws (Base Seat only).
Picture 7
Remove the screws attaching the recliner mechanism.
Remove the recliner mechanism.
Installation Procedure
Important
Do not lubricate the seatback recliner mechanism.
Picture 7
1. Install the recliner mechanism to the seat frame.
2. Install the cables to the actuators.
3. Securely snap the cable retaining clips to the actuators with the tabs up.
Picture 6
4. Install the seat adjusters to the seat if removed.
Notice
Use the correct fastener in the correct location. Replacement fasteners must be the correct part number for that application. Fasteners requiring replacement or fasteners requiring the use of thread locking compound or sealant are identified in the service procedure. Do not use paints, lubricants, or corrosion inhibitors on fasteners or fastener joint surfaces unless specified. These coatings affect fastener torque and joint clamping force and may damage the fastener. Use the correct tightening sequence and specifications when installing fasteners in order to avoid damage to parts and systems.
5. Apply Loctite™ 271 to the bolts and secure the adjuster to the seat.
Tighten
Tighten the bolts to 24 N•m (18 lb in).
Picture 5
Important
Use a tread locking compound on the hinge bolts.
6. Install the hinge bolts, seatback release cables, and nuts.
Tighten
Tighten the hinge bolt nuts to 24 N•m (18 lb ft).
Picture 4
7. Install the seat cushion trim cover. Refer to Seat Cushion Trim Cover and Pad Replacement .
Picture 3
8. Install the side trim panel. Refer to Trim Panel Replacement - Front Seat .
Picture 2
9. Install the recliner handle.
A. Position the handle retaining spring clip into the lock position.
B. Snap the handle onto the reclining mechanism shaft.
Picture 1
Install the seat. Refer to Seat Replacement
Document ID# 656467
2002 Chevrolet Corvette
Document ID# 656467
2002 Chevrolet Corvette
________________________________________
Seat Back Recliner Mechanism Replacement - Front
Removal Procedure
Picture 1
1. Raise the seat to the full up position (power seat).
2. Remove the seat. Refer to Seat Replacement .
Picture 2
3. Remove the recliner handle.
A. With a suitable blunt ended tool inserted between the cushion and the handle push the handle retaining spring clip down.
B. Pull the handle from the shaft.
Picture 3
Remove the side trim panel. Refer to Trim Panel Replacement - Front Seat .
Picture 4
Remove the seat cushion cover. Refer to Seat Cushion Trim Cover and Pad Replacement .
Picture 5
Remove the hinge pin nuts and the hinge pins.
Lay the seatback down
Remove the cables from the actuators.
Picture 6
Remove the seat from the adjuster to access the recliner mechanism attaching screws (Base Seat only).
Picture 7
Remove the screws attaching the recliner mechanism.
Remove the recliner mechanism.
Installation Procedure
Important
Do not lubricate the seatback recliner mechanism.
Picture 7
1. Install the recliner mechanism to the seat frame.
2. Install the cables to the actuators.
3. Securely snap the cable retaining clips to the actuators with the tabs up.
Picture 6
4. Install the seat adjusters to the seat if removed.
Notice
Use the correct fastener in the correct location. Replacement fasteners must be the correct part number for that application. Fasteners requiring replacement or fasteners requiring the use of thread locking compound or sealant are identified in the service procedure. Do not use paints, lubricants, or corrosion inhibitors on fasteners or fastener joint surfaces unless specified. These coatings affect fastener torque and joint clamping force and may damage the fastener. Use the correct tightening sequence and specifications when installing fasteners in order to avoid damage to parts and systems.
5. Apply Loctite™ 271 to the bolts and secure the adjuster to the seat.
Tighten
Tighten the bolts to 24 N•m (18 lb in).
Picture 5
Important
Use a tread locking compound on the hinge bolts.
6. Install the hinge bolts, seatback release cables, and nuts.
Tighten
Tighten the hinge bolt nuts to 24 N•m (18 lb ft).
Picture 4
7. Install the seat cushion trim cover. Refer to Seat Cushion Trim Cover and Pad Replacement .
Picture 3
8. Install the side trim panel. Refer to Trim Panel Replacement - Front Seat .
Picture 2
9. Install the recliner handle.
A. Position the handle retaining spring clip into the lock position.
B. Snap the handle onto the reclining mechanism shaft.
Picture 1
Install the seat. Refer to Seat Replacement
Document ID# 656467
2002 Chevrolet Corvette

Corvette Stories
The Best of Corvette for Corvette Enthusiasts

5 Best & 5 Worst Corvette Daily Drivers
Joe Kucinski
The Headlights of Every Corvette Generation Explained
Joe Kucinski
5 Best & 5 Most Overrated Corvette Track Packages of All Time!
Joe Kucinski
Every 2027 Corvette Engine Explained
Joe Kucinski
Designer Imagines A Corvette That Looks More Like a Corvette Than the Corvette
Verdad Gallardo
10 Ugly Corvettes That We Still Kinda Love
Joe Kucinski
Top 10 Most Expensive Corvettes Ever Sold on Bring A Trailer
Brett Foote
10 Things Every Corvette Owner Needs (2026 Edition)
Michael S. Palmer
8 Most "Only Corvette Owners Understand" Quirks and Problems
Pouria Savadkouei

2nd Gear

Joined: Oct 2023
Posts: 2
Likes: 0
I have tge seat apart and a replacement part. The nuts on tge end of the cable prevent removal. Is there a technique to install the new cable? Remove and replace the nut?
QUOTE=c5BlackBeauty;1578617395]The handle popped off the spindle and I'm trying to reattach. The spindle however pushes in a bit when I try to reattach the handle and consequently, the handle isn't grabbing. I'm thinking I will have to remove and see why the spindle has play. It looks like the cover where the seat controls are placed comes off of the seat and then I presume I will be able to access the spindle to see what's going on.
Anyone experience a similar problem and if so can you help me with the fix?[/QUOTE]
QUOTE=c5BlackBeauty;1578617395]The handle popped off the spindle and I'm trying to reattach. The spindle however pushes in a bit when I try to reattach the handle and consequently, the handle isn't grabbing. I'm thinking I will have to remove and see why the spindle has play. It looks like the cover where the seat controls are placed comes off of the seat and then I presume I will be able to access the spindle to see what's going on.
Anyone experience a similar problem and if so can you help me with the fix?[/QUOTE]
