


Broken seat
Thread Starter
Drifting


Joined: Oct 2003
Posts: 1,330
Likes: 1
From: Kerrville Texas
OK I finally broke down and bought the wife a 05 C5. Beautiful car but the drivers side seat back leans all the way back and wont adjust. Is there a gear or locking mechanism that controls this?
Thanks Kona
Thanks Kona
Burning Brakes

Joined: Jul 2011
Posts: 943
Likes: 3
From: casa conejo california: my casa sue's casa
Should be a handle at the bottom outside that you pull up on. If there is no resistance on the seat back, it will pop forward on its own about 5-6 inches. Also check the back of the seat for the full tilt lever. If this is jammed it could be causing the previous lever to not function.
Administrator


Joined: Mar 2001
Posts: 368,340
Likes: 24,781
From: In a parallel universe. Currently own 2014 Stingray Coupe.
C7 of the Year - Modified Finalist 2021
MO Events Coordinator
St. Jude Co-Organizer
St. Jude Donor '03 thru '26
NCM Sinkhole Donor
CI 5, 8 & 11 Veteran
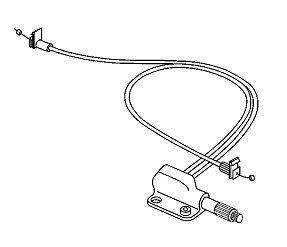
There is a seat back recliner mechanism that may be what your problem is - not sure of that but it could be a possibility I guess. I have a file that I saved from here on the forum that talks about replacing teh cable that connects to the seat recliner lever. If you'd like a copy to review and see if that is your problem, then PM me your e-mail address and I'll send it to you.
Tech Contributor


Joined: Dec 2003
Posts: 19,384
Likes: 87
From: Horncastle Lincolnshire, England
2023 C5 of the Year Finalist - Unmodified
You could try resynching the cables. It may not work as its usually the fix for a twisting seat which sounds different to you symptoms
The "seat twisting" problem is different to the normal rocking seat fix
One side of the seat back seems to give way and won’t support your weight causing the seat to "twist".
It’s an easy procedure and worth trying before replacing cables.
Adjust the unoccupied seat to the fully forward position
Recline the seat to the fully rearward position and release the recliner handle to lock the seat back
Release the unoccupied seat to the fully upright position and release the recliner handle to lock the seat back. This will allow both the outboard and the inboard recliner mechanisms to release and resynch to the fully upright position
Check the seatback recliner mechanism for resynchronization by applying pressure with your hand to the headrest.
There’s a TSB published which covers the problem:
http://www.corvetteactioncenter.com/...ck+Recliner%29
Last edited by DeeGee; Sep 13, 2011 at 02:32 PM.
Tech Contributor
Joined: Dec 2003
Posts: 19,384
Likes: 87
From: Horncastle Lincolnshire, England
2023 C5 of the Year Finalist - Unmodified
If that doesn't work and you need to replace the cable here's the info:
Document ID# 656467
2002 Chevrolet Corvette
________________________________________
Seat Back Recliner Mechanism Replacement - Front
Removal Procedure
Picture 1
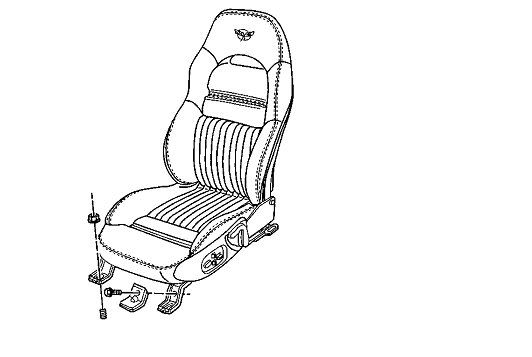
1. Raise the seat to the full up position (power seat).
2. Remove the seat. Refer to Seat Replacement .
Picture 2
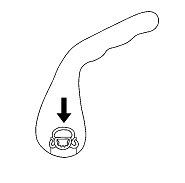
3. Remove the recliner handle.
A. With a suitable blunt ended tool inserted between the cushion and the handle push the handle retaining spring clip down.
B. Pull the handle from the shaft.
Picture 3
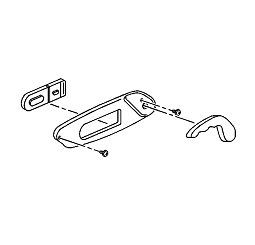
Remove the side trim panel. Refer to Trim Panel Replacement - Front Seat .
Picture 4
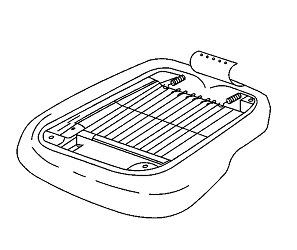
Remove the seat cushion cover. Refer to Seat Cushion Trim Cover and Pad Replacement .
Picture 5
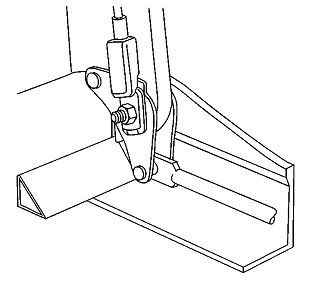
Remove the hinge pin nuts and the hinge pins.
Lay the seatback down
Remove the cables from the actuators.
Picture 6
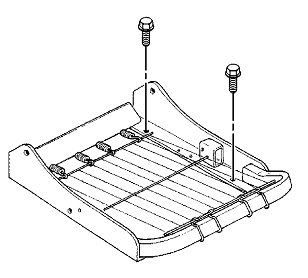
Remove the seat from the adjuster to access the recliner mechanism attaching screws (Base Seat only).
Picture 7
Remove the screws attaching the recliner mechanism.
Remove the recliner mechanism.
Installation Procedure
Important
Do not lubricate the seatback recliner mechanism.
Picture 7
1. Install the recliner mechanism to the seat frame.
2. Install the cables to the actuators.
3. Securely snap the cable retaining clips to the actuators with the tabs up.
Picture 6
4. Install the seat adjusters to the seat if removed.
Notice
Use the correct fastener in the correct location. Replacement fasteners must be the correct part number for that application. Fasteners requiring replacement or fasteners requiring the use of thread locking compound or sealant are identified in the service procedure. Do not use paints, lubricants, or corrosion inhibitors on fasteners or fastener joint surfaces unless specified. These coatings affect fastener torque and joint clamping force and may damage the fastener. Use the correct tightening sequence and specifications when installing fasteners in order to avoid damage to parts and systems.
5. Apply Loctite� 271 to the bolts and secure the adjuster to the seat.
Tighten
Tighten the bolts to 24 N�m (18 lb in).
Picture 5
Important
Use a tread locking compound on the hinge bolts.
6. Install the hinge bolts, seatback release cables, and nuts.
Tighten
Tighten the hinge bolt nuts to 24 N�m (18 lb ft).
Picture 4
7. Install the seat cushion trim cover. Refer to Seat Cushion Trim Cover and Pad Replacement .
Picture 3
8. Install the side trim panel. Refer to Trim Panel Replacement - Front Seat .
Picture 2
9. Install the recliner handle.
A. Position the handle retaining spring clip into the lock position.
B. Snap the handle onto the reclining mechanism shaft.
Picture 1
Install the seat. Refer to Seat Replacement
Document ID# 656467
2002 Chevrolet Corvette
Document ID# 656467
2002 Chevrolet Corvette
________________________________________
Seat Back Recliner Mechanism Replacement - Front
Removal Procedure
Picture 1
1. Raise the seat to the full up position (power seat).
2. Remove the seat. Refer to Seat Replacement .
Picture 2
3. Remove the recliner handle.
A. With a suitable blunt ended tool inserted between the cushion and the handle push the handle retaining spring clip down.
B. Pull the handle from the shaft.
Picture 3
Remove the side trim panel. Refer to Trim Panel Replacement - Front Seat .
Picture 4
Remove the seat cushion cover. Refer to Seat Cushion Trim Cover and Pad Replacement .
Picture 5
Remove the hinge pin nuts and the hinge pins.
Lay the seatback down
Remove the cables from the actuators.
Picture 6
Remove the seat from the adjuster to access the recliner mechanism attaching screws (Base Seat only).
Picture 7
Remove the screws attaching the recliner mechanism.
Remove the recliner mechanism.
Installation Procedure
Important
Do not lubricate the seatback recliner mechanism.
Picture 7
1. Install the recliner mechanism to the seat frame.
2. Install the cables to the actuators.
3. Securely snap the cable retaining clips to the actuators with the tabs up.
Picture 6
4. Install the seat adjusters to the seat if removed.
Notice
Use the correct fastener in the correct location. Replacement fasteners must be the correct part number for that application. Fasteners requiring replacement or fasteners requiring the use of thread locking compound or sealant are identified in the service procedure. Do not use paints, lubricants, or corrosion inhibitors on fasteners or fastener joint surfaces unless specified. These coatings affect fastener torque and joint clamping force and may damage the fastener. Use the correct tightening sequence and specifications when installing fasteners in order to avoid damage to parts and systems.
5. Apply Loctite� 271 to the bolts and secure the adjuster to the seat.
Tighten
Tighten the bolts to 24 N�m (18 lb in).
Picture 5
Important
Use a tread locking compound on the hinge bolts.
6. Install the hinge bolts, seatback release cables, and nuts.
Tighten
Tighten the hinge bolt nuts to 24 N�m (18 lb ft).
Picture 4
7. Install the seat cushion trim cover. Refer to Seat Cushion Trim Cover and Pad Replacement .
Picture 3
8. Install the side trim panel. Refer to Trim Panel Replacement - Front Seat .
Picture 2
9. Install the recliner handle.
A. Position the handle retaining spring clip into the lock position.
B. Snap the handle onto the reclining mechanism shaft.
Picture 1
Install the seat. Refer to Seat Replacement
Document ID# 656467
2002 Chevrolet Corvette
Corvette Stories
The Best of Corvette for Corvette Enthusiasts

Top 10 Most Expensive Corvettes Ever Sold on Bring A Trailer
Brett Foote
10 Things Every Corvette Owner Needs (2026 Edition)
Michael S. Palmer
8 Most "Only Corvette Owners Understand" Quirks and Problems
Pouria Savadkouei
10 Reasons the C6 Z06 is Still A Performance Benchmark After 20 Years
Joe Kucinski
How Much Horsepower Every Corvette Engine "LOST" in 1972
Joe Kucinski
Top 10 DOs and DON'Ts for Protecting Your Convertible Top!
Michael S. Palmer
Top 10 Most Explosive Corvettes Ever Made: Power-to-Weight Ratio Ranked!
Joe Kucinski
150 hp to 1,250 hp: Every Corvette Generation Compared by the Specs That Matter
Joe Kucinski
8 Coolest Corvette Pace Cars (and Replicas) of All Time
Verdad Gallardo

 Thats what makes this place great


 And avatars like yours.

Cruising

Joined: Mar 2001
Posts: 11
Likes: 0
From: Severn Maryland
Recently had the twist problem after leaning into the back to get something. Thought I broke the seat frame but found this thread, followed the procedure and once again sitting straight. Thanks...

Intermediate
Joined: Dec 2013
Posts: 27
Likes: 0
From: Plano Texas
Well I had the same problem and also thought I broke the seat. I was simply leaning back to get my cell phone out of my pocket when I felt and heard this snap. Then I drove home twisting side to side in rush hour traffic. Thank God for this forum and the information it contains. I was going to take it to the Dealer for a repair/new seat. Either they would have sold me one or they would still be laughing at how easy the repair was.

Pro


Joined: Sep 2008
Posts: 660
Likes: 16
From: Tustin California
Is there a way to "synchronize a sport seat. No one ever sits in my passenger seat. So after many years, my wife rides in the car and says the seats are weak and twisty. I say BS and sit on that side and SOB, the seat twists and is very uncomfortable. Any ideas? Sorry to revive an old thread! Rod


Navigator
Joined: Apr 2008
Posts: 9
Likes: 0
Thank you - your procedure corrected my problem!
======================================== ======
======================================== ======
You could try resynching the cables. It may not work as its usually the fix for a twisting seat which sounds different to you symptoms. The "seat twisting" problem is different to the normal rocking seat fix One side of the seat back seems to give way and won�t support your weight causing the seat to "twist". It�s an easy procedure and worth trying before replacing cables. Adjust the unoccupied seat to the fully forward position ine the seat to the fully rearward position and release the recliner handle to lock the seat back Release the unoccupied seat to the fully upright position and release the recliner handle to lock the seat back. This will allow both the outboard and the inboard recliner mechanisms to release and resynch to the fully upright position Check the seatback recliner mechanism for resynchronization by applying pressure with your hand to the headrest. There�s a TSB published which covers the problem:
http://www.corvetteactioncenter.com/...ck+Recliner%29
http://www.corvetteactioncenter.com/...ck+Recliner%29
Drifting
Joined: Nov 2011
Posts: 1,401
Likes: 141
From: Summerville South Carolina