
Headlight aiming/adjusting help???

Thread Starter
Drifting


Joined: Mar 2011
Posts: 1,807
Likes: 331
From: Ocala FL
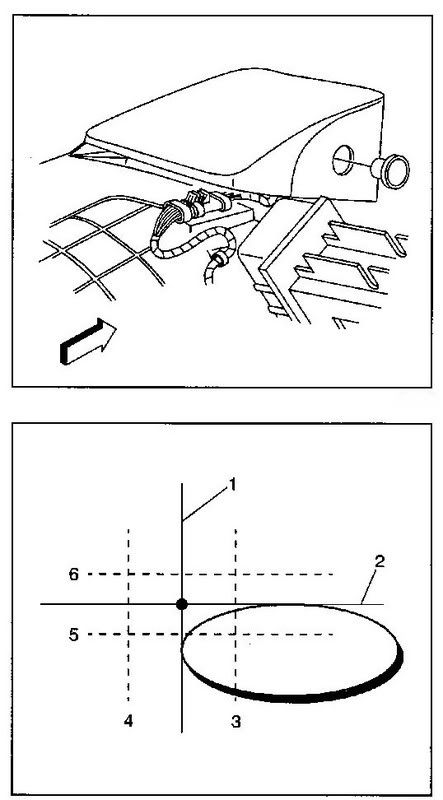
Hoping that someone on here can help a fella out. I wanted to adjust/aim my headlights better but apparently the adjustment screw is froze/seized and I can't get them to budge. I tried some searching and didn't find anything that helps. Actually, I think that one of them is completely broke off and the other side is seized...there is only an extended metal "screw" adjustor on the drivers side. IF it would help I can remove the shrouds and take pics but that may take a couple of days. ANY suggestions or ideas on how I can get these to loosen up? Thanks In Advance.
Le Mans Master


Joined: Jan 2004
Posts: 9,488
Likes: 1,743
From: Knoxville Tn
Those long 'screws' do tend to both seize up and break easily. the other bad news is that you can not buy the individual pieces from GM.
it's likely your best bet is to go to the parts for sale section and see if anyone has a couple of these pieces that are usable.
If you just replaced a bulb, there is a likelyhood you did not get the bulb inserted straight and the light is pointing incorrrectly. Make sure the bulb is snapped into place right...
Just a thought, if yu just replace a headlight bulb, and did not get it inserted straight it will be pointed wrong. Rechack the fit, there are two tabs that must be in the correct postion. If you installed incorrectly the light will be pointed down...
Last edited by Phanni; Apr 30, 2012 at 01:00 PM.
Thread Starter
Drifting
Joined: Mar 2011
Posts: 1,807
Likes: 331
From: Ocala FL
Thanks for the information...I was afraid that I would not be able to get those replacements without replacing the whole unit...sounds like that's what it will entail. FML.  I replaced the OEM lens with a set of ACA projectors last fall but I wanted to fine tune/readjust them. If it's not one thing it's another lately.
I replaced the OEM lens with a set of ACA projectors last fall but I wanted to fine tune/readjust them. If it's not one thing it's another lately.


Tech Contributor


Joined: Dec 2003
Posts: 19,384
Likes: 87
From: Horncastle Lincolnshire, England
2023 C5 of the Year Finalist - Unmodified
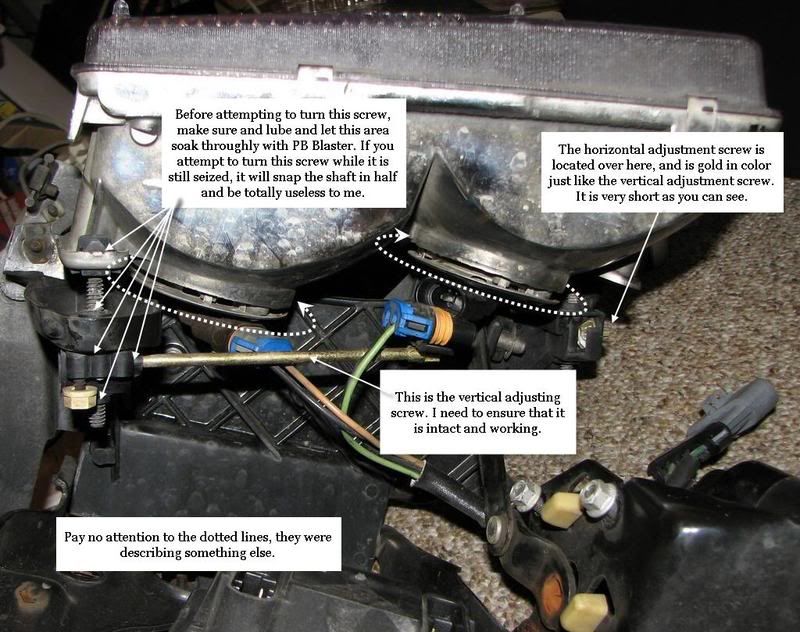
The rod assembly is metal set in plastic. If its broken then its a unit repalcement. Heres the How To I posted a while ago. The pics may help decide if you can refurb the "golden rod".
Aiming Stock Headlights
Preparation
Chose a white wall to project the lights onto
Mark a vertical centreline on the screen in line with the center of the car (black tape?)
(look over the roof of the car to get the line)
Measure the height from the floor to the center of the headlight capsule
Mark a horizontal aiming line on the screen
Measure the distance between the centreline of the right headlight module and the center of the left headlight module.
Position the vertical tapes this distance to the right and left of the screen centreline
Lubricate the adjustment screws before adjusting See Note
Adjustments
Raise the hood
Raise the headlights
Remove the headlamp adjustment screw plug
Turn on the low beam headlights and block the light from projecting onto the screen from the passenger headlight
Check the horizontal aim
Adjust the horizontal aim adjusting screw to align the left edge of the high intensity zone with the headlight vertical centreline
The left edge of the beam should lie within 4� to the left and 4� to the right
of the vertical centreline.
Check the vertical aim
Adjust the vertical aim adjusting screw to align the top edge of the high intensity zone with the headlight horizontal centreline
The left edge of the beam should lie within 2� above and 2.5� below the lamp horizontal centreline.
Reinstall the headlamp adjustment screw plug
Repeat for the other headlight
Turn off the lights and close the hood
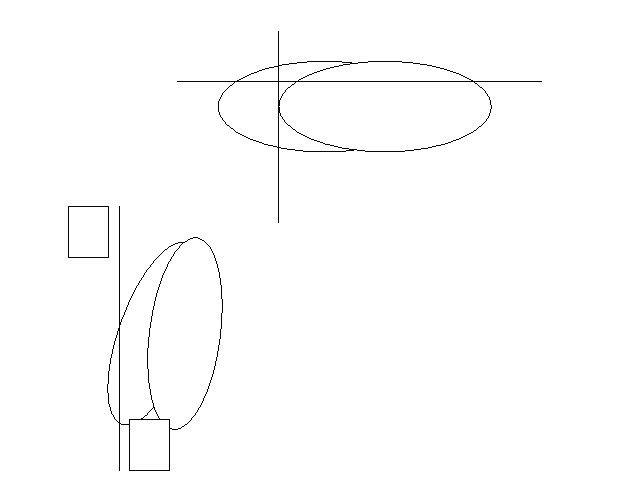
This is the pattern you're looking for
Advice Frome LonestarFRC:
Lubrication may not be enough. The problem is that the spray can't actually penetrate to where it's needed. There's a little internal gear-drive mechanism involved.
Important! If you attempt to make any adjustments, especially one involving the up/down adjuster and it doesn't move, or you meet a lot of resistance, stop right there. Do NOT attempt to force things. You will ABSOLUTELY break the long "goldenrod' (gold colored rod about 3" long). This is not an "if" or "maybe". Do NOT force it by twisting your wrench/nut-driver harder and harder. Once broken, these pieces are NOT available as a separate repair piece from GM. They will only sell you the entire headlight assembly.
If yours are frozen up, do a search on this issue. Many many posts about it. "Goldenrods" is one if the terms that may be helpful when doing a search. There IS a way to unfreeze the gear-drive mechanism but it involves removal of the headlight assembly to get access.
(Thanks to Junkman2008 for the picture)
Aiming Stock Headlights
Preparation
Chose a white wall to project the lights onto
Mark a vertical centreline on the screen in line with the center of the car (black tape?)
(look over the roof of the car to get the line)
Measure the height from the floor to the center of the headlight capsule
Mark a horizontal aiming line on the screen
Measure the distance between the centreline of the right headlight module and the center of the left headlight module.
Position the vertical tapes this distance to the right and left of the screen centreline
Lubricate the adjustment screws before adjusting See Note
Adjustments
Raise the hood
Raise the headlights
Remove the headlamp adjustment screw plug
Turn on the low beam headlights and block the light from projecting onto the screen from the passenger headlight
Check the horizontal aim
Adjust the horizontal aim adjusting screw to align the left edge of the high intensity zone with the headlight vertical centreline
The left edge of the beam should lie within 4� to the left and 4� to the right
of the vertical centreline.
Check the vertical aim
Adjust the vertical aim adjusting screw to align the top edge of the high intensity zone with the headlight horizontal centreline
The left edge of the beam should lie within 2� above and 2.5� below the lamp horizontal centreline.
Reinstall the headlamp adjustment screw plug
Repeat for the other headlight
Turn off the lights and close the hood
This is the pattern you're looking for
Advice Frome LonestarFRC:
Lubrication may not be enough. The problem is that the spray can't actually penetrate to where it's needed. There's a little internal gear-drive mechanism involved.
Important! If you attempt to make any adjustments, especially one involving the up/down adjuster and it doesn't move, or you meet a lot of resistance, stop right there. Do NOT attempt to force things. You will ABSOLUTELY break the long "goldenrod' (gold colored rod about 3" long). This is not an "if" or "maybe". Do NOT force it by twisting your wrench/nut-driver harder and harder. Once broken, these pieces are NOT available as a separate repair piece from GM. They will only sell you the entire headlight assembly.
If yours are frozen up, do a search on this issue. Many many posts about it. "Goldenrods" is one if the terms that may be helpful when doing a search. There IS a way to unfreeze the gear-drive mechanism but it involves removal of the headlight assembly to get access.
(Thanks to Junkman2008 for the picture)
Safety Car

Joined: Apr 2007
Posts: 3,640
Likes: 83
From: . New York
Thanks for the information...I was afraid that I would not be able to get those replacements without replacing the whole unit...sounds like that's what it will entail. FML. I replaced the OEM lens with a set of ACA projectors last fall but I wanted to fine tune/readjust them. If it's not one thing it's another lately.
I replaced the OEM lens with a set of ACA projectors last fall but I wanted to fine tune/readjust them. If it's not one thing it's another lately. 
Good luck
Advanced

Joined: Jul 2012
Posts: 71
Likes: 12
From: Lansing Michigan
This may be covered elseware and I apologize for any duplication (I'm new). I just repaired my broken golden rod headlight adjuster on my '01. It was broken off flush with the gear housing.
I removed the gear box and disassembled it. It's all plastic except for the positioning screw and one of the bevel gears. I removed the metal bevel gear and drilled a hole through the center of it the same diameter as the golden rod shaft, inserted the broken shaft in the hole and drilled and pinned it on the gear. Greased and reassembled the gear box and reinstalled it. Seems to work fine now. Sorry I didn't take any pictures. I will on the next go round - the passenger side is frozen also.
I removed the gear box and disassembled it. It's all plastic except for the positioning screw and one of the bevel gears. I removed the metal bevel gear and drilled a hole through the center of it the same diameter as the golden rod shaft, inserted the broken shaft in the hole and drilled and pinned it on the gear. Greased and reassembled the gear box and reinstalled it. Seems to work fine now. Sorry I didn't take any pictures. I will on the next go round - the passenger side is frozen also.


